Christmas Cranberry Punch Festive and Refreshing Drink

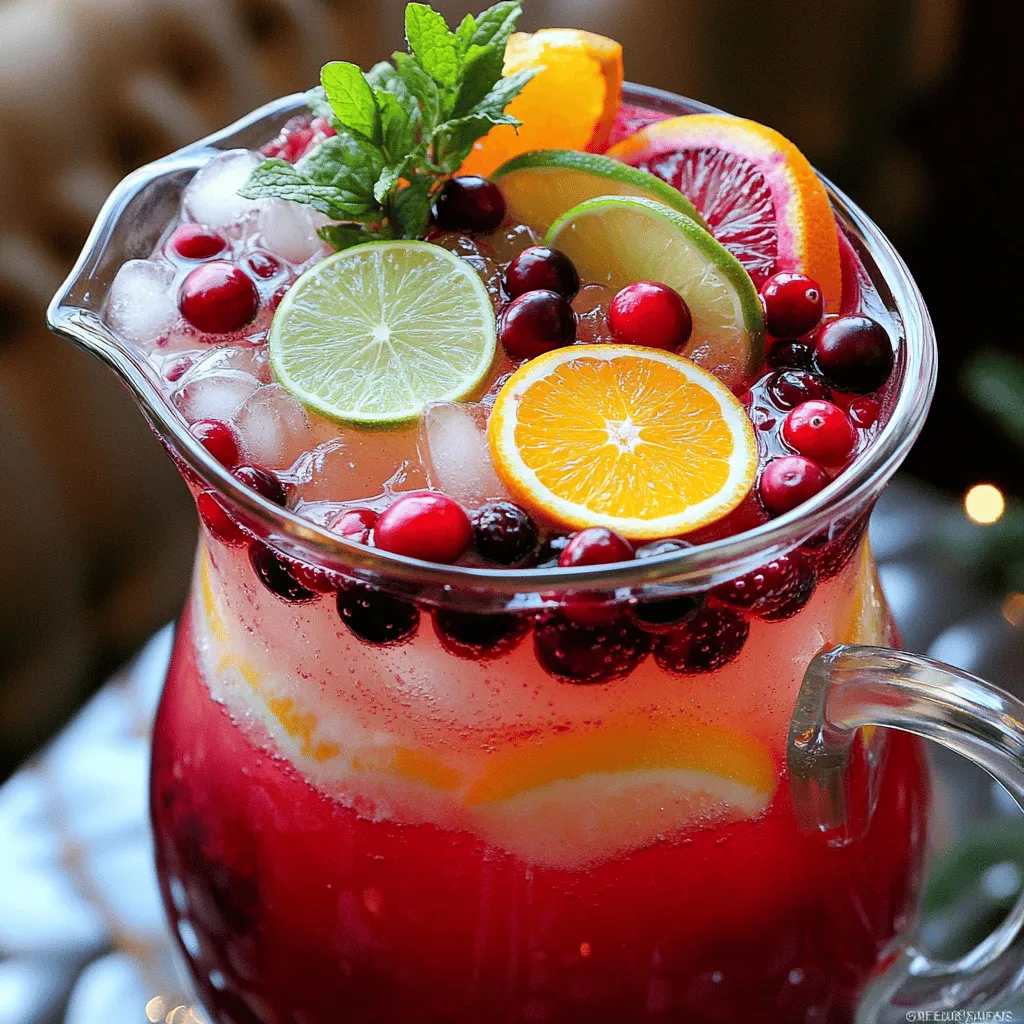
Get ready to impress your holiday guests with my Christmas Cranberry Punch! This drink is not only festive and refreshing, but it’s also easy to make. With just a few simple ingredients like cranberry juice, orange juice, and pomegranate juice, you’ll create a flavorful mix everyone will love. I’ll guide you through each step, offering tips and tricks to enhance your punch. Let’s dive into the cheerful world of holiday drinks!
Ingredients
To make a delicious Christmas Cranberry Punch, gather the following ingredients:
– 4 cups pure cranberry juice
– 2 cups freshly squeezed orange juice
– 1 cup sparkling water or club soda
– 1 cup pomegranate juice
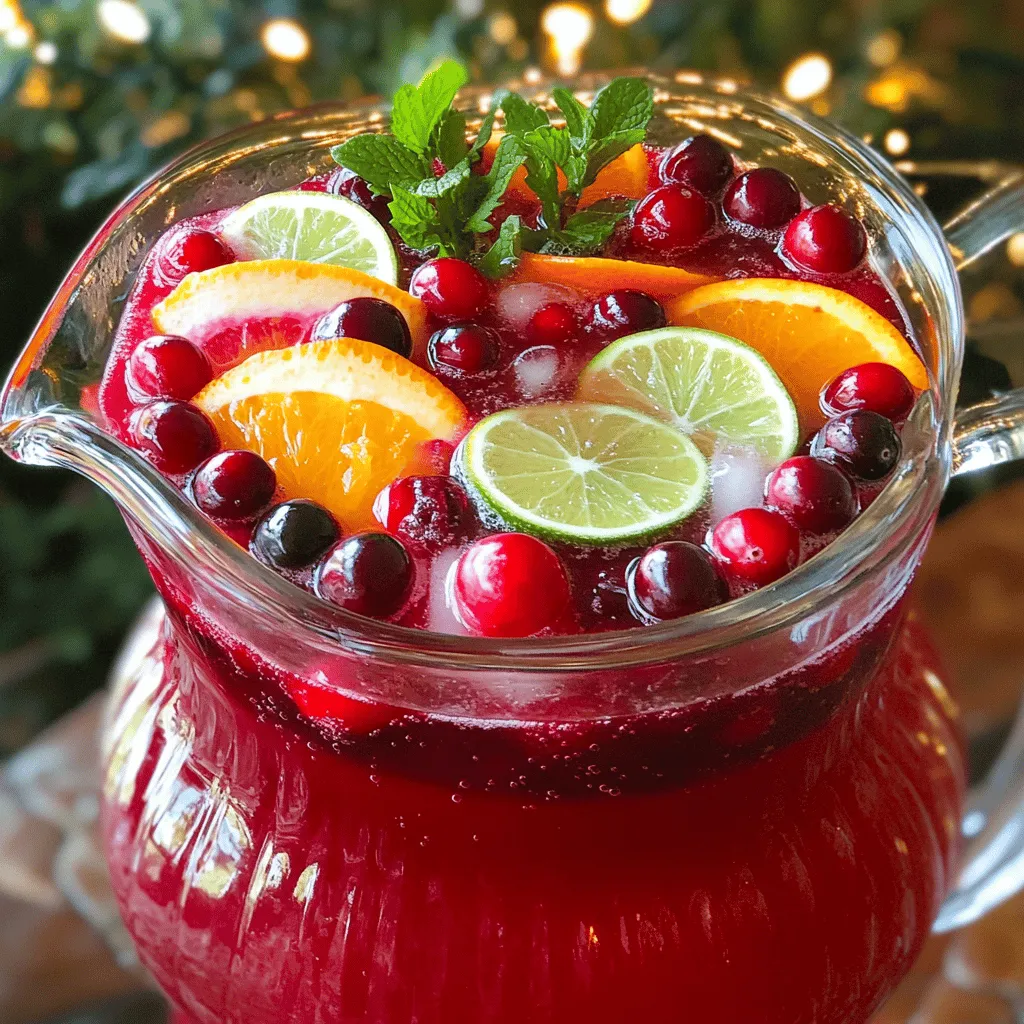
– 1/2 cup whole fresh cranberries
– 1 medium orange, thinly sliced
– 1/2 lime, thinly sliced
– 1 teaspoon freshly grated ginger
– Fresh mint leaves for garnish
– Ice cubes
These ingredients blend together beautifully. The cranberry juice offers a tart kick, while the orange juice adds sweetness. The pomegranate juice gives a rich color and extra fruitiness. Fresh cranberries, orange slices, and lime slices make the punch look festive. Ginger brings a warm spice, and mint leaves give it a refreshing touch.Enjoy the vibrant colors and flavors this punch brings to your holiday gatherings!
Step-by-Step Instructions
Preparation Steps
– Mixing the juices
In a large pitcher, pour 4 cups of pure cranberry juice, 2 cups of freshly squeezed orange juice, and 1 cup of pomegranate juice. Stir well with a long spoon until all juices combine nicely. This blend gives the punch its rich flavor.
– Adding ginger and sparkling water
Grate 1 teaspoon of fresh ginger directly into the juice mixture. This adds a warm, spicy note. Next, slowly pour in 1 cup of sparkling water or club soda. Pour gently to keep the bubbles intact. Stir lightly to mix without losing the fizz.
– Assembling the garnishes
Prepare the garnishes by slicing 1 medium orange and 1/2 lime into thin rounds. You can also rinse 1/2 cup of whole fresh cranberries. These will float beautifully in the punch, adding color and style.
Serving Instructions
– Filling the glasses
Grab your serving glasses and fill each one with ice cubes halfway. This keeps the punch cold and refreshing. Then, pour the punch mixture over the ice until the glasses are about three-quarters full.
– Garnishing for presentation
For a festive touch, float the fresh cranberries, orange slices, and lime slices on top of the punch in each glass. Finally, add a few sprigs of fresh mint to each glass. This not only looks great but also adds a crisp aroma.
By following these simple steps, you create a stunning Christmas Cranberry Punch. Enjoy making this festive drink!
Tips & Tricks
Expert Tips for the Best Flavor
Using fresh juices makes a big difference. Fresh juices taste brighter and more lively. Store-bought juices can be fine, but they often lack that fresh zing. I always recommend squeezing your own oranges for this punch. It is easy and the taste is worth it.
Mixing gently is also key. When you add the sparkling water, pour it slowly. This keeps the bubbles from going flat. Stir lightly with a large spoon to keep the fizz intact. You want your punch to be refreshing and bubbly!
Presentation Tips
Serving in fun glasses can wow your guests. Try using mason jars or tall clear glasses. These add a rustic touch and show off the colorful layers of the punch.
To enhance the visual appeal, float slices of orange and lime on top. Scatter fresh cranberries around the rim of the glass. Garnish with mint leaves for a pop of green. This makes your Christmas Cranberry Punch look as good as it tastes!

Variations
Alternative Fruit Juices
You can switch up the juices in this punch. Try using apple juice or grape juice. These juices add more sweetness. You can also mix in some lemon juice for a tart twist. Adding seasonal fruits makes it even better. Think about using fresh berries or slices of pear. These fruits not only taste great but also look lovely in the punch.
Alcoholic Version
If you want to give your punch a kick, add some spirits. A splash of vodka or rum works well. These spirits blend nicely with the fruity flavors. Just be careful not to add too much. You want to keep the punch balanced. If you use spirits, try to add more juice to keep the flavor strong. Mixing in a bit of sparkling wine can also add a festive touch.
Storage Info
Storing Leftover Punch
To store leftover punch, use a clean pitcher. Cover it tightly with plastic wrap or a lid. This way, it stays fresh in the fridge. The punch will stay good for about 2 to 3 days. After this time, the flavors may fade. You may also notice the fizzy effect will lessen.
Preparing in Advance
If you want to prepare the punch ahead of time, mix the juices first. Keep the juice mixture in the fridge for up to 24 hours. Just add the sparkling water right before serving. This keeps the bubbles fresh and fun. For optimal flavor, wait until serving to add the garnishes like fresh cranberries and mint. This way, everything looks bright and appealing when you serve your drink.
FAQs
Common Questions
Can I make this punch ahead of time?
Yes, you can make this punch a few hours before your guests arrive. Mix all the juices and ginger in a pitcher. Add the sparkling water just before serving. This keeps the fizz fresh and fun.
What can I substitute if I don’t have pomegranate juice?
If you don’t have pomegranate juice, you can use cherry juice or cranberry juice instead. Both options keep the drink tasty and colorful.
Is it possible to make a non-alcoholic version of this punch?
Absolutely! This punch is already non-alcoholic. Just stick to the recipe with juices and sparkling water. Everyone can enjoy this festive drink.
Ingredient Substitutions
Alternatives for fresh ginger
If you can’t find fresh ginger, try using ground ginger. Use about 1/4 teaspoon of ground ginger for every teaspoon of fresh ginger. It will still add a nice spice to your punch.
Other garnishing options
For garnish, you can use fresh basil or rosemary instead of mint. You may also add thin cucumber slices or edible flowers for a unique touch. These options can make your punch look even more special.
This blog post shared a fun cranberry punch recipe. We covered ingredients, preparation steps, and serving tips. I included expert advice on flavor and presentation. You can also try tasty variations or make it alcoholic. Don’t forget how to store leftovers for later enjoyment.
Making this punch adds joy to any gathering. Experiment with flavors and enjoy the freshness!


![- 4 ripe peaches, sliced into wedges - 1 cup granulated sugar, divided - 1 teaspoon pure vanilla extract - 1 teaspoon ground cinnamon - 1 cup all-purpose flour - 1 tablespoon baking powder - 1/2 teaspoon sea salt - 1 cup whole milk - 1/2 cup unsalted butter, melted and slightly cooled - 1 teaspoon freshly squeezed lemon juice - Optional: Creamy vanilla ice cream for serving You need four ripe peaches for the base. They should be juicy for the best taste. Use one cup of granulated sugar, split in half. One half will sweeten the peaches, and the other half will go into the batter. You will also need one teaspoon each of pure vanilla extract and ground cinnamon for flavor. One cup of all-purpose flour and one tablespoon of baking powder will make the batter rise. Add half a teaspoon of sea salt to balance the sweetness. One cup of whole milk helps create a smooth batter. Lastly, you need half a cup of unsalted butter, melted, and one teaspoon of freshly squeezed lemon juice to brighten the flavor. You can make this dish even better by adding creamy vanilla ice cream when you serve it. The cold ice cream pairs well with the warm cobbler. If you want extra flavor, consider adding a pinch of nutmeg or using brown sugar instead of granulated sugar. These choices can add depth to your peach cobbler. Use the full recipe to explore all the possibilities! Start by gathering 4 ripe peaches. Slice them into wedges. Place the sliced peaches in a large mixing bowl. Add 1/2 cup of granulated sugar to the peaches. Pour in 1 teaspoon of pure vanilla extract. Sprinkle 1 teaspoon of ground cinnamon over the peaches. Squeeze in 1 teaspoon of freshly squeezed lemon juice. Gently toss the peaches until they are well-coated. Set this bowl aside for about 10 minutes. This waiting time allows the peaches to macerate and release their juices. In another bowl, add 1 cup of all-purpose flour. Measure 1 tablespoon of baking powder and add it to the flour. Next, sprinkle in 1/2 teaspoon of sea salt. Finally, add the remaining 1/2 cup of granulated sugar. Whisk these dry ingredients together until they are mixed well. This step ensures even flavor throughout the cobbler. Now, it’s time to mix the wet and dry ingredients. Gradually pour in 1 cup of whole milk into the dry mix. Stir gently until the batter is just combined. Be careful not to overmix; lumps are okay! Next, add 1/2 cup of melted and slightly cooled unsalted butter. Mix until the batter is smooth and free of lumps. Once done, pour the batter into a greased 9x13 inch baking dish. Spread it evenly across the bottom. Then, take your peach mixture and spoon it over the batter carefully. Do not stir. The peaches will sink while baking. Now you’re ready to bake your Easy Peach Cobbler. Check the [Full Recipe] for baking time and tips. To make the best peach cobbler, use ripe peaches. They should be soft to touch. Slice them evenly for a nice look. Mixing in sugar and cinnamon enhances the sweetness and flavor. Letting peaches sit for ten minutes helps them release juices. This makes the filling juicy and tasty. One mistake is overmixing the batter. This can make your cobbler tough. Another common issue is using unripe peaches. They won't have the same flavor. Don’t stir the peach mixture into the batter. This can ruin the layered look. Also, avoid opening the oven door too often. It can cause uneven baking. Always preheat your oven for even cooking. Use a greased baking dish to prevent sticking. Bake until the top is golden brown, checking with a toothpick. Let it cool for ten minutes before serving. This helps the flavors settle. For a treat, top with creamy vanilla ice cream. It adds a rich taste that pairs well with the cobbler. For the full recipe, check the previous sections. {{image_4}} You can swap peaches for other fruits. Try using fresh plums, cherries, or even berries. Each fruit brings its own taste. For example, blueberries add a sweet burst of flavor. Raspberries can give a nice tartness. The method stays the same; just change the fruit. This keeps your dessert fresh and fun! You can make this cobbler gluten-free easily. Just switch out the all-purpose flour for a gluten-free blend. Many brands offer great options that work well in baking. Check the mix for a good rise. You can also use almond flour for a nutty taste. The cobbler will still be delicious and warm. Toppings can make your cobbler even better. Consider adding a sprinkle of oats on top for crunch. You can also mix in nuts like pecans for added flavor. Drizzling honey over your serving can add a sweet touch. Want a dessert with flair? Top your cobbler with whipped cream or ice cream for a special treat. Each topping can change the whole experience! For the full recipe, check out the Peachy Dream Cobbler. To store leftover peach cobbler, let it cool completely. Once cooled, cover the dish tightly with plastic wrap or aluminum foil. You can also transfer it to an airtight container. This will keep it fresh for up to three days in the fridge. When you want to enjoy your cobbler again, preheat your oven to 350°F (175°C). Place the cobbler in an oven-safe dish. Cover it with foil to keep it moist. Heat for about 15-20 minutes, until it’s warm. You can also microwave it for about 30 seconds, but the oven gives a better texture. If you want to freeze peach cobbler, wrap it tightly in plastic wrap. Then, place it in a freezer bag. It can last up to three months in the freezer. To thaw, move it to the fridge overnight. Reheat it in the oven for the best taste. You can also bake it straight from frozen; just add a few extra minutes to the cooking time. Enjoy your peach cobbler again with these easy storage tips! The best peaches for cobbler are freestone peaches. They are sweet and juicy. Their flesh comes off the pit easily, making slicing simple. Yellow peaches work well too. They have a nice balance of sweet and tart flavors. For a unique twist, try ripe white peaches. They are sweeter and less acidic. Yes, you can prep your peach cobbler ahead. Prepare the peach filling and batter separately. Store each in the fridge for up to a day. When ready to bake, combine them and follow the baking steps. If you want to bake it later, just keep it covered. No, peeling peaches is not necessary. The skin adds texture and flavor. Many people enjoy the rustic look. If you prefer a smoother texture, you can peel them. It’s really up to your taste. To achieve a crispier crust, try these tips: - Use cold butter in the batter. - Don’t overmix the batter; lumps are fine. - Bake the cobbler in a preheated oven. - For extra crunch, sprinkle a little sugar on top before baking. You can serve Easy Peach Cobbler with: - Creamy vanilla ice cream - Fresh whipped cream - A drizzle of caramel sauce - A sprinkle of nuts for crunch Each option adds a new layer of flavor to your dessert! Enjoy it warm for the best taste. For the full recipe, check out the details above. In this blog post, we explored how to make an easy peach cobbler. We covered key ingredients, step-by-step prep, and helpful tips for success. We also discussed fun variations and smart storage methods. As you bake your cobbler, remember that fresh peaches shine. Enjoy personalizing your dish with other fruits too. Making peach cobbler can be fun and tasty. With practice, you’ll master this classic dessert.](https://fastmealmate.com/wp-content/uploads/2025/06/359a1da5-912a-4431-92dc-d72eb97db899-768x768.webp)
. To keep your loaded baked potato salad fresh, store it in an airtight container. Make sure to cover the salad tightly to prevent air from entering. This keeps the flavors intact and stops the salad from drying out. In the refrigerator, your salad stays fresh for up to three days. After three days, the taste and texture start to decline. Reheating loaded baked potato salad can be tricky. The best way to do it is slowly. You can warm it in the microwave on low power. Stir it gently to help the heat spread evenly. Avoid using high heat, as it can make the potatoes mushy. You can also serve it cold for a refreshing twist. Can it be frozen? Yes, but it may change the texture. If you freeze it, store it in a freezer-safe container. When you thaw it, the salad might be a bit watery. To fix this, just stir it well and add a bit of sour cream or mayonnaise to bring back creaminess. Enjoy your loaded baked potato salad, no matter how you choose to serve it! You can prepare this salad up to a day in advance. Just follow all the steps and chill it in the fridge. This makes it perfect for parties or picnics. The flavors will mix together nicely, making it taste even better. Absolutely! You can use any cheese you like. Try mozzarella for a milder taste or pepper jack for some spice. Just make sure your cheese melts well if you bake the potatoes. If you want to cut calories, try Greek yogurt or a mix of sour cream and yogurt. Both options keep the creamy texture but add extra protein. They also help the salad taste fresh and zesty. This potato salad will stay fresh for about 3 to 5 days in the fridge. Just make sure to store it in an airtight container. Check for any changes in smell or texture before serving. Yes! This salad is very flexible. You can add diced tomatoes, jalapeños, or olives. Try mixing in some corn or bell peppers for extra crunch. Get creative and add whatever you enjoy! You can find the full recipe for Loaded Baked Potato Salad in this article. It has all the details you need to create this delicious dish at home. In this blog post, we explored how to make a creamy Loaded Baked Potato Salad. We covered important ingredients, step-by-step prep, and helpful tips. Remember, choosing the right potatoes and mixing well makes a big difference. Feel free to customize with your favorite toppings and seasonings. This dish works great for gatherings or as a side for grilled meats. With these guidelines, you can serve a delicious and satisfying salad any time. Trust me, it’s worth the effort! Enjoy your cooking adventure!](https://fastmealmate.com/wp-content/uploads/2025/06/841684b0-3d76-4995-bccc-748e700eeb02-768x768.webp)


