Cheesy Garlic Chicken Wraps Flavorful and Simple Meal

- 2 cups cooked chicken, shredded - 1 cup shredded mozzarella cheese - 1/2 cup cream cheese, softened to room temperature - 4 large flour tortillas - 3 cloves garlic, minced - 1 tablespoon extra virgin olive oil - 1/2 teaspoon smoked paprika - 1/4 teaspoon freshly ground black pepper - 1/4 teaspoon sea salt - 1 cup fresh spinach leaves, washed and dried - 1 medium tomato, diced into small cubes - 1/4 cup fresh cilantro, chopped (optional for garnish) Gather these ingredients to create a rich and creamy filling. The combination of chicken and cheeses makes it so tasty. Minced garlic adds a nice kick. Smoked paprika gives your wraps a subtle warmth. Fresh spinach and tomatoes add color and crunch. Don't forget the cilantro for a fresh touch. You can find the full recipe above to guide you through the cooking process. Enjoy the fun of mixing these ingredients and creating your wraps! - Step 1: Sautéing Garlic Start by heating the extra virgin olive oil in a medium skillet over medium heat. Add the minced garlic and sauté it for about one minute. You want it fragrant but not browned. Browning can make the garlic bitter. - Step 2: Mixing the Filling In a mixing bowl, combine the shredded chicken, shredded mozzarella cheese, and softened cream cheese. Add the sautéed garlic, smoked paprika, black pepper, and salt. Stir well until the mixture is smooth and the cheeses blend together. - Step 3: Filling the Tortilla Lay one tortilla flat on a clean surface. Scoop a generous amount of the cheesy chicken filling and place it in the center. Top with a handful of fresh spinach and diced tomato. If you like, add chopped cilantro for extra flavor. - Step 4: Rolling the Wrap Fold in the sides of the tortilla toward the center. Then, carefully roll it up from the bottom to form a tight wrap. Press gently as you roll to keep the filling inside. Repeat this with the remaining tortillas and filling. - Step 5: Grilling in the Skillet Heat the skillet again if needed. Place the wraps seam-side down in the skillet. Grill for about 2-3 minutes on each side until golden brown and crispy. - Step 6: Slicing and Serving Once grilled, let the wraps rest for a minute. Slice each wrap diagonally for easy handling. Serve hot, possibly with your favorite dipping sauce. You can find the complete details in the Full Recipe section. - Ensuring Optimal Grilling Temperature Start by heating your skillet over medium heat. This helps get a nice golden-brown finish. If it’s too hot, the outside may burn while the inside stays cold. - Tips for Evenly Melting Cheese Mix your cheeses well with the chicken filling. This allows the cheese to melt smoothly. Using room temperature cream cheese can help it blend better too. - Adding Spices or Herbs For a kick, try adding red pepper flakes or Italian herbs. Fresh basil or oregano can also add great flavor. Just a pinch can change the taste. - Customizing the Filling You can swap the chicken for shrimp or beef. Adding black beans or corn can make it heartier. Think about what you like and mix it in. - Avoiding Filling Spillage When filling the tortilla, don’t overstuff it. Keep the filling in the center, leaving space on the edges. This helps prevent messes when rolling. - Making a Tighter Roll Start rolling from the bottom, tucking the filling in as you go. Roll it tightly, and press gently to keep it closed. A tight wrap holds the fillings nicely. For more tips, check out the Full Recipe for Cheesy Garlic Chicken Wraps! {{image_4}} You can change the protein in these wraps for a new taste. Using grilled shrimp or steak adds a different flair. For shrimp, just grill it until it’s pink and firm. If you prefer steak, use thin slices of grilled meat. Both options blend well with the cheese and garlic flavors. If you want a vegetarian version with grilled veggies, consider zucchini, bell peppers, and mushrooms. Grill them until they're tender. They add a nice crunch and a smoky taste. This version is perfect for meat-free meals! Feel free to switch up the cheese for your wraps. Switching to cheddar or pepper jack offers a sharp or spicy kick. Cheddar melts well and gives a rich flavor. Pepper jack adds heat and zest. Both options make the wraps extra tasty. You can also try cream cheese options and variations. Mix in herbs or spices to the cream cheese for a new twist. Garlic or chive cream cheese can make the filling even creamier and more flavorful. Don’t forget about toppings! Suggested dipping sauces like ranch or salsa can elevate your wraps. A creamy ranch balances the garlic well. Salsa adds freshness and a bit of spice. Serving your wraps with a salad or rice is a great idea. A simple side salad with mixed greens pairs nicely. If you prefer rice, consider a cilantro lime rice for a fresh touch. These sides complement the wrap and make it a full meal. Enjoy experimenting with these variations to find your perfect cheesy garlic chicken wrap! For the full recipe, check out the entire cooking guide. Refrigeration Guidelines You can keep your Cheesy Garlic Chicken Wraps in the fridge. Store them in an airtight container. They stay fresh for 3 to 4 days. Make sure they cool down before sealing them. This keeps them from getting soggy. Freezing for Long-term Storage If you want to keep them longer, freezing works great. Wrap each one in plastic wrap and place them in a freezer bag. They can stay frozen for up to 3 months. Just remember to label the bag with the date. Best Methods for Reheating To reheat, you have a few good options. The oven is best for even heating. Preheat it to 350°F (175°C) and bake for about 10-15 minutes. You can also use a skillet over medium heat. Just heat them for a few minutes on each side. Ensuring Crispy Texture To keep that crispy texture, avoid microwaving them. Microwaves can make the wraps soggy. If you must use a microwave, place a paper towel under the wrap. This step helps absorb moisture. How Long Can You Keep Them? Cheesy Garlic Chicken Wraps last in the fridge for 3 to 4 days. In the freezer, they can last for about 3 months. Signs of Spoilage to Watch Out For Look for any off smells or changes in color. If the wraps feel slimy or sticky, it’s best to throw them out. Always trust your senses when it comes to food safety. For the full recipe, check out Cheesy Garlic Chicken Wraps! To add heat, try these tips: - Mix in diced jalapeños or other hot peppers. - Use spicy cheese, like pepper jack. - Add hot sauce to the filling. - Sprinkle red pepper flakes inside before rolling. These options give you the kick you want! Yes, you can prep the wraps in advance! Here’s how: - Assemble the wraps and wrap them in plastic. - Store them in the fridge for up to 2 days. - When ready to eat, just grill them as directed. This makes meal time quick and easy! Here are some great side dish ideas: - Crisp salad with mixed greens. - Fresh fruit salad for a sweet touch. - Crunchy potato chips or fries for a fun crunch. - Steamed veggies for a healthy option. These sides pair well with the wraps! Look for these signs: - The wraps should be golden brown on both sides. - The cheese inside should be melted and gooey. - When you cut them, the filling should stay inside. These cues show you are ready to enjoy your meal! Cheesy garlic chicken wraps offer a quick and tasty meal option. We covered main ingredients, like chicken, cheese, and garlic. You learned step-by-step how to prepare, assemble, and cook these wraps. I also shared tips for flavor and storage. Incorporate your favorite proteins or cheese for fun variations. With practice, you'll master this easy recipe. Enjoy these wraps anytime, and share them with friends and family!

WANT TO SAVE THIS RECIPE?

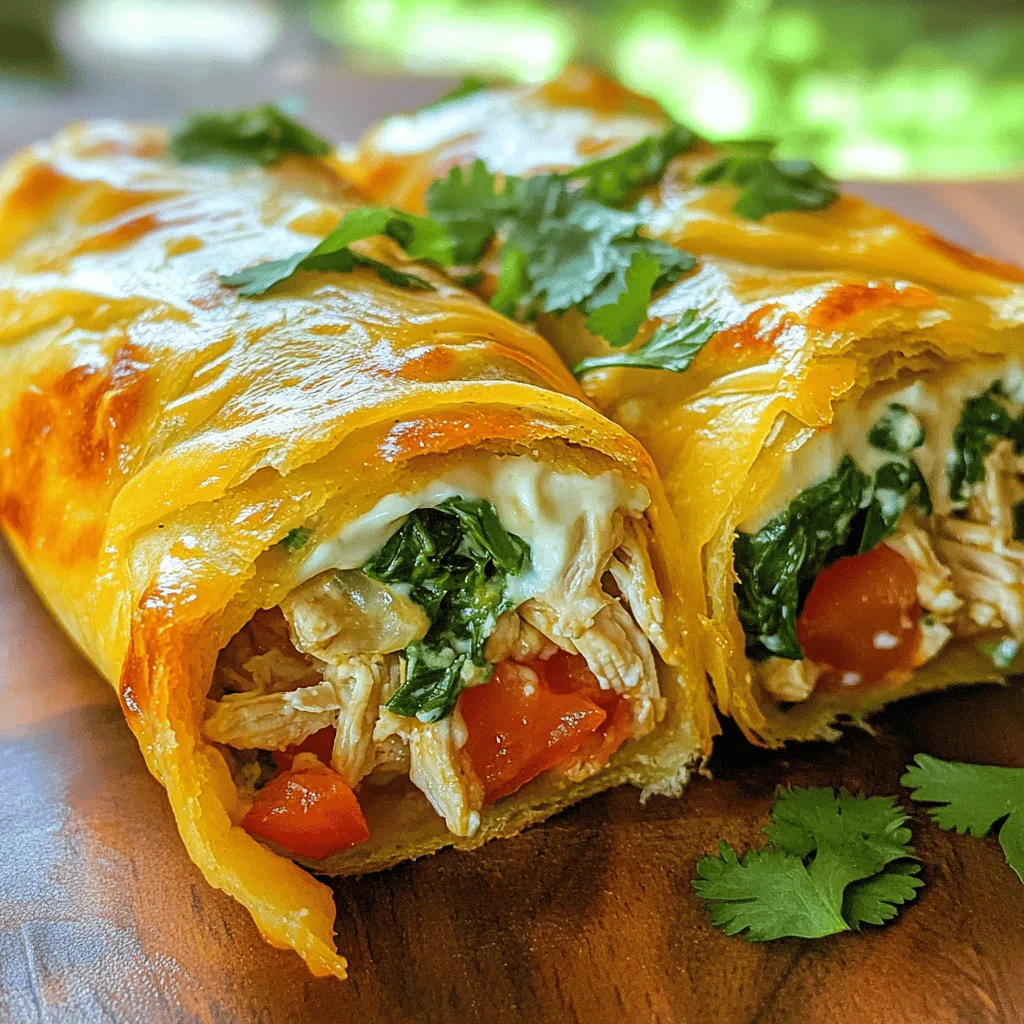
If you’re craving a quick and tasty meal, Cheesy Garlic Chicken Wraps are a must-try! This flavorful dish combines tender chicken, gooey cheese, and zesty garlic—all wrapped in a warm tortilla. It’s simple to make and perfect for busy weeknights or fun lunches. Let me show you how to whip up these delicious wraps that everyone will love! Get ready for some cheesy goodness!

Ingredients

Main Ingredients for Cheesy Garlic Chicken Wraps

– 2 cups cooked chicken, shredded

– 1 cup shredded mozzarella cheese

– 1/2 cup cream cheese, softened to room temperature

Tortilla and Additional Ingredients

– 4 large flour tortillas

– 3 cloves garlic, minced

– 1 tablespoon extra virgin olive oil

Seasoning and Garnish

– 1/2 teaspoon smoked paprika

– 1/4 teaspoon freshly ground black pepper

– 1/4 teaspoon sea salt

– 1 cup fresh spinach leaves, washed and dried

– 1 medium tomato, diced into small cubes

– 1/4 cup fresh cilantro, chopped (optional for garnish)

Gather these ingredients to create a rich and creamy filling. The combination of chicken and cheeses makes it so tasty. Minced garlic adds a nice kick. Smoked paprika gives your wraps a subtle warmth. Fresh spinach and tomatoes add color and crunch. Don’t forget the cilantro for a fresh touch.

You can find the full recipe above to guide you through the cooking process. Enjoy the fun of mixing these ingredients and creating your wraps!

Step-by-Step Instructions

Preparation Steps

Step 1: Sautéing Garlic

Start by heating the extra virgin olive oil in a medium skillet over medium heat. Add the minced garlic and sauté it for about one minute. You want it fragrant but not browned. Browning can make the garlic bitter.

Step 2: Mixing the Filling

In a mixing bowl, combine the shredded chicken, shredded mozzarella cheese, and softened cream cheese. Add the sautéed garlic, smoked paprika, black pepper, and salt. Stir well until the mixture is smooth and the cheeses blend together.

Assembling the Wraps

Step 3: Filling the Tortilla

Lay one tortilla flat on a clean surface. Scoop a generous amount of the cheesy chicken filling and place it in the center. Top with a handful of fresh spinach and diced tomato. If you like, add chopped cilantro for extra flavor.

Step 4: Rolling the Wrap

Fold in the sides of the tortilla toward the center. Then, carefully roll it up from the bottom to form a tight wrap. Press gently as you roll to keep the filling inside. Repeat this with the remaining tortillas and filling.

Cooking the Wraps

Step 5: Grilling in the Skillet

Heat the skillet again if needed. Place the wraps seam-side down in the skillet. Grill for about 2-3 minutes on each side until golden brown and crispy.

Step 6: Slicing and Serving

Once grilled, let the wraps rest for a minute. Slice each wrap diagonally for easy handling. Serve hot, possibly with your favorite dipping sauce. You can find the complete details in the Full Recipe section.

Tips & Tricks

Best Practices for Cooking

Ensuring Optimal Grilling Temperature

Start by heating your skillet over medium heat. This helps get a nice golden-brown finish. If it’s too hot, the outside may burn while the inside stays cold.

Tips for Evenly Melting Cheese

Mix your cheeses well with the chicken filling. This allows the cheese to melt smoothly. Using room temperature cream cheese can help it blend better too.

Enhancing Flavor

Adding Spices or Herbs

For a kick, try adding red pepper flakes or Italian herbs. Fresh basil or oregano can also add great flavor. Just a pinch can change the taste.

Customizing the Filling

You can swap the chicken for shrimp or beef. Adding black beans or corn can make it heartier. Think about what you like and mix it in.

Perfecting the Wrap Technique

Avoiding Filling Spillage

When filling the tortilla, don’t overstuff it. Keep the filling in the center, leaving space on the edges. This helps prevent messes when rolling.

Making a Tighter Roll

Start rolling from the bottom, tucking the filling in as you go. Roll it tightly, and press gently to keep it closed. A tight wrap holds the fillings nicely.

For more tips, check out the Full Recipe for Cheesy Garlic Chicken Wraps!

Variations

Different Protein Options

You can change the protein in these wraps for a new taste. Using grilled shrimp or steak adds a different flair. For shrimp, just grill it until it’s pink and firm. If you prefer steak, use thin slices of grilled meat. Both options blend well with the cheese and garlic flavors.

If you want a vegetarian version with grilled veggies, consider zucchini, bell peppers, and mushrooms. Grill them until they’re tender. They add a nice crunch and a smoky taste. This version is perfect for meat-free meals!

Cheese Alternatives

Feel free to switch up the cheese for your wraps. Switching to cheddar or pepper jack offers a sharp or spicy kick. Cheddar melts well and gives a rich flavor. Pepper jack adds heat and zest. Both options make the wraps extra tasty.

You can also try cream cheese options and variations. Mix in herbs or spices to the cream cheese for a new twist. Garlic or chive cream cheese can make the filling even creamier and more flavorful.

Additional Toppings and Sides

Don’t forget about toppings! Suggested dipping sauces like ranch or salsa can elevate your wraps. A creamy ranch balances the garlic well. Salsa adds freshness and a bit of spice.

Serving your wraps with a salad or rice is a great idea. A simple side salad with mixed greens pairs nicely. If you prefer rice, consider a cilantro lime rice for a fresh touch. These sides complement the wrap and make it a full meal.

Enjoy experimenting with these variations to find your perfect cheesy garlic chicken wrap! For the full recipe, check out the entire cooking guide.

Storage Info

Storing Leftovers

Refrigeration Guidelines

You can keep your Cheesy Garlic Chicken Wraps in the fridge. Store them in an airtight container. They stay fresh for 3 to 4 days. Make sure they cool down before sealing them. This keeps them from getting soggy.

Freezing for Long-term Storage

If you want to keep them longer, freezing works great. Wrap each one in plastic wrap and place them in a freezer bag. They can stay frozen for up to 3 months. Just remember to label the bag with the date.

Reheating Instructions

Best Methods for Reheating

To reheat, you have a few good options. The oven is best for even heating. Preheat it to 350°F (175°C) and bake for about 10-15 minutes. You can also use a skillet over medium heat. Just heat them for a few minutes on each side.

Ensuring Crispy Texture

To keep that crispy texture, avoid microwaving them. Microwaves can make the wraps soggy. If you must use a microwave, place a paper towel under the wrap. This step helps absorb moisture.

Shelf Life

How Long Can You Keep Them?

Cheesy Garlic Chicken Wraps last in the fridge for 3 to 4 days. In the freezer, they can last for about 3 months.

Signs of Spoilage to Watch Out For

Look for any off smells or changes in color. If the wraps feel slimy or sticky, it’s best to throw them out. Always trust your senses when it comes to food safety.

For the full recipe, check out Cheesy Garlic Chicken Wraps!

FAQs

How can I make Cheesy Garlic Chicken Wraps spicier?

To add heat, try these tips:

– Mix in diced jalapeños or other hot peppers.

– Use spicy cheese, like pepper jack.

– Add hot sauce to the filling.

– Sprinkle red pepper flakes inside before rolling.

These options give you the kick you want!

Can I make the wraps ahead of time?

Yes, you can prep the wraps in advance! Here’s how:

– Assemble the wraps and wrap them in plastic.

– Store them in the fridge for up to 2 days.

– When ready to eat, just grill them as directed.

This makes meal time quick and easy!

What are the best sides to serve with Cheesy Garlic Chicken Wraps?

Here are some great side dish ideas:

– Crisp salad with mixed greens.

– Fresh fruit salad for a sweet touch.

– Crunchy potato chips or fries for a fun crunch.

– Steamed veggies for a healthy option.

These sides pair well with the wraps!

How do I know when the wraps are done cooking?

Look for these signs:

– The wraps should be golden brown on both sides.

– The cheese inside should be melted and gooey.

– When you cut them, the filling should stay inside.

These cues show you are ready to enjoy your meal!

Cheesy garlic chicken wraps offer a quick and tasty meal option. We covered main ingredients, like chicken, cheese, and garlic. You learned step-by-step how to prepare, assemble, and cook these wraps. I also shared tips for flavor and storage.

Incorporate your favorite proteins or cheese for fun variations. With practice, you’ll master this easy recipe. Enjoy these wraps anytime, and share them with friends and family!

- 2 cups cooked chicken, shredded - 1 cup shredded mozzarella cheese - 1/2 cup cream cheese, softened to room temperature - 4 large flour tortillas - 3 cloves garlic, minced - 1 tablespoon extra virgin olive oil - 1/2 teaspoon smoked paprika - 1/4 teaspoon freshly ground black pepper - 1/4 teaspoon sea salt - 1 cup fresh spinach leaves, washed and dried - 1 medium tomato, diced into small cubes - 1/4 cup fresh cilantro, chopped (optional for garnish) Gather these ingredients to create a rich and creamy filling. The combination of chicken and cheeses makes it so tasty. Minced garlic adds a nice kick. Smoked paprika gives your wraps a subtle warmth. Fresh spinach and tomatoes add color and crunch. Don't forget the cilantro for a fresh touch. You can find the full recipe above to guide you through the cooking process. Enjoy the fun of mixing these ingredients and creating your wraps! - Step 1: Sautéing Garlic Start by heating the extra virgin olive oil in a medium skillet over medium heat. Add the minced garlic and sauté it for about one minute. You want it fragrant but not browned. Browning can make the garlic bitter. - Step 2: Mixing the Filling In a mixing bowl, combine the shredded chicken, shredded mozzarella cheese, and softened cream cheese. Add the sautéed garlic, smoked paprika, black pepper, and salt. Stir well until the mixture is smooth and the cheeses blend together. - Step 3: Filling the Tortilla Lay one tortilla flat on a clean surface. Scoop a generous amount of the cheesy chicken filling and place it in the center. Top with a handful of fresh spinach and diced tomato. If you like, add chopped cilantro for extra flavor. - Step 4: Rolling the Wrap Fold in the sides of the tortilla toward the center. Then, carefully roll it up from the bottom to form a tight wrap. Press gently as you roll to keep the filling inside. Repeat this with the remaining tortillas and filling. - Step 5: Grilling in the Skillet Heat the skillet again if needed. Place the wraps seam-side down in the skillet. Grill for about 2-3 minutes on each side until golden brown and crispy. - Step 6: Slicing and Serving Once grilled, let the wraps rest for a minute. Slice each wrap diagonally for easy handling. Serve hot, possibly with your favorite dipping sauce. You can find the complete details in the Full Recipe section. - Ensuring Optimal Grilling Temperature Start by heating your skillet over medium heat. This helps get a nice golden-brown finish. If it’s too hot, the outside may burn while the inside stays cold. - Tips for Evenly Melting Cheese Mix your cheeses well with the chicken filling. This allows the cheese to melt smoothly. Using room temperature cream cheese can help it blend better too. - Adding Spices or Herbs For a kick, try adding red pepper flakes or Italian herbs. Fresh basil or oregano can also add great flavor. Just a pinch can change the taste. - Customizing the Filling You can swap the chicken for shrimp or beef. Adding black beans or corn can make it heartier. Think about what you like and mix it in. - Avoiding Filling Spillage When filling the tortilla, don’t overstuff it. Keep the filling in the center, leaving space on the edges. This helps prevent messes when rolling. - Making a Tighter Roll Start rolling from the bottom, tucking the filling in as you go. Roll it tightly, and press gently to keep it closed. A tight wrap holds the fillings nicely. For more tips, check out the Full Recipe for Cheesy Garlic Chicken Wraps! {{image_4}} You can change the protein in these wraps for a new taste. Using grilled shrimp or steak adds a different flair. For shrimp, just grill it until it’s pink and firm. If you prefer steak, use thin slices of grilled meat. Both options blend well with the cheese and garlic flavors. If you want a vegetarian version with grilled veggies, consider zucchini, bell peppers, and mushrooms. Grill them until they're tender. They add a nice crunch and a smoky taste. This version is perfect for meat-free meals! Feel free to switch up the cheese for your wraps. Switching to cheddar or pepper jack offers a sharp or spicy kick. Cheddar melts well and gives a rich flavor. Pepper jack adds heat and zest. Both options make the wraps extra tasty. You can also try cream cheese options and variations. Mix in herbs or spices to the cream cheese for a new twist. Garlic or chive cream cheese can make the filling even creamier and more flavorful. Don’t forget about toppings! Suggested dipping sauces like ranch or salsa can elevate your wraps. A creamy ranch balances the garlic well. Salsa adds freshness and a bit of spice. Serving your wraps with a salad or rice is a great idea. A simple side salad with mixed greens pairs nicely. If you prefer rice, consider a cilantro lime rice for a fresh touch. These sides complement the wrap and make it a full meal. Enjoy experimenting with these variations to find your perfect cheesy garlic chicken wrap! For the full recipe, check out the entire cooking guide. Refrigeration Guidelines You can keep your Cheesy Garlic Chicken Wraps in the fridge. Store them in an airtight container. They stay fresh for 3 to 4 days. Make sure they cool down before sealing them. This keeps them from getting soggy. Freezing for Long-term Storage If you want to keep them longer, freezing works great. Wrap each one in plastic wrap and place them in a freezer bag. They can stay frozen for up to 3 months. Just remember to label the bag with the date. Best Methods for Reheating To reheat, you have a few good options. The oven is best for even heating. Preheat it to 350°F (175°C) and bake for about 10-15 minutes. You can also use a skillet over medium heat. Just heat them for a few minutes on each side. Ensuring Crispy Texture To keep that crispy texture, avoid microwaving them. Microwaves can make the wraps soggy. If you must use a microwave, place a paper towel under the wrap. This step helps absorb moisture. How Long Can You Keep Them? Cheesy Garlic Chicken Wraps last in the fridge for 3 to 4 days. In the freezer, they can last for about 3 months. Signs of Spoilage to Watch Out For Look for any off smells or changes in color. If the wraps feel slimy or sticky, it’s best to throw them out. Always trust your senses when it comes to food safety. For the full recipe, check out Cheesy Garlic Chicken Wraps! To add heat, try these tips: - Mix in diced jalapeños or other hot peppers. - Use spicy cheese, like pepper jack. - Add hot sauce to the filling. - Sprinkle red pepper flakes inside before rolling. These options give you the kick you want! Yes, you can prep the wraps in advance! Here’s how: - Assemble the wraps and wrap them in plastic. - Store them in the fridge for up to 2 days. - When ready to eat, just grill them as directed. This makes meal time quick and easy! Here are some great side dish ideas: - Crisp salad with mixed greens. - Fresh fruit salad for a sweet touch. - Crunchy potato chips or fries for a fun crunch. - Steamed veggies for a healthy option. These sides pair well with the wraps! Look for these signs: - The wraps should be golden brown on both sides. - The cheese inside should be melted and gooey. - When you cut them, the filling should stay inside. These cues show you are ready to enjoy your meal! Cheesy garlic chicken wraps offer a quick and tasty meal option. We covered main ingredients, like chicken, cheese, and garlic. You learned step-by-step how to prepare, assemble, and cook these wraps. I also shared tips for flavor and storage. Incorporate your favorite proteins or cheese for fun variations. With practice, you'll master this easy recipe. Enjoy these wraps anytime, and share them with friends and family!

Cheesy Garlic Chicken Wraps

Indulge in delicious Cheesy Garlic Chicken Wraps that are quick and easy to make! With tender chicken, creamy cheeses, and a burst of garlic flavor, these wraps are perfect for lunch or dinner. Just 30 minutes to prepare, and they're a hit with the family! Follow our easy steps to create a golden, crispy wrap filled with fresh spinach and tomatoes. Click to explore the full recipe and elevate your meal times!

Ingredients
  

2 cups cooked chicken, shredded

1 cup shredded mozzarella cheese

1/2 cup cream cheese, softened to room temperature

4 large flour tortillas

3 cloves garlic, minced

1 tablespoon extra virgin olive oil

1/2 teaspoon smoked paprika

1/4 teaspoon freshly ground black pepper

1/4 teaspoon sea salt

1 cup fresh spinach leaves, washed and dried

1 medium tomato, diced into small cubes

1/4 cup fresh cilantro, chopped (optional for garnish)

Instructions
 

In a medium-sized skillet, heat the extra virgin olive oil over medium heat. Add the minced garlic and sauté for about 1 minute, or until the garlic becomes fragrant but not browned to prevent bitterness.

    In a mixing bowl, combine the shredded chicken, shredded mozzarella cheese, softened cream cheese, sautéed garlic, smoked paprika, black pepper, and salt. Stir thoroughly until everything is evenly mixed and the cheeses begin to meld together.

      Take one tortilla and lay it flat on a clean, dry surface. Scoop a generous amount of the cheesy chicken filling and place it in the center of the tortilla. Add a handful of fresh spinach, sprinkle with diced tomato, and if desired, add some chopped cilantro for an extra burst of flavor.

        Begin by folding in the sides of the tortilla toward the center, then carefully roll it up from the bottom to form a tight wrap. Ensure that the filling remains enclosed within, pressing gently as you roll. Repeat this process for the remaining tortillas and filling.

          Return the skillet to the heat and allow it to warm up again (you can wipe it with a paper towel if it has residue). Place the prepared wraps seam-side down in the skillet. Grill them for about 2-3 minutes on each side, or until they are a delightful golden brown and crispy.

            Once all the wraps are grilled to perfection, remove them from the skillet and let them rest for a minute. Slice each wrap diagonally in half for easier handling. Serve immediately while hot, possibly with a side of your favorite dipping sauce.

              Prep Time: 15 minutes | Total Time: 30 minutes | Servings: 4

                WANT TO SAVE THIS RECIPE?

                Related Posts