Skip to content
About
Contact
Cookie Policy
Copyright Policy
Disclaimer
Search
Home
Dinner
Appetizer
Desserts
Drinks
About
Contact
Privacy Policy
Toggle Menu
Home
/
Dinner
- Page 13
Dinner
One Pan Harvest Chicken and Maple Veggies Delight
Cheeseburger Quesadilla Smash Sliders Flavor Fusion
One Pan Pickle Jar Chicken Thighs Simple Recipe
One Pan Summer Corn Zucchini Orzo Flavorful Dish
One-Pot Creamy Veggie Soup Delightfully Simple Recipe
Buffalo Chicken Zucchini Casserole Flavorful Dish
Stuffed Yellow Squash Flavorful and Nutritious Meal
Easy Frittata Recipe Simple and Flavorful Meal
Fresh Tomato Pie Flavorful and Easy Recipe to Enjoy
Summer Zucchini Quinoa Casserole Flavorful and Fresh
Page navigation
Previous Page
Previous
1
…
11
12
13
14
15
…
36
Next Page
Next
Home
Dinner
Appetizer
Desserts
Drinks
About
Contact
Privacy Policy
Toggle Menu Close
Search for:
Search

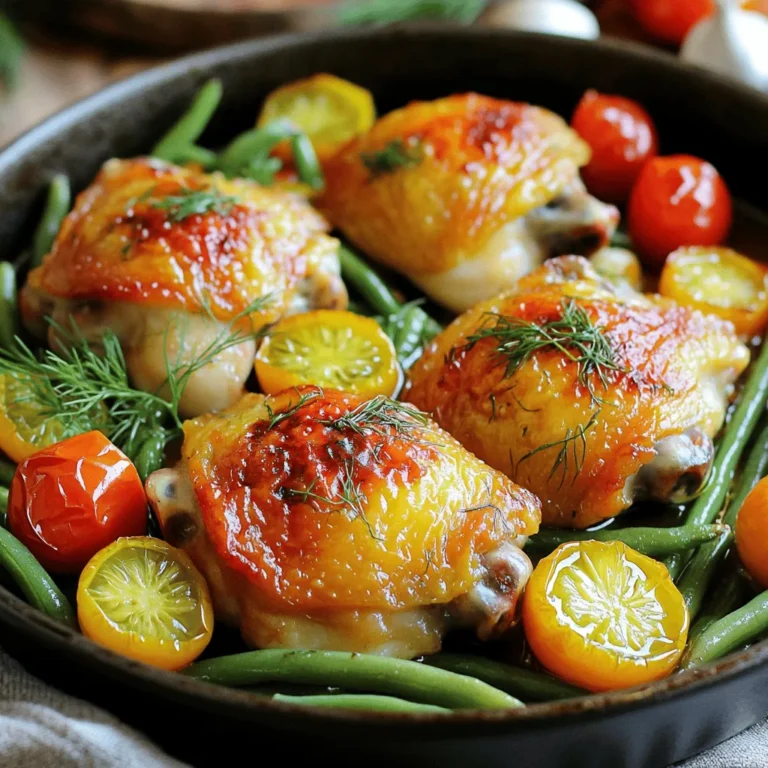
![To make One Pan Harvest Chicken and Maple Veggies, gather these key ingredients: - 4 boneless, skinless chicken thighs - 1 large sweet potato, peeled and diced into 1-inch cubes - 2 cups Brussels sprouts, halved - 2 medium carrots, sliced into rounds - 1 large red onion, cut into wedges - 1/4 cup pure maple syrup These ingredients create a colorful and flavorful dish. The chicken provides protein, while the veggies add texture and sweetness. For the delicious marinade, you will need: - 2 tablespoons extra virgin olive oil - 1 teaspoon garlic powder - 1 teaspoon smoked paprika - 1 teaspoon dried thyme - Salt and freshly ground black pepper, to taste This mix of spices brings depth to the chicken. The olive oil helps keep the meat moist and tender. Feel free to switch up the veggies based on what is fresh. Here are some ideas: - Swap sweet potatoes for butternut squash in the fall. - Try green beans instead of Brussels sprouts in the summer. - Use parsnips in place of carrots for a unique flavor. Adjusting your veggies can keep this dish exciting and fresh throughout the year. For the full recipe, check out the complete guide. First, preheat your oven to 400°F (200°C). This step is key for even cooking. While the oven heats, gather your ingredients. You will need chicken thighs, veggies, and seasonings. Make sure to wash the vegetables well. This ensures a fresh taste in your dish. In a large bowl, add two tablespoons of extra virgin olive oil. Then, mix in one teaspoon each of garlic powder, smoked paprika, and dried thyme. Don’t forget to sprinkle in some salt and pepper. This blend will give your chicken great flavor. Now, add the chicken thighs to the bowl. Use your hands or a spoon to coat each piece well with the marinade. Make sure every inch gets some love. In another bowl, toss together the sweet potatoes, Brussels sprouts, carrot rounds, and red onion wedges. Drizzle half of the maple syrup over the veggies. Stir them until they are well coated. Next, take a large baking sheet or oven-safe skillet. Place the marinated chicken in the center and surround it with the veggies. This layout helps everything cook evenly. Finally, pour the remaining maple syrup over the chicken and veggies. This adds sweetness and flavor. Now, you’re ready to bake! For the full recipe details, check out [Full Recipe]. To get juicy chicken, choose boneless, skinless thighs. They stay moist and cook evenly. Use a meat thermometer to check doneness. Aim for 165°F (75°C) in the thickest part. Let the chicken rest for a few minutes after baking. This helps keep the juices inside. Each vegetable cooks at a different rate. Sweet potatoes need longer, while Brussels sprouts cook fast. Cut the sweet potatoes smaller for even cooking. If you want softer carrots, slice them thinner. Always check the doneness of your veggies with a fork. They should be tender but not mushy. For a rustic look, serve right from the pan. This shows off the colors and textures. If you prefer a more formal style, plate the chicken and veggies separately. Drizzle some maple glaze over the dish for shine and flavor. Adding fresh parsley as a garnish gives a bright touch. For a fun twist, use colorful plates to enhance the dish's appeal. For full details, check the Full Recipe. {{image_4}} You can mix and match veggies for your dish. If you want to try something new, consider using: - Butternut squash - Cauliflower florets - Green beans - Zucchini, sliced These options add different colors and tastes to your meal. Each veggie cooks well with the chicken and maple glaze. Feel free to experiment with what you have at home! You can switch up the protein for this recipe. If you prefer beef, use tender beef cuts. For a leaner option, turkey thighs work well too. If you want a plant-based meal, try chickpeas or tofu. Both soak up the flavors nicely. Use the same cooking time to keep everything balanced. Changing the herbs and spices can give your dish a fresh twist. Here are some ideas: - Swap thyme for rosemary for a woodsy taste. - Use cumin for a warm, earthy flavor. - Add a pinch of cinnamon for a hint of sweetness. These changes not only add new tastes but also keep things exciting in the kitchen. Don't hesitate to play around with different combinations to find what you love! Store any leftovers in an airtight container. This keeps the chicken and veggies fresh. Let them cool to room temperature before sealing. You can keep them in the fridge for up to three days. If you want to enjoy the meal later, consider freezing it. To reheat, preheat your oven to 350°F (175°C). Place the leftovers in an oven-safe dish. Cover it with foil to keep moisture in. Heat for about 15-20 minutes. This method helps keep the chicken juicy and the veggies tender. You can also use a microwave if you're short on time. Just cover the dish and heat for a few minutes until warm. If you freeze the dish, make sure to use a freezer-safe container. It can last up to three months in the freezer. When you're ready to eat, thaw it in the fridge overnight. This helps maintain texture and taste. After thawing, reheat it using the oven or microwave for the best results. Enjoy your meal again with great flavor! Yes, you can use chicken breast. Chicken breasts cook faster than thighs. They may dry out if overcooked. I recommend checking the temperature early. Aim for 165°F (75°C). Adjust the cooking time to about 20-25 minutes. This keeps the meat tender and juicy. To make this dish gluten-free, ensure all ingredients are gluten-free. The spices and maple syrup should be checked for gluten. Avoid any sauces or mixes that may contain gluten. This recipe naturally uses whole foods, so it's easy to keep it gluten-free. This dish pairs well with a few sides. Consider serving it with: - Quinoa for a hearty grain option - A fresh green salad for crunch - Mashed potatoes for comfort - Crusty bread to soak up the sweet sauce These sides complement the flavors of the chicken and veggies. Enjoy experimenting with different combinations! You’ve now learned how to make One Pan Harvest Chicken and Maple Veggies. We covered ingredients, preparation steps, and helpful tips for perfecting this dish. You can also try different veggies and proteins to keep it fresh. Store leftovers properly to enjoy again. Cooking should be fun and easy, so don’t hesitate to experiment. Trust in your skills, and enjoy every tasty bite. Happy cooking!](https://fastmealmate.com/wp-content/uploads/2025/07/0df21e0d-fcb2-40bc-96f0-06bb271e9586-768x768.webp)
![- Ground beef - Flour tortillas - Cheeses: cheddar and mozzarella - Pickles, ketchup, and mustard The heart of my Cheeseburger Quesadilla Smash Sliders lies in the essential ingredients. I always choose high-quality ground beef for flavor. The flour tortillas serve as the base, holding everything together. I love using both cheddar and mozzarella cheese. They melt perfectly and add a creamy texture. Pickles, ketchup, and mustard bring that classic cheeseburger taste. - Garlic powder - Onion powder - Salt and pepper Seasonings are key to great flavor. I add garlic powder and onion powder to the beef. They enhance the taste without being overpowering. Salt and pepper are a must for balance. Adjust them to your liking for the best results. - Fresh lettuce leaves - Sliced tomatoes and onions For extra crunch and freshness, I recommend optional toppings. Fresh lettuce leaves add a nice texture. Sliced tomatoes and onions give a burst of flavor. Feel free to mix and match these toppings to suit your taste. They make the sliders even better! For the full recipe, check out the [Full Recipe]. - Start by mixing the ground beef with garlic powder, onion powder, salt, and pepper. - Use your hands or a spoon to blend the mixture well. - Divide the mixture into 8 equal parts. Shape each part into small patties. - Preheat a large skillet over medium-high heat. - Place the patties in the skillet, making sure not to crowd them. - Cook each patty for 2-3 minutes. Look for a nice golden brown crust before flipping. - Once cooked through, remove the patties and set them aside on a plate. - Lay one flour tortilla flat in the skillet. - Sprinkle half of the shredded cheddar and mozzarella cheese on the tortilla. - Place 2 cooked beef patties on top of the cheese. - Add chopped pickles and drizzle ketchup and mustard over the patties for extra flavor. - Top with the remaining cheese, then place a second tortilla over it. - Cook for about 2-3 minutes until the bottom is golden brown. Flip it carefully to cook the other side until crispy. - Once cooked, let it rest for a minute on a cutting board. Slice into wedges and enjoy. For the full recipe, check the [Full Recipe]. To ensure even cooking of patties, make them all the same size. I like to shape them about the size of a golf ball. This way, they cook evenly in the skillet. Preheat your skillet well before adding the patties. This helps develop a nice crust. For a crispy quesadilla, use medium-high heat while cooking. This allows the tortillas to become golden and crispy. Flip them carefully to keep the fillings intact. You want that delightful crunch with every bite! Adding spices can make a big difference. Try a pinch of smoked paprika or chili powder for a kick. Fresh herbs, like cilantro or parsley, can brighten the flavors too. These small changes can take your sliders to the next level. When it comes to sauces, think beyond ketchup and mustard. Barbecue sauce or spicy mayo can add a new twist. You can even mix them for extra flavor. Don’t be afraid to experiment! For the best sides, consider crispy fries or a fresh salad. Both pair nicely with these sliders. You can also serve them with a side of salsa for a fun dip! Presentation is key. Try stacking the quesadilla slices in a tower. Add fresh lettuce or tomatoes on the side for color. It makes the dish look great and appetizing. For a fun touch, use small skewers to hold the sliders together! You can find the full recipe for these delicious Cheeseburger Quesadilla Smash Sliders to explore more ways to enjoy this amazing dish! {{image_4}} You can change the protein in these sliders. Instead of ground beef, try ground chicken or turkey. Both offer great taste and a leaner option. If you want a plant-based choice, use vegan ground meat. Vegan cheese options are also available. Brands like Daiya or Violife melt well and taste good. Want some spice? Add jalapeños to your sliders for a kick. You can also mix in spices like cumin or chili powder for extra flavor. For a Southwestern twist, top your quesadilla with avocado or pico de gallo. These toppings add freshness and texture, making every bite exciting. You can cook your sliders in different ways. Grilling gives a smoky flavor. If you prefer stovetop cooking, use a skillet for a crispy finish. An air fryer is perfect for a lighter option. Set it to 375°F and cook for about 8-10 minutes. This method makes your quesadilla super crispy without excess oil. For the complete recipe, check out the Full Recipe. To keep your quesadilla sliders fresh, store them in an airtight container. Place parchment paper between layers to avoid sticking. They can last up to three days in the fridge. Make sure to cool them down before sealing. This helps keep them safe and tasty. When reheating, use a skillet over medium heat. This method warms them evenly and keeps them crispy. Add a drop of oil for extra crispness. Avoid the microwave, as it can make them soggy. Heat each slider for about 3-4 minutes per side. You can freeze either assembled or cooked sliders. Wrap each slider tightly in plastic wrap and then in foil. This helps prevent freezer burn. They can last up to two months in the freezer. To enjoy them, thaw in the fridge overnight. Reheat in the skillet as mentioned above for the best results. For the full recipe, check out the earlier sections. To make these sliders, start by mixing ground beef with garlic powder, onion powder, salt, and pepper. Shape the mix into small patties. Next, cook the patties in a skillet until they are brown. Then, place one tortilla in the skillet, add cheese, cooked patties, pickles, ketchup, and mustard. Top with another tortilla. Cook until both tortillas are crispy and the cheese melts. Cut the quesadilla into wedges, and enjoy! I recommend using a blend of cheddar and mozzarella. Cheddar gives a rich flavor, while mozzarella melts beautifully. You can also try pepper jack for a spicy kick or gouda for a smoky taste. Mixing these cheeses will create a creamy, tasty filling that pulls apart nicely. Yes, you can prepare the beef patties and chop the toppings ahead of time. Store them in the fridge for up to a day. When ready to cook, just assemble the quesadillas and grill them. This will save you time and let you enjoy your meal stress-free. For the full recipe, check out the details above. You learned how to make delicious cheeseburger quesadilla smash sliders. We covered essential ingredients, like ground beef and cheeses, and how to cook them perfectly. I shared key tips for flavor and cooking techniques. You also discovered variations and storage tips for these tasty sliders. By trying these recipes, you can impress your family or friends at your next gathering. Happy cooking!](https://fastmealmate.com/wp-content/uploads/2025/07/75d3e756-492b-48dc-99fb-d4828a25c64e-768x768.webp)
. Enjoy your cooking! To boost flavor, use fresh herbs. Fresh basil adds a bright note. You can also try parsley or thyme. Adding lemon zest brings a nice zing. For a kick, sprinkle in some red pepper flakes. If you want more depth, use vegetable broth instead of water. You can even roast the zucchini and corn first to enhance their sweetness. One common mistake is overcooking the orzo. Keep a close eye on it as it simmers. If you let it cook too long, it can become mushy. Another mistake is not seasoning enough. Taste and adjust with salt and pepper during cooking. Lastly, don’t skip the resting time after cooking. This helps the flavors blend better. To serve, use a large bowl for a family-style look. Spoon the orzo into the center, leaving some space around it. Top with fresh basil leaves for color. You can also add a sprinkle of cheese for richness. Serve with a lemon wedge on the side. This adds a pop of color and lets guests brighten their dish as they like. For the full recipe, be sure to check out the detailed cooking steps. {{image_4}} This dish shines as a vegetarian option. It uses fresh veggies and orzo, making it filling. To make it vegan, simply ensure your vegetable broth is plant-based. You can also add more protein by including chickpeas or tofu. These additions will keep the dish hearty and satisfying. If you need a gluten-free version, swap the orzo for gluten-free pasta. There are many types available, like rice or quinoa pasta. Just check the cooking time, as it may vary from regular orzo. This way, you can enjoy the flavors without worrying about gluten. Feel free to get creative with seasonal veggies! Try adding diced tomatoes, spinach, or bell peppers. You could also include peas or carrots for extra color and nutrition. Just remember to adjust the cooking time, so everything remains tender and vibrant. These changes can make the dish fun and new each time you prepare it. For the complete recipe, check the Full Recipe section. To keep your One Pan Summer Corn Zucchini Orzo fresh, let it cool first. Transfer the dish into an airtight container. Store it in the fridge for up to three days. This helps maintain its flavors and textures. When you are ready to enjoy leftovers, you can reheat them easily. Place the orzo in a skillet over low heat. Add a splash of vegetable broth or water to prevent sticking. Stir occasionally until it is heated through. This should take about 5 to 7 minutes. You can also use a microwave. Heat for one minute, then stir and check if it's warm. Repeat until heated. If you want to save your dish for later, freezing is a great option. Allow the orzo to cool completely. Portion it into freezer-safe bags or containers. Make sure to remove as much air as possible. Label the bags with the date. You can freeze it for up to three months. For best results, thaw it overnight in the fridge before reheating. For the full recipe, check out the detailed instructions above. To cook orzo perfectly, start with plenty of water. Use a ratio of 1 cup of orzo to 2 cups of water or broth. Bring the liquid to a boil, then add the orzo. Stir it gently to prevent sticking. Cook for about 8 to 10 minutes. Taste it a minute or two before the time is up. You want it al dente, firm but not hard. If there’s excess liquid, drain it off. This method keeps your orzo from getting mushy. Yes, you can use frozen vegetables in this dish. They save time and are often just as healthy. For the One Pan Summer Corn Zucchini Orzo, frozen corn works great. Just add it directly to the skillet. You may need to cook it a bit longer. Frozen zucchini can also work, but fresh zucchini gives a nicer texture. If using frozen, make sure to thaw it first if you want even cooking. Many sides go well with this dish. Here are some ideas: - Grilled Chicken: Adds protein and a nice char. - Garlic Bread: Perfect for soaking up extra broth. - Simple Salad: A light salad with lemon dressing complements the dish. - Roasted Vegetables: A mix of seasonal veggies enhances the meal. These sides make your meal more complete and satisfying. For the full recipe, check out the details above! You learned about the key ingredients and how to cook them. I covered steps, tips, and tricks for a great dish. You also found ways to adapt the recipe for special diets. Storing and reheating leftovers will help cut waste. Always aim for flavor and avoid common mistakes. With these insights, you'll create a tasty one-pan summer corn zucchini orzo. Enjoy your cooking journey and impress your guests!](https://fastmealmate.com/wp-content/uploads/2025/07/e3382d29-f029-483c-a1d1-82293022c013-768x768.webp)


 to guide you through each step. - Preheat your oven to 375°F (190°C). - Rinse and prepare the quinoa and vegetables. To start, turn on your oven and set it to 375°F (190°C). This step ensures your oven is hot and ready when it’s time to bake. While it heats, take one cup of quinoa and rinse it under cool water. This helps remove any bitterness. Next, chop your zucchinis and bell pepper. Dice the zucchini into small cubes and chop the bell pepper into bite-sized pieces. Don’t forget to finely dice one small onion and mince three cloves of garlic. - Sauté onion and garlic in olive oil until translucent. - Add zucchini and bell pepper, cooking until softened. Next, grab a medium saucepan. Add one tablespoon of olive oil and heat it over medium. Once the oil is warm, toss in your diced onion and minced garlic. Stir them for about 3-4 minutes. You want the onion to turn translucent and smell great. After that, add the diced zucchini and chopped bell pepper. Cook these veggies for around 5 minutes, stirring often. They should soften but still have a little crunch. - Mix in quinoa, cherry tomatoes, broth, and seasonings. - Transfer to a casserole dish and bake for 20-25 minutes. Now comes the fun part! Mix in your rinsed quinoa, one cup of halved cherry tomatoes, and two cups of vegetable broth into the pan. Add one teaspoon of dried oregano, one teaspoon of dried basil, and sprinkle salt and pepper to taste. Stir everything well to combine. Bring this mix to a gentle boil. Once it bubbles, reduce the heat to low, cover the pan, and let it simmer for 15 minutes. This allows the quinoa to absorb the broth. Once done, transfer the mixture into a lightly greased 9x13 inch casserole dish. If you love cheese, sprinkle one cup of shredded mozzarella on top. Place the dish in your preheated oven and bake for 20-25 minutes. You’ll know it’s ready when it bubbles and the cheese is golden brown. To make fluffy quinoa, rinse it well before cooking. This removes the bitter coating called saponin. Use two cups of vegetable broth for one cup of quinoa. Bring it to a boil, then lower the heat and cover. Let it simmer for 15 minutes. After cooking, let it rest for five minutes before fluffing with a fork. This will keep it light and airy. For the vegetables, sauté onion and garlic first in olive oil. Cook them until they are soft and fragrant. Then add zucchini and bell pepper. Stir them for about five minutes until they soften. This builds a great flavor base for your casserole. To elevate the dish, try adding a pinch of red pepper flakes for heat. Fresh herbs like thyme or parsley can add brightness. You can also swap out the dried oregano and basil for fresh herbs. Fresh herbs bring a stronger flavor. If you want to change ingredients, use brown rice instead of quinoa. You can also add cooked beans for a protein boost. For a creamier texture, mix in some ricotta cheese or yogurt before baking. Pair the casserole with a light side salad or some crusty bread. A fresh garden salad with lemon vinaigrette works well. It adds a nice contrast to the warm casserole. For gatherings, serve the casserole directly from the dish. Garnish with fresh basil leaves to make it look inviting. You can also sprinkle some extra cheese on top just before serving for a melty touch. {{image_4}} You can easily change the vegetables in this casserole. Try using bell peppers, spinach, or even eggplant. These swaps keep the dish vibrant and fresh throughout the summer. You can also mix in seasonal veggies like corn or cherry tomatoes for a burst of flavor. If you need a quinoa substitute, consider using brown rice or farro. These grains add a nice texture and flavor. Other options include couscous or even cauliflower rice for a low-carb choice. To make this casserole vegan, simply skip the cheese or use a plant-based cheese. You'll still get a creamy texture from the cooked veggies and broth. For a gluten-free option, use certified gluten-free quinoa. This way, everyone can enjoy the dish. If you're looking to cut calories, reduce the olive oil or skip the cheese. You can also use less quinoa and bulk up with more veggies. This keeps the dish light, tasty, and full of nutrients. Each of these variations allows you to enjoy this Summer Zucchini Quinoa Casserole in your own way. For the full recipe, check out the detailed instructions above. To keep your summer zucchini quinoa casserole fresh, first let it cool. Once cool, store it in an airtight container. You can refrigerate it for up to five days. If you want to save it for later, freeze it. Use a freezer-safe container or heavy-duty freezer bags. This way, it can last for up to three months. Remember to label the container with the date. This helps you track how long it has been stored. When you want to enjoy the casserole again, reheating is easy. For the best texture, use an oven. Preheat the oven to 350°F (175°C). Place the casserole in an oven-safe dish and cover it with foil. Heat for about 20 minutes or until warm. If you're in a hurry, you can use the microwave. Place a single serving in a microwave-safe dish. Heat for 1-2 minutes, checking every 30 seconds. This will keep the flavors and texture intact. Enjoy your delicious meal! Can I prepare the Summer Zucchini Quinoa Casserole in advance? Yes, you can prepare it ahead of time. Make the casserole, then cover and refrigerate it. When you're ready to eat, just bake it straight from the fridge. You may need to add a few more minutes to the cooking time. How to customize the recipe to suit my taste preferences? Feel free to swap out the veggies. For instance, you can use spinach, carrots, or even corn. You can also change the cheese or add some cooked chicken for extra protein. What are the best herbs to use for added flavor? Fresh herbs like basil and thyme work great. You can also try parsley or cilantro. These herbs add a fresh taste and brighten up your dish. Is this recipe suitable for a low-carb diet? This recipe is not low-carb due to the quinoa. Quinoa has more carbs than other grains but is also high in protein. If you want a lower carb option, you can use cauliflower rice instead of quinoa. What are the main nutritional benefits of zucchini and quinoa? Zucchini is low in calories and high in vitamins A and C. It also has a lot of water, which keeps you hydrated. Quinoa is a complete protein, meaning it has all nine essential amino acids. It’s also high in fiber, which is good for digestion. What should I do if my casserole is too watery? If your casserole is watery, try draining some liquid before baking. You can also bake it longer to help it thicken up. How can I prevent the quinoa from sticking together? To prevent sticking, rinse the quinoa well before cooking. This removes excess starch. Also, fluff the quinoa with a fork after it cooks to keep it separate. For the full recipe, check out the details above! You learned how to make a tasty Summer Zucchini Quinoa Casserole. We covered the ingredients, simple steps, and tips for perfect results. You can adjust the recipe to fit your taste and needs. Explore flavor swaps and storage tips to keep it fresh. With this dish, enjoy a healthy meal that is easy to make. I hope you try it and enjoy every bite!](https://fastmealmate.com/wp-content/uploads/2025/07/552d1654-693f-4b1b-8ee9-d91b85ff9950-768x768.webp)