Skip to content
About
Contact
Cookie Policy
Copyright Policy
Disclaimer
Search
Home
Dinner
Appetizer
Desserts
Drinks
About
Contact
Privacy Policy
Toggle Menu
Home
/
Appetizer
- Page 9
Appetizer
Spicy Dill Pickled Okra Flavorful and Tangy Delight
Oven-Baked Yellow Squash Fritters Flavorful and Easy
Baked Zucchini Parmesan Crispy and Flavorful Delight
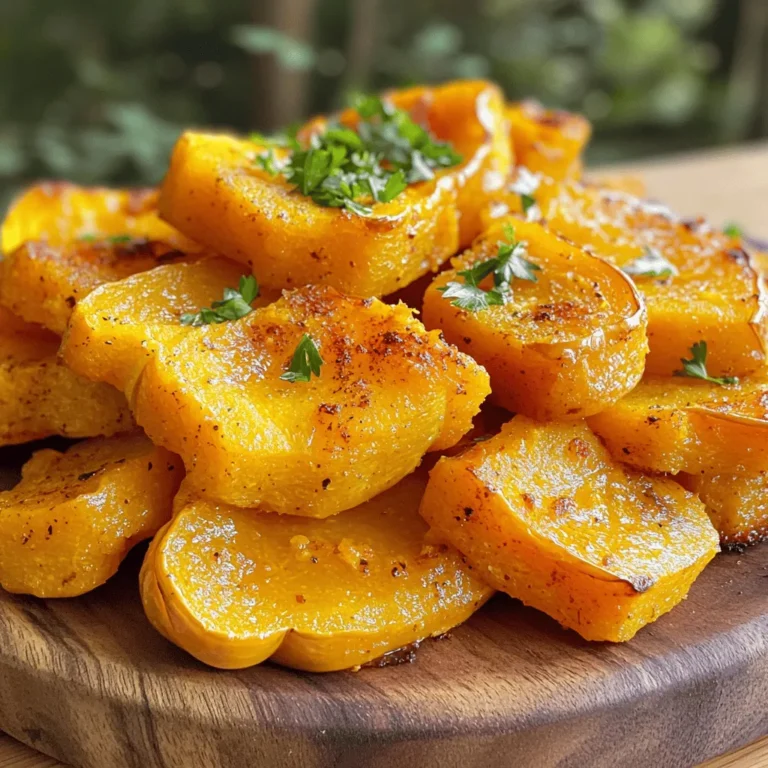
Crispy Roasted Squash Tasty and Simple Side Dish
Mom’s Squash Patties Delicious and Simple Recipe
Crispy Okra Fritters Irresistible Flavor and Crunch
Southern Fried Okra Crispy and Flavorful Snack
Easy Chicken Crescent Rolls Delightful Family Meal
Ingredient Zucchini Fritters Crispy and Flavorful Dish
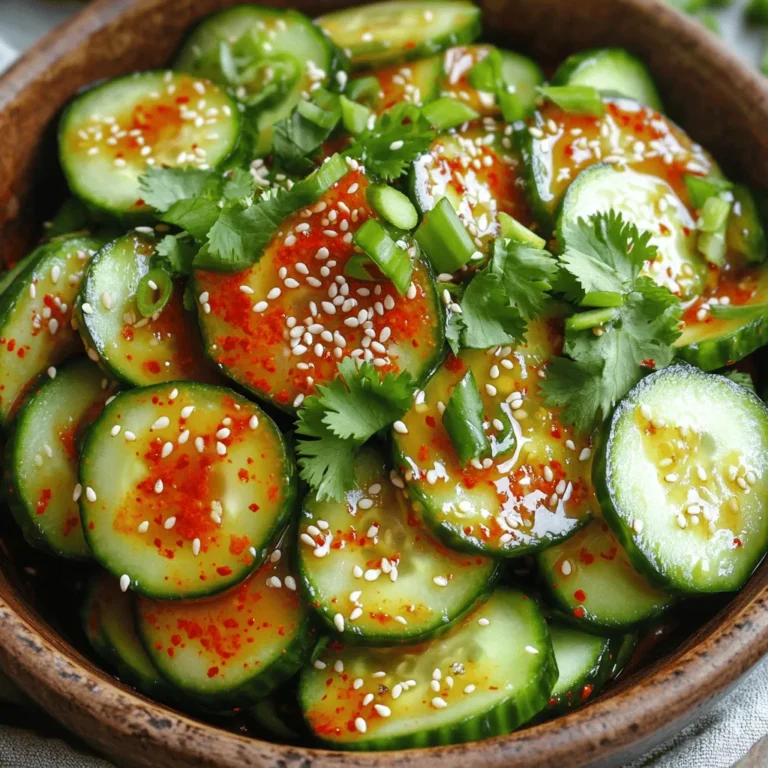
Spicy Korean Cucumber Salad Simple and Fresh Recipe
Page navigation
Previous Page
Previous
1
…
7
8
9
10
11
…
16
Next Page
Next
Home
Dinner
Appetizer
Desserts
Drinks
About
Contact
Privacy Policy
Toggle Menu Close
Search for:
Search


![- 2 medium yellow squashes - 1 small onion - 1 cup whole wheat breadcrumbs - 2 large eggs - 1/2 cup freshly grated Parmesan cheese - 1/4 cup fresh parsley - 1 teaspoon garlic powder - 1 teaspoon paprika - Salt and pepper to taste - Cooking spray or olive oil Using fresh ingredients makes a big difference in flavor. The yellow squash adds a nice sweetness. The onion gives it a sharp bite. Whole wheat breadcrumbs help bind the fritters while adding fiber. Eggs are key for holding everything together while baking. Herbs and spices really boost the taste. Fresh parsley adds a pop of color and flavor. Garlic powder gives a nice depth, and paprika adds warmth. Don't forget to season with salt and pepper to make flavors shine. For greasing, using cooking spray or olive oil helps the fritters brown nicely. You want a golden crust that contrasts with the soft inside. For a full recipe, check out the [Full Recipe]. - Preheat the oven to 400°F (200°C). - Prepare and grease the baking sheet. Use cooking spray or a drizzle of olive oil. - Grate the yellow squash. - Chop the onion finely and remove excess moisture. Wrap it in a towel, twist, and squeeze gently. - Mix all the ingredients in a bowl. - Form fritters and place them on the baking sheet. Aim for patties about 2-3 inches wide. - Spray or drizzle the fritters with olive oil. - Bake for 20-25 minutes, flipping halfway. This ensures they cook evenly and get crispy. Follow these steps to make your fritters tasty and enjoyable. You can find the Full Recipe for more details. To get your fritters nice and crispy, start by removing excess moisture from the squash. Moisture makes them soggy. After grating the squash, wrap it in a clean kitchen towel. Twist and squeeze the towel to remove as much liquid as you can. This step is key to crispiness. Next, use cooking spray wisely. Lightly spray the tops of the fritters before baking. This helps them brown evenly and adds a nice crunch. You can also drizzle olive oil for a richer flavor. Garnish your fritters with fresh parsley for a pop of color. It adds a fresh taste that pairs well with the fritters. You can also serve them with dips. Creamy yogurt or tzatziki works great. These dips add another layer of flavor and make your dish more fun. Oven types may vary, so cooking times can change. If you use a convection oven, check your fritters a few minutes early. They may cook faster. For standard ovens, stick to 20-25 minutes. To ensure even baking, flip the fritters halfway through cooking. This helps both sides become golden and crispy. Enjoy your perfectly baked fritters from the [Full Recipe]. {{image_4}} You can change the recipe by using different vegetables. Zucchini works well, too. It has a similar texture and taste. Carrots can add a sweet touch. Sweet potatoes bring a nice flavor and color. For cheese, you can swap the Parmesan for feta or cheddar. Feta gives a tangy twist, while cheddar offers a rich taste. This simple change can make your fritters unique. To boost the flavor, you can add spices. Try cumin for a warm taste. Chili flakes can bring some heat. Just a pinch can change the whole dish. Adding fresh herbs can also enhance the flavor. Basil gives a sweet note, while thyme adds earthiness. Mixing in any of these can make your fritters even better. If you need a gluten-free option, use gluten-free breadcrumbs. These work just as well in the recipe. You can also use ground oats or almond flour. Both are great substitutes. For binding, you can add more eggs or use mashed beans. Beans add protein and help hold the fritters together. These easy swaps keep the dish tasty and friendly for all diets. For the full recipe, check out the main article. To keep your fritters fresh, refrigerate them quickly. Place them in a single layer on a plate. Cover them with plastic wrap or foil. If you have many fritters, stack them with parchment paper in between layers. The best containers for storage are airtight ones. Use glass or plastic containers with tight lids. This helps keep moisture out and preserves flavor. For the best texture, reheat fritters in the oven. Set it to 350°F (175°C). Place fritters on a baking sheet for about 10 minutes. This method keeps them crispy. If you want to freeze fritters, let them cool first. Place them in a single layer on a baking sheet and freeze for about an hour. Once frozen, transfer them to a freezer bag. They can last up to three months in the freezer. Baked fritters last about 3 to 4 days in the fridge. Always check for signs of spoilage. If they smell sour or look slimy, throw them away. Fresh fritters should smell like squash and herbs. Enjoy your delicious oven-baked yellow squash fritters! For the full recipe, check out the section above. Yes, you can prepare these fritters ahead of time. To do this, follow these steps: - Prepare the Mixture: Make the fritter mix as per the Full Recipe. - Storage: Place the mixture in an airtight container. You can keep it in the fridge for up to two days. - Form the Fritters: When ready to cook, form the fritters and bake them. This method saves time on busy days and keeps the flavor fresh. Yes, yellow squash fritters offer great health benefits. Here are some reasons they are good for you: - Low in Calories: Yellow squash is low in calories, making it a great choice for light meals. - High in Fiber: It helps with digestion and keeps you full longer. - Rich in Vitamins: Yellow squash is packed with vitamins A and C, which support your immune system. Incorporating these fritters into your meals can add nutrition without sacrificing taste. If you want a healthier fritter, try these substitutes for breadcrumbs: - Oats: Use ground oats for a gluten-free option. - Chickpea Flour: This adds protein and a nutty flavor. - Crushed Nuts: Almonds or walnuts can give a crunchy texture. These alternatives can change the taste and texture, making your fritters unique. Absolutely! Baking in an air fryer is simple and fast. Here’s how to adjust the recipe: - Temperature: Set your air fryer to 375°F (190°C). - Cooking Time: Cook for about 12-15 minutes, flipping halfway through. Using an air fryer makes the fritters extra crispy while using less oil. Oven-baked yellow squash fritters are easy and fun to make. We covered key ingredients like squash, onion, and Parmesan. You learned how to prep, mix, bake, and even store leftovers. Remember to remove moisture for crispiness and try different spices for added flavor. These fritters are not just tasty; they're a healthy choice too. With simple steps, you can impress anyone. Enjoy experimenting with variations that suit your taste. Now, get cooking and savor your delicious fritters!](https://fastmealmate.com/wp-content/uploads/2025/06/228bb01e-104c-4728-9be6-f22ec78a35c6-768x768.webp)
![When making Baked Zucchini Parmesan, you need fresh, simple ingredients. Here’s what you should gather: - 4 medium zucchinis, sliced into ½-inch thick rounds - 1 cup shredded mozzarella cheese - ½ cup freshly grated Parmesan cheese - 1 cup panko breadcrumbs - 2 garlic cloves, finely minced - 1 teaspoon dried oregano - 1 teaspoon dried basil - 1 teaspoon sea salt - ½ teaspoon freshly cracked black pepper - 2 tablespoons extra virgin olive oil - Fresh basil leaves for garnish (optional) These ingredients create a great mix of flavors and textures. The zucchini becomes soft, while the cheese melts beautifully. The panko breadcrumbs add the perfect crunch. Each bite gives you a taste of cheesy goodness! For the full recipe, check out the detailed instructions. Enjoy creating this dish! - Preheat the oven to 400°F (200°C). - Line a baking sheet with parchment paper. - In a bowl, combine: - 1 cup panko breadcrumbs - 2 minced garlic cloves - 1 teaspoon dried oregano - 1 teaspoon dried basil - 1 teaspoon sea salt - ½ teaspoon black pepper - Toss the ingredients well. - Drizzle 2 tablespoons olive oil over the mixture. - Mix again until all the breadcrumbs are coated. - Lay sliced zucchini on the baking sheet in a single layer. - Sprinkle the breadcrumb mixture evenly over the zucchini. - Add 1 cup shredded mozzarella cheese on top. - Finish with ½ cup grated Parmesan cheese for extra flavor. - Place the baking sheet in the oven. - Bake for 25-30 minutes until golden and bubbly. - Let cool for a few minutes. - Garnish with fresh basil leaves if desired. For the full recipe, check out the detailed steps included above. Enjoy your crispy, cheesy zucchini! To make your baked zucchini truly crunchy, adjust the breadcrumb coating. Use panko breadcrumbs for a lighter, crispier texture compared to regular breadcrumbs. If you want even more crunch, mix in some crushed cornflakes or a sprinkle of grated Parmesan into the panko. This combination gives a great bite. Baking technique plays a key role too. Make sure you lay the zucchini slices in a single layer. If they overlap, they will steam instead of bake, and you’ll lose that crunch. Turning the baking sheet halfway through baking can also help ensure even cooking. For more flavor, add spices like smoked paprika or chili powder. These spices bring a warm touch that pairs well with zucchini. Fresh herbs can brighten the dish. Use fresh basil or parsley for a burst of color and taste. If fresh herbs are hard to find, dried herbs like oregano or thyme work well too. You can serve baked zucchini parmesan in many ways. For a delightful appetizer, cut it into small squares and serve with a dipping sauce. As a side dish, pair it with grilled chicken or fish for a healthy meal. You can also serve it over pasta for a heartier option. Feel free to explore these ideas and make the dish your own. Enjoy the process! For the full recipe, check out the [Full Recipe]. {{image_4}} You can make baked zucchini parmesan even more exciting by adding other veggies. Try including bell peppers, tomatoes, or mushrooms. These vegetables add color and taste. You can also mix in some spinach for a healthy twist. Adding protein can turn this dish into a hearty meal. Consider cooked chicken, turkey, or even crumbled sausage. For a vegetarian option, use chickpeas or lentils. They add both flavor and protein. If you need a gluten-free dish, swap panko for gluten-free breadcrumbs. This keeps the crunch while catering to dietary needs. Always check the labels to ensure they are truly gluten-free. For a vegan version, replace cheese with plant-based alternatives. Nutritional yeast gives a cheesy flavor without dairy. You can also use cashew cheese for a creamy texture. Use olive oil to replace any butter in the recipe. Using seasonal herbs can elevate your baked zucchini parmesan. Fresh basil, parsley, or thyme can add unique flavors. You can mix and match herbs based on the season for fresh taste. During holidays, adapt this dish to fit the occasion. Add a layer of roasted garlic or sun-dried tomatoes for a festive flair. These simple changes can make it special for gatherings. For the full recipe, check out the [Full Recipe]. To keep your Baked Zucchini Parmesan fresh, store leftovers in an airtight container. This helps lock in flavor and moisture. You can keep it in the fridge for up to three days. If you want to enjoy it later, make sure it cools completely before sealing. Freezing is a great way to save this tasty dish. Here’s how to do it: 1. Cool Completely: Ensure the dish is fully cooled. 2. Wrap it Up: Use plastic wrap to cover it tightly. Then, place it in a freezer-safe container or bag. 3. Label and Date: Write the date on the bag or container. This helps you remember when you made it. You can freeze it for up to three months. When you’re ready to eat, you can reheat it in the oven or microwave. - Oven Method: Preheat the oven to 350°F (175°C). Place the zucchini on a baking sheet and cover it with foil. Bake for about 15-20 minutes until hot. This keeps it crispy. - Microwave Method: Heat it in a microwave-safe dish. Cover it with a damp paper towel. Heat in short bursts of 30 seconds until warm. Note, this method may make it a bit soggy. Choose the method that works best for you! Enjoy your delicious dish anytime! You can tell when the zucchini is done by checking its color and texture. The cheese should be golden and bubbly. The zucchini should be soft but not mushy. This usually takes about 25-30 minutes in the oven. Keep an eye on it to avoid overcooking. Yes, you can use different cheeses! Cheddar, gouda, or even a spicy pepper jack can work well. Mix and match to find your favorite flavor. Just make sure the cheese melts nicely to create a gooey texture. Baked zucchini parmesan is a healthy choice. Each serving has about 180 calories, with 10 grams of fat and 8 grams of protein. It also provides vitamins A and C, plus calcium from the cheese. This dish is a great way to enjoy veggies! You can prepare the zucchini ahead of time! Slice and layer them with breadcrumbs and cheese. Cover the dish and store it in the fridge for up to 24 hours. Just bake it right before serving for a fresh taste. Yes, the recipe is vegetarian as it uses no meat. It features cheese, zucchini, and herbs, all of which are plant-based. Enjoy this dish as a great meat-free option for any meal. To spice things up, add crushed red pepper flakes to the breadcrumb mix. You can also use spicy cheese or add jalapeños for extra kick. Adjust the heat to your taste for a fun twist! For the full recipe, check out the Cheesy Baked Zucchini Delights. Enjoy your cooking adventure! This blog post shares a simple and tasty baked zucchini parmesan recipe. We covered essential ingredients, step-by-step instructions, and helpful tips to enhance flavor and crunch. You learned how to store leftovers and even make variations for different diets. Now you can confidently whip up this dish as a side or appetizer. Enjoy experimenting with flavors and sharing your creations. Baked zucchini parmesan is a great way to eat healthy and delicious food. Happy cooking!](https://fastmealmate.com/wp-content/uploads/2025/06/6985a322-15fd-4ae0-839d-4317f4e09967-768x768.webp)
![- 2 cups grated zucchini or yellow squash - 1 cup breadcrumbs (preferably seasoned) - 1/2 cup grated parmesan cheese - 1/4 cup finely chopped onion - 2 cloves garlic, minced - 2 large eggs - 1 teaspoon dried oregano - 1/2 teaspoon salt - 1/4 teaspoon black pepper - 1/4 cup fresh parsley, chopped (optional) - Skillet - Cooking oil - Mixing bowl - Kitchen towel Mom's squash patties use simple ingredients. The main ones are zucchini or yellow squash. You need seasoned breadcrumbs to add flavor. Parmesan cheese gives a nice touch. Onions and garlic boost the taste. Eggs help bind everything together. Spices like oregano, salt, and pepper add extra flavor. Fresh parsley adds color and freshness to the mix. For cooking, you will need a skillet and some oil. A mixing bowl helps combine all ingredients. A kitchen towel is handy for squeezing out squash moisture. This is part of the [Full Recipe]. Start by grating the zucchini or yellow squash. I use a box grater for this. Then, take the grated squash and put it in a clean kitchen towel or cheesecloth. Squeeze it hard to drain as much moisture as you can. This step is key. If there is too much moisture, the patties will be soggy. We want them crispy and delicious. In a large bowl, combine the drained squash with the other ingredients. Add breadcrumbs, grated parmesan cheese, chopped onion, minced garlic, eggs, dried oregano, salt, and black pepper. If you like, toss in some chopped parsley too. Mix everything well using your hands or a spoon. The mixture should feel a bit sticky and hold together well. This texture helps the patties stay intact while cooking. Next, heat a large skillet on medium heat. Pour in enough olive oil to cover the bottom of the pan. Wait until the oil shimmers, but don’t let it smoke. This shows it’s hot enough for frying. Scoop about 1/4 cup of the squash mix and shape it into a patty. Gently place it in the hot skillet. Don’t overcrowd the pan. Leave space between each patty for even cooking. Cook the patties for about 4 to 5 minutes on each side. They should turn golden brown and crispy. Keep an eye on the heat. Adjust it as needed to prevent burning. You might need to fry in batches, depending on your skillet size. Once cooked, take them out and place them on a plate lined with paper towels. This will soak up any extra oil and keep the patties crispy. Follow these steps, and you'll have lovely, golden squash patties ready to enjoy! For the full recipe, check out the earlier section. To get the best texture, you want your patties crispy, not soggy. Start by squeezing out moisture from the grated squash. Use a clean kitchen towel for this. If you skip this step, your patties may fall apart or become mushy. Keep the right ratio of ingredients. Too much squash can lead to sogginess. Aim for two cups of squash to one cup of breadcrumbs. This balance helps create a sturdy patty. Cooking time is key. Heat your skillet to medium. This temperature helps the patties cook evenly. If the heat is too low, they won’t crisp up. If it’s too high, they may burn. Fry each side for 4-5 minutes. Check for a golden brown color. Don’t rush this process. Undercooked patties can be mushy, while overcooked ones can taste dry. For serving, add tasty condiments. A dollop of yogurt or sour cream works great. Fresh herbs like parsley add color and flavor. You can also pair these patties with a salad or roasted veggies. They make a lovely side for grilled meats too. Explore different sauces like tzatziki or spicy ketchup for extra flavor. Enjoy making these patties your own! {{image_4}} You can change the squash for variety. Try using butternut squash or pattypan squash. Each type gives a unique taste and texture. You can also add more veggies. Grated carrots or bell peppers mix well. Fresh herbs, like basil or thyme, add a fresh kick. You can bake these patties instead of frying them. Just place them on a baking sheet and drizzle with olive oil. Bake at 400°F for 20 minutes, flipping halfway through. This method makes them a bit healthier. An air fryer is another option. It cooks them fast and gives a nice crisp without much oil. Set the air fryer to 375°F and cook for about 12-15 minutes. Adding cheese can elevate the flavor. Try feta, cheddar, or even goat cheese. Each brings a different taste. You can also play with spices. Add a pinch of cumin for warmth or smoked paprika for depth. Experimenting with flavors can lead to your perfect batch of patties. Check out the Full Recipe for more ideas! To store leftovers, let the patties cool first. Place them in an airtight container. This helps to keep them fresh. You can store them in the fridge for up to three days. To extend freshness, reheat only what you will eat. This avoids sogginess in the remaining patties. For freezing, make sure the patties are fully cooled. Arrange them in a single layer on a baking sheet. Place the sheet in the freezer until they are solid. Then transfer them to a freezer bag. This method helps prevent them from sticking together. When ready to eat, reheat frozen patties in the oven. Bake them at 350°F for about 15 minutes or until hot. The expected freshness duration is about three days in the fridge. Frozen patties can last up to three months. Signs of spoilage include a sour smell or a change in color. If you notice any of these, it’s best to discard them. Fry the patties for about 4 to 5 minutes on each side. This cooking time gives them a nice golden color and crispy texture. Make sure to keep an eye on them. If the heat is too high, they may burn. Adjust the heat as needed for even cooking. Yes, you can make these patties gluten-free. Instead of breadcrumbs, use gluten-free breadcrumbs or crushed gluten-free crackers. You can also use ground oats as a substitute. Just check the labels to ensure they're gluten-free. These patties pair well with many side dishes and sauces. Here are some great options: - A fresh salad with lemon vinaigrette - Creamy yogurt or sour cream for dipping - Applesauce for a sweet contrast - Grilled vegetables or a medley of roasted root veggies - A slice of lemon to brighten the dish For the full recipe, check out Mom's Heavenly Squash Patties. Enjoy! This blog post covered how to make delicious squash patties. We looked at key ingredients, preparation steps, and cooking tips. I shared ways to adjust the recipe and storage methods for leftovers. Making these patties can be fun and simple. You can explore new flavors and textures that suit your taste. Enjoy these tips, and I hope you create something tasty. Experimenting in the kitchen leads to great meals!](https://fastmealmate.com/wp-content/uploads/2025/06/c31883a2-1cc5-40ff-adb3-b1ed6b0d87a1-768x768.webp)
![- 1 pound fresh okra, thoroughly washed and chopped into small bite-sized pieces - 1/4 cup fresh cilantro, finely chopped - 1/4 cup green onions, finely sliced The fresh okra gives these fritters their unique texture and flavor. Look for firm, green okra pods. They should not be too large, as larger okra can be tough. Fresh cilantro and green onions add brightness and enhance the flavor. - 1 cup chickpea flour (also known as besan) - 1/2 cup cornmeal for added texture - 1 teaspoon cumin powder - 1 teaspoon coriander powder - 1/2 teaspoon turmeric powder for color - 1 teaspoon red chili powder (adjust per your spice preference) - 1 teaspoon baking powder for fluffiness - Salt, to taste Chickpea flour is the base for the batter. It gives a nice crunch and a nutty taste. Cornmeal adds extra texture that makes each bite satisfying. The spices bring warmth and depth, while baking powder ensures the fritters puff up nicely. You can consider adding a pinch of garlic powder or onion powder for a savory kick. A splash of lemon juice can brighten the dish. If you enjoy heat, diced jalapeños can add a spicy twist. Experiment with these options to find your favorite flavor combination. For the complete recipe, check out the [Full Recipe]. Start with fresh okra. Wash it well under cool water. Make sure to remove all dirt. Pat the okra dry using a paper towel. This step is key for crispiness. Once dry, chop the okra into small pieces. Aim for uniform sizes to ensure even cooking. In a large bowl, mix the dry ingredients. Combine chickpea flour, cornmeal, cumin, coriander, turmeric, red chili powder, baking powder, and salt. Use a whisk to blend them thoroughly. This ensures all the spices mix evenly. Next, add the chopped okra, cilantro, and green onions. Gently toss to coat the okra with the flour mix. Be careful not to break the okra pieces. Slowly add water to the bowl. Stir until you reach a thick batter. The batter should cling to the okra pieces. Heat vegetable oil in a deep frying pan. Use enough oil to cover the fritters by about 1-2 inches. Get the oil hot over medium heat. To test, drop a small amount of batter in the oil; it should sizzle. Use a tablespoon to drop spoonfuls of the batter-coated okra into the hot oil. Don’t overcrowd the pan. This helps keep the oil hot and ensures crispiness. Fry the fritters for 3-4 minutes. They should turn golden brown and crisp. When done, remove them with a slotted spoon. Place them on paper towels to drain excess oil. Enjoy them hot for the best flavor and crunch! For the full recipe, check out the section above. To make crispy okra fritters, start with fresh okra. Moist okra makes the fritters soggy. Make sure to wash and dry the okra well. Chop the okra into small, even pieces. This helps them cook evenly. When mixing the batter, aim for a thick consistency. It should cling to the okra without running off. If the batter is too thin, your fritters will not be crispy. To boost flavor, use fresh herbs like cilantro and green onions. The spices are key too. Cumin, coriander, and red chili powder add depth. You can adjust the spice level to your taste. For a vibrant look, add turmeric too. This gives the fritters a lovely golden color. And don't forget the baking powder! It makes the fritters light and airy. One common mistake is overcrowding the pan. This lowers the oil temperature and leads to soggy fritters. Fry in small batches for the best results. Another mistake is not letting the oil heat enough before frying. A good test is to drop a small spoonful of batter in the oil. If it sizzles, the oil is ready. Lastly, skip the excess water when mixing the batter. Too much water makes for a runny mix, which is not ideal. For my detailed cooking process, check the Full Recipe. {{image_4}} To make crispy okra fritters gluten-free, use rice flour instead of chickpea flour. Rice flour gives a light crunch. You can also try almond flour for a nutty flavor. Adjust the amount of water to keep the batter thick. For a spicy kick, add diced jalapeños or chopped green chilies to the batter. You can also increase the red chili powder for extra heat. Another option is to mix in a tablespoon of hot sauce to give a zesty flavor. Feel free to mix in other veggies like corn, spinach, or bell peppers. Chopped carrots can add a sweet crunch. You could also add cheese for a creamy texture. Experiment with herbs like dill or parsley for fresh flavor. For the full recipe, check out the instructions above. Store leftover crispy okra fritters in an airtight container. This keeps them fresh and crispy. If you have more than you can eat, allow them to cool completely first. Then, place them in the container. To keep them from getting soggy, avoid stacking them directly on top of each other. To reheat, use an oven or an air fryer. Preheat your oven to 375°F (190°C). Place the fritters on a baking sheet. Heat for about 10-15 minutes until they are hot and crispy again. If using an air fryer, set it to 350°F (175°C) and heat for 5-7 minutes. Avoid microwaving as it makes them soft. You can freeze the fritters for later. Allow them to cool completely, then place them in a single layer on a baking sheet. Freeze until solid, then transfer to a freezer bag. This way, they won’t stick together. When you’re ready to eat them, follow the reheating steps above. Enjoy the crispy goodness later! For the full recipe, check out the detailed instructions provided earlier. To make crispy okra fritters from scratch, start with fresh okra. Wash and chop it into small pieces. Mix chickpea flour, cornmeal, and spices in a bowl. Toss in the chopped okra and herbs. Gradually add water to create a thick batter. Heat vegetable oil in a pan. Drop spoonfuls of the batter into the hot oil. Fry until golden brown and crisp. Drain on paper towels. Enjoy hot! For more detailed steps, check the Full Recipe. Crispy okra fritters pair well with many sides. I love serving them with tangy yogurt sauce or spicy chutney. You can also try them with a fresh salad or pickles. These sides add flavor and balance the dish. Serve them as a snack or an appetizer. They also complement grilled meats nicely. Yes, you can bake the fritters instead of frying them. Preheat your oven to 400°F (200°C). Use a baking sheet lined with parchment paper. Lightly coat the fritters with oil for crispiness. Bake them for about 20-25 minutes, flipping halfway through. This method is healthier and still delicious, though they may not be as crispy as fried ones. Crispy okra fritters are a tasty snack made with fresh ingredients and dry spices. I shared steps to prepare and fry them for that perfect crunch. Plus, I included tips to avoid common mistakes and ideas for fun variations. Remember to store leftovers correctly and reheat for best results. Making these fritters is simple and rewarding. Enjoy your cooking journey and taste the crunch!](https://fastmealmate.com/wp-content/uploads/2025/06/a8f815b1-ce7d-4f81-9471-c6052c40d9a8-768x768.webp)


. To make crispy zucchini fritters, start by removing excess moisture. This step is crucial. Grate the zucchini and sprinkle it with salt. Let it sit for about ten minutes. Then, use a clean towel to squeeze out the water. The drier your zucchini, the firmer your fritters will be. Next, pay attention to frying temperature. Heat your olive oil over medium heat until it shimmers. If the oil is too hot, the outside will burn before the inside cooks. If it's too cool, the fritters will soak up too much oil and become greasy. Use olive oil for frying. It has a nice flavor and a good smoke point. This oil will help achieve that perfect golden color. Pair your fritters with delicious dips. Greek yogurt or sour cream works great. You can also try tzatziki for a refreshing twist. For a beautiful presentation, arrange the fritters on a colorful platter. Add a sprinkle of fresh herbs, like parsley or dill. This adds color and a fresh taste. If your fritters are falling apart, it might be due to too much moisture. Ensure you've squeezed out all the water from the zucchini. You might also need to add a bit more flour to bind the mix. For more flavor, consider adding spices. Cumin or Italian seasoning can elevate the taste. You can also mix in different cheeses, like feta or cheddar, for a new twist. {{image_4}} For a healthier twist on zucchini fritters, try using whole wheat flour. This choice adds fiber and nutrients. It also gives the fritters a nice, nutty flavor. You can also bake the fritters instead of frying them. Just place them on a baking sheet, brush with a little olive oil, and bake until golden. This method cuts down on oil and keeps the fritters light. To mix things up, consider adding different cheeses. Feta gives a tangy touch, while cheddar brings a sharp flavor. You can also spice things up by incorporating spices. Cumin or Italian seasoning can add depth. A pinch of red pepper flakes can give them a kick too! If you need a gluten-free option, almond flour works well. It keeps the fritters nice and crispy. For those following a vegan diet, you can replace the egg with a flaxseed mixture. Just mix one tablespoon of ground flaxseed with three tablespoons of water. Let it sit for a few minutes until it thickens. This simple swap allows everyone to enjoy these tasty fritters. Don't forget to check the Full Recipe for all the details! To keep your zucchini fritters fresh, place them in an airtight container. Make sure to layer parchment paper between fritters to prevent sticking. Store them in the fridge for up to three days. After this time, the fritters may lose their crispiness. If you notice any off smell or mold, it's best to toss them. When it comes to reheating, the oven is your best friend. Preheat it to 350°F (175°C). Place the fritters on a baking sheet and heat for about 10 minutes. This keeps them crispy. You can use the microwave for quick reheating, but they may turn soft. If you choose this method, heat them on a microwave-safe plate for about 30 seconds. For the best taste, stick to the oven whenever possible. For more tips, you can check the Full Recipe. Zucchini fritters can last up to three days in the fridge. To store them, place them in an airtight container. Check for signs of spoilage like a sour smell or visible mold. If you see either, it's best to toss them. Yes, you can freeze zucchini fritters! To do this, let them cool completely. Then, place them in a single layer on a baking sheet and freeze for about an hour. Once frozen, transfer them to a freezer-safe bag. They will keep for up to three months. Zucchini fritters pair well with a variety of sides. You can serve them with: - Greek yogurt or sour cream - Fresh salsa or marinara sauce - A crisp green salad - Roasted vegetables These options add flavor and help balance the dish. Yes, you can make zucchini fritters ahead of time. Prepare them and store them in the fridge for up to a day. When ready to eat, just heat them in a skillet until warm. This keeps them crispy and delicious. For the full recipe, check out the Crispy Zucchini Bliss Fritters. Zucchini fritters are easy to make and tasty. You learned about key ingredients, step-by-step cooking, and tips for success. You also explored variations for healthy and dietary needs. Remember, removing excess moisture helps keep them crispy. Try different flavors or dips for fun. Store leftovers properly and reheat them well. Enjoy your zucchini fritters as a snack or a meal! Keep experimenting to make them your own. Happy cooking!](https://fastmealmate.com/wp-content/uploads/2025/06/98182d0e-52f3-455d-9b2a-3674903e8280-768x768.webp)