Skip to content
About
Contact
Cookie Policy
Copyright Policy
Disclaimer
Search
Home
Dinner
Appetizer
Desserts
Drinks
About
Contact
Privacy Policy
Toggle Menu
Home
/
Appetizer
- Page 7
Appetizer
Easy Watermelon Feta Salad Fresh and Flavorful Delight
Cilantro Lime Pasta Salad Fresh and Flavorful Dish
Cucumber Salad Fresh and Easy Summer Delight
Crispy Beef Taquitos Delightful and Easy Recipe
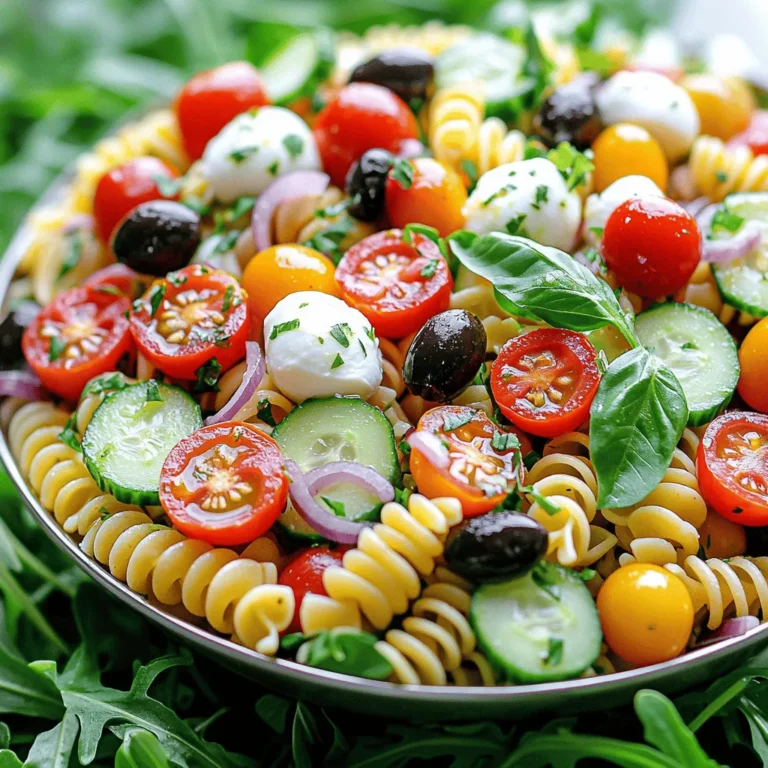
Italian Pasta Salad Flavorful and Easy Recipe
Refreshing Watermelon Cucumber Feta Salad Delight
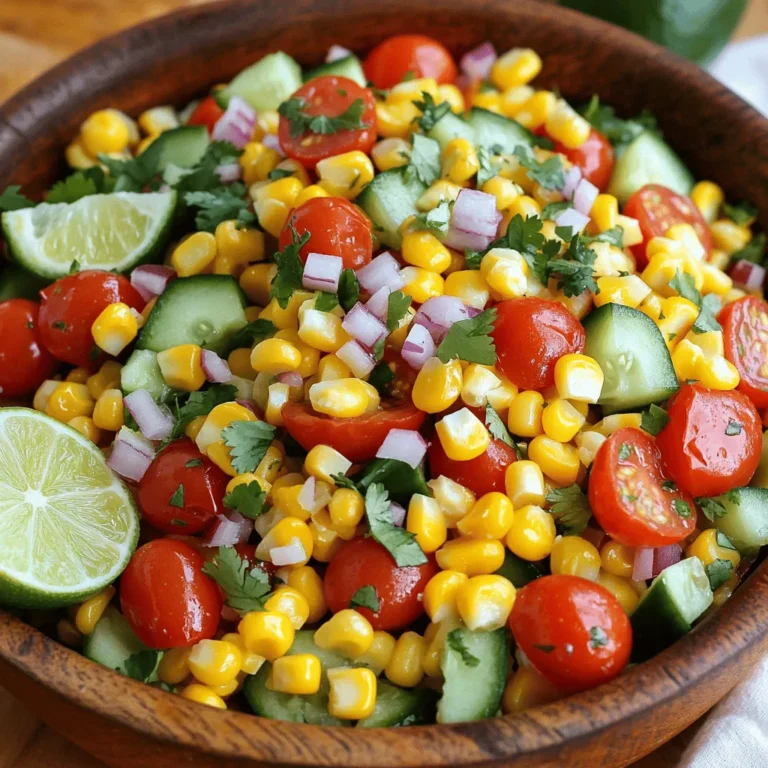
Grilled Corn Salad Fresh and Flavorful Delight
Summer Corn Salad Refreshing and Flavorful Recipe
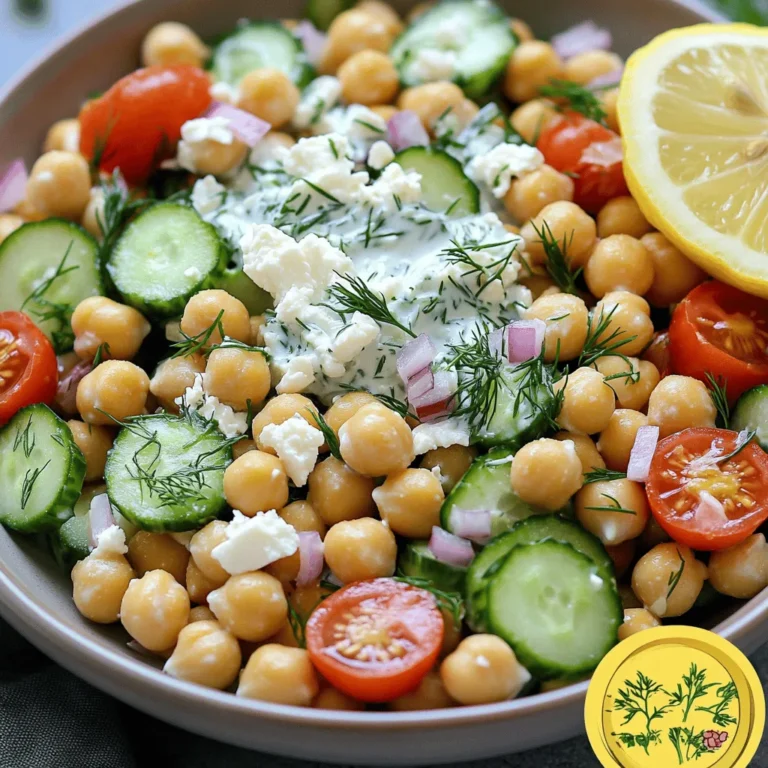
Tzatziki Chickpea Salad Fresh and Flavorful Recipe
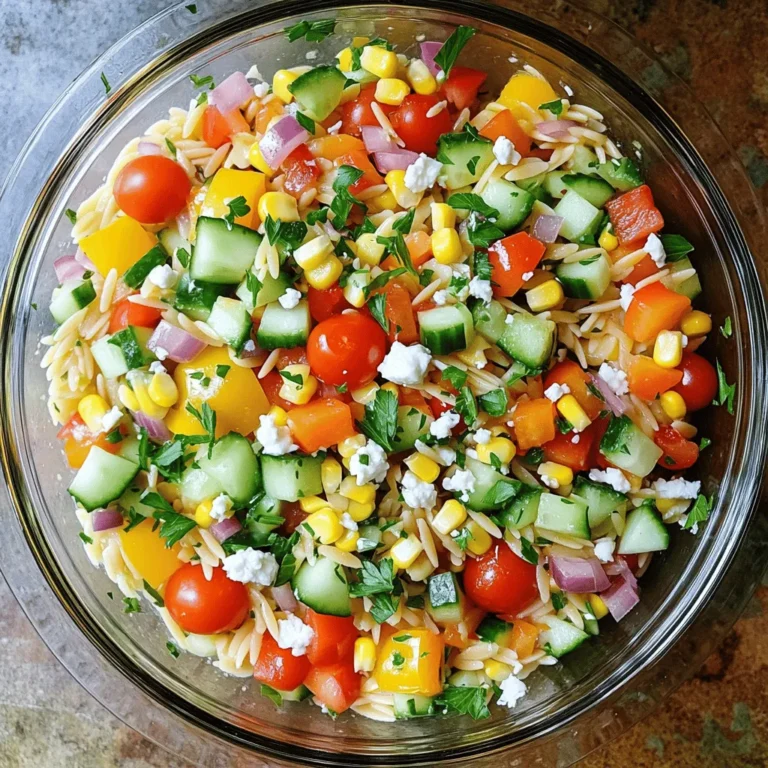
Rainbow Orzo Salad Fresh and Flavorful Dish
Page navigation
Previous Page
Previous
1
…
5
6
7
8
9
…
16
Next Page
Next
Home
Dinner
Appetizer
Desserts
Drinks
About
Contact
Privacy Policy
Toggle Menu Close
Search for:
Search

![- Watermelon: 4 cups of seedless watermelon, cut into bite-sized cubes - Feta Cheese: 1 cup of creamy feta cheese, crumbled into small pieces - Fresh Herbs: 1/2 cup of fresh mint leaves, roughly chopped - Balsamic Glaze: 1/4 cup for drizzle - Olive Oil: 1 tablespoon of extra-virgin olive oil - Lime Juice: Juice of 1 fresh lime - Salt and Pepper: To taste I love using fresh watermelon in this salad. The juicy sweetness of watermelon pairs perfectly with the salty feta cheese. When you bite into the watermelon, it feels like summer. The mint leaves add a nice touch of freshness. For the dressing, balsamic glaze brings a rich flavor. A little olive oil adds smoothness, while lime juice gives it a bright kick. Don’t forget to add salt and pepper to bring out all the flavors. This salad is quick to make and very tasty. You can find the Full Recipe to help you create this fresh and flavorful delight. - Combine Watermelon and Feta In a large mixing bowl, add 4 cups of watermelon cubes and 1 cup of crumbled feta cheese. Mix them gently to keep the texture nice. - Add Mint Leaves and Toss Next, add 1/2 cup of chopped mint leaves. Toss everything lightly. This lets the flavors mix well without breaking the cheese or watermelon. - Whisk Together Balsamic Glaze, Olive Oil, Lime Juice, Salt, and Pepper In a small bowl, whisk together 1/4 cup of balsamic glaze, 1 tablespoon of olive oil, and the juice of 1 lime. Add a pinch of salt and some freshly ground pepper. Mix until it’s smooth and well combined. - Drizzle Dressing Over Salad Pour the dressing over the watermelon and feta mixture. Use a gentle motion to coat everything evenly. - Adjust Seasoning to Taste Taste your salad now. If it needs more flavor, add a bit more salt or pepper. - Transfer to Serving Platter Finally, move the salad to a nice serving platter. Arrange it to make it look pretty. Enjoy the fresh and vibrant colors! For the complete recipe, check out the [Full Recipe]. - Use a shallow bowl for serving. It makes the salad look lovely and inviting. - Garnish with whole mint leaves on top. This adds a nice pop of color. - Consider adding cucumber for crunch. It pairs well with the sweet watermelon. - You can also add red onion for a bit of bite. Adjust the amount based on your taste. - Feel free to tweak the dressing. If you like it sweeter, add more balsamic glaze. If you prefer it tangy, add more lime juice. - This salad goes great with grilled meats. Try it alongside chicken or steak. - It’s also perfect as a side dish for picnics or barbecues. - Serve it as a light lunch. Just add some crusty bread for a complete meal. For the full recipe, check out the [Full Recipe]. {{image_4}} You can change the feta cheese to goat cheese or ricotta. Both options add a creamy taste. Goat cheese gives a tangy flavor that pairs well with watermelon. Ricotta offers a mild and smooth touch. These swaps can keep the salad exciting. You can also switch up the herbs. Try using fresh basil or cilantro instead of mint. Basil brings a sweet and aromatic taste, while cilantro adds a bright and zesty kick. Both options elevate the salad in unique ways. If you want a vegan or dairy-free version, skip the feta cheese. Use avocado instead for creaminess. You can also try dairy-free feta made from nuts. This keeps the salad fresh and vibrant while meeting dietary needs. For gluten-free eaters, this salad is a perfect choice. All the ingredients are naturally gluten-free. You can enjoy this dish without worry while savoring its flavor. You can add seasonal fruits or vegetables for a new twist. In summer, try adding fresh berries for sweetness. In fall, diced apples can add a crisp bite. You can also mix in cucumbers for extra crunch during warm months. Each season brings new flavors to explore in your salad. After making this salad, store it in a tight container. Keep it in the fridge. The salad tastes best fresh. However, it can last for 1 to 2 days. The watermelon stays juicy, and the feta stays creamy. If you notice the mint wilting, use it up quickly. You should not freeze watermelon feta salad. Freezing changes the texture of the watermelon. It becomes mushy when thawed. Feta also does not freeze well. Enjoy this salad fresh for the best taste. You do not need to reheat this salad. If you have leftovers, just refresh it. Add a touch of olive oil and a squeeze of lime juice. This brightens the flavors again. Toss gently to combine. Enjoy the flavors as if it were fresh! You can make the salad ahead of time. However, I suggest you wait to add the dressing until just before serving. This keeps the watermelon fresh and crisp. You can prep the watermelon, feta, and mint a few hours in advance. Just store them in the fridge in separate containers. This way, everything stays fresh and delicious. This salad pairs well with many dishes. Here are some tasty ideas: - Grilled chicken or fish for a light meal. - A fresh baguette or pita bread for a fun crunch. - Quinoa or couscous salad for extra fiber. - A light soup like gazpacho for a refreshing combo. These options add flavor and balance to your meal, making it even more enjoyable. Choosing the right watermelon is key to a great salad. Here are some easy tips: - Look for a watermelon that feels heavy for its size. - Check for a uniform shape; avoid any that are flat or irregular. - Find a creamy yellow spot on the bottom. This means it ripened on the ground. - Tap the watermelon; it should sound hollow. - Lastly, avoid any bruises or soft spots. With these tips, you can find a sweet and juicy watermelon for your salad. For the full recipe, check out the details above. This blog post covered the ingredients and steps for making a delicious watermelon feta salad. You learned about choosing fresh watermelon, the best cheese, and seasoning tips. I shared ideas for easy variations and how to store the salad safely. Remember, this dish pairs well with grilled meats and can be tailored to your taste. So, feel free to experiment with different herbs and dressings. Enjoy this refreshing salad at your next meal!](https://fastmealmate.com/wp-content/uploads/2025/07/95b959a9-55ac-465b-944b-7a71b981c201-768x768.webp)
![- Pasta Types: I recommend using rotini or fusilli pasta. These shapes hold the dressing well. If you prefer, you can swap them for penne or farfalle. Just make sure the pasta cooks until it’s al dente. - Fresh Vegetables: For a great taste and texture, use cherry tomatoes, cucumbers, and bell peppers. These add color and crunch. Red onion gives a nice bite. Fresh corn, either cooked or frozen, adds sweetness. Lastly, diced avocado brings creaminess to the salad. - Dressing Components: The dressing is what makes this salad shine. Use the juice of two fresh limes for tangy flavor. Extra virgin olive oil adds richness. Garlic powder gives depth. Don’t forget salt and freshly ground pepper to taste. These ingredients create that fresh cilantro lime flavor that everyone loves. You can find the complete preparation method in the [Full Recipe]. To start, bring a large pot of salted water to a boil. This step is key for flavor. Add 8 oz of rotini or fusilli pasta. Cook it until it's al dente, which means it should have a slight bite. This usually takes about 8 to 10 minutes. Once cooked, drain the pasta. Rinsing it under cold water stops the cooking. It also helps cool it down quickly. You’ll need a large pot for boiling and a colander for draining. While the pasta cools, get your veggies ready. Chop the cherry tomatoes, cucumber, bell pepper, and red onion. Aim for even pieces to ensure a nice bite. Use a sharp knife for clean cuts. For the avocado, slice it carefully. Cut it in half, remove the pit, and scoop out the flesh with a spoon. Then dice it into small pieces. Handle it gently to avoid mashing. Next, it’s time for the dressing. In a small bowl, combine the juice of 2 limes, 3 tablespoons of olive oil, and 1 teaspoon of garlic powder. Whisk these ingredients together until they blend well. Always taste it! Adjust the seasoning with salt and pepper to suit your preference. Now, let’s mix everything together. In a large bowl, combine the cooled pasta, chopped veggies, and diced avocado. Drizzle the dressing over the top. Toss gently to coat everything. Be careful not to mash the avocado. Finally, fold in ½ cup of chopped cilantro. This adds a fresh flavor. Mix gently, ensuring the avocado stays intact. For the best taste, cover the salad and chill it in the fridge for at least 30 minutes. This allows all the flavors to blend beautifully. For the full recipe, check the instructions at the beginning. Enjoy your bright and zesty Cilantro Lime Pasta Salad! To boost the citrus flavor in your cilantro lime pasta salad, try adding lime zest. This adds a bright, fresh taste. You can also mix in a little orange juice for a sweet twist. For herbs and spices, consider adding fresh parsley or mint. Both pair well with cilantro. A pinch of cumin or chili powder can also give your salad a nice kick. You want your salad to look as good as it tastes. Serve it in a clear bowl to show off the colorful veggies. You can layer the ingredients for a fun effect. For garnishes, fresh cilantro leaves work wonders. Add lime wedges on the side for a pop of color and extra zing. Slices of radish or a sprinkle of feta cheese can also elevate the dish. Chill your salad for at least 30 minutes before serving. This lets the flavors mix well. If you have time, chilling it longer is even better. To enjoy leftovers, keep them in a sealed container. Add a splash of lime juice before eating. This helps keep everything fresh and tasty. {{image_4}} You can change this salad to match your taste. Here are some great protein options: - Chicken - Shrimp - Beans Adding these gives you more protein and flavor. If you want a vegetarian dish, beans are a good choice. They add nutrients and make the salad filling. Need to change the recipe for special diets? No problem! You can use gluten-free pasta instead of regular pasta. There are many kinds available, like rice or chickpea pasta. For a vegan version, simply swap out the dressing. Use a mix of lime juice and avocado oil, or find a vegan dressing at the store. The best ingredients change with the seasons. In summer, use fresh corn and ripe tomatoes. They add sweetness and crunch. In winter, try roasted vegetables like squash or broccoli. They give warmth and heartiness to the dish. Always look for local produce. It tastes better and supports your community! Check your farmer's market for fresh options. For the full recipe, check out the entire section above! To keep your cilantro lime pasta salad fresh, store it in the fridge. Place it in an airtight container; this helps lock in flavors. Use a glass or plastic container with a tight lid. Avoid large bowls, as they can let air in and make the salad dry out. You can freeze pasta salad, but it may change the texture. If you choose to freeze it, use a freezer-safe container. When you want to eat it, move it to the fridge overnight. Let it thaw slowly for best results. Serve it cold once it’s thawed. Leftovers will last up to three days in the fridge. Check for signs of spoilage before eating. If you see any mold or if it smells off, throw it away. Always trust your senses. Keeping track of freshness helps you enjoy your salad at its best! For the full recipe, check the section above. To keep avocado fresh, use lime juice. The acid slows the browning. You can also cover the avocado tightly with plastic wrap. This limits air exposure. If you mix the avocado in last, it stays bright green longer. Yes, you can prepare this pasta salad a few hours in advance. Just store it in the fridge. For the best taste, mix in the avocado right before serving. This helps keep it fresh. If you dislike cilantro, try parsley or basil instead. Both herbs add a fresh taste. You can also use mint for a unique twist. Mix in different herbs to find your favorite flavor. To make this pasta salad gluten-free, use gluten-free pasta. Many brands offer great options like rice or quinoa pasta. Check the box for cooking times. The rest of the ingredients are naturally gluten-free. Serve the pasta salad in a large, colorful bowl. Add lime wedges and extra cilantro on top for decoration. This makes it more inviting. For a buffet, set it out with serving spoons. This allows guests to help themselves easily. This blog post covered key ingredients, cooking steps, and helpful tips for making a delicious pasta salad. Remember to choose the right pasta and fresh vegetables for a tasty mix. The dressing adds incredible flavor, so don't skip it. Storing leftovers properly keeps your salad fresh for later. Try different variations to suit your taste. My final thought? Pasta salad is versatile and fun. Enjoy making it your own, and share it with others!](https://fastmealmate.com/wp-content/uploads/2025/07/1fb0967e-6542-4160-ae3e-9e2a11b1d0c7-768x768.webp)
 to explore more about making this dish. For dressings, try balsamic vinaigrette or yogurt-based dressings. Pair this salad with grilled chicken or fish for a complete meal. Cucumber salads are easy to make and fun to enjoy. We covered the key ingredients, preparation steps, and tips to make your salad shine. From classic recipes to global twists, there are many ways to enjoy cucumbers. They offer great health benefits, too, and fit into various diets. Remember to choose fresh cucumbers for the best taste. With helpful serving ideas, you can impress at any meal. Explore, experiment, and taste, and soon you'll make a salad everyone loves.](https://fastmealmate.com/wp-content/uploads/2025/07/f486dd4d-c258-4f41-b39b-ef28058aa0c9-768x768.webp)

![- 4 cups of juicy watermelon (cut into cubes) - 2 cups of crisp cucumber (diced) - 1 cup of creamy feta cheese (crumbled) - 1/4 cup of fresh mint leaves (finely chopped) - 2 tablespoons of high-quality olive oil - 1 tablespoon of balsamic reduction (optional) - Sea salt to taste - Freshly cracked black pepper to taste - Juice from one fresh lemon The ingredients for this salad create a refreshing blend. The watermelon brings sweetness, while the cucumber adds crunch. Feta cheese gives a creamy touch, making the dish rich and satisfying. Fresh mint adds a burst of flavor that brightens every bite. Using high-quality olive oil enhances the taste, while balsamic reduction adds a sweet twist. You can adjust salt and pepper to fit your taste. The lemon juice lifts the flavors, making everything pop. This salad is perfect for hot days. It’s simple to make and looks great on any table. Plus, it’s a great way to enjoy fresh, seasonal produce. For the full recipe, check out the detailed steps later in this article. To cube watermelon, start with a big, ripe piece. Cut off both ends to make it stable. Stand it up, then slice down the sides to remove the skin. Now, cut the flesh into thick slabs. After that, slice the slabs into cubes. Aim for bite-sized pieces so they are easy to eat. For the cucumber, wash it well. Cut off the ends, then slice it in half lengthwise. Use a spoon to scrape out the seeds if you want a less watery salad. Next, chop it into small, even pieces. This helps the cucumber mix well with other ingredients. When it comes to crumbling feta cheese, first take it out of its packaging. Use your hands or a fork to break it into small pieces. Try to keep the crumbles big enough to stay distinct in the salad. This way, you get that lovely creamy bite. In a large bowl, start by adding the cubed watermelon and diced cucumber. Gently mix them together, ensuring they are evenly combined. Next, sprinkle the crumbled feta cheese over the top. This will add a creamy texture and a salty kick. Add the finely chopped mint leaves next. This herb brightens the salad with its fresh flavor. Now, drizzle the olive oil and squeeze the fresh lemon juice over the salad. This will give it a bright, zesty taste. Using a large spoon, carefully toss the salad. Do this gently to keep the feta from mashing. You want to mix the flavors without losing the feta's shape. Now it's time to season the salad. Add sea salt and freshly cracked black pepper to taste. Start with a little, then adjust as needed. The salt will help enhance all the flavors. Let the salad rest for about 10 minutes before serving. This step is key. It allows the flavors to meld together. The watermelon will release some juice, creating a light dressing. For the complete recipe, check the [Full Recipe]. To create the best flavor in your salad, balance sweetness and acidity. Watermelon is sweet, so you need acidity to cut through that. Fresh lemon juice adds bright notes. You can also try balsamic reduction for a sweet twist. Adjust seasonings to your taste. Add sea salt and black pepper slowly. Taste as you go. This way, the salad fits your personal preference. Presentation matters when serving this salad. For a colorful display, choose a large bowl. Layer the watermelon, cucumber, and feta beautifully. You can also arrange the watermelon cubes in a fun pattern. Lastly, garnish with extra mint leaves. This adds a pop of green and a fresh smell. Having the right tools makes preparation easy. A sharp chef's knife is key for cutting watermelon and cucumber. Use a sturdy mixing bowl to combine all ingredients gently. These tools ensure you maintain the salad's texture and create a lovely dish. For the best results, make sure your tools are clean and ready to go. For a complete guide, check the Full Recipe. {{image_4}} You can swap feta cheese for a vegan option like tofu or almond cheese. These substitutes provide a similar creamy texture. If you want to add more flavor, try using a vegan feta made from cashews. For fruits or vegetables, consider adding berries, mango, or radishes. These additions add color and a unique taste to your salad. Watermelon pairs well with many fruits, so feel free to get creative! Different dressings can enhance your salad. A simple lemon vinaigrette works great. Mix olive oil, lemon juice, salt, and pepper for a fresh taste. You can also make your own balsamic reduction at home. Just simmer balsamic vinegar on low heat until it thickens. This sweet and tangy sauce pairs well with the salad, adding depth to the flavors. Changing the salad with the seasons can keep it fresh. In summer, add fresh basil or strawberries for a sweet twist. In fall, try diced apples or pears for a crunchy bite. For winter, include pomegranate seeds or citrus fruits. These ingredients add a pop of color and flavor to your dish. Always look for seasonal produce to keep your salad exciting and vibrant! To keep your leftover salad fresh, place it in an airtight container. This helps prevent moisture loss and keeps flavors strong. You can use glass or plastic containers. Glass is great for easy cleaning and doesn’t absorb odors. If you want to keep it extra fresh, add a layer of plastic wrap on top before sealing. You can freeze Watermelon Cucumber Feta Salad, but it’s not ideal. Freezing can change the texture of watermelon and cucumber. If you choose to freeze, prepare it without the feta and dressing. Store the fruit and cucumber in a freezer-safe bag. When you're ready to eat, thaw it in the fridge overnight. Add feta and dressing just before serving. In the fridge, this salad lasts about 2 to 3 days. After that, it may start to lose its crispness. Look for signs of spoilage, like a mushy texture or off smell. If the feta starts to look slimy, it’s time to toss it. Always trust your senses when deciding if food is still good to eat. To make this salad heartier, add protein or grains. You can include: - Grilled chicken breast, sliced thin - Cooked quinoa for a nutty flavor - Chickpeas for a plant-based option - Shrimp for a light seafood touch These ingredients mix well with the fresh flavors and keep your salad satisfying. Yes, you can prep ingredients ahead. To keep the salad fresh: - Chop watermelon and cucumber a few hours before serving. - Store the feta separately to avoid sogginess. - Mix everything together just before serving. This way, you enjoy that crisp texture and vibrant taste. Watermelon is hydrating and low in calories. It has vitamins A and C, which support your skin and immune system. Cucumber is also hydrating and offers fiber, which is good for digestion. This salad fits into a healthy diet by providing essential nutrients with low calories. Yes, this salad is gluten-free. All the ingredients, including watermelon, cucumber, and feta, do not contain gluten. For extra options: - Serve it with gluten-free crackers. - Pair it with gluten-free bread for a light meal. Feel free to enjoy this salad without worries about gluten! The Watermelon Cucumber Feta Salad is a refreshingly light dish. You learned about its main ingredients, step-by-step preparation, and unique variations. Remember to balance flavors and let it rest before serving. With tips for storage and healthy options, you can enjoy this salad any time. This recipe is simple, delicious, and perfect for warm days. Now, you have the tools to create a great salad that impresses everyone. Enjoy making it your own!](https://fastmealmate.com/wp-content/uploads/2025/07/b20d6dc1-e7c2-400f-acd5-da5290acfeaa-768x768.webp)