Skip to content
About
Contact
Cookie Policy
Copyright Policy
Disclaimer
Search
Home
Dinner
Appetizer
Desserts
Drinks
About
Contact
Privacy Policy
Toggle Menu
Home
/
Appetizer
- Page 6
Appetizer
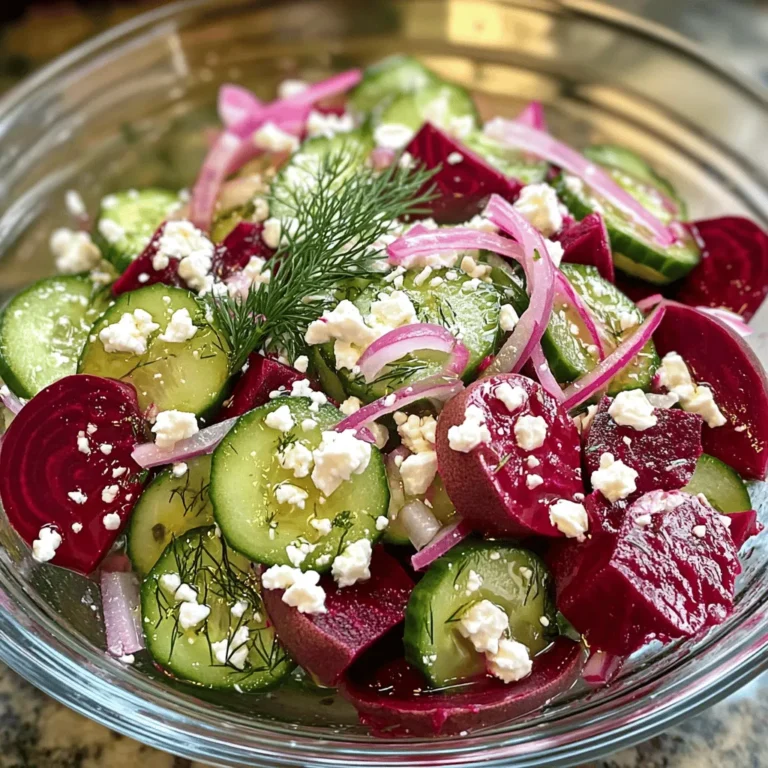
Beet and Feta Cucumber Salad Fresh and Tasty Treat
Summer Spinach and Fruit Salad Fresh and Tasty Dish
Spring Fresh Salad Bowl Vibrant and Nutritious Meal
Blueberry Peach Feta Salad Fresh and Flavorful Dish
Chili Lime Shrimp Zesty and Flavorful Delight
Tomato and Herby Bean Salad Fresh and Flavorful Dish
Summer Peach Watermelon Salad Fresh and Flavorful Treat
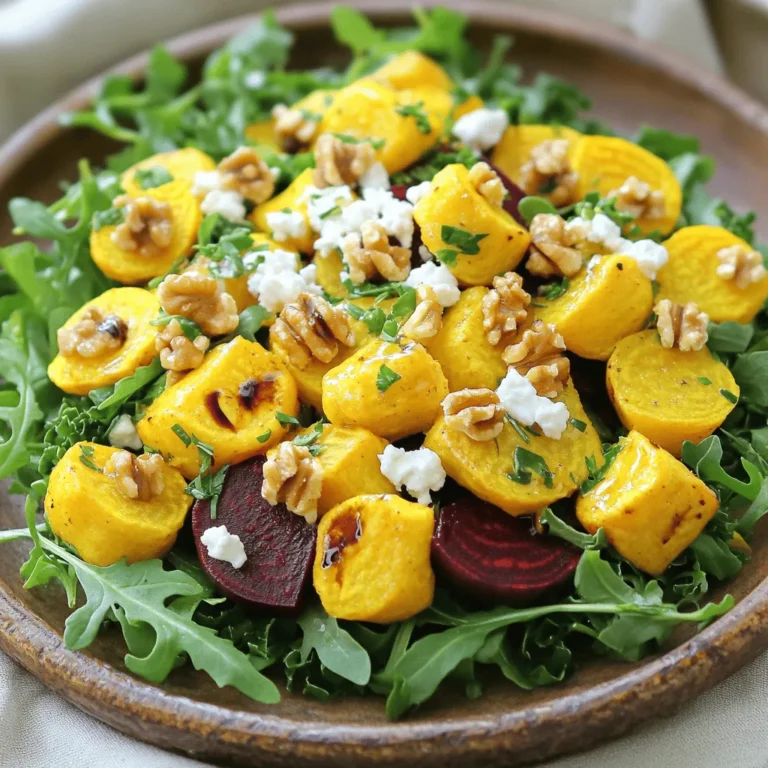
Golden Beet Salad with Walnuts and Goat Cheese Delight
Garden Fresh Summer Salad Flavorful and Easy Recipe
Fresh Peach Bruschetta Flavorful Summer Delight
Page navigation
Previous Page
Previous
1
…
4
5
6
7
8
…
16
Next Page
Next
Home
Dinner
Appetizer
Desserts
Drinks
About
Contact
Privacy Policy
Toggle Menu Close
Search for:
Search

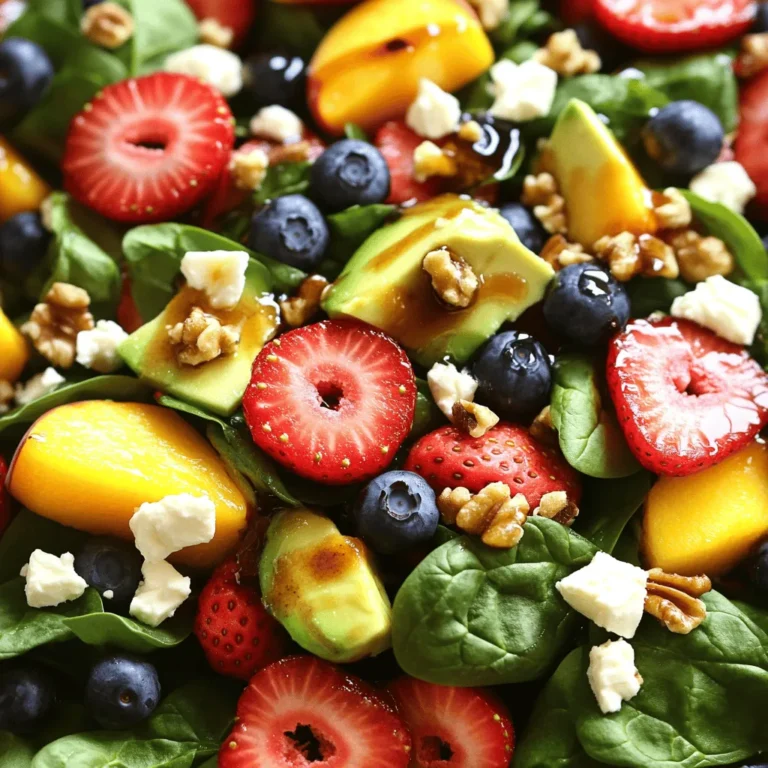
![- 2 ripe peaches, sliced into wedges - 1 cup fresh blueberries, rinsed and drained - 4 cups mixed salad greens (arugula, spinach, and romaine) - 1/4 cup red onion, thinly sliced - 1/2 cup feta cheese, crumbled - 1/4 cup nuts (chopped pecans or walnuts) - 2 tablespoons honey - 2 tablespoons balsamic vinegar - 2 tablespoons extra-virgin olive oil - Salt and pepper to taste To make the Blueberry Peach Feta Salad, gather fresh produce first. Ripe peaches add sweetness. Fresh blueberries bring a burst of flavor. Mixed salad greens offer crunch and color. Thinly sliced red onion adds a mild bite. Next, you need dairy and nuts. Crumbled feta cheese gives a creamy texture. Choose chopped pecans or walnuts for a nutty crunch. Then, prepare the dressing ingredients. Honey provides natural sweetness. Balsamic vinegar adds a tangy touch. Extra-virgin olive oil brings richness. Don’t forget salt and pepper to enhance all flavors. Check the [Full Recipe] for more details! - Gently combine 2 ripe peaches, sliced into wedges, 1 cup fresh blueberries, and 1/4 cup red onion, thinly sliced, in a large bowl. This mix brings out sweet and savory notes. - Layer 4 cups of mixed salad greens on top, using a blend of arugula, spinach, and romaine. Be careful not to bruise the leaves. - Sprinkle 1/2 cup crumbled feta cheese and 1/4 cup chopped nuts, like pecans or walnuts, over the greens. This adds creaminess and crunch. - Drizzle the prepared dressing evenly over everything. This will tie all the flavors together. - Toss the salad gently to coat the ingredients. The goal is to mix without making it soggy. - Taste the salad and adjust the seasoning with salt and pepper as necessary. This step ensures the flavors pop. For more detailed instructions, check out the Full Recipe. Using local honey boosts the flavor of your dressing. It adds a rich sweetness that makes each bite delightful. Look for honey from nearby farms for the best taste. You also want to choose ripe peaches. They should feel soft but not mushy. Ripe peaches bring a natural sweetness that shines in your salad. When you bite into them, they should almost melt in your mouth. For a beautiful look, add extra fruit on top. A few blueberries or peach slices create a colorful display. You can also serve the salad in individual bowls. This adds an elegant touch and makes it easy for guests to enjoy. Each bowl can be topped with a little extra feta for a nice finish. You can adjust the sweetness or tang of your dressing. Changing the honey and vinegar ratios helps. If you want it sweeter, add more honey. If you prefer a tangy flavor, increase the balsamic vinegar. Adding fresh herbs like basil or mint can also enhance the taste. They add a burst of freshness that pairs well with the fruit. {{image_4}} You can swap peaches for other fruits. Try using strawberries or mango for a new twist. These fruits add sweetness and vibrant color. Seasonal fruits can also work well. Think of ripe cherries in summer or pears in fall. Each fruit brings its own flavor and texture. This keeps your salad fresh and exciting. Want to make this salad a meal? Add grilled chicken or shrimp. They pair well with the sweet fruit and tangy feta. For a vegetarian option, chickpeas are a great choice. They add protein and fiber, making the salad filling. This way, you can enjoy it for lunch or dinner. Experimenting with dressings can change the whole dish. Try different vinegars like apple cider or red wine vinegar. Each one gives a unique flavor. You can also create a creamy dressing using yogurt or buttermilk. This adds richness and pairs nicely with the salad's freshness. For the full recipe, you can check the link provided. To keep your Blueberry Peach Feta Salad fresh, store the components separately. This helps maintain their texture and flavor. Keep the greens in a dry, airtight container. Place the fruit in another container to avoid sogginess. Store the dressing in a small jar or bowl with a lid. This keeps it fresh and prevents it from mixing with the salad too soon. When stored properly, the salad can last about 2-3 days. The mixed greens will stay crisp for about a day, while the fruit will start to soften after that. Check for any signs of spoilage, like off smells or discoloration. If the salad looks unappealing or smells strange, it's best to toss it. If you have leftovers, try using them in other dishes. Add the salad greens to a sandwich or wrap for extra crunch. You can stir the fruit into yogurt or oatmeal for a tasty breakfast. Use leftover feta in an omelet or sprinkle it on pasta. By reusing ingredients, you reduce waste and enjoy new meals! For the full recipe of this delicious salad, check out the Blueberry Peach Feta Salad recipe above! Blueberry Peach Feta Salad stays fresh for about two days in the fridge. To keep it tasty, store the salad without the dressing. This way, the greens stay crisp. Place the salad in an airtight container to avoid moisture. Add the dressing just before serving. This helps maintain the salad's texture and flavor. Yes, you can make the salad in advance. For best results, prep the ingredients a day ahead. Slice the peaches and onions, and wash the blueberries. Keep them in separate containers in the fridge. Mix the salad right before serving. This keeps everything fresh and crunchy. If you want to change things up, try these substitutions: - Use goat cheese instead of feta for a creamier taste. - Swap out the peaches for nectarines or mangoes if you prefer. - For a nut-free version, skip the nuts or use seeds. - Choose dairy-free cheese for a plant-based option. You can enhance this salad's flavor easily. Here are some ideas: - Add fresh herbs like basil or mint for a burst of freshness. - Sprinkle in a pinch of chili flakes for a light kick. - Use a splash of lemon juice for extra brightness. - Experiment with different oils, like sesame or avocado, for unique taste. This blog post covered a flavorful Blueberry Peach Feta Salad. You learned about fresh ingredients, step-by-step assembly, and tips to perfect your dish. Remember to adjust the dressing to suit your taste. Experiment with fruits and proteins for variety. Store leftovers properly to keep them fresh. Enjoy making this salad your own and impress your friends. Simple changes can elevate your meals. Healthy eating can be fun and delicious!](https://fastmealmate.com/wp-content/uploads/2025/07/bb9b81a5-7ffe-4e71-9206-cbaa633d04dc-768x768.webp)


. - Cut watermelon into small cubes. - Slice peaches into delicate wedges. First, I start with the watermelon. I cut it into small cubes. This shape makes it easy to scoop. Next, I slice the peaches into delicate wedges. Their sweet juices will add a nice touch to the salad. - Combine watermelon and peach slices in a large bowl. - Fold in feta cheese and basil leaves. In a large bowl, I combine the watermelon and peach slices. Their colors make a beautiful mix. Then, I gently fold in crumbled feta cheese and torn basil leaves. This step helps blend the flavors well without breaking the fruit. - Whisk together honey, lime juice, salt, and pepper. In a small bowl, I whisk honey and lime juice. I add a pinch of salt and a few cracks of pepper. This dressing brings sweet and tangy flavors together. - Drizzle dressing over salad and gently toss. - Sprinkle chopped pistachios on top just before serving. I drizzle the honey-lime dressing over the salad. Then, I gently toss everything together. This ensures each piece of fruit gets coated. If I want extra crunch, I sprinkle chopped pistachios on top just before serving. Enjoy right away for the best taste or chill for a bit first. For the full recipe, check out the details above! To make the best Summer Peach Watermelon Salad, start with ripe fruits. Look for peaches that are soft to touch but not mushy. They should smell sweet and fragrant. For watermelon, choose a heavy one with a uniform color. A yellow spot on the bottom shows ripeness. Freshness matters a lot for flavor. The riper your fruits are, the sweeter and juicier your salad will taste. When serving this salad, choose a large, colorful bowl. A bright bowl adds to the salad's appeal. You can also use clear glass bowls for individual servings. This way, everyone can see the vibrant colors. Consider garnishing with more basil leaves on top for a fresh look. This salad pairs well with grilled meats, like chicken or shrimp. You can also serve it alongside other dishes for a complete meal. To elevate your Summer Peach Watermelon Salad, think about adding fresh herbs. Mint or cilantro can add a new twist. You could also sprinkle some chili flakes for a kick. For dressings, try mixing olive oil with balsamic vinegar. This adds a rich layer of flavor. A simple honey-lemon dressing is also a great choice. These enhancements will make your salad even more delicious. You can find the Full Recipe to explore more ideas. {{image_4}} You can change up this salad easily. Swap feta cheese for goat cheese or mozzarella. Both add a creamy touch. If you want some crunch, add nuts or seeds. Try walnuts, almonds, or sunflower seeds for a nice bite. Summer brings many fruits. You can add strawberries or blueberries for a twist. These fruits pair well with peaches and watermelon. If you want a fall twist, use apples and nuts. This keeps the salad fun and fresh all year round. This salad is gluten-free, making it safe for those with gluten issues. If you want a vegan version, skip the cheese and honey. Use agave syrup instead of honey for sweetness. This way, everyone can enjoy this tasty dish! To keep your Summer Peach Watermelon Salad fresh, store it properly. First, place any leftover salad in an airtight container. This helps prevent air from wilting the greens and fruits. It’s best to store the dressing separately. This way, the salad maintains its crispness and flavor. For containers, use glass or BPA-free plastic. Glass containers work well as they do not absorb odors. If you use plastic, ensure it is food-grade. This keeps your salad safe and fresh for longer. You can keep the salad in the refrigerator for about 2 days. After that, the fruits may start to break down. Signs of spoilage include a mushy texture or off smell. If the salad looks slimy, it’s best to toss it. Always trust your senses when it comes to food safety. Yes, you can prepare this salad ahead of time. To keep it fresh, follow these tips: - Cut fruits just before serving: Watermelon and peaches taste best when fresh. - Keep dressing separate: Mix honey and lime juice just before serving. - Store in an airtight container: This helps prevent browning and keeps the salad crisp. You can add many fruits to enhance the taste. Here are some great options: - Strawberries: Their sweet and tart flavor pairs well with peaches. - Blueberries: These tiny gems add a pop of color and sweetness. - Mango: Its juicy texture complements the watermelon nicely. You can easily tweak the sweetness to fit your taste. Here are some ideas: - Add more honey: If you like it sweeter, drizzle in more honey. - Use less honey: For a lighter taste, use less honey while mixing. - Add lime juice: This adds a tangy flavor that balances sweetness. This blog post covers how to make a refreshing summer salad with watermelon and peaches. You learned about the best fresh ingredients, how to prepare the fruits, mix the salad, and create a light dressing. I shared tips for choosing top-quality fruits and offered variations to suit your taste. Remember, freshness is key for flavor. This salad is perfect for warm days and pairs well with grilled dishes. Enjoy this delightful recipe and make it your own with unique twists! Your summer meals will shine with this colorful dish.](https://fastmealmate.com/wp-content/uploads/2025/07/6d26c9a9-fbdd-445d-815a-0962cba54d08-768x768.webp)
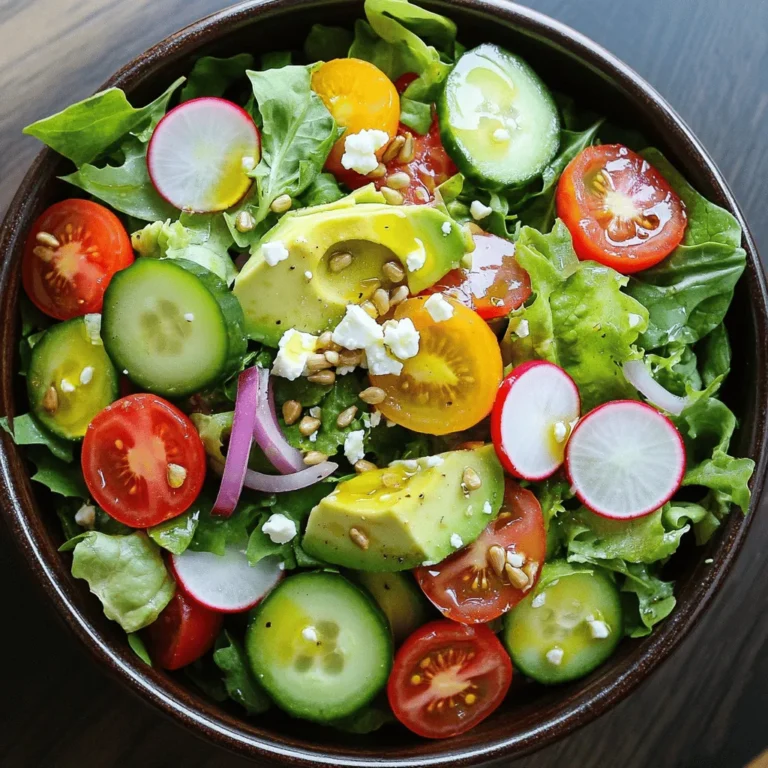
. To make your salad shine, use bright bowls. Serve it in individual portions for a fancy touch. Add a sprinkle of extra feta on top. A few fresh basil leaves also make a great garnish. For a special look, drizzle balsamic reduction over each serving. This adds both flavor and visual appeal. You can boost the flavor in many ways. Try adding nuts like walnuts or almonds for crunch. You might also include fruits, such as sliced strawberries or juicy peaches. Fresh herbs like cilantro or mint can add a new twist. For a bit of spice, sprinkle in some red pepper flakes. Just remember, balance is key! One common mistake is over-dressing the salad. Too much dressing can drown the fresh flavors. Start with a little, and add more if needed. Another mistake is cutting veggies too small. Larger pieces keep the crunch and texture. Finally, don’t forget to taste before serving. Adjust seasoning to suit your taste buds. {{image_4}} You can easily adjust this salad for special diets. For a vegan version, skip the feta cheese. Instead, use tofu or nuts for a protein boost. If you want a gluten-free option, all ingredients are already safe. Just be sure to check any packaged items for hidden gluten. You can swap ingredients based on the season. In summer, use ripe peaches instead of tomatoes. In fall, try roasted squash in place of corn. These swaps keep the salad fresh and exciting all year. Feel free to mix and match what’s in your garden or local market. Want to make your salad more fun? Add sliced radishes for a peppery crunch. Nuts like almonds or walnuts add a great texture. You could also toss in herbs like dill or cilantro for a different flavor. Don't shy away from experimenting. Each add-on can change the taste and feel of your dish. Check out the Full Recipe for more ideas and inspiration! To keep your garden fresh summer salad tasty, store it right. Use an airtight container. This helps avoid moisture loss. You can keep it in the fridge for up to three days. If you plan to enjoy it later, store the dressing separately. This keeps the greens crisp and fresh. Wash your vegetables before storage. After washing, dry them well to avoid sogginess. You can wrap herbs like basil in a damp paper towel. This helps keep them fresh for longer. For tomatoes, store them at room temperature. This keeps their taste and texture just right. This salad is best enjoyed cold. If you want to warm it up, just use a quick microwave blast. Heat for only a few seconds to avoid mushy greens. When serving, toss the salad gently to mix the flavors. You can add more feta or basil for a fresh touch. For the full recipe, check out the detailed steps above. The best summer vegetables for salad include tomatoes, cucumbers, and bell peppers. You can also use zucchini, radishes, and corn. They add color and crunch. Fresh herbs like basil and cilantro enhance the flavor. Choose veggies that are in season for the best taste. Yes, you can make this salad ahead of time. Prepare the salad without the dressing. Store it in the fridge for up to a day. When you are ready to eat, add the dressing. This keeps the salad fresh and crisp. A light vinaigrette works well with summer salad. You can use olive oil and balsamic vinegar. Lemon juice also adds a nice touch. For a creamier option, try a yogurt-based dressing. These dressings bring out the flavors of the fresh vegetables. For the full recipe, check out the Garden Fresh Summer Salad Delight. In this blog post, we explored how to make a fresh summer salad. We started with the best ingredients and optional add-ins. Then, we covered easy steps to prepare the base and mix in tasty veggies. I shared tips for great presentation and flavor boosts. We also discussed how to adapt this salad for diets and seasons. Lastly, we highlighted storage tips to keep everything fresh. Enjoy experimenting with your salad to make it your own. You have all the tools for success!](https://fastmealmate.com/wp-content/uploads/2025/07/1438f769-be73-4858-be33-2952a8dc2b24-768x768.webp)