Skip to content
About
Contact
Cookie Policy
Copyright Policy
Disclaimer
Search
Home
Dinner
Appetizer
Desserts
Drinks
About
Contact
Privacy Policy
Toggle Menu
Home
/
Appetizer
- Page 4
Appetizer
Cheesy Parmesan Chicken Bombs Irresistible Flavor Hit
Chickpea Feta Avocado Salad Fresh and Flavorful Meal
Greek Chickpea Cucumber Feta Salad Fresh and Tasty
Garlic Butter Bread Rolls Simple and Flavorful Treat
Mustard Hasselback Kielbasa Bites Quick and Tasty Snack
Pickle Juice Hot Honey Wings Savory and Flavorful Dish
Caramel Apple Pie Butter Board Irresistible Delight
Pickle Juice Hot Honey Wings Irresistible Recipe
Zucchini Pizza Boats Tasty and Easy Family Meal
Peach Caprese Skewers Fresh and Flavorful Appetizer
Page navigation
Previous Page
Previous
1
2
3
4
5
6
…
16
Next Page
Next
Home
Dinner
Appetizer
Desserts
Drinks
About
Contact
Privacy Policy
Toggle Menu Close
Search for:
Search


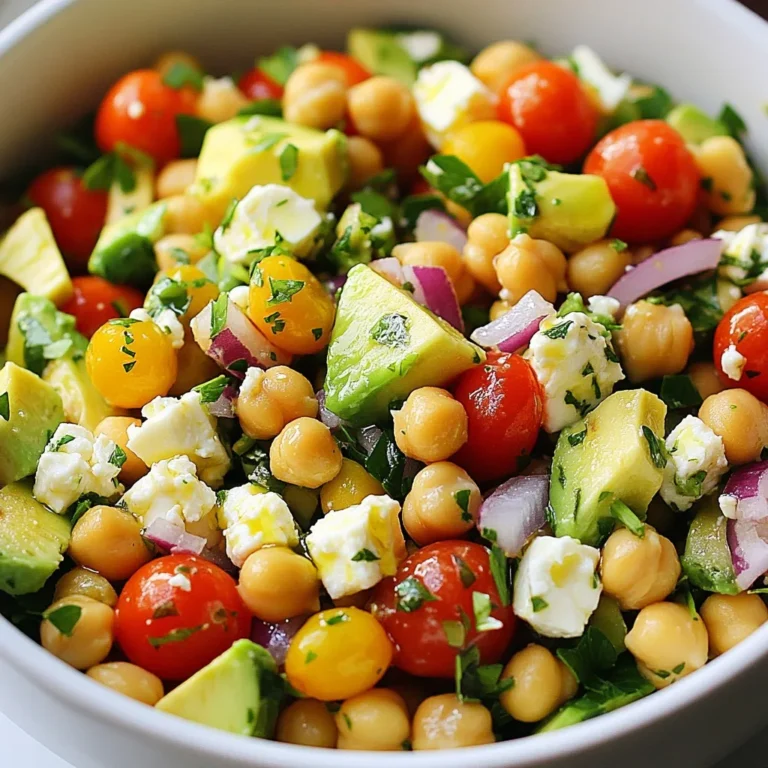
![To make Greek Chickpea Cucumber Feta Salad, you will need: - 1 can (15 oz) chickpeas, thoroughly drained and rinsed - 1 medium cucumber, diced into bite-sized pieces - 1 cup cherry tomatoes, halved - 1/2 medium red onion, finely chopped - 1 cup feta cheese, crumbled - 1/4 cup Kalamata olives, pitted and halved - 1/4 cup fresh parsley, finely chopped - 3 tablespoons extra virgin olive oil - 2 tablespoons red wine vinegar (or substitute with apple cider vinegar) - 1 teaspoon dried oregano - Salt and freshly ground black pepper to taste You can swap out some ingredients based on what you have. No feta cheese? Use goat cheese or a dairy-free option. If you don’t like Kalamata olives, green olives work well too. For a crunchier salad, add bell peppers or radishes. You can also mix in some avocados for a creamy twist. Don't have red wine vinegar? Use lemon juice or apple cider vinegar instead. Fresh ingredients make this salad shine. When you use ripe tomatoes and crisp cucumbers, you enhance the flavor and texture. Fresh herbs like parsley brighten the dish. They add a pop of color and a burst of flavor. The quality of your olive oil matters too. A good extra virgin olive oil brings depth to the dressing. Using fresh produce not only boosts taste but also adds vital nutrients. Enjoying this salad means savoring the vibrant flavors of the Mediterranean. Start by gathering all your ingredients. You will need: - 1 can (15 oz) chickpeas, thoroughly drained and rinsed - 1 medium cucumber, diced into bite-sized pieces - 1 cup cherry tomatoes, halved - 1/2 medium red onion, finely chopped - 1 cup feta cheese, crumbled - 1/4 cup Kalamata olives, pitted and halved - 1/4 cup fresh parsley, finely chopped In a large mixing bowl, add the chickpeas, cucumber, cherry tomatoes, and red onion. Stir gently to mix everything well. Next, it’s time to add flavor and texture. Carefully fold in the crumbled feta cheese, Kalamata olives, and fresh parsley. Use a gentle hand to keep the feta intact. This adds creaminess to the salad. Now, let’s whip up the dressing. In a small bowl, combine: - 3 tablespoons extra virgin olive oil - 2 tablespoons red wine vinegar (or apple cider vinegar) - 1 teaspoon dried oregano - Salt and freshly ground black pepper to taste Whisk these ingredients together until the mixture is smooth and well blended. The dressing will enhance the salad's taste. Drizzle the dressing over the salad mixture in the large bowl. Using a gentle folding motion, toss everything together. You want all the ingredients to be nicely coated. Let the salad sit at room temperature for 10-15 minutes. This resting time allows the flavors to meld beautifully. For the full recipe, check the Mediterranean Chickpea Cucumber Feta Delight. To keep your Greek Chickpea Cucumber Feta Salad fresh, choose the best ingredients. Use ripe cherry tomatoes and crisp cucumbers. Look for bright green, firm cucumbers. Always rinse canned chickpeas well to remove any canning liquid. This step helps reduce sodium and enhances flavor. Store leftover salad in an airtight container in the fridge. This will help maintain its freshness for up to 2 days. Serve your salad at room temperature for the best taste. This allows the flavors to shine. If you store it in the fridge, take it out about 20 minutes before serving. Letting it warm slightly helps enhance the taste and makes for a more enjoyable meal. To boost the flavor of your salad, try adding fresh herbs. Basil or mint can add a nice twist. A squeeze of fresh lemon juice can brighten the dish even more. For a spicy kick, add a pinch of red pepper flakes. Mixing in different olives can also create a unique taste. If you want to change the dressing, add a touch of honey or Dijon mustard for extra depth. These small changes can make your salad even more exciting. For the full recipe, check out the Mediterranean Chickpea Cucumber Feta Delight. {{image_4}} You can easily boost the protein in your Greek chickpea cucumber feta salad. Grilled chicken, shrimp, or even tofu work well. Just cut them into bite-sized pieces. Mix them in with the chickpeas. This adds flavor and makes the salad more filling. If you want a vegan version, swap the feta cheese for avocado or a plant-based cheese. Avocado gives a creamy texture and healthy fats. You can also add hemp seeds for more protein. This keeps the salad fresh and tasty without any animal products. Feel free to change up the ingredients based on the season. In spring, add fresh radishes for a crunchy bite. In summer, diced bell peppers add sweetness. In fall, try roasted butternut squash for warmth. Each swap keeps your salad exciting and full of flavor. Explore the [Full Recipe] for more ideas on how to make this dish your own! To keep your Greek chickpea cucumber feta salad fresh, store it in an airtight container. This will help keep the flavors strong and the ingredients crisp. If you have leftovers, it’s best to separate the dressing from the salad. This way, the salad won’t get soggy. Just toss the dressing in when you’re ready to enjoy it again. When stored properly, the salad lasts about 3 to 5 days in the fridge. The chickpeas and feta cheese hold up well. However, the cucumber and tomatoes start to lose their crunch after a couple of days. Make sure to check for any signs of spoilage, like a funky smell or slimy texture. I do not recommend freezing this salad. The textures change, and the fresh ingredients do not thaw well. If you want to prep ahead, consider freezing the chickpeas separately. They can last up to 3 months in the freezer. Just thaw them in the fridge overnight before mixing them back into your salad. For the best taste, always enjoy your salad fresh! For the full recipe, refer back to the Mediterranean Chickpea Cucumber Feta Delight. Yes, you can make this salad the night before. Just keep it in the fridge. The flavors will blend well overnight. However, the salad may lose some crunch. To keep it fresh, add the cucumber and feta just before serving. If you don’t have feta, try using goat cheese or ricotta. Both options bring a creamy taste. You can also use a dairy-free cheese for a vegan twist. Just choose a cheese that crumbles well to mimic feta. To spice up your salad, add chopped jalapeños or red pepper flakes. You can also mix in a spicy dressing. Try adding a dash of hot sauce to the olive oil and vinegar mix. This will give your salad a nice kick. Yes, this salad is gluten-free! All the ingredients are naturally free of gluten. Chickpeas, cucumber, tomatoes, and feta are all safe for a gluten-free diet. It's a great choice for those with gluten sensitivity. Enjoy this fresh and tasty salad without worry. In this blog post, I covered the core ingredients and their importance. We explored how to prepare, mix, and dress the salad. I also shared tips for freshness and serving. You learned about different variations to suit your taste and how to store your salad properly. Eating fresh, tasty food is fun and easy. Enjoy your Greek Chickpea Cucumber Feta Salad, and don’t be afraid to experiment with new flavors!](https://fastmealmate.com/wp-content/uploads/2025/07/24431354-d8c0-436c-9845-ce85b88e9160-768x768.webp)


. Prepare to impress your friends and family! - In a medium saucepan, combine diced Granny Smith apples, brown sugar, ground cinnamon, ground nutmeg, and fresh lemon juice. - Cook over medium heat for 5-7 minutes. Stir occasionally until the apples are tender and caramelized. Cooking the apples is key. The sugar helps them become sweet, while the spices add warmth. The lemon juice brightens the flavor, making it pop. You want the apples to be soft but not mushy. The perfect mix will smell heavenly! - Take a large serving board and spread softened butter evenly across the surface. - Carefully layer the warm caramelized apples over the butter. The butter acts as a rich base. It helps the apples stick and adds creaminess. Make sure to cover the board well. This step sets the stage for the sweet treats to come. - Generously drizzle caramel sauce over the apples. - If you like, sprinkle chopped pecans or walnuts on top. Finish with a pinch of flaky sea salt. The caramel sauce enhances the sweetness and creates a lovely glossy finish. The nuts give a nice crunch, while the sea salt balances the flavor. This dish looks amazing and tastes even better! You can serve it with toasted crostini or crisp apple slices. Don't forget to check out the Full Recipe for more details! For this recipe, I recommend using tart apple varieties. Granny Smith apples work great. Their tartness balances the sweet caramel. Honeycrisp apples are another excellent choice. They add a nice crunch and flavor. Make sure your butter is at room temperature. Softened butter spreads easily on the board. This creates a smooth base for the apples. If the butter is too cold, it will not spread well. Feel free to experiment with spices. Add a pinch of cloves for warmth. You could also try vanilla extract for extra depth. These little tweaks can elevate the taste. Each bite can become even more delightful. {{image_4}} You can easily add a twist to your butter board. Incorporate chocolate chips. Just sprinkle them over the caramelized apples. You can also drizzle melted chocolate on top. This adds rich flavor and a fun look. Do you have nut allergies? No problem! Replace the nuts with seeds like pumpkin or sunflower seeds. If you prefer, you can skip the nuts entirely. Your butter board will still taste amazing! Feel free to switch up the flavors! Use different nut butters, like almond or cashew. You can also try flavored butter spreads. Each variation brings a new taste and experience. Keep your Caramel Apple Pie Butter Board in the refrigerator. Use an airtight container to keep it fresh. This helps to maintain the flavors and textures. For the best taste, enjoy this treat within 2-3 days. After that, the apples may lose their crispness. If you want to serve it warm, gently warm it in the microwave. Heat it in short bursts to avoid cooking the apples again. This helps to bring back the cozy, warm flavors that make this dish so special. A butter board is a fun and tasty way to serve butter. You take a large board and spread softened butter across it. Then, you add delicious toppings. It’s like a charcuterie board, but with butter! You can use sweet or savory toppings. The Caramel Apple Pie Butter Board uses caramelized apples, cinnamon, and nuts for a sweet treat. It’s perfect for sharing at parties or family gatherings. Yes, you can prep this butter board ahead! Make the caramelized apples and store them in the fridge. Just keep them in an airtight container. You can spread the butter on the board when you are ready to serve. Then, layer the apples and drizzle the caramel sauce. This way, you save time and still enjoy a fresh dish. Yes, you can make a vegan version! For the butter, use coconut oil or vegan butter. You can also make your own caramel using coconut milk and brown sugar. This way, you keep the same flavors but make it vegan-friendly. Enjoy the same delicious taste while being kind to dietary needs! This butter board recipe is simple, fun, and full of flavor. We started with caramelized apples and buttery goodness, then added our favorite toppings. You can adjust the recipe to fit your taste. Use different apples, add nuts, or go nut-free. Remember, store leftovers well to keep them fresh. This dish is perfect for sharing and can fit any diet with easy swaps. Enjoy making your own version of this tasty treat!](https://fastmealmate.com/wp-content/uploads/2025/07/ddf5207e-0125-4d49-a59c-c6b722e82f52-768x768.webp)

![- 2 ripe peaches, cut into wedges - 1 cup cherry tomatoes, rinsed and dried - 1 cup fresh basil leaves, gently washed and dried - 8 oz fresh mozzarella balls (bocconcini), drained - 3 tablespoons balsamic glaze - 2 tablespoons extra-virgin olive oil - Salt and freshly ground black pepper, to taste - 12-15 (6-inch) wooden skewers Peach Caprese skewers blend sweet and savory flavors. The ripe peaches add natural sweetness. Use firm yet soft peaches for the best taste. Cherry tomatoes bring a burst of juiciness. Fresh basil adds aromatic freshness that complements the fruit. For the creamy element, fresh mozzarella balls are ideal. They provide a soft texture and mild flavor. Drizzle balsamic glaze for sweetness and tang. Extra-virgin olive oil enhances all the flavors. You’ll need salt and black pepper to season. They add depth to your dish. Finally, grab some wooden skewers to assemble your tasty bites. For the complete list of ingredients and measurements, refer to the Full Recipe. 1. Cutting peaches into wedges: Start with two ripe peaches. Cut them into even wedges. Make sure they are sweet and juicy for the best flavor. 2. Rinsing cherry tomatoes and drying: Take one cup of cherry tomatoes. Rinse them well under cool water. After rinsing, use a clean towel to dry them gently. This helps keep the skewers from getting soggy. 3. Draining mozzarella balls: Use eight ounces of fresh mozzarella balls. Drain them to remove excess liquid. This keeps the skewers light and fresh. 1. Step-by-step threading process: Grab a six-inch wooden skewer. Start by threading a fresh basil leaf onto the skewer. Then, add a peach wedge. Next, slide on a cherry tomato, followed by a mozzarella ball. 2. Layering pattern for vibrant colors: Repeat the pattern: basil, peach, tomato, mozzarella. This layering creates a colorful and appealing look. Aim for a mix of colors on each skewer. 3. Tips for an appealing presentation: Leave some space at the end of each skewer. This makes them easy to handle. Arrange the finished skewers on a platter or in a jar for a fun touch. 1. Drizzling olive oil: Once your skewers are ready, drizzle them lightly with extra-virgin olive oil. This adds richness and enhances the flavors of the fresh ingredients. 2. Adding seasoning: Sprinkle a little salt and freshly cracked black pepper over the skewers. This adds a nice kick and brings out the taste of each ingredient. 3. Applying balsamic glaze: Finally, drizzle balsamic glaze over the skewers. This sweet and tangy glaze adds a wonderful finish to the dish. For the full recipe, check out the instructions I shared earlier. When making Peach Caprese Skewers, the first step is choosing ripe peaches. Look for peaches that feel slightly soft when you press them. Their color should be vibrant and rich. Ripe peaches add natural sweetness, making your skewers delicious. Next, consider the mozzarella and basil. You want fresh mozzarella balls, called bocconcini. They should be firm and moist. Fresh basil leaves should be bright green and fragrant. If they look wilted, they won't taste good. Using fresh ingredients elevates your dish. For easy skewering, start with a wooden skewer. Grab a fresh basil leaf and thread it onto the skewer first. This helps anchor the other ingredients. Next, add a peach wedge, then a cherry tomato, and finish with a mozzarella ball. Repeat this pattern to create a colorful skewer. To make your skewers visually appealing, mix up the colors. Alternate between peach, tomato, and mozzarella. This creates a beautiful display. You can also arrange the skewers in a jar for a fun presentation. When serving, think about your platter. A large, decorative platter can be eye-catching. You can also arrange the skewers in a tall vase. This adds a unique touch to your table. Pair your Peach Caprese Skewers with drinks like lemonade or sparkling water. They also go well with other appetizers, like bruschetta. This way, you create a delightful spread for your guests. For the full recipe, check out the detailed instructions to help you on your cooking adventure! {{image_4}} You can switch out the peaches for other fruits. Strawberries add sweetness, while figs bring a rich taste. Both work well with the cheese. For cheese, try feta or goat cheese instead of mozzarella. Feta adds a salty kick, while goat cheese offers creaminess. To boost flavors, add spices or herbs. A sprinkle of black pepper can elevate taste. Fresh mint or thyme can also add a nice twist. Experiment with different glazes too. A honey glaze can add sweetness, while a spicy chili glaze can bring heat. You can easily make these skewers vegan. Use tofu or avocado in place of cheese. For low-carb or keto options, skip the fruit and focus on cheese and herbs. Cherry tomatoes still fit well in this version. This allows everyone to enjoy the dish, no matter their diet. To keep your Peach Caprese Skewers fresh, store them in the fridge. Use an airtight container to avoid drying out. Place a damp paper towel inside the container. This helps keep the ingredients moist. Try to eat leftovers within two days for the best taste. Reheat your skewers in a pan on low heat. This warms them gently without losing flavor. Avoid using a microwave, as it can make the cheese rubbery. Heat just until the cheese is warm, about 2-3 minutes. Freezing these skewers is tricky. I do not recommend it because the peaches and mozzarella lose texture. If you must freeze, assemble them without the balsamic glaze. Wrap the skewers tightly in plastic wrap. Store them in a freezer-safe bag. Use within a month for best results. Yes, you can prepare these skewers a few hours in advance. Keep them in the fridge until serving. This helps the flavors blend. - Storage timelines: Store them for up to 4 hours. After that, the peaches may get mushy. - Ingredients that keep well: Mozzarella and cherry tomatoes hold up nicely. Fresh basil gets a bit wilty but will still taste great. For this dish, use yellow or white peaches. Both are sweet and juicy. Yellow peaches have a nice tang, while white peaches are sweeter. - Recommended varieties for sweetness and texture: Look for Freestone peaches. They come off the pit easily and have great flavor. Absolutely! You can mix and match ingredients to fit your taste. Try using different fruits or cheeses. - Suggestions for personalizing flavors and textures: Substitute peaches with strawberries or figs. You can also use feta or goat cheese instead of mozzarella. These skewers are perfect for gatherings. You can set them up on a big platter for guests to grab. - Ideas for large gatherings and events: Arrange them in a tall vase for fun. Add a small bowl of balsamic glaze for dipping. This will impress your guests! For the complete recipe, check out the [Full Recipe]. Peach Caprese skewers bring together fresh produce, creamy mozzarella, and bold flavors. Using ripe peaches, cherry tomatoes, and basil makes them a vibrant choice. Adding olive oil, balsamic glaze, and a touch of seasoning elevates every bite. You can easily swap ingredients for different tastes or dietary needs. Remember, these skewers are fun and simple to make. They are perfect for summer gatherings or a light snack. Enjoy crafting your own skewers, and let your creativity shine!](https://fastmealmate.com/wp-content/uploads/2025/07/b9012ea0-d5e7-459d-b2ed-b5a660c32588-768x768.webp)