Skip to content
About
Contact
Cookie Policy
Copyright Policy
Disclaimer
Search
Home
Dinner
Appetizer
Desserts
Drinks
About
Contact
Privacy Policy
Toggle Menu
Home
/
Appetizer
- Page 13
Appetizer
Sweet and Savory Honey Garlic Wings Irresistible Dish
Nashville Hot Beef Mozzarella Sticks Flavorful Snack
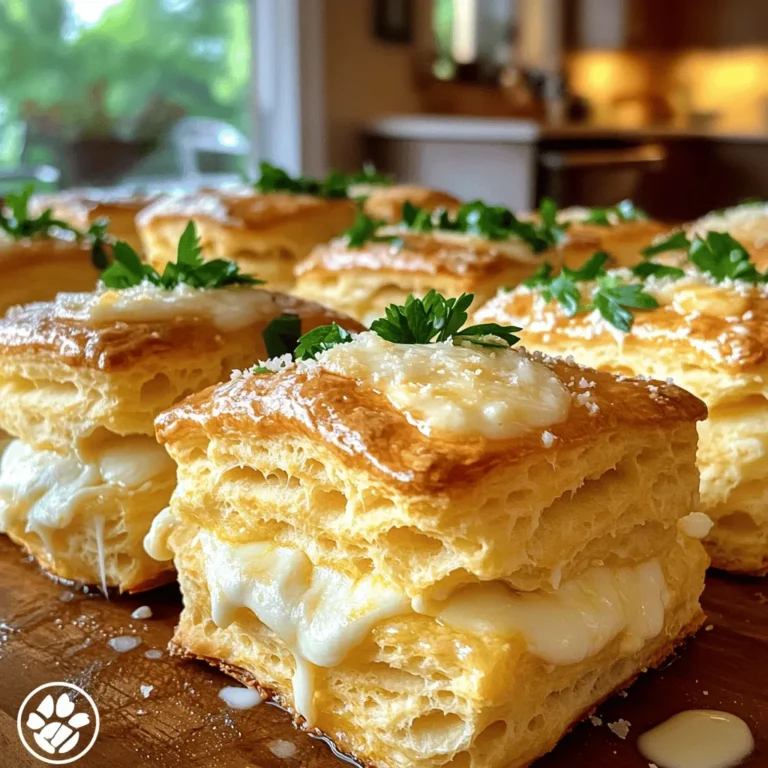
Cheesy Mozzarella Biscuit Delights Simple Recipe
Garlic Parmesan Cheeseburger Bombs Tasty and Simple
Zesty Italian Pasta Salad Flavorful Summer Delight
Vinegar Slaw Crisp and Tangy Cabbage Delight
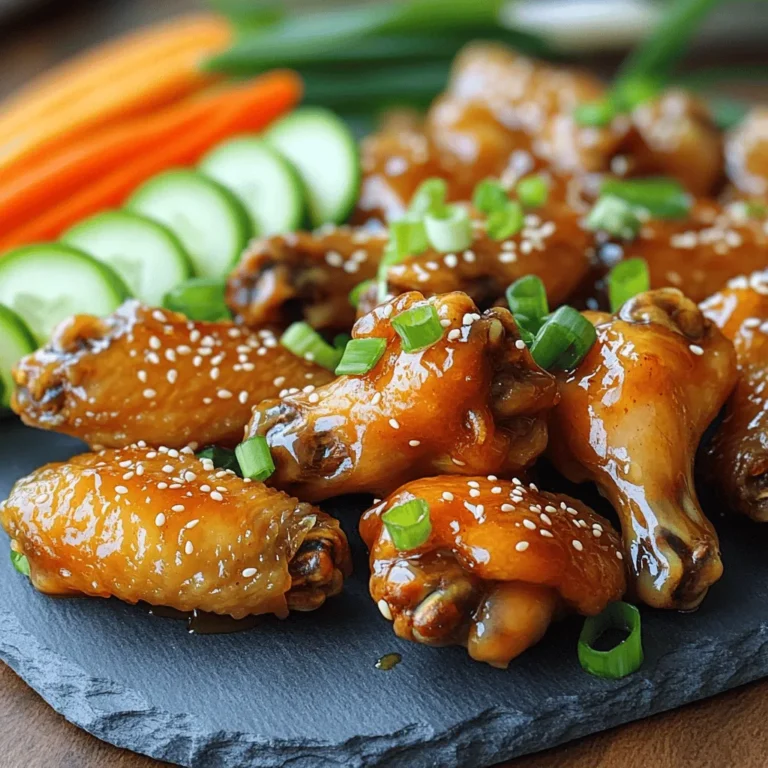
Crispy Air Fryer Chicken Wings Easy and Flavorful Recipe
Cucumber and Onion Salad Fresh and Crisp Recipe
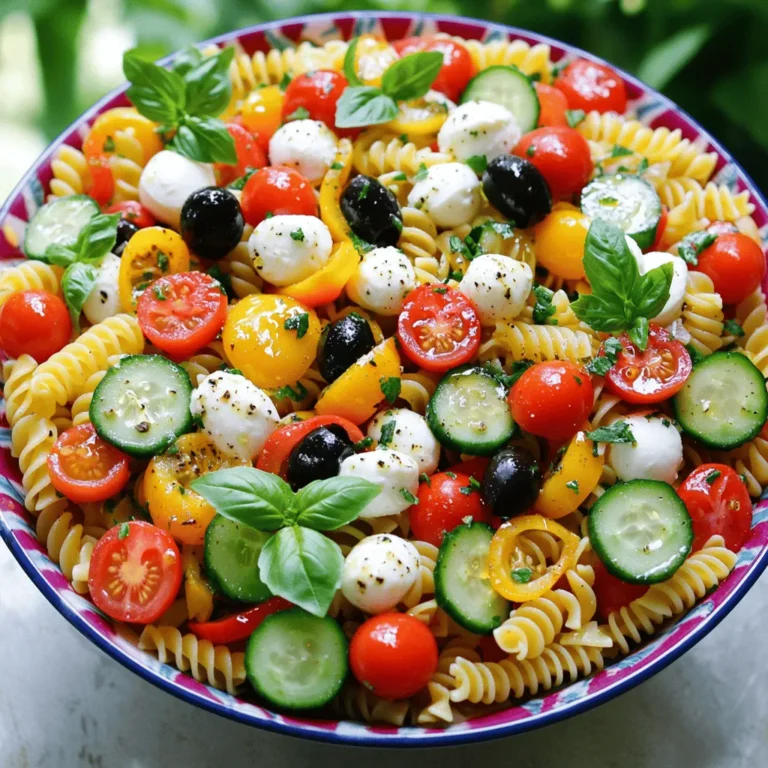
Italian Pasta Salad Flavorful and Fresh Recipe Guide
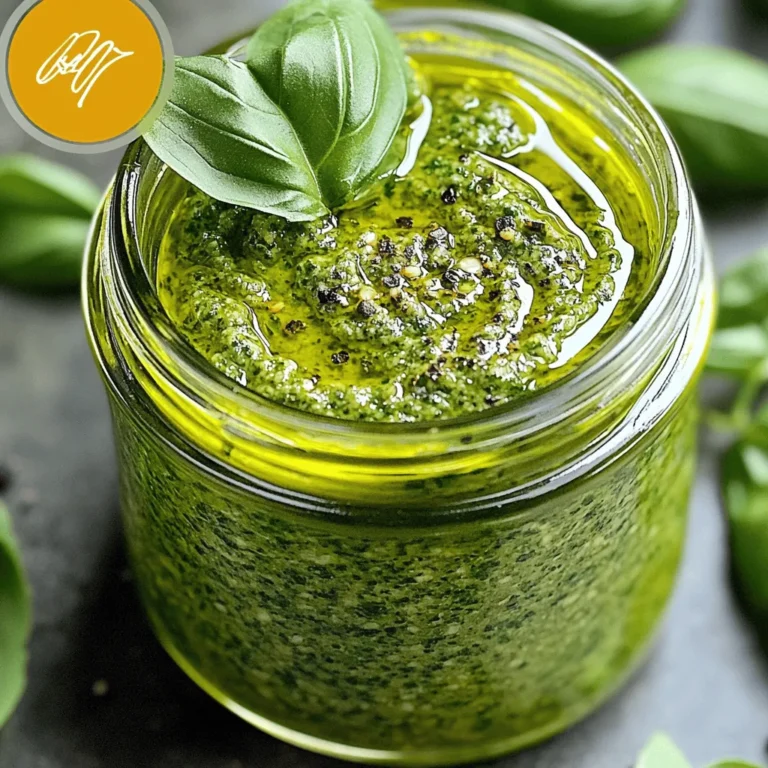
Pesto Recipe without Nuts Easy and Flavorful Dish
Page navigation
Previous Page
Previous
1
…
11
12
13
14
15
16
Next Page
Next
Home
Dinner
Appetizer
Desserts
Drinks
About
Contact
Privacy Policy
Toggle Menu Close
Search for:
Search


![- 1 lb ground beef - 1 cup shredded cheddar cheese - 1 cup shredded mozzarella cheese - 1/2 cup grated Parmesan cheese - 1 tablespoon minced garlic - 1 teaspoon onion powder - 1 teaspoon garlic powder - 1/2 teaspoon salt - 1/2 teaspoon black pepper - 1 package (16 oz) refrigerated pizza dough - 1/2 cup unsalted butter, melted - 2 tablespoons fresh parsley, chopped (for garnish) I recommend using fresh ground beef for the best flavor and texture. Look for good-quality cheeses. A mix of sharp cheddar and creamy mozzarella works wonders. For the Parmesan, choose a block and grate it yourself. Fresh garlic adds a punch that garlic powder cannot match. Always opt for unsalted butter to control the saltiness in your dish. Each serving contains approximately: - Calories: 250 - Protein: 15g - Carbohydrates: 20g - Fat: 14g - Fiber: 1g - Sugar: 1g This dish packs flavor and comfort in each bomb. Enjoy the satisfaction of creating these tasty bites. For the full recipe, check the section above. First, preheat your oven to 375°F (190°C). This ensures the bombs bake evenly. While the oven warms up, grab a large mixing bowl. In this bowl, mix together the ground beef, shredded cheddar, mozzarella, and grated Parmesan cheese. Add minced garlic, onion powder, garlic powder, salt, and black pepper. Stir until all the ingredients blend well. This mixture is the heart of your cheeseburger bombs. Next, you need to handle the pizza dough. Lightly flour a clean surface to prevent sticking. Roll out the pizza dough into a large rectangle. Use a pizza cutter or knife to slice the dough into 12 equal squares. Each square should measure about 3 inches by 3 inches. For each square, place a generous spoonful of the cheeseburger filling right in the center. Now, fold the corners of each dough square over the filling. Pinch them tightly to create a seal. Place the sealed bombs seam-side down on your prepared baking sheet. Now it’s time to bake. Brush the tops of each bomb with melted butter. This gives them a nice, golden finish. Bake these tasty treats in the preheated oven for 18-20 minutes. They should puff up and turn a beautiful golden brown. After baking, let them cool for a few minutes on the baking sheet. This step helps enhance the flavors. For a fresh touch, sprinkle chopped parsley on top just before serving. For the full recipe, check the earlier section. Enjoy your Garlic Parmesan Cheeseburger Bombs! To make your Garlic Parmesan Cheeseburger Bombs pop with flavor, use quality spices. Fresh garlic adds a strong taste. Minced garlic blends well with the beef. Garlic powder boosts the garlic flavor. Onion powder adds depth and sweetness. The mix of cheddar, mozzarella, and Parmesan gives a rich, creamy texture. Try using sharp cheddar for a bolder taste. Always taste the mixture before sealing the bombs. Adjust the salt and pepper to your liking. A perfect golden crust makes your bombs look and taste great. Start by brushing the tops with melted butter. This adds flavor and helps with browning. Bake at 375°F for 18-20 minutes. Keep an eye on them as they bake. If they are not golden yet, let them bake a few more minutes. The crust should be puffed and golden brown. For a stunning display, use a large platter. Place the bombs in a circle, and sprinkle fresh parsley on top. This adds a nice pop of color. Serve with dipping sauces like ketchup or ranch for extra fun. You can also add a side of pickles or a fresh salad. This makes a great snack or meal for any gathering. Enjoy each tasty bite from your Garlic Parmesan Cheeseburger Bombs! For the complete recipe, click [Full Recipe]. {{image_4}} You can change the filling for your Garlic Parmesan Cheeseburger Bombs. For a vegetarian option, swap ground beef for cooked lentils or black beans. Add some diced bell peppers and chopped onions for flavor. If you want a spicy kick, mix in jalapeños or hot sauce. You can even use spicy sausage for a meaty twist. This way, everyone can enjoy these tasty bombs. If you need a gluten-free option, use gluten-free pizza dough. Many stores sell this now. If you feel adventurous, you can make homemade dough. Combine almond flour, coconut flour, and eggs for a gluten-free base. This change keeps the bombs delicious and safe for those with gluten issues. Experiment with different types of dough to find your favorite. Toppings can take your bombs to a new level. After baking, try adding melted cheese on top. You can also sprinkle some crispy bacon bits for extra flavor. Fresh herbs like chives or cilantro can add a burst of color and taste. Consider serving with a side of garlic butter for dipping. These creative touches make your Garlic Parmesan Cheeseburger Bombs truly special. For detailed steps, check the Full Recipe. After you enjoy your Garlic Parmesan Cheeseburger Bombs, store any leftovers right away. Let them cool to room temperature first. Then, place them in an airtight container. This keeps them fresh and tasty. You can also wrap them tightly in plastic wrap. Store them in the fridge for up to three days. If you want to keep them longer, freezing is a great option. When it’s time to eat those leftover bombs, reheating them properly is key. Preheat your oven to 350°F (175°C). Place the bombs on a baking sheet. Heat for about 10-15 minutes. This helps them regain their crispiness. You can also use a microwave. Heat them for about 30-45 seconds. However, the oven method is best for keeping that nice texture. If you want to freeze your Garlic Parmesan Cheeseburger Bombs, do it before baking. After shaping the bombs, place them on a baking sheet. Freeze them for about an hour until solid. Then, transfer them to a freezer-safe bag. They can last up to three months in the freezer. When you’re ready to bake, just add a few extra minutes to the cooking time. Enjoy the fresh taste anytime with this simple method! You can still enjoy these bombs without specific cheese. Use any cheese you like. Try gouda, pepper jack, or even cream cheese. Just make sure the cheese melts well. This keeps the bombs gooey and tasty. Yes, you can prepare these bombs ahead of time. Make the filling and fill the dough squares. Place them on a baking sheet. Cover and store them in the fridge. Bake them fresh when you are ready to eat. This saves time for your busy days. Dipping sauces make these bombs even better. Ketchup is a classic choice. Ranch dressing or garlic aioli adds a nice touch. You can also try spicy mustard or BBQ sauce. Each sauce brings a new flavor and fun to your meal. This blog post covered all you need for Garlic Parmesan Cheeseburger Bombs. I shared the key ingredients, step-by-step instructions, and handy tips to enhance flavor. You also learned about great variations to try and how to store your tasty treats. In my final thoughts, remember to have fun while cooking. Experiment with flavors and enjoy every bite of your creations. Happy cooking!](https://fastmealmate.com/wp-content/uploads/2025/06/70ca770e-dfd2-457a-a57a-f773e5b0e22d-768x768.webp)


![- 2 large cucumbers, peeled and thinly sliced - 1 medium red onion, thinly sliced - 1/4 cup apple cider vinegar - 2 tablespoons honey - 1 tablespoon olive oil - 1 teaspoon salt - 1/2 teaspoon freshly ground black pepper - 1/4 teaspoon red pepper flakes (optional, for a hint of heat) - Fresh dill or chopped parsley for garnish Cucumbers are refreshing and hydrating. They contain vitamins A and K. Red onions add a sweet and mild flavor. They also have antioxidants that may help reduce inflammation. Apple cider vinegar provides a tangy taste. It may help with digestion. Honey adds sweetness and balances flavors. Olive oil not only adds richness but is also heart-healthy. Salt enhances all the flavors, while black pepper adds a slight kick. Fresh herbs like dill or parsley brighten up the dish. If you can’t find red onions, try using white or yellow onions. Both will work well. You can swap apple cider vinegar with white wine vinegar for a different taste. If you prefer, maple syrup can replace honey for a vegan option. For a lighter touch, use lemon juice instead of vinegar. If you want a different herb, mint or basil can add a unique flavor twist. For those who dislike spice, leave out the red pepper flakes altogether. You can find the full recipe above for a detailed guide on making this crisp salad! To make a fresh cucumber and onion salad, start with two large cucumbers. Peel them and slice them thinly. Use a sharp knife or a mandolin slicer for even slices. Next, take one medium red onion and slice it thinly as well. Add both slices to a large mixing bowl. In a small bowl, whisk together 1/4 cup of apple cider vinegar and 2 tablespoons of honey. Add 1 tablespoon of olive oil, 1 teaspoon of salt, 1/2 teaspoon of freshly ground black pepper, and 1/4 teaspoon of red pepper flakes if you like some heat. Mix until the honey is dissolved. Drizzle this dressing over the cucumbers and onions. Toss everything gently with two big spoons or salad tongs. Cover the bowl and place it in the fridge for at least 30 minutes. This helps the flavors meld together. When you are ready to serve, toss the salad again. Taste it, and adjust the seasoning if needed. Finally, add fresh dill or chopped parsley on top for garnish. To slice cucumbers and onions well, aim for thin and even pieces. This helps them blend in the salad. Use a mandolin slicer if you have one; it gives uniform slices. If you use a knife, keep your fingers tucked in. This helps prevent cuts. Chill your knife in the fridge before slicing. This can keep your vegetables crisper. Mixing the salad well is key to great flavor. Use two large spoons or salad tongs to toss the ingredients. Be gentle to avoid crushing the vegetables. Make sure every slice gets coated in dressing. Let the salad sit in the fridge for at least 30 minutes. This allows the flavors to soak in. Before serving, always taste and adjust the seasoning. This ensures the salad is just right for you. For a fun twist, consider adding other fresh herbs like basil or cilantro! To boost the taste of your Cucumber and Onion Salad, think about adding fresh herbs. Chopped dill or parsley brings a bright flavor. You can also add a squeeze of lemon juice for zest. If you like heat, try adding a pinch of cayenne pepper. This will give your salad a nice kick. Always taste as you go. Adjust the flavors to fit your own liking. For the best dressing, whisk the ingredients well. Mix the vinegar, honey, and olive oil until smooth. The honey needs to dissolve fully. If the dressing is too thick, add a little water or more vinegar. This will help it coat the veggies better. You want a nice balance between tangy and sweet. One common mistake is not letting the salad chill. Allowing it to sit in the fridge helps the flavors blend. Another mistake is cutting the cucumbers too thick. Thin slices absorb the dressing well. Lastly, don’t forget to taste your salad before serving. Adjust the salt and pepper to make it just right. Remember, the key is to keep it fresh and crisp. For a full recipe, check out the Crisp Cucumber & Sweet Onion Delight. {{image_4}} You can make this salad even better by adding other veggies. Try bell peppers for crunch. You can also add tomatoes for a sweet touch. Radishes bring a nice bite and color. Grated carrots can add a fun twist. Mix and match to find your favorite blend! While I love the apple cider vinegar dressing, you can switch it up. Try a creamy dressing like ranch or yogurt. Lemon juice can add a fresh zing. You can also use balsamic vinegar for a sweeter flavor. Experiment with herbs like basil or cilantro to change the taste. Seasonal ingredients can make your salad shine. In summer, add fresh herbs like mint or basil. In fall, sliced apples can give a sweet crunch. Winter might call for roasted veggies like squash. Use what’s fresh at the market to keep it exciting! For the complete recipe, check out the [Full Recipe]. To keep your cucumber and onion salad fresh, store it in an airtight container. This helps keep the crispness intact. Make sure to place the salad in the fridge. The cold temperature slows down spoilage. If you have a lot of salad left, divide it into smaller containers. When stored properly, this salad lasts about 3 to 5 days in the fridge. To maintain freshness, avoid adding dressing until you are ready to eat. The vinegar can cause the cucumbers to become soggy over time. If you notice any signs of wilting or change in color, it’s best to discard the salad. I do not recommend freezing cucumber and onion salad. The freezing process makes cucumbers watery and soft, ruining their crunch. If you want to use cucumbers later, consider pickling them instead. Pickled cucumbers can last for months and taste great in many dishes. For fresh enjoyment, stick to the fridge for this salad. You can find the Full Recipe to enjoy this dish fresh. For this salad, I recommend using English cucumbers. They are long, thin, and have fewer seeds. Their skin is also tender, which means no peeling is needed. If English cucumbers are not available, you can use Persian cucumbers. They are small and sweet, making them a great choice too. Yes, you can make this salad ahead of time. In fact, chilling it for a few hours helps the flavors blend. I suggest preparing it up to a day in advance. Just remember to toss it again before serving to mix the dressing well. To add some heat, you can increase the red pepper flakes in the dressing. You can also add sliced jalapeños or a dash of hot sauce for an extra kick. Start with a small amount and taste as you go to find the right spice level for you. This salad pairs well with grilled meats like chicken or fish. It also makes a great side for sandwiches and wraps. For a light meal, serve it alongside quinoa or rice. The fresh flavors complement many dishes beautifully. If you want to explore more, check out the Full Recipe for ideas on how to enhance your meal. Cucumber and Onion Salad is fresh and easy to make. You learned the best ingredients, helpful tips for slicing and mixing, and ways to enhance flavor. I shared options for variations, storage, and common mistakes to avoid. In the end, this salad is great any time of year. Enjoying it can brighten any meal. Keep experimenting and find what flavors you love best!](https://fastmealmate.com/wp-content/uploads/2025/06/e5e61b33-6e6d-48c4-8abd-5090a0f7425b-768x768.webp)