Skip to content
About
Contact
Cookie Policy
Copyright Policy
Disclaimer
Search
Home
Dinner
Appetizer
Desserts
Drinks
About
Contact
Privacy Policy
Toggle Menu
Home
/
Appetizer
- Page 11
Appetizer
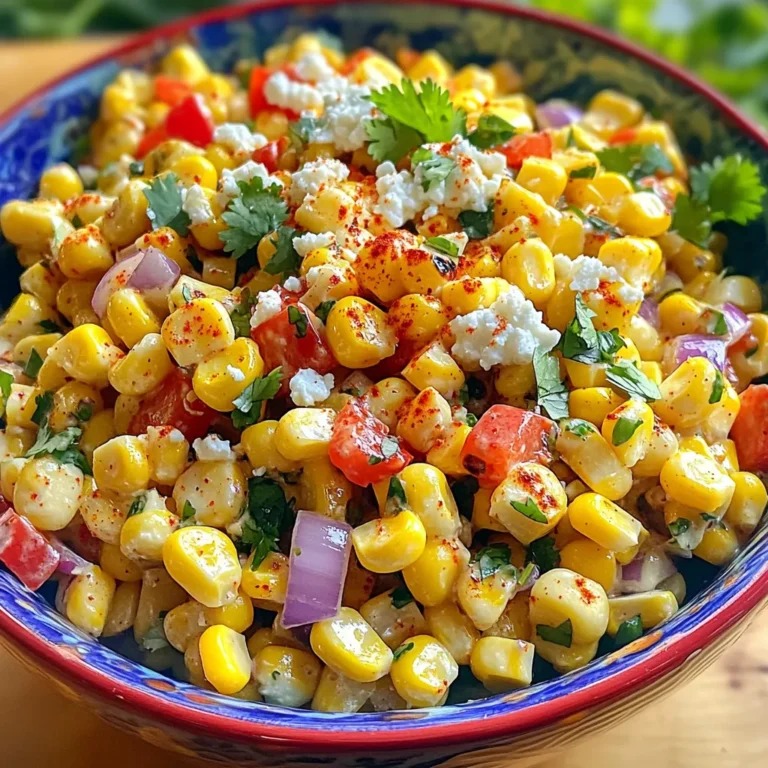
Mexican Street Corn Salad Flavorful and Fresh Dish
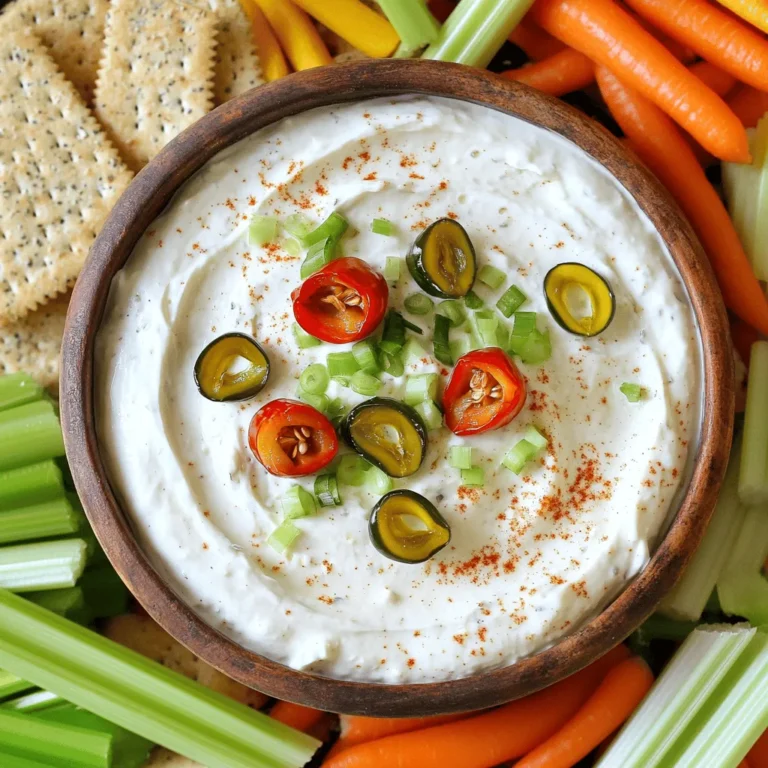
Pepperoncini Cream Cheese Dip Flavorful Party Snack
Hooters Daytona Beach Style Wings Simple Recipe Guide
Passover Charoset with Grape Juice Simple Recipe
Mexican Street Corn in a Cup Flavorful Recipe
Corn Cheese with Miso Flavorful and Simple Delight
Deep Dish Pizza Cupcakes Tasty and Easy Recipe
Cheesy Garlic Biscuit Bombs Irresistible and Easy
Zesty Italian Pasta Salad Flavorful and Fun Dish
Mediterranean Arugula Salad Fresh and Flavorful Dish
Page navigation
Previous Page
Previous
1
…
9
10
11
12
13
…
16
Next Page
Next
Home
Dinner
Appetizer
Desserts
Drinks
About
Contact
Privacy Policy
Toggle Menu Close
Search for:
Search


![- 3 medium apples, peeled, cored, and diced into small cubes - 1 cup walnuts, finely chopped to enhance texture - 1 teaspoon ground cinnamon for warmth - 1/2 cup grape juice (preferably 100% juice for a natural flavor) - 2 tablespoons honey (or agave syrup for a vegan alternative) - 1/4 cup raisins for sweetness and chew - 1 tablespoon fresh lemon juice for brightness To make Passover charoset with grape juice, I focus on using fresh and quality ingredients. Apples are the star here. I love using sweet and crisp varieties like Fuji or Honeycrisp. They bring great flavor and texture. Walnuts give a nice crunch and a bit of richness. Ground cinnamon adds warmth and depth. Grape juice not only sweetens but also ties all the flavors together. - For a vegan option, swap honey for agave syrup. - If nuts are a concern, replace walnuts with sunflower seeds. I enjoy adapting recipes to fit different needs. If you want a vegan charoset, agave syrup works well in place of honey. If you want a nut-free version, sunflower seeds give a similar crunch without the allergens. - Choose firm apples that are not bruised. - Look for grape juice that is 100% juice without added sugars. When selecting apples, feel them in your hand. They should feel firm and solid. For grape juice, read the label. Aim for juices that are pure and natural. This choice enhances the taste of your charoset. For the full recipe, check the details above. Enjoy your cooking! - Dicing Apples and Chopping Walnuts Start by peeling, coring, and dicing three medium apples into small cubes. Use a sharp knife for safety and precision. Next, finely chop one cup of walnuts. This adds a nice crunch to your charoset. Make sure the apples and walnuts are mixed well in a large bowl. - Mixing Cinnamon with Apples and Walnuts Now, sprinkle one teaspoon of ground cinnamon over the apple and walnut mix. Toss everything gently to coat the pieces evenly. The scent of cinnamon will make your kitchen smell warm and inviting. - Whisking Ingredients Together In a small bowl, whisk together half a cup of grape juice, two tablespoons of honey (or agave syrup), and one tablespoon of fresh lemon juice. Make sure the mixture is smooth and well-blended. This juice mix will bring sweetness and tang to the charoset. - Tossing Mixture for Even Coating Carefully pour the grape juice mixture over the apple-walnut blend. Stir gently until everything is well coated. This ensures that each bite is full of flavor. Next, add a quarter cup of raisins to the mix. Give it another gentle stir to evenly distribute the raisins. - Serving Suggestions Cover the bowl with plastic wrap or a lid and place it in the refrigerator. Let it chill for at least one hour. This helps the flavors meld beautifully. For serving, transfer the charoset to a decorative platter or individual bowls. A light sprinkle of cinnamon on top adds visual appeal. You can find the full recipe [here]. To make the best charoset, chill it for at least one hour. This time helps the flavors mix well. The longer it sits, the better it tastes. If you have time, chill it overnight for even more flavor. For flavor enhancements, try adding spices. A pinch of nutmeg adds warmth. You can also mix in a splash of orange juice for a citrus twist. This makes your charoset unique and exciting. When serving, aim for a beautiful look. Place the charoset in a nice bowl. For eye appeal, sprinkle extra cinnamon on top. You can also add whole walnuts or a few raisins for color. These simple touches make your dish stand out. One common mistake is overmixing the ingredients. Mixing too much can turn the apples mushy. Instead, mix gently to keep the cubes intact. This keeps the texture fresh and enjoyable. Another mistake is using the wrong apple varieties. For charoset, use sweet apples like Honeycrisp or Fuji. Avoid tart apples, as they can spoil the flavor balance. Choosing the right apples makes a big difference in taste. {{image_4}} When I think of Passover charoset, I picture the classic blend of apples and nuts. The traditional recipe sticks to simple flavors. It uses just apples, walnuts, and a touch of cinnamon. This mix brings a sweet and nutty taste that feels like home. Modern takes on charoset can be more creative. You can add dried fruits like apricots or figs for a twist. Some people also like to mix in spices like nutmeg or ginger. These small changes can make your charoset unique, while still honoring its roots. If you need a gluten-free charoset, you're in luck! All the main ingredients are naturally gluten-free. Just double-check your walnuts and any additional ingredients for cross-contamination. For vegan options, swap honey with agave syrup. This keeps the sweetness without using animal products. If you want a low-sugar version, use less honey or agave. You can rely more on the natural sweetness of the apples and grapes. Charoset varies across cultures. For example, in Sephardic traditions, you may find charoset made with dates and red wine. This adds a rich, deep flavor. In Ashkenazi traditions, the apple and walnut combo is more common. You can also explore different styles, like adding pomegranate seeds for a fresh taste. Each variation tells a story of its own, connecting us to our heritage. So, feel free to experiment and find what speaks to you! For the full recipe, check out my Passover Charoset Delight. To keep your charoset fresh, refrigerate it right after making it. Place it in an airtight container. This helps keep the flavors strong and the texture nice. If you have leftovers, they will stay tasty in the fridge for several days. You can also freeze charoset if you want to save it for later. Use a freezer-safe container and leave some space at the top. This allows it to expand as it freezes. Just remember to thaw it in the fridge before serving. Charoset lasts about 3 to 5 days in the fridge. If you freeze it, it can last for about 3 months. Always check for any off smells or changes in texture before eating. This way, you can enjoy it at its best. When reheating charoset, do it gently. Use the microwave or a small pot. Heat it on low to keep it fresh. Stir it often to warm it evenly. You want to avoid cooking it too much. This helps maintain the great taste and texture you love. Passover Charoset is a sweet and chunky mix. It usually includes fruits, nuts, and wine or juice. This dish represents the mortar used by the Jewish people when they built in Egypt. It is an important part of the Passover Seder. During the Seder, we eat charoset to remember the hard work of our ancestors. The flavors remind us of the sweetness of freedom and the hope for a bright future. Yes, you can make Passover Charoset ahead of time. It is best to prepare it a day before. This allows the flavors to blend well. You should let it chill in the fridge for at least one hour. For best taste, the longer it sits, the better it becomes. Just cover it tightly to keep it fresh. Charoset pairs well with many foods. It goes nicely with matzah during Passover. You can also serve it with roasted meats or brisket. Some people like to add it to salads for a sweet crunch. Charoset's flavors balance well with savory dishes. Try it with cheese for a unique snack. This blog covered how to make Passover Charoset, from choosing the right ingredients to serving ideas. You learned about essential ingredients like apples and walnuts. I shared tips for easy substitutions and how to select quality items. You got step-by-step instructions, tricks for the best results, and variations to try. Proper storage and reheating tips help keep your Charoset fresh. Embrace this dish's significance and flavors. Enjoy making your own delicious Charoset this Passover!](https://fastmealmate.com/wp-content/uploads/2025/06/25826363-49ff-4690-9ead-27057b46bedc-768x768.webp)


![To make a Zesty Italian Pasta Salad, you need fresh and colorful ingredients. Here’s the complete list of ingredients you will need: - 2 cups rotini pasta - 1 cup cherry tomatoes, halved - 1 cup cucumber, diced - 1/2 cup black olives, sliced - 1/2 cup red bell pepper, chopped - 1/4 cup red onion, finely chopped - 1/2 cup mozzarella balls, halved - 1/3 cup Italian dressing - 1 tablespoon fresh basil, chopped - 1 teaspoon dried oregano - Salt and pepper to taste Each ingredient brings its own flavor and texture. The rotini pasta is fun and holds dressings well. Cherry tomatoes add sweetness, while cucumbers give a nice crunch. Black olives bring a salty bite, and bell peppers add color and freshness. Red onions add a bit of sharpness, while mozzarella balls provide creaminess. For the dressing, you can use store-bought or make your own. I love using fresh basil and oregano for a burst of flavor. Finally, season with salt and pepper to balance everything. You can find the full recipe [here]. Enjoy your cooking adventure! - Bring salted water to a boil. - Cook rotini pasta until al dente. - Drain and cool under cold water. Cooking the pasta is the first step. Use a large pot and fill it with water. Add a good amount of salt to the water. This step adds flavor to the pasta. Once the water boils, add the rotini pasta. Follow the package directions for cooking time until it is al dente. This means the pasta should be firm but cooked. After cooking, drain the pasta and rinse it under cold water. This stops the cooking process and cools the pasta quickly. - Combine cherry tomatoes, cucumber, olives, bell pepper, and onion. - Stir gently to mix. While the pasta cools, you can prepare the vegetables. Take a large bowl and add the halved cherry tomatoes, diced cucumber, sliced black olives, chopped red bell pepper, and finely chopped red onion. Each vegetable brings its own flavor and texture to the salad. Stir gently to mix them without squishing the tomatoes. This colorful mix will make your salad bright and fun! - Add cooled pasta to the vegetable mix. - Incorporate mozzarella balls. - Drizzle with dressing and seasonings. Once the pasta is cool, add it to the bowl with the mixed vegetables. Next, add halved mozzarella balls. These little cheese bites add creaminess. Now, drizzle the Italian dressing over the pasta and vegetables. Don't forget to sprinkle the fresh basil, dried oregano, salt, and pepper. These seasonings will enhance the flavors. - Toss ingredients to combine. - Refrigerate for at least 30 minutes. Now, it is time to mix everything. Toss all the ingredients together carefully. You want every part to be coated with dressing. Cover the bowl with a lid or plastic wrap. Place it in the fridge for at least 30 minutes. Chilling the salad helps the flavors blend well. Trust me, the wait is worth it! To get the best taste from your Zesty Italian Pasta Salad, choose a good Italian dressing. Brands like Annie's or Ken's work well. Don't use too much dressing at first; you can always add more later. Always taste as you go. A little salt and pepper can boost the flavor. Remember, it's easy to add, but hard to take away. Serving your pasta salad is just as fun as making it! You can use a large bowl for a family-style meal. This makes it easy for everyone to help themselves. For a more stylish look, you can serve it in small bowls. This way, each guest gets their own. A sprinkle of fresh basil on top adds a nice touch. It makes the dish look bright and tasty! One common mistake is overcooking the pasta. Make sure to cook it just until it's al dente. This keeps your pasta from getting mushy. Another mistake is not chilling the salad. Chilling helps the flavors blend well. If you skip this step, your salad may not taste as good. Aim to chill it for at least 30 minutes before serving. For the full recipe, check out the Zesty Italian Pasta Salad section. {{image_4}} You can easily adapt this salad to fit different diets. For a gluten-free option, use gluten-free rotini pasta. It cooks just like regular pasta. Many brands make great options now. For a vegan twist, swap the mozzarella cheese with vegan cheese or even avocado. Both add creaminess and flavor to your dish. Want to make this salad more filling? Add some protein! Grilled chicken works great. Just chop it into bite-sized pieces. Shrimp is another tasty choice. Cook it until pink and toss it in. For a plant-based option, chickpeas are perfect. They add a nice texture. When you add protein, taste your salad again. You may need to adjust the seasoning. Just add a pinch of salt or a dash of dressing. Using seasonal veggies can elevate your pasta salad. In summer, add fresh zucchini or bell peppers. They bring a nice crunch and color. In fall, roasted butternut squash can add sweet notes. You can also switch up the dressing. Try a balsamic vinaigrette for a tangy twist. This keeps your salad exciting and fresh year-round. To store your zesty Italian pasta salad, use airtight containers. Glass or plastic containers work well. Make sure the lid seals tightly to keep air out. This helps maintain freshness. For best results, store the salad in the fridge within two hours of serving. You can freeze pasta salad, but it might change texture. To freeze, place it in a freezer-safe container. Label the container with the date. When ready to eat, thaw it in the fridge overnight. Reheat gently on the stove or in the microwave. Be careful not to overcook it again. In the fridge, your pasta salad lasts about three to five days. Keep an eye out for signs of spoilage. If it has an off smell, or if the vegetables look mushy, it’s best to toss it. Trust your senses; they guide you well in the kitchen. You can make Zesty Italian Pasta Salad a day before serving. Cook the pasta, mix it with the veggies, and add the dressing. Store it in the fridge. Chilling helps the flavors blend well. Just give it a good toss before serving. This makes it a great option for parties. Yes, you can customize the ingredients to fit your taste. Try adding different vegetables like bell peppers or zucchini. You can also swap out mozzarella for feta or add beans for protein. Get creative! Make it your own. Italian Pasta Salad pairs well with grilled meats, like chicken or steak. It also goes nicely with crusty bread or a fresh green salad. For a fun twist, serve it with garlic bread for a complete meal. No, it's not safe to leave pasta salad out for long. The safe time is about two hours. After that, bacteria can grow, making it unsafe to eat. Keep it chilled if you are not serving it right away. Absolutely! Homemade Italian dressing adds a personal touch. You can control the flavors and ingredients. Mix olive oil, vinegar, herbs, and spices to create your blend. This makes the salad even more special. For the full recipe, check out the section above! This Zesty Italian Pasta Salad is a bright and tasty dish. It combines fresh veggies, pasta, and cheese. Each bite is full of flavor. Here’s a quick look at what you need and how to make it. - 2 cups rotini pasta - 1 cup cherry tomatoes, halved - 1 cup cucumber, diced - 1/2 cup black olives, sliced - 1/2 cup red bell pepper, chopped - 1/4 cup red onion, finely chopped - 1/2 cup mozzarella balls, halved - 1/3 cup Italian dressing (store-bought or homemade) - 1 tablespoon fresh basil, chopped - 1 teaspoon dried oregano - Salt and pepper to taste First, cook the rotini pasta in salted boiling water. Follow the package instructions for best results. Drain and cool the pasta under cold water. This stops the cooking and keeps it firm. While the pasta cools, chop the veggies. Use a large bowl for the cherry tomatoes, cucumber, black olives, red bell pepper, and red onion. Stir them gently to mix. Next, add the cooled pasta to the veggies. Toss in the mozzarella balls, making sure they spread evenly. Now, drizzle the Italian dressing over the mix. Add the chopped basil, dried oregano, and a sprinkle of salt and pepper. Toss everything together until well coated. Finally, cover the bowl and chill in the fridge for at least 30 minutes. This step helps all the flavors blend nicely. Serve the pasta salad in a large bowl. You can also use individual bowls for a fun touch. Garnish with extra basil leaves for color. Enjoy this tasty dish at picnics or family meals! This blog post detailed how to make a zesty Italian pasta salad. We reviewed all the ingredients, cooking steps, and tips for the best flavor. You learned how to store leftovers and variations to suit your diet. Remember to chill the salad and avoid overcooking the pasta. With these tips, you can impress friends and family with this easy dish. Enjoy creating your own version of this refreshing salad!](https://fastmealmate.com/wp-content/uploads/2025/06/c8b502a6-31c8-41d1-a3bc-a403a8dd39f3-768x768.webp)
![- Arugula (4 cups) - Cherry tomatoes (1 cup) - Cucumber (1 medium) - Red onion (1/2 medium) - Kalamata olives (1/2 cup) - Feta cheese (1/4 cup) - Sunflower seeds (1/4 cup, optional) - Extra virgin olive oil (1/4 cup) - Fresh lemon juice (2 tablespoons) - Dried oregano (1 teaspoon) - Salt and black pepper to taste Gathering fresh ingredients is key for this salad. Arugula gives it a peppery taste. Cherry tomatoes add sweetness and color. Cucumber brings crunch, while red onion gives a nice bite. Now, let’s talk about the add-ins. Kalamata olives add a briny flavor. Feta cheese gives creaminess and tang. If you want a crunch, add sunflower seeds. They work well with the other flavors. Next, we need the dressing. Extra virgin olive oil is rich and smooth. Fresh lemon juice brightens the salad. Dried oregano adds an earthy touch. Don’t forget salt and black pepper to finish. You can find the complete recipe in the [Full Recipe]. First, wash the arugula well. Rinse it under cold water to remove dirt. After washing, dry it gently with a salad spinner or a clean kitchen towel. This step helps the leaves stay crisp. Next, prepare the vegetables. Slice the cherry tomatoes in half. Dice the cucumber into half-inch cubes. For the red onion, cut it into thin rings. These steps add color and crunch to your salad. Now, it's time to mix the salad. In a large mixing bowl, add the fresh arugula, halved cherry tomatoes, diced cucumber, sliced red onion, and Kalamata olives. Use your hands to toss the salad gently. This method keeps the leaves from bruising. After mixing, sprinkle the crumbled feta cheese on top. This cheese adds a creamy texture and salty flavor. If you want extra crunch, you can also add sunflower seeds at this point. For the dressing, take a small bowl. Whisk together the extra virgin olive oil, fresh lemon juice, and dried oregano. Add a pinch of salt and pepper for taste. Whisk until everything combines well. Drizzle the dressing over the salad mixture. Use a large spoon or salad tongs to toss gently. This ensures every bite is flavorful without crushing the arugula. For a complete meal, check out the Full Recipe for all the details. To keep arugula fresh, handle it gently. Avoid squishing or bruising the leaves. When washing arugula, fill a bowl with cold water. Submerge the leaves and swish them around. This helps remove dirt without damaging them. Lift the arugula out and place it on a clean towel. Pat it dry carefully to keep the leaves crisp. To boost the flavor of your Mediterranean Arugula Salad, add fresh herbs like basil or parsley. These herbs bring bright notes to the dish. You can also sprinkle in a pinch of crushed red pepper for heat. When garnishing, use a few extra olives or a lemon wedge. This adds a pop of color and makes the salad look inviting. Serve your salad right after mixing for the best taste. The freshness of the arugula is key. If you need to prep ahead, wash and dry the arugula first. Store it in a container lined with paper towels. This keeps the leaves dry and crisp. You can chop the other veggies and store them separately. Just combine everything before serving. Enjoy the full flavors of your Mediterranean Arugula Salad! For the full recipe, refer to the earlier section. {{image_4}} You can make your Mediterranean arugula salad even more filling. Adding grilled chicken is a great choice. It brings a nice smoky flavor. If you prefer a plant-based option, try chickpeas. They add protein and a hearty texture. For a seafood twist, consider incorporating shrimp. Lightly sautéed or grilled shrimp works well. It adds a delightful taste that pairs nicely with the fresh ingredients. Feel free to adjust your salad based on the season. In summer, add ripe peaches or strawberries for sweetness. In fall, consider roasted butternut squash for warmth. You can also change up the dressing. Swap traditional vinegar for balsamic or apple cider vinegar. Each type will give the salad a unique flavor profile. If you want to make your Mediterranean arugula salad vegan, simply omit the cheese. The salad will still be fresh and tasty. For those needing gluten-free options, this salad is perfect. All ingredients are gluten-free, making it a safe choice for everyone. Enjoy your meal without worries! To store leftover Mediterranean Arugula Salad, place it in an airtight container. This helps keep the salad fresh and prevents it from drying out. Use glass or plastic containers with tight lids. If you have a lot of salad, consider dividing it into smaller portions. This makes it easy to grab just what you need. The salad stays fresh for about three days in the fridge. After this, the arugula may wilt, and the tomatoes might get mushy. Watch for signs like a slimy texture or off smells. If you see these, it's best to toss the salad. Fresh ingredients are key to a great taste. To refresh the salad, add a splash of lemon juice or olive oil. This can bring back some flavor and zest. You can also mix in fresh arugula or other greens. If you want to repurpose leftover salad, try using it as a filling for wraps or sandwiches. You can also stir it into cooked pasta for a quick meal. Arugula is low in calories but packed with nutrients. It has vitamins A, C, and K. Arugula also contains calcium and iron. These nutrients support bone health and boost immunity. Eating arugula can improve heart health due to its antioxidants. It's a great choice for a Mediterranean diet. This diet focuses on whole foods, healthy fats, and fresh produce. Arugula fits perfectly into this style of eating, enhancing flavors and health. Yes, you can prepare parts of the salad ahead of time. Wash and dry the arugula and veggies first. Store them separately to keep them fresh. Chop the tomatoes, cucumber, and onion in advance. Keep them in airtight containers in the fridge. You can make the dressing ahead too. Just whisk together olive oil, lemon juice, and seasonings. Store the dressing in a jar. When ready to serve, mix everything together for a fresh salad. You can try several dressings with this salad. A classic vinaigrette works well. Use olive oil, vinegar, salt, and pepper. A lemon-tahini dressing adds a creamy touch. You could also use balsamic vinaigrette for sweetness. Another tasty option is yogurt-based dressing for a tangy kick. Each dressing can enhance the salad’s flavors, so experiment to find your favorite. For the full recipe, check out the details above. In this blog post, we explored the Mediterranean Arugula Salad. We discussed fresh produce, flavorful add-ins, and the best dressing to bring it all together. You learned how to prepare, mix, and serve the salad with tips for freshness and flavor enhancement. Remember, this salad is versatile—you can change the protein or vegetables based on the season. Enjoy making your own tasty versions and store leftovers properly. With the right care, your salad can stay fresh and delicious for days.](https://fastmealmate.com/wp-content/uploads/2025/06/6fae422d-07df-4724-84de-c8edab5789ea-768x768.webp)