Caramel Banana Pecan Cake Deliciously Simple Recipe

Are you ready to impress your friends and family with a cake that’s both easy and delicious? My Caramel Banana Pecan Cake is the perfect blend of sweet and nutty. This simple recipe will guide you through every step, from gathering ingredients to taking that first bite. With tips and variations included, you can make this cake your own. Let’s get baking and create a treat everyone will love!
Ingredients
Detailed Ingredient List
To make the Caramel Banana Pecan Cake, you’ll need:
– 3 ripe bananas, well-mashed
– 1 cup granulated sugar
– 1/2 cup unsalted butter, softened to room temperature
– 2 large eggs, at room temperature
– 1 teaspoon pure vanilla extract
– 1 1/2 cups all-purpose flour
– 1 teaspoon baking powder
– 1/2 teaspoon baking soda
– 1/4 teaspoon fine sea salt
– 1/2 cup buttermilk, at room temperature
– 1 cup pecans, roughly chopped
– 1 cup caramel sauce, either store-bought or homemade
Ingredient Substitutions
You can swap some ingredients based on what you have:
– Bananas: Use applesauce in equal parts for a lower-calorie option.
– Butter: Coconut oil works well if you want a dairy-free cake.
– Buttermilk: Mix milk with a splash of vinegar or lemon juice for a simple substitute.
– Pecans: Walnuts or almonds can replace pecans if needed.
Notes on Freshness of Ingredients
Fresh ingredients make a big difference in flavor. Use ripe bananas for the best taste. Check that your baking powder and baking soda are fresh. Old leavening agents can lead to a flat cake. Store your pecans in the fridge to keep them crunchy. Always use room temperature eggs and butter for a smooth batter. These small details help create a moist and tasty cake.
Step-by-Step Instructions
Preparation Steps
1. Preheat your oven to 350°F (175°C). Grease a 9-inch round cake pan with butter. Dust it with flour to help the cake release easily.
2. In a large bowl, mix the softened butter and sugar. Use an electric mixer on medium speed until it is light and fluffy. This takes about 3-5 minutes.
3. Add the eggs one at a time to the creamed mixture. Mix well after each egg. Then, add the vanilla extract and the well-mashed bananas. Blend until just combined.
4. In another bowl, whisk together the flour, baking powder, baking soda, and salt. This helps to combine the dry ingredients evenly.
5. Gradually mix the dry ingredients into the wet mixture. Alternate with the buttermilk. Start and end with the dry mix. Be gentle to keep the cake soft.
6. Fold in the chopped pecans. Ensure they are evenly spread through the batter without mixing too much.
7. Pour the batter into the prepared cake pan. Use a spatula to smooth the top.
8. Bake the cake for 30-35 minutes. Check if it is done by inserting a toothpick. It should come out clean or with a few crumbs.
9. After baking, let the cake cool in the pan for 10 minutes. Then, transfer it to a wire rack to cool completely.
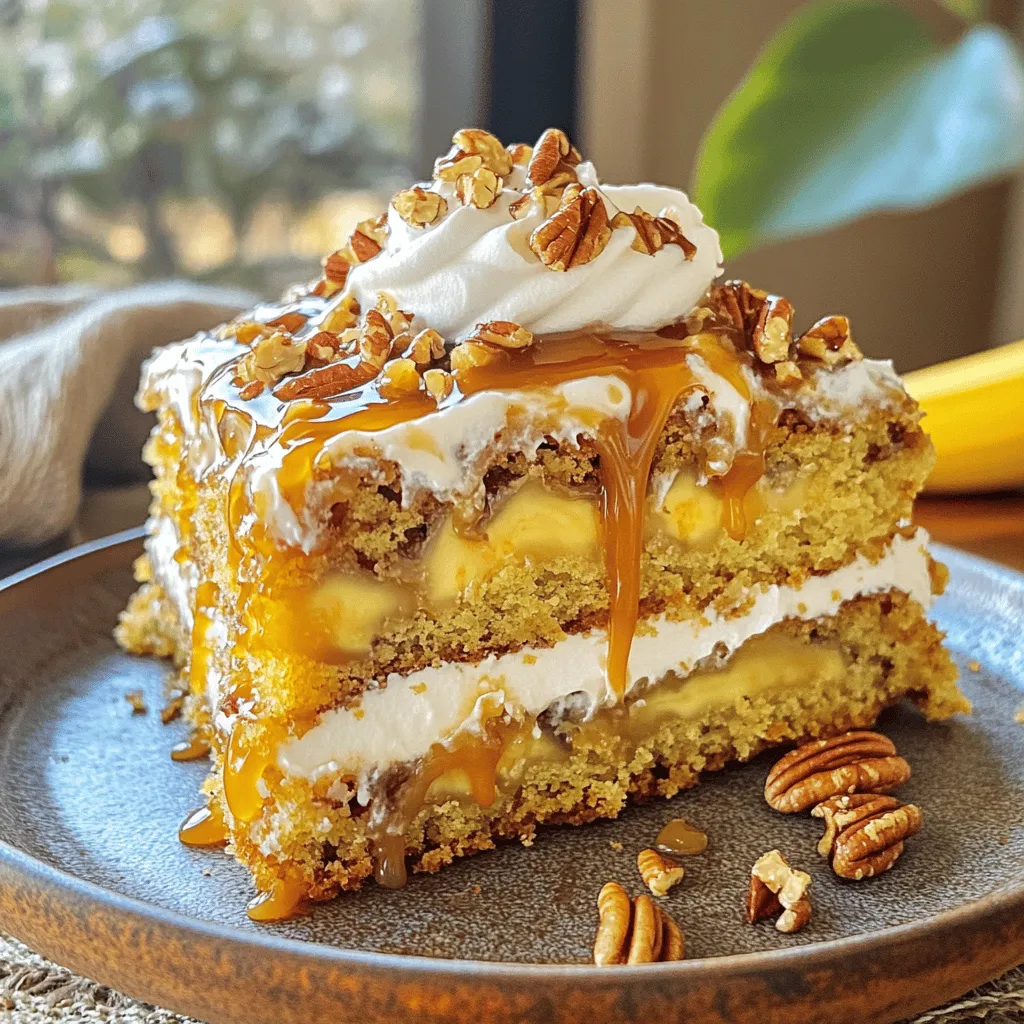
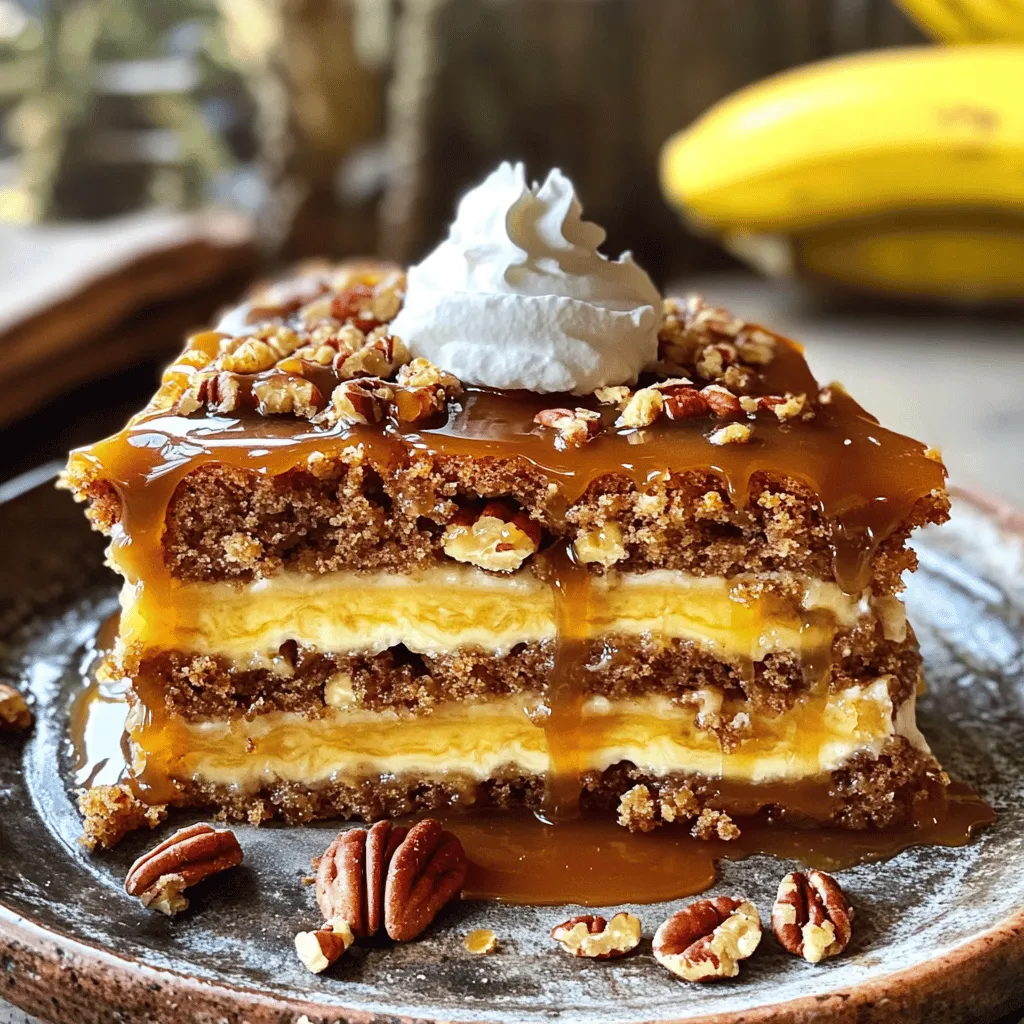
10. Once cool, drizzle the caramel sauce over the top of the cake. For a nice touch, sprinkle more chopped pecans on top.
Baking Tips
– Use ripe bananas for the best flavor.
– Make sure your butter is soft for easy mixing.
– Do not overmix the batter. This keeps the cake light.
– Test for doneness by checking the center with a toothpick.
Cooling and Serving Instructions
– Allow the cake to cool completely before serving.
– Drizzle more caramel sauce and add whipped cream for extra delight.
– Serve on individual plates for a nice presentation. Enjoy every bite!
Tips & Tricks
How to Achieve the Best Flavor
To get the best flavor from your cake, use ripe bananas. The riper they are, the sweeter and more flavorful your cake will be. Choose bananas with lots of brown spots for maximum sweetness. Also, use fresh pecans. Toast them lightly in a pan to bring out their nutty flavor. This extra step adds depth to your cake.
Common Mistakes to Avoid
One common mistake is overmixing the batter. Mix just until the wet and dry ingredients blend. Overmixing will make your cake tough. Another mistake is skipping the cooling step. If you cut the cake too soon, it may fall apart. Allow it to cool fully before slicing for better structure.
Decorating Suggestions
For decoration, drizzle caramel sauce on top just before serving. You can add a sprinkle of chopped pecans for crunch. A dollop of whipped cream beside each slice adds a nice touch. For a pop of color, place a mint leaf on top. These small details make your cake look and taste more special. Enjoy crafting this delightful treat!

Variations
Alternative Nut Options
You can switch pecans for walnuts or almonds. These nuts add a different crunch and flavor. Walnuts give a rich, earthy taste. Almonds bring a light, sweet note. Use the same amount as the recipe calls for. Feel free to experiment and find your favorite!
Adding Fruit or Flavor Enhancements
For more fruity goodness, add blueberries or chopped apples. Blueberries add a burst of juiciness. Apples give a crisp texture and sweet flavor. You can also mix in spices like cinnamon or nutmeg for warmth. A little zest from lemon or orange brightens the cake too!
Gluten-Free Modifications
To make this cake gluten-free, swap all-purpose flour with a gluten-free blend. Look for one that contains xanthan gum for the best texture. You can also use almond flour, but note that it may change the cake’s density. Adjust the baking time as needed, and enjoy a deliciously different cake!
Storage Info
How to Store Leftovers
To store leftovers, wait until the cake cools. Wrap it tightly in plastic wrap or foil. Place it in an airtight container. Store it at room temperature for up to three days. If you need it to last longer, refrigeration is a good option. Just be sure to wrap it well to prevent drying out.
Freezing Instructions
Freezing this cake is easy. First, let it cool completely. Then, slice it into pieces. Wrap each slice in plastic wrap tightly. Place the wrapped slices in a freezer-safe bag. You can freeze them for up to three months. When you’re ready to enjoy, just thaw at room temperature or in the fridge overnight.
Reheating Tips
To reheat the cake, use the microwave or the oven. If using the microwave, warm a slice for about 15 to 20 seconds. Check to avoid overheating. For the oven, preheat it to 350°F (175°C). Place the slice on a baking sheet and warm it for about 10 minutes. This method keeps it moist and delicious. Enjoy your treat warm, and don’t forget to add a drizzle of caramel on top!
FAQs
How can I make the cake more moist?
To make the cake more moist, use very ripe bananas. The riper the banana, the more moisture it adds. You can also add a bit more buttermilk to the batter. If you like, try adding a spoon of sour cream or yogurt. These options give extra creaminess and help keep the cake soft. Remember not to overbake it; this can dry it out. Check the cake a few minutes before the timer goes off.
Can I use different types of nuts?
Yes, you can use different nuts in this cake. Walnuts or almonds make great swaps if you don’t have pecans. They add a nice crunch and flavor. Just chop them roughly, like you would with pecans. If you’re allergic to nuts, try using seeds like sunflower seeds or pumpkin seeds for a similar texture. You can also skip the nuts altogether if you prefer a nut-free cake.
What to serve with Caramel Banana Pecan Cake?
This cake pairs well with many tasty sides. A dollop of whipped cream adds lightness and creaminess. Vanilla ice cream is another great match; the warm cake and cold ice cream create a lovely contrast. Fresh fruit, like sliced strawberries or blueberries, brings a fresh touch. For a special treat, drizzle more caramel sauce on top for extra sweetness.It gives all the steps and ingredients you need to bake this sweet treat at home. Enjoy experimenting with it!
This blog post covered all you need for a great Caramel Banana Pecan Cake. We explored the key ingredients, providing options for freshness and substitutions. Step-by-step instructions helped simplify the baking process. I shared tips to enhance flavor and avoid common mistakes. Don’t forget to check out variations for added creativity.
In the end, baking is fun and rewarding. With the right tips, you’ll impress everyone with your cake. Enjoy the process and savor each bite!


![- 2 large chicken breasts, cut into 1-inch cubes - 1 cup assorted bell peppers (red, yellow, green), chopped into 1-inch pieces - 1 medium red onion, cut into wedges - 1 medium zucchini, sliced into rounds - 1 tablespoon extra-virgin olive oil - 2 tablespoons of your favorite BBQ sauce - 1 tablespoon honey for a touch of sweetness - Sea salt and freshly cracked pepper to taste - 4 cups mixed salad greens (a blend of arugula, spinach, and romaine) - 1/2 cup cherry tomatoes, halved for a pop of color - 1/4 cup crumbled feta cheese, optional for a tangy kick - Fresh parsley, roughly chopped for a vibrant garnish - Cheese and Garnishes - Feta cheese adds a nice salty bite. - Chopped nuts can add a crunch. - Alternative Proteins - You can use shrimp or tofu instead of chicken. - Beef or pork works well too. - Additional Vegetables - Try adding cucumbers for extra freshness. - Avocado can give a creamy texture. Using fresh and colorful ingredients makes this BBQ chicken skewer salad a true feast for the eyes and the taste buds. The combination of marinated chicken and vibrant veggies creates a healthy and satisfying meal. For the full recipe, check out the detailed preparation steps. - Marinating the Chicken Start by cutting the chicken breasts into 1-inch cubes. In a mixing bowl, add the chicken, extra-virgin olive oil, BBQ sauce, honey, sea salt, and cracked pepper. Mix everything well, so each piece gets coated. Cover the bowl with plastic wrap. Place it in the fridge for at least 30 minutes. This time allows the flavors to blend well. - Assembling Skewers After marinating, it’s time to get skewering! Take your marinated chicken and thread it onto skewers. Alternate the chicken cubes with colorful bell peppers, red onion wedges, and zucchini rounds. This not only adds flavor but also makes the skewers look great. - Preheating the Grill While you prepare the skewers, preheat your grill or grill pan to medium-high heat. A hot grill will help achieve nice grill marks and a great char on the chicken. - Cooking the Skewers Place the skewers on the grill. Cook them for about 10-12 minutes. Turn them occasionally to ensure even cooking. The chicken should reach an internal temperature of 165°F. For added flavor, brush some BBQ sauce on the skewers in the last few minutes of cooking. - Combining Salad Ingredients In a large bowl, toss together the mixed salad greens, halved cherry tomatoes, and crumbled feta cheese if you want that tangy kick. The bright colors will make the salad look fresh and inviting. - Plating and Presentation Once the skewers are grilled, let them rest for a minute. Arrange the skewers on top of the salad. Garnish with chopped parsley for a burst of color. If you like, drizzle some extra BBQ sauce over the top for added flavor. This BBQ Chicken Skewer Salad is not just tasty; it looks amazing too! For the complete recipe, check [Full Recipe]. Achieving Perfect Grill Marks To get those perfect grill marks, heat your grill well. Use medium-high heat for the best results. Make sure your grill grates are clean and oiled. Place the skewers at an angle on the grill. After a few minutes, rotate them for those classic crosshatch marks. This not only looks great but adds flavor from the char. Avoiding Dry Chicken To keep your chicken juicy, don’t overcook it. Aim for a cooking time of 10 to 12 minutes. Always check the internal temperature. It should reach 165°F for safety. Marinating the chicken helps lock in moisture. The honey in the marinade adds sweetness and keeps it tender. Pairing with Side Dishes This BBQ chicken skewer salad pairs well with many sides. Try cornbread for a sweet touch or baked beans for heartiness. A light coleslaw adds crunch and balances the meal. You can also serve it with grilled corn on the cob. These sides enhance the flavors of your dish. Creative Ways to Serve For a fun twist, serve the salad in a large bowl. Let guests build their own plates with skewers on top. You could also use small plates for individual servings. Arrange skewers and salad artfully. This makes your meal feel special and inviting. Using Different BBQ Sauces Experiment with various BBQ sauces to find your favorite. A tangy vinegar-based sauce adds zest. A sweet and smoky sauce brings comfort. You can even try spicy sauces for a kick. Each sauce changes the skewer's flavor profile, making it unique. Adding Herbs and Spices Fresh herbs and spices can elevate your salad. Try adding chopped cilantro or basil for brightness. A sprinkle of smoked paprika or cumin gives depth. You can mix in garlic powder or onion powder in the marinade too. This simple addition makes a big difference in taste. For more detailed instructions, check out the Full Recipe. {{image_4}} Gluten-Free Options You can easily make this salad gluten-free. Use gluten-free BBQ sauce to ensure no gluten sneaks in. Check labels on sauces and dressings to be safe. Vegetarian Alternatives For a tasty vegetarian twist, swap chicken for firm tofu or tempeh. Marinate the tofu in the same BBQ sauce for great flavor. Add extra veggies like mushrooms or eggplant for more texture. Spicy BBQ Chicken Skewers Want a kick? Mix in some cayenne pepper or chili powder in your BBQ sauce. You can also serve with a spicy dipping sauce. This will spice up your salad and give it a fun twist. Asian-Inspired Salad Version Try an Asian spin! Replace BBQ sauce with teriyaki sauce for a new flavor. Add sesame oil and some sliced green onions for extra zing. Serve with a sprinkle of sesame seeds on top for crunch. Summer Veggie Additions Summer is perfect for fresh veggies. Add corn, cherry tomatoes, or cucumbers to your salad. These bright flavors make your dish feel light and refreshing. Fall-inspired Ingredients As the weather cools, swap in autumn veggies like roasted butternut squash or Brussels sprouts. Toss in some dried cranberries or walnuts for a seasonal touch. These changes will warm up your meal perfectly. For the full recipe, check out BBQ Chicken Skewer Salad with a Twist. - Best Practices for Refrigeration After making your BBQ chicken skewer salad, let it cool to room temperature. Place any leftovers in an airtight container. Store it in the fridge. This keeps your meal fresh and safe to eat for later. Enjoy your salad within three days for the best taste. - Freezing Chicken Skewers If you have leftover chicken skewers, you can freeze them. Wrap each skewer tightly in plastic wrap. Then, place them in a freezer bag. Be sure to remove as much air as possible before sealing. This helps prevent freezer burn. You can freeze them for up to three months. - Best Methods for Reheating To reheat your chicken skewers, the oven works best. Preheat your oven to 350°F. Place the skewers on a baking sheet and cover them with foil. Heat for about 10-15 minutes. You can also use a microwave. Heat on a microwave-safe plate for 1-2 minutes, checking often. - Tips to Maintain Flavor If you want to keep the flavor strong, brush the skewers with a bit of BBQ sauce before reheating. This adds moisture and taste. Avoid reheating the salad, as fresh greens lose their crunch. - Recommended Storage Timeframes Your BBQ chicken skewer salad lasts about three days in the fridge. Chicken skewers can stay fresh in the freezer for up to three months. Always check for freshness before eating. - Signs of Spoilage Look for changes in color or smell. If the chicken looks dull or has an off odor, discard it. Wilting greens or slimy texture are also signs your salad is no longer good. Always trust your senses when it comes to food safety. - Alternative Proteins: You can use shrimp, beef, or pork. These meats add unique flavors and textures. Cut them into similar-sized pieces to ensure even cooking. - Plant-Based Options: Try tofu or tempeh for a vegan twist. Firm tofu holds up well on skewers. Marinate it just like chicken to soak up all the flavors. - Prepping Ingredients in Advance: Yes! You can chop the veggies and marinate the chicken a day before. Just keep them in the fridge until you’re ready to grill. - Storing Marinated Chicken: Store the marinated chicken in an airtight container. This keeps it fresh and ready for grilling later. - Popular BBQ Sauce Brands: Look for brands like Sweet Baby Ray’s or Stubbs. They offer bold flavors that work well for grilling. - Homemade BBQ Sauce Recommendations: Making your own is easy! Combine ketchup, brown sugar, and vinegar for a tangy taste. Add spices like paprika and garlic for extra flavor. This blog post covered key steps for making delicious chicken skewers and salad. We explored main and optional ingredients, ensuring you have choices for every taste. The grilling process was detailed, alongside tips for perfecting flavors. Variations and storage tips help you adapt and maintain your dish. Cooking can be fun and easy. With practice, you can master this recipe and impress others. Enjoy your tasty creations and share them with friends!](https://fastmealmate.com/wp-content/uploads/2025/06/4abc5258-ee82-48d5-ae8b-570509c2b72d-768x768.webp)


