Are you ready to wow your friends and family with an amazing dessert? This Cannoli Cake is simple, flavorful, and packed with all the classic cannoli tastes you love. In this post, I’ll guide you step-by-step through the essentials, from choosing fresh ingredients to perfecting the frosting. Let’s dive into a world of sweet layers and delightful flavors that will make your next gathering unforgettable!
Ingredients
List of Ingredients
– 2 cups all-purpose flour
– 1 ½ cups granulated sugar
– ½ cup unsalted butter, softened
– 1 cup creamy ricotta cheese
– 3 large eggs, at room temperature
– 1 tsp pure vanilla extract
– 1 tsp baking powder
– ½ tsp baking soda
– ½ tsp salt
– 1 tsp ground cinnamon
– 1 cup mini chocolate chips
– ½ cup crushed pistachios (for topping)
– Powdered sugar (for dusting)
To create a Cannoli Cake, use fresh ingredients. Fresh items bring out the best taste. Quality ricotta makes the cake creamy and rich. Fresh eggs help the cake rise well. I always suggest using high-quality vanilla extract. It enhances the flavor.
You can make some substitutions if needed. For a dairy-free option, try almond or coconut milk yogurt instead of ricotta. You can also use dairy-free butter. These swaps keep the taste close to the original.
Another option is to switch out regular flour for gluten-free flour. This helps those with gluten sensitivities enjoy the cake too. Whatever you choose, keep it fresh to ensure the best Cannoli Cake experience.
Step-by-Step Instructions
Preparation Steps
1. Preheat the Oven: Start by preheating your oven to 350°F (175°C).
2. Prepare Cake Pans: Grease two 9-inch round cake pans with butter. Dust them with flour to help the cakes come out easily.
3. Cream the Butter and Sugar: In a large bowl, mix the softened butter and granulated sugar. Use an electric mixer for about 3-4 minutes until light and fluffy.
4. Incorporate Ricotta: Add the ricotta cheese to this mixture. Blend until it is smooth and free of lumps.
5. Mix in Eggs and Vanilla: Crack three large eggs into the bowl, mixing well after each. Add in the pure vanilla extract and combine.
6. Combine Dry Ingredients: In a separate bowl, whisk together the flour, baking powder, baking soda, salt, and cinnamon.
7. Combine Wet and Dry Mixtures: Gradually add the dry mix to the ricotta mix. Stir gently until just combined. Don’t overmix; some lumps are fine!
8. Fold in Chocolate Chips: With a spatula, fold in mini chocolate chips until they are spread throughout the batter.
9. Divide the Batter: Pour the batter evenly into the prepared pans. Smooth the tops with a spatula.
Baking Details
– Baking Time and Temperature: Place the pans in the oven and bake for 25-30 minutes.
– Check Doneness: To check if the cakes are done, insert a toothpick in the center. It should come out clean.
Cooling and Assembly
1. Cool the Cakes: After baking, take the cakes out and let them cool in the pans for about 10 minutes. Then, invert them onto wire racks to cool completely.
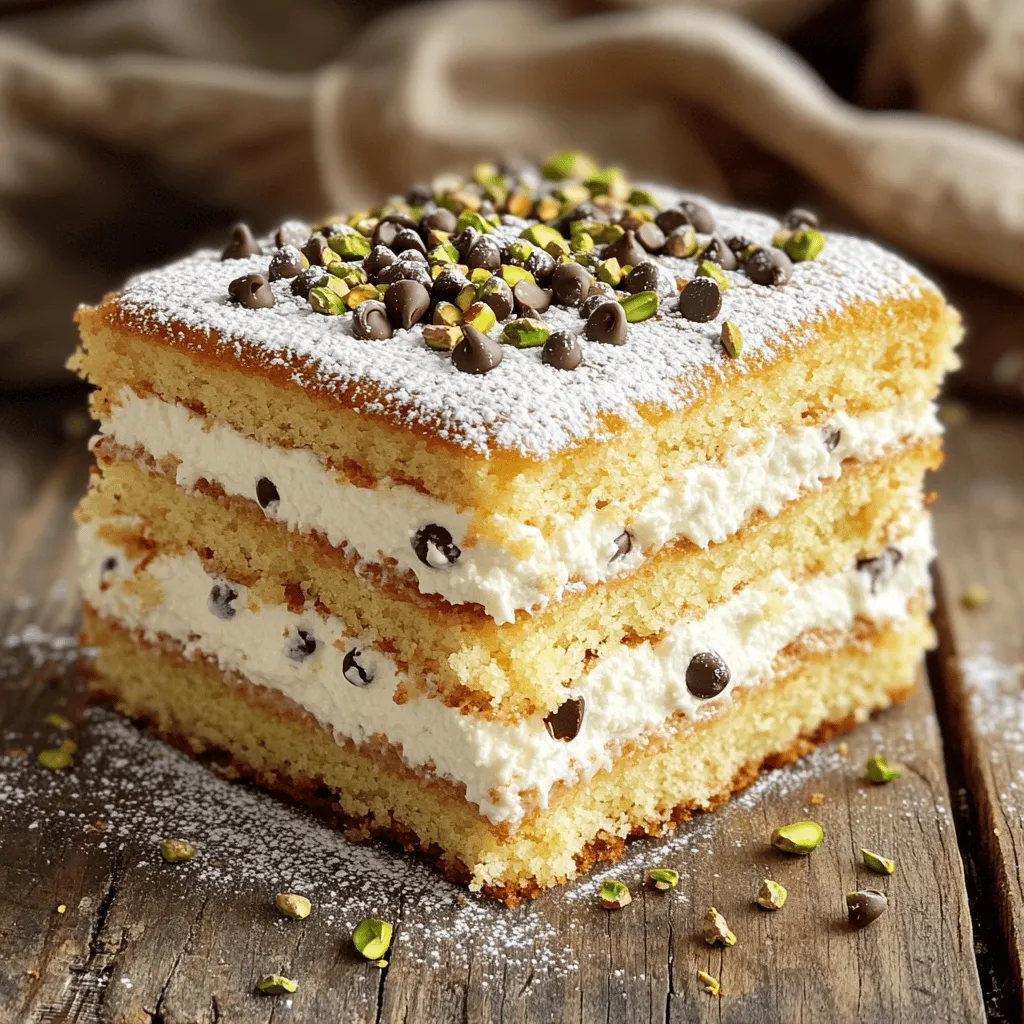
2. Layer the Cakes: Once cool, put one cake layer on a serving plate. Spread a layer of ricotta filling on top. You can mix powdered sugar with ricotta for sweetness. Place the second layer on top.
3. Frost: Use any leftover ricotta filling or whipped cream to frost the top and sides of the cake.
4. Garnish: For a lovely finish, sprinkle crushed pistachios on top. Dust it with powdered sugar before serving.
Tips & Tricks
Achieving the Perfect Texture
To get the best texture in your Cannoli Cake, avoid overmixing. Mix until the wet and dry ingredients just come together. You want some lumps to keep it light. Using room temperature ingredients is key. It helps everything blend smoothly, which gives the cake a fluffy texture.
Flavor Enhancements
You can add spices or extracts for a unique twist. Try adding a pinch of nutmeg or almond extract for extra flavor. These small changes can make your cake stand out. For serving, consider pairing it with fresh berries or a scoop of vanilla ice cream. These sides brighten the cake and add freshness.

Variations
Flavor Variations
You can have fun with Cannoli Cake by changing the filling. While the classic ricotta is great, try adding chocolate or fruit.
– Chocolate Filling: Mix in cocoa powder or melted chocolate for a rich taste.
– Fruit Filling: Use pureed strawberries or raspberries for a fresh twist.
You can also switch up the cake flavors. A lemon or almond cake base adds a new layer of taste. Want to mix up the frosting? Use whipped cream, cream cheese, or even a flavored buttercream.
Dietary Modifications
If you want a gluten-free version, swap regular flour for almond or coconut flour. You can also find gluten-free cake mixes.
For a vegan Cannoli Cake, replace eggs with flax eggs and use vegan butter. Substitute ricotta with cashew cream or a store-bought vegan alternative.
If you’re cutting back on sugar, reduce the granulated sugar by half. You can also use natural sweeteners like honey or maple syrup. Just keep in mind that these may change the cake’s texture.
These variations help you enjoy Cannoli Cake while meeting different dietary needs.
Storage Info
Best Practices for Storing Cannoli Cake
To keep your Cannoli Cake fresh, store it in an airtight container. This will help prevent it from drying out and losing flavor. If you have leftovers, place them in the fridge. It is best to wrap each slice in plastic wrap before putting it in the container.
For freezing, slice the cake first. Wrap each slice tightly in plastic wrap, then place them in a freezer-safe bag. This way, you can take out one slice at a time. When you want to enjoy a slice, let it thaw in the fridge overnight.
Shelf Life
Cannoli Cake can stay fresh in the fridge for about 4 to 5 days. If frozen, it can last up to 3 months. Always look for signs of spoilage. If the cake smells off or has a change in texture, it’s best to toss it. Mold is a clear sign that the cake is no longer safe to eat. Enjoy your Cannoli Cake while it’s fresh for the best taste!
FAQs
Common Questions about Cannoli Cake
What is Cannoli Cake?
Cannoli cake is a delightful dessert inspired by the classic Italian cannoli. It features layers of moist cake filled with a rich ricotta mixture. The cake often includes mini chocolate chips and hints of cinnamon, giving it a sweet and creamy flavor.
Can I make Cannoli Cake ahead of time?
Yes! You can make cannoli cake a day or two in advance. Just store it in the fridge. Keep it covered to maintain freshness. This also allows the flavors to blend nicely.
How long does Cannoli Cake last in the refrigerator?
Cannoli cake lasts about 3 to 5 days in the refrigerator. Make sure to cover it well. Check for any signs of spoilage before serving.
Can I use other cheeses instead of ricotta?
You can use mascarpone cheese if you want a richer taste. Cream cheese is another option for a different flavor. However, ricotta provides the classic cannoli texture you crave.
Serving Suggestions
Pairing Cannoli Cake with beverages
Cannoli cake pairs well with coffee or espresso. A glass of sweet dessert wine also complements its flavors. For a non-alcoholic option, try a chilled almond milk or vanilla soda.
Ideal occasions for serving Cannoli Cake
Serve cannoli cake at birthday parties, family gatherings, or holidays. It’s perfect for any celebration. You can also enjoy it as a special treat on a cozy night in.
Making a Cannoli Cake is fun and rewarding. You learned about fresh ingredients, step-by-step baking, and cooling tips. We explored variations and storage methods, too. Remember, fresh tastes best, and small changes can make a big difference. You can adapt this cake to fit any diet or preference. Now it’s time to gather your ingredients and start baking. Enjoy each bite of your tasty creation! This cake is a treat everyone will love.


