Berry Peach Cheesecake Delightfully Creamy Recipe

Craving a dessert that’s both fruity and creamy? You’re in the right place! This Berry Peach Cheesecake combines sweet peaches and fresh berries for an unforgettable treat. With a buttery crust and a smooth filling, you’ll impress everyone with this easy, step-by-step recipe. Plus, I’ll share valuable tips and fun variations to customize this cheesecake to your taste. Let’s dive into the details of this mouthwatering delight!
Ingredients
Main Ingredients for Berry Peach Cheesecake
– 1 ½ cups graham cracker crumbs
– 16 oz cream cheese, softened
– 2 cups fresh peaches, peeled and chopped
– 1 cup mixed berries (strawberries, blueberries, raspberries)
The graham cracker crumbs form the crust. The cream cheese makes it rich and creamy. Fresh peaches add sweetness, while mixed berries bring a pop of flavor.
Optional Ingredients for Flavor Enhancement
– 1 cup sour cream
– 1 teaspoon vanilla extract
– Zest of 1 lemon
Sour cream adds tang and creaminess. Vanilla extract boosts sweetness. Lemon zest gives a refreshing touch.
Essential Baking Supplies
– 9-inch springform pan
– Electric mixer
A springform pan helps you remove the cheesecake easily. An electric mixer makes mixing the cream cheese simple.Happy baking!
Step-by-Step Instructions
Prepping the Crust
1. Preheat your oven to 325°F (163°C). This step is key for a great crust.
2. In a bowl, mix 1 ½ cups of graham cracker crumbs with ⅓ cup of granulated sugar.
3. Pour in ½ cup of melted butter. Stir until it looks like wet sand.
4. Press this mixture firmly into your springform pan. Bake for 10 minutes. Let it cool.
Preparing the Cheesecake Filling
1. Grab a large bowl and beat 16 oz of softened cream cheese. Mix until it is smooth.
2. Add 1 cup of sour cream, 1 cup of sugar, and 1 teaspoon of vanilla extract. Mix until smooth.
3. Add 3 large eggs, one at a time. Beat gently after each egg to avoid lumps.
4. Gently fold in the zest of 1 lemon, 2 cups of chopped peaches, and 1 cup of mixed berries.
Baking the Cheesecake
1. Pour the cheesecake filling into the cooled crust. Smooth the top with a spatula.
2. Bake in the oven for 50-60 minutes. The edges should be set, but the middle should jiggle slightly.
3. Turn off the oven and crack the door. Let the cheesecake cool in the oven for 1 hour.
4. After cooling, let it reach room temperature, then refrigerate for at least 4 hours. For best results, chill overnight.Enjoy your creamy creation!
Tips & Tricks
Achieving the Perfect Creamy Texture
To get a smooth, creamy texture in your cheesecake, avoid overmixing the filling. When you mix too much, air gets in, and this can cause cracks later. Mix just until the ingredients blend together. This keeps the cheesecake silky and rich.
Cooling the cheesecake in the oven helps prevent cracks. After baking, turn off the oven and crack the door open. Let it sit in there for about an hour. This gradual cooling makes a big difference in the final look.
Serving Suggestions
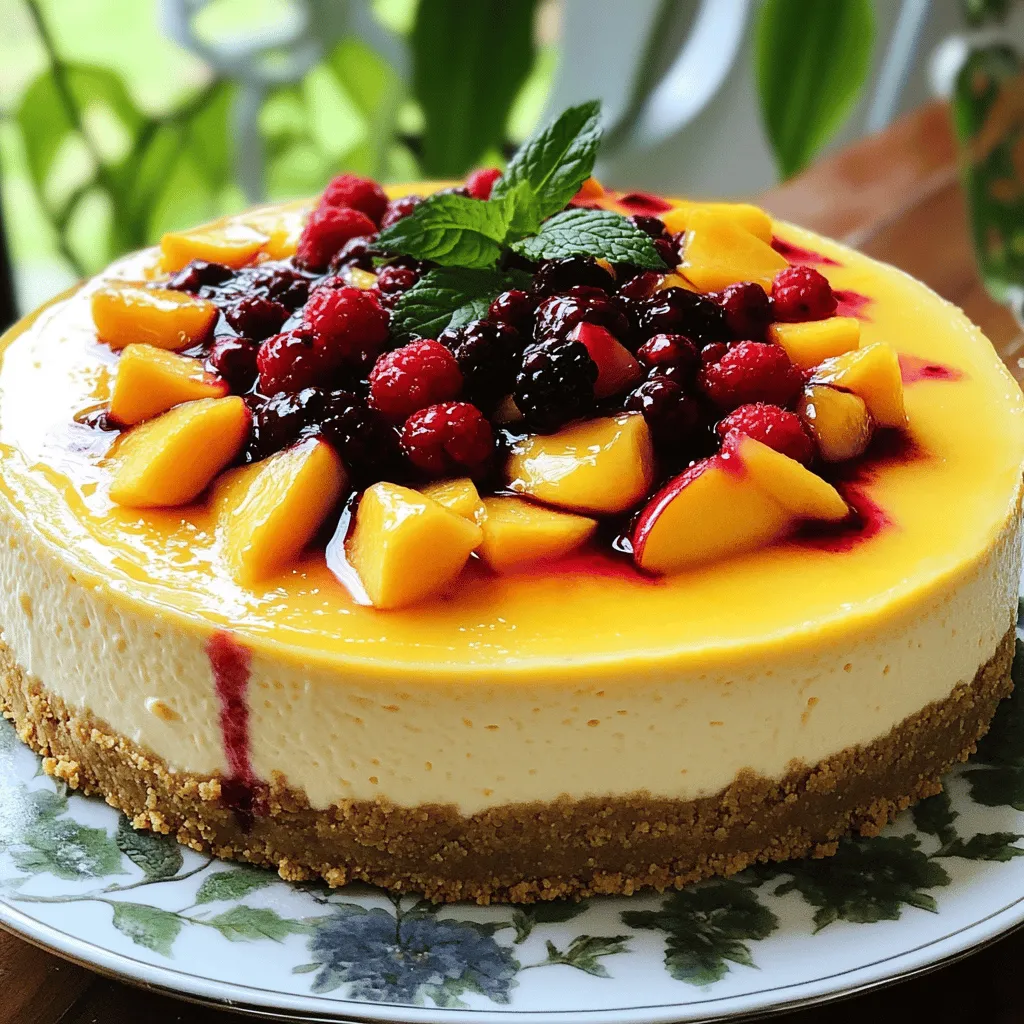
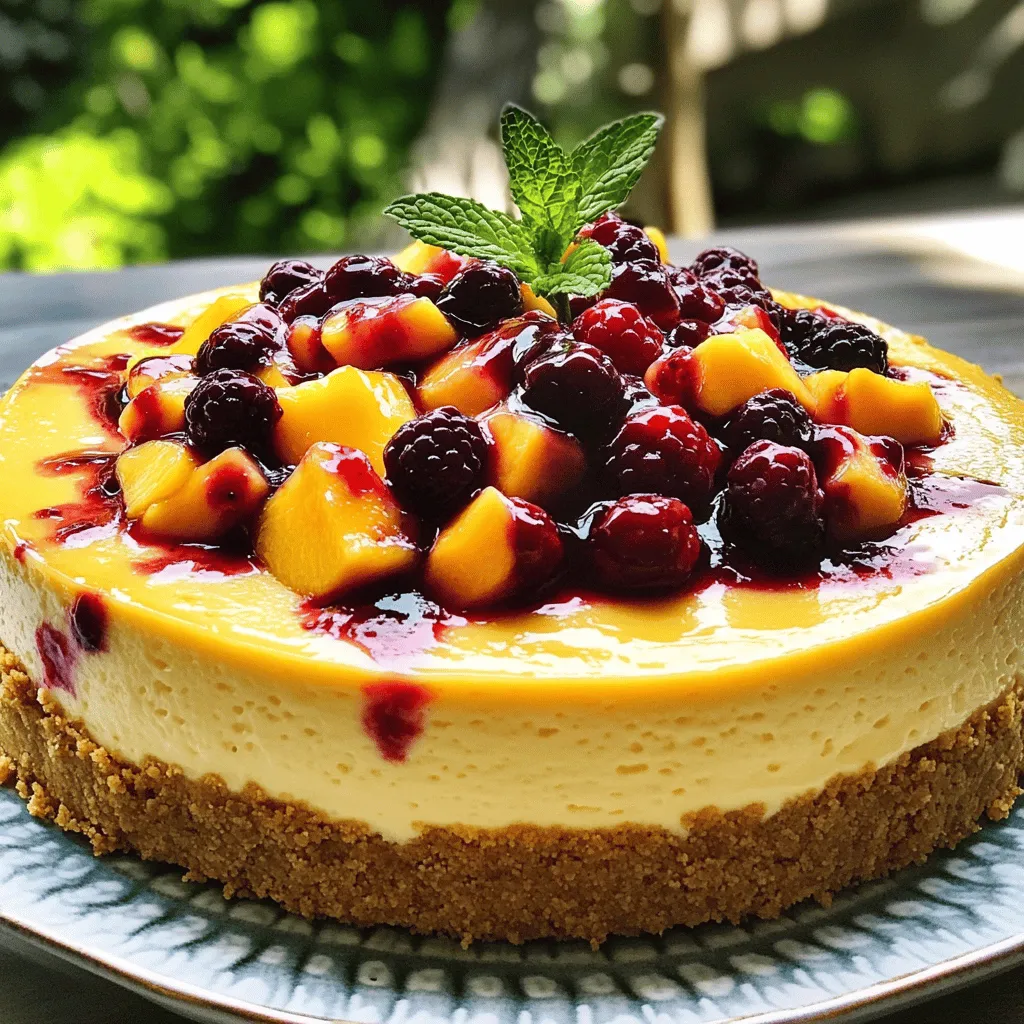
How you top your cheesecake can make it even better. I love to drizzle a homemade berry sauce over each slice. Fresh mint leaves and extra berries on top add a nice touch. It makes each slice look colorful and tasty.
When serving drinks, pair your cheesecake with a light tea or sparkling water. You could also serve it with a scoop of vanilla ice cream. Both options enhance the fruity flavors of the cheesecake.
Enhancing Flavor
To add more depth, think about extra spices. A pinch of cinnamon or nutmeg can bring warmth. If you like a zing, try adding a drop of almond extract. It pairs well with the fruit.
You can also play with different types of fruit. Swap peaches for mangoes or pineapples for a tropical twist. Use any berries you love, like blackberries or cherries.

Variations
Flavored Cheesecakes
You can change the flavor of your cheesecake easily. For a tropical twist, use mango or pineapple instead of peaches. The sweet, juicy taste will make your dessert refreshing. You can also mix in other berries. Try raspberries, blueberries, or blackberries. They add a nice pop of color and flavor.
Dietary Adjustments
If you need a gluten-free option, use gluten-free graham crackers for the crust. Just crush them like regular graham crackers and mix with melted butter and sugar. For vegan cheesecake, use cashew cream or coconut cream instead of cream cheese. You can also replace eggs with flaxseed meal mixed with water. This way, everyone can enjoy your cheesecake!
No-bake Version
Creating a no-bake berry peach cheesecake is simple. Instead of baking, chill it in the fridge. Use the same crust recipe and press it into your pan. For the filling, blend cream cheese, sugar, and vanilla until smooth. Fold in your fruits. Pour the filling over the crust. Then, let it chill for at least four hours. You’ll have a creamy dessert without ever turning on the oven.
Storage Info
Short-Term Storage
To keep your berry peach cheesecake fresh, store it in the fridge. Wrap it tightly in plastic wrap or place it in an airtight container. This helps to prevent it from absorbing other odors. Your cheesecake can stay fresh in the fridge for about 4 to 5 days.
Freezing Instructions
If you want to save some cheesecake for later, you can freeze it. First, let the cheesecake cool completely. Then, wrap it in plastic wrap and aluminum foil. This double layer protects it from freezer burn. You can freeze it for up to 3 months. When you are ready to eat it, simply take it out of the freezer. Place it in the fridge for several hours or overnight to defrost.
Shelf Life Tips
Always check for signs of spoilage before eating leftover cheesecake. If you notice any mold or an off smell, it’s best to throw it away. To extend freshness, avoid cutting into the cheesecake until you are ready to serve. Keeping it whole helps it last longer. Enjoy your creamy dessert without the worry of spoilage!
FAQs
What is the best way to prevent cheesecake cracks?
To prevent cracks in your cheesecake, use a few simple techniques. First, mix your filling gently. Overmixing adds air, which can cause cracks. Second, let the cheesecake cool slowly. After baking, crack the oven door open. This helps the cheesecake cool gradually. Lastly, refrigerate it overnight for the best results. These methods will give you a smooth, creamy cheesecake.
Can I use frozen fruits in this recipe?
Yes, you can use frozen fruits in this recipe. Frozen fruits are convenient and can be just as tasty. They often have great flavor and are easy to find. Just remember to thaw and drain them before mixing them into the batter. This avoids adding extra moisture. Using frozen fruits can save you prep time while still giving a great flavor.
How long does it take for cheesecake to set?
Cheesecake usually takes about 4 hours to set in the fridge. However, for the best flavor, leave it overnight. Cooling it in the oven for about an hour after baking helps too. This gradual cooling allows the cheesecake to firm up without cracking. Patience is key for that perfect slice!
Is it necessary to use a water bath?
Using a water bath is not necessary, but it has its benefits. A water bath helps distribute heat evenly. This can give you a creamier texture. It also lowers the chance of cracks forming. If you have time, consider using this method. It can elevate your cheesecake experience.
This blog post detailed how to make a delicious berry peach cheesecake. You learned about key ingredients, essential tools, and step-by-step instructions. We explored tips to achieve a creamy texture and variations, like no-bake options and dietary adjustments. Remember, storing your cheesecake properly ensures its freshness. With these insights, you are set to impress friends and family with your cheesecake. Enjoy crafting your dessert, and don’t forget to share!


![For a great crispy tofu panini, you need: - 1 block firm tofu, well-pressed and sliced into 1/2 inch slabs - 1 tablespoon soy sauce - 1 tablespoon sesame oil - 1 tablespoon cornstarch - 1 large round ciabatta or focaccia bread, sliced in half horizontally - 1/2 cup fresh spinach leaves, washed and dried - 1/2 red bell pepper, roasted, peeled, and sliced thin - 1 small ripe avocado, sliced - 2 tablespoons hummus or vegan mayonnaise - Salt and freshly ground black pepper to taste - Olive oil, for grilling These ingredients work together to create a crispy, tasty panini that is both filling and healthy. You can add some extra flavor with these ingredients: - Sliced tomatoes for freshness - Red onion for a bit of bite - Fresh herbs like basil or cilantro - A dash of hot sauce for heat If you want to mix things up, these optional ingredients can make your panini even better. To make your meal complete, consider these sides: - A light salad with lemon vinaigrette - Sweet potato fries for crunch - A bowl of soup, like tomato or lentil These sides balance the flavors and add variety to your meal. Plus, they are easy to prepare! For the full recipe, check out the detailed steps to bring your crispy tofu panini to life. To start, we need to prepare the tofu. First, press the block of firm tofu. Use a clean kitchen towel or tofu press. This step removes excess moisture. Removing moisture is key for achieving crispiness later. Once pressed, slice the tofu into even slabs, each about 1/2 inch thick. This ensures even cooking and crispiness. Next, we will marinate the tofu. In a mixing bowl, whisk together soy sauce, sesame oil, and a pinch of salt and pepper. Then, add your tofu slices to this mixture. Make sure each piece gets coated well. Let the tofu soak in the marinade for about 15 minutes. This allows the tofu to absorb all those tasty flavors. Now, it’s time to cook the tofu. After marinating, take the slices out and sprinkle cornstarch on both sides. This coating is crucial for that nice, crispy texture. Heat a non-stick skillet over medium heat. Add a drizzle of olive oil to the pan. When the oil shimmers, carefully lay the coated tofu slices in the skillet. Cook each slice for about 4-5 minutes on each side. Look for a golden brown color and a crispy texture. Once done, transfer the tofu to a plate and set it aside. Let’s move on to assembling the panini. Take your ciabatta or focaccia bread and cut it in half horizontally. Spread hummus or vegan mayo on the inside of both halves. This adds moisture and flavor to the sandwich. On the bottom half, layer fresh spinach leaves first. Then add the crispy tofu slices, followed by roasted red bell pepper slices. Finally, place avocado slices on top. Now, close the sandwich with the top half of the bread. Press it down gently to hold everything in place. Next, we grill the panini. Preheat your panini press or another skillet over medium heat. Brush the outside of the sandwich with olive oil. This helps to create a crunchy crust while grilling. If using a skillet, place a heavy pan on top of the sandwich. This presses it down as it cooks. Grill for about 3-4 minutes on each side. Look for a beautiful golden brown color and a crispy texture. Once grilled to perfection, remove the panini from the heat. Slice it in half with a sharp knife and serve warm for the best taste. Enjoy your crispy tofu panini, a flavorful and satisfying delight! For the full recipe, check out the earlier sections. To make your tofu crispy, follow these tips: - Press the tofu well: Remove as much water as possible. This helps the tofu absorb flavors better. - Use cornstarch: Coat both sides of the tofu slices with cornstarch. This creates a crunchy crust. - Heat your skillet properly: Use medium heat and wait for the oil to shimmer before adding the tofu. - Do not overcrowd the pan: Cook in batches if needed. This allows each piece to get crisp. Here are some mistakes to watch out for: - Skipping the marination: Marinating adds flavor. Don’t rush this step. - Using too little oil: A light drizzle helps achieve that golden color and crisp texture. - Not slicing evenly: Make sure your tofu slabs are even. This ensures consistent cooking. - Opening the panini too soon: Let it grill fully to get the best texture. Having the right tools makes a big difference. Here are my top picks: - Panini press: This tool cooks evenly and gives perfect grill marks. - Non-stick skillet: If you don’t have a press, a good skillet works too. - Heavy pan: Use it to press down the sandwich while it cooks in a skillet. - Sharp knife: A sharp knife helps slice your panini without squishing it. Using these tips and tools, you can create a delicious crispy tofu panini. For the full recipe, check out the earlier sections. {{image_4}} When making a crispy tofu panini, you can switch up the ingredients to match your taste. This adds fun and keeps things interesting. You can use different sauces or spreads. Try using pesto or spicy mustard instead of hummus. Swap spinach for kale or arugula for a bolder flavor. For added crunch, add sliced cucumbers or pickles. You can also replace the red bell pepper with grilled zucchini or eggplant. Each swap brings a new twist to your panini. To keep this dish vegan, stick with plant-based ingredients. Use gluten-free bread to make it gluten-free. Many brands offer delicious options that taste great. Check labels to ensure they have no animal products. This allows everyone to enjoy the crispy tofu panini without worry. Fresh produce can change with the seasons. In spring, try adding fresh asparagus or sprouts. In summer, include ripe tomatoes or zucchini. In fall, swap in roasted butternut squash for a sweet flavor. Winter might call for roasted root vegetables like carrots or sweet potatoes. These seasonal swaps help you enjoy fresh tastes all year long. This recipe offers endless possibilities for creativity. Use the [Full Recipe] as your base, and let your imagination run wild with variations! To keep your crispy tofu panini fresh, wrap it tightly. Use plastic wrap or foil for best results. Store it in the fridge for up to three days. Avoid leaving it out at room temperature. This helps prevent sogginess and keeps the flavors intact. To reheat, use a skillet over medium heat. Place the panini in the skillet and cover it. Heat for about 4-5 minutes on each side. This method helps restore the crispiness. You can also use a toaster oven for a similar effect. Avoid the microwave, as it can make the bread soft. If you want to freeze your panini, wrap it well in plastic wrap and foil. It can last for up to a month in the freezer. When you’re ready to eat, thaw it in the fridge overnight. Reheat it in a skillet for the best texture. This way, you can enjoy a quick meal without losing flavor. To make tofu extra crispy, start with firm tofu. Press it well to remove water. Slice it into even slabs. Marinate the slices in soy sauce and sesame oil. Let them soak for at least 15 minutes. After marinating, coat each slice with cornstarch. This coating helps create that crunchy texture you want. Cook the tofu in a hot skillet with olive oil. Flip it until golden brown on both sides. Yes, you can use many types of bread. Ciabatta and focaccia work great, but others can too. Try sourdough or whole grain for a different taste. Each bread type adds its own flavor and texture. Choose one that you love, and enjoy your panini in a new way. Dipping sauces can enhance your panini experience. Hummus is a classic choice. It adds creaminess and flavor. Vegan mayo also works well for a smooth dip. You can try spicy salsa for a kick. Another option is a tangy vinaigrette. Each sauce complements the crispy tofu and adds fun flavors. For more ideas, check out the Full Recipe for inspiration. In summary, we explored how to make a crispy tofu panini. We covered the main and optional ingredients, step-by-step cooking tips, and even some fun variations. Remember to store leftovers well and reheat them correctly for the best taste. Experiment with flavors and enjoy this dish as part of your meals. With a few simple steps, you can have a delicious, crispy tofu panini that satisfies your cravings. Enjoy your cooking journey!](https://fastmealmate.com/wp-content/uploads/2025/06/c0074219-6fc3-4ba3-a1d2-dcd469194d4e-768x768.webp)


![- 1 pound fresh okra, thoroughly washed and chopped into small bite-sized pieces - 1/4 cup fresh cilantro, finely chopped - 1/4 cup green onions, finely sliced The fresh okra gives these fritters their unique texture and flavor. Look for firm, green okra pods. They should not be too large, as larger okra can be tough. Fresh cilantro and green onions add brightness and enhance the flavor. - 1 cup chickpea flour (also known as besan) - 1/2 cup cornmeal for added texture - 1 teaspoon cumin powder - 1 teaspoon coriander powder - 1/2 teaspoon turmeric powder for color - 1 teaspoon red chili powder (adjust per your spice preference) - 1 teaspoon baking powder for fluffiness - Salt, to taste Chickpea flour is the base for the batter. It gives a nice crunch and a nutty taste. Cornmeal adds extra texture that makes each bite satisfying. The spices bring warmth and depth, while baking powder ensures the fritters puff up nicely. You can consider adding a pinch of garlic powder or onion powder for a savory kick. A splash of lemon juice can brighten the dish. If you enjoy heat, diced jalapeños can add a spicy twist. Experiment with these options to find your favorite flavor combination. For the complete recipe, check out the [Full Recipe]. Start with fresh okra. Wash it well under cool water. Make sure to remove all dirt. Pat the okra dry using a paper towel. This step is key for crispiness. Once dry, chop the okra into small pieces. Aim for uniform sizes to ensure even cooking. In a large bowl, mix the dry ingredients. Combine chickpea flour, cornmeal, cumin, coriander, turmeric, red chili powder, baking powder, and salt. Use a whisk to blend them thoroughly. This ensures all the spices mix evenly. Next, add the chopped okra, cilantro, and green onions. Gently toss to coat the okra with the flour mix. Be careful not to break the okra pieces. Slowly add water to the bowl. Stir until you reach a thick batter. The batter should cling to the okra pieces. Heat vegetable oil in a deep frying pan. Use enough oil to cover the fritters by about 1-2 inches. Get the oil hot over medium heat. To test, drop a small amount of batter in the oil; it should sizzle. Use a tablespoon to drop spoonfuls of the batter-coated okra into the hot oil. Don’t overcrowd the pan. This helps keep the oil hot and ensures crispiness. Fry the fritters for 3-4 minutes. They should turn golden brown and crisp. When done, remove them with a slotted spoon. Place them on paper towels to drain excess oil. Enjoy them hot for the best flavor and crunch! For the full recipe, check out the section above. To make crispy okra fritters, start with fresh okra. Moist okra makes the fritters soggy. Make sure to wash and dry the okra well. Chop the okra into small, even pieces. This helps them cook evenly. When mixing the batter, aim for a thick consistency. It should cling to the okra without running off. If the batter is too thin, your fritters will not be crispy. To boost flavor, use fresh herbs like cilantro and green onions. The spices are key too. Cumin, coriander, and red chili powder add depth. You can adjust the spice level to your taste. For a vibrant look, add turmeric too. This gives the fritters a lovely golden color. And don't forget the baking powder! It makes the fritters light and airy. One common mistake is overcrowding the pan. This lowers the oil temperature and leads to soggy fritters. Fry in small batches for the best results. Another mistake is not letting the oil heat enough before frying. A good test is to drop a small spoonful of batter in the oil. If it sizzles, the oil is ready. Lastly, skip the excess water when mixing the batter. Too much water makes for a runny mix, which is not ideal. For my detailed cooking process, check the Full Recipe. {{image_4}} To make crispy okra fritters gluten-free, use rice flour instead of chickpea flour. Rice flour gives a light crunch. You can also try almond flour for a nutty flavor. Adjust the amount of water to keep the batter thick. For a spicy kick, add diced jalapeños or chopped green chilies to the batter. You can also increase the red chili powder for extra heat. Another option is to mix in a tablespoon of hot sauce to give a zesty flavor. Feel free to mix in other veggies like corn, spinach, or bell peppers. Chopped carrots can add a sweet crunch. You could also add cheese for a creamy texture. Experiment with herbs like dill or parsley for fresh flavor. For the full recipe, check out the instructions above. Store leftover crispy okra fritters in an airtight container. This keeps them fresh and crispy. If you have more than you can eat, allow them to cool completely first. Then, place them in the container. To keep them from getting soggy, avoid stacking them directly on top of each other. To reheat, use an oven or an air fryer. Preheat your oven to 375°F (190°C). Place the fritters on a baking sheet. Heat for about 10-15 minutes until they are hot and crispy again. If using an air fryer, set it to 350°F (175°C) and heat for 5-7 minutes. Avoid microwaving as it makes them soft. You can freeze the fritters for later. Allow them to cool completely, then place them in a single layer on a baking sheet. Freeze until solid, then transfer to a freezer bag. This way, they won’t stick together. When you’re ready to eat them, follow the reheating steps above. Enjoy the crispy goodness later! For the full recipe, check out the detailed instructions provided earlier. To make crispy okra fritters from scratch, start with fresh okra. Wash and chop it into small pieces. Mix chickpea flour, cornmeal, and spices in a bowl. Toss in the chopped okra and herbs. Gradually add water to create a thick batter. Heat vegetable oil in a pan. Drop spoonfuls of the batter into the hot oil. Fry until golden brown and crisp. Drain on paper towels. Enjoy hot! For more detailed steps, check the Full Recipe. Crispy okra fritters pair well with many sides. I love serving them with tangy yogurt sauce or spicy chutney. You can also try them with a fresh salad or pickles. These sides add flavor and balance the dish. Serve them as a snack or an appetizer. They also complement grilled meats nicely. Yes, you can bake the fritters instead of frying them. Preheat your oven to 400°F (200°C). Use a baking sheet lined with parchment paper. Lightly coat the fritters with oil for crispiness. Bake them for about 20-25 minutes, flipping halfway through. This method is healthier and still delicious, though they may not be as crispy as fried ones. Crispy okra fritters are a tasty snack made with fresh ingredients and dry spices. I shared steps to prepare and fry them for that perfect crunch. Plus, I included tips to avoid common mistakes and ideas for fun variations. Remember to store leftovers correctly and reheat for best results. Making these fritters is simple and rewarding. Enjoy your cooking journey and taste the crunch!](https://fastmealmate.com/wp-content/uploads/2025/06/a8f815b1-ce7d-4f81-9471-c6052c40d9a8-768x768.webp)