Creamy Parmesan Chicken Pillows Simple and Tasty Dish


Welcome to my kitchen! Today, I’m excited to share my recipe for Creamy Parmesan Chicken Pillows, a simple and tasty dish you’ll love. This comforting meal combines juicy chicken and rich cheese, all wrapped in a golden dough. Perfect for a family dinner or a cozy night in, these chicken pillows are sure to impress. Ready to make something delicious? Let’s dive into the ingredients and get cooking!
Why I Love This Recipe
- Deliciously Creamy: The combination of cream cheese and Parmesan creates a rich, velvety filling that is utterly satisfying.
- Quick and Easy: This recipe comes together in just 30 minutes, making it a perfect choice for busy weeknights.
- Versatile Dish: These chicken pillows can be served as an appetizer, a main course, or even as a party snack.
- Kid-Friendly: With their fun pillow shape and cheesy filling, these are sure to be a hit with kids and adults alike!
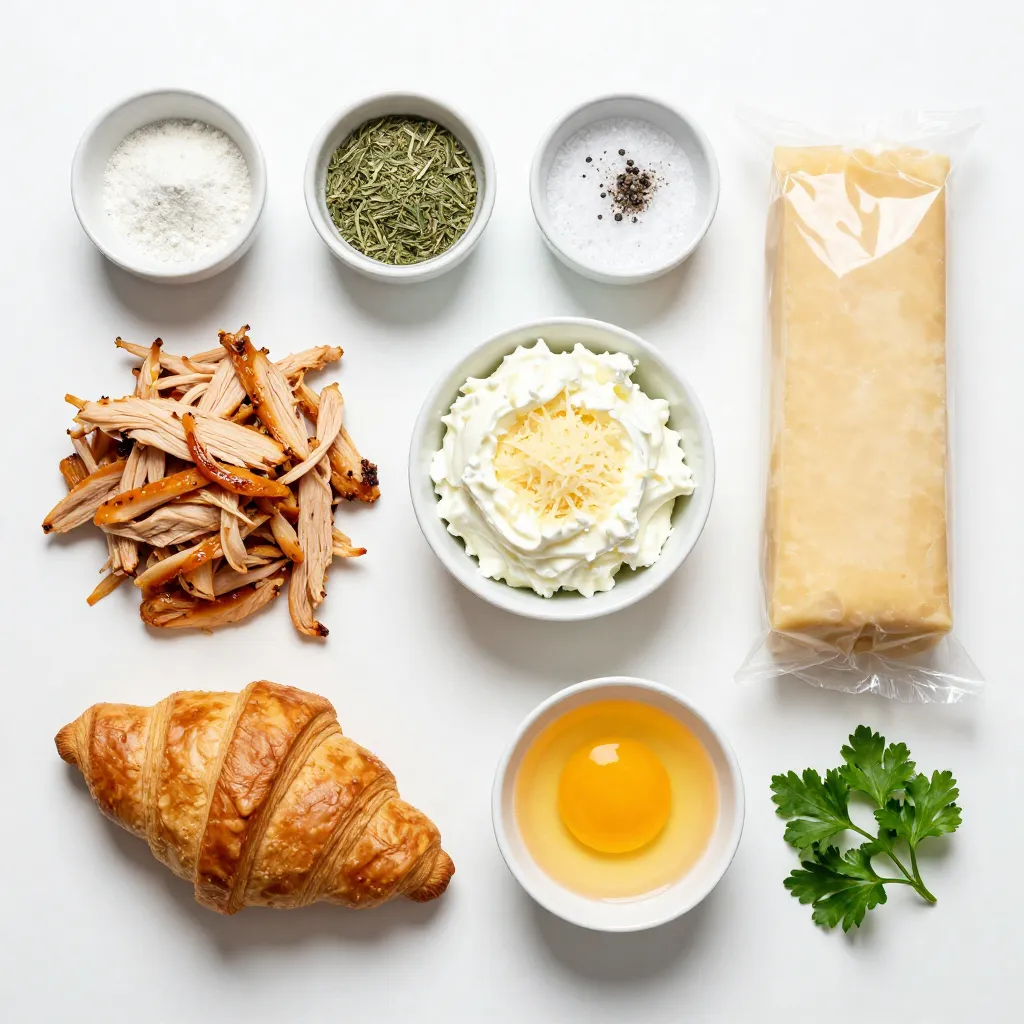
Ingredients
Detailed List of Ingredients
– 2 cups cooked shredded chicken
– 1 cup cream cheese, softened to room temperature
– 1 cup grated Parmesan cheese
– 1 tablespoon garlic powder
– 1 tablespoon dried Italian herbs (mixed oregano, basil, thyme)
– 1 teaspoon salt
– 1/2 teaspoon black pepper
– 1 package (8 oz) crescent roll dough
– 1 egg, beaten (for egg wash)
– Fresh parsley, chopped (for garnishing)
Description of Ingredients
Each ingredient plays a key role in the taste of creamy Parmesan chicken pillows. The cooked shredded chicken gives protein and texture. Cream cheese adds creaminess, making each bite rich. Grated Parmesan cheese brings a sharp and nutty flavor. Garlic powder enhances the taste with a savory kick. The dried Italian herbs add warmth and depth. Salt and black pepper balance the flavors, making them pop. Finally, the crescent roll dough creates a flaky and soft outer layer.
Tips for Ingredient Substitutions
You can swap cooked shredded chicken for turkey or even tofu for a vegetarian option. If you want a lighter option, use low-fat cream cheese. Parmesan cheese can be replaced with mozzarella or feta for a different twist. Garlic powder can be fresh minced garlic, but remember to adjust the amount. If you lack dried Italian herbs, use fresh herbs; just double the amount.
Step-by-Step Instructions
Prepping the Oven and Baking Sheet
First, set your oven to 375°F (190°C). This heat helps the pillows bake evenly. While it warms up, grab a baking sheet. Line it with parchment paper. This step keeps the pillows from sticking.
Mixing the Chicken Filling
In a large bowl, combine the cooked shredded chicken, cream cheese, and Parmesan cheese. Add the garlic powder, dried herbs, salt, and black pepper. Mix all these together with a fork or spatula. You want a smooth filling that blends well.
Assembling the Chicken Pillows
Unroll the crescent roll dough. Separate it into triangles. If you use a dough sheet, cut it into equal triangles. Take a heaping tablespoon of the chicken filling. Place it at the wide end of each triangle. Now, roll the dough from the wide end to the pointed end. Pinch the ends to seal them tight. This step is key to keeping the filling inside.
Baking Instructions and Key Times
Arrange the stuffed pillows on the lined baking sheet. Use a pastry brush to coat the tops with the beaten egg. This gives them a nice golden color. Bake in the oven for 15 to 18 minutes. Look for a puffed-up, golden brown finish. Once done, take them out and let them cool for a few minutes. Before serving, sprinkle fresh chopped parsley on top for a burst of color and flavor.
Tips & Tricks
How to Ensure Perfectly Sealed Pillows
To keep the filling inside, pinch the dough tightly. Make sure the edges touch. If they don’t stick, use a bit of water on your fingers. This helps the dough seal better. Always roll from the wide end to the pointed end. This keeps the filling snug inside.
Adjusting Flavor Profiles
You can change the taste by adding extra spices. Try paprika for a smoky flavor. You can also add chopped spinach for freshness. If you like heat, add red pepper flakes. Taste the filling before sealing it. This way, you can adjust the flavors to your liking.
Serving Suggestions for Best Presentation
Serve your chicken pillows on a nice platter. Add fresh parsley for color and flavor. You can also serve them with marinara sauce for dipping. This adds a fun touch and balances the creamy filling. For a special look, place the pillows on a bed of arugula or mixed greens.
Pro Tips
- Perfectly Seal the Dough: Ensure you pinch the edges of the crescent roll dough tightly to prevent any filling from leaking out during baking.
- Customize the Filling: Feel free to add your favorite ingredients like spinach, sun-dried tomatoes, or even some cooked bacon for extra flavor.
- Serve with Sauce: Pair these pillows with a marinara or garlic butter sauce for a delicious dipping experience.
- Storage Tips: Store any leftovers in an airtight container in the fridge for up to 3 days, and reheat in the oven for best results.
Variations
Different Cheese Options
You can change the cheese for a new taste. Try using mozzarella for a meltier bite. Cheddar adds a sharp flavor that many love. For a tangy twist, use goat cheese. Mix different cheeses for a fun blend.
Adding Vegetables or Herbs
You can boost nutrition by adding veggies. Spinach or broccoli works great in this dish. Chopped mushrooms add a nice earthy flavor. Fresh herbs, like basil or thyme, enhance the taste. Mix them into the chicken filling for extra flavor.
Using Alternative Dough Choices
Not a fan of crescent roll dough? You can use puff pastry for a flakier texture. Biscuit dough also works if you want a denser pillow. For a gluten-free option, try gluten-free dough. Each choice gives a unique twist to your chicken pillows.
Storage Info
How to Store Leftover Chicken Pillows
To store leftover chicken pillows, let them cool first. Place them in an airtight container. They will stay fresh for about three days in the fridge. If you want to keep them longer, consider freezing.
Reheating Recommendations
When ready to eat, you can reheat the chicken pillows in the oven. Set your oven to 350°F (175°C). Place the pillows on a baking sheet and cover them with foil. Heat for about 10 to 15 minutes, until warmed through. This keeps the pillows crispy.
Freezing Instructions for Longer Storage
To freeze chicken pillows, wrap each one in plastic wrap. Place them in a freezer bag or container. They can last up to three months in the freezer. When you’re ready to eat, thaw them overnight in the fridge. Then, reheat them as mentioned before. Enjoy the taste of a fresh meal!
FAQs
Can I make this recipe ahead of time?
Yes, you can prepare the filling a day in advance. Store it in the fridge. When you are ready, unroll the dough and fill it with the prepared mix. Then, bake as directed. This makes meal prep easy and saves time.
What sides pair well with Creamy Parmesan Chicken Pillows?
These chicken pillows go well with many sides. Here are some great options:
– Simple green salad
– Roasted vegetables
– Garlic bread
– Marinara sauce for dipping
Each of these adds flavor and texture to your meal.
How do I prevent the filling from leaking?
To stop the filling from leaking, pinch the dough tightly at the ends. Make sure you seal them well. Also, avoid overfilling each pillow. A heaping tablespoon of filling works perfectly.
Is it possible to make this recipe gluten-free?
Yes, you can make this recipe gluten-free. Use gluten-free crescent roll dough. Many brands offer this option now. Just ensure to check the label for ingredients.
In this blog post, we explored the key ingredients needed for delicious Chicken Pillows and how to prepare them step by step. We shared tips for perfecting your dish and offered variations to suit your taste. Finally, I provided storage tips to keep leftovers fresh.
Embrace your creativity in the kitchen. Experiment with flavors and techniques. Enjoy every bite of your Chicken Pillows and share them with friends and famil

Creamy Parmesan Chicken Pillows
Ingredients
- 2 cups cooked shredded chicken
- 1 cup cream cheese, softened to room temperature
- 1 cup grated Parmesan cheese
- 1 tablespoon garlic powder
- 1 tablespoon dried Italian herbs
- 1 teaspoon salt
- 0.5 teaspoon black pepper
- 1 package (8 oz) crescent roll dough
- 1 egg beaten (for egg wash)
- to taste fresh parsley, chopped (for garnishing)
Instructions
- Begin by preheating your oven to 375°F (190°C). Prepare a baking sheet by lining it with parchment paper to prevent sticking.
- In a large mixing bowl, combine the cooked shredded chicken, softened cream cheese, grated Parmesan cheese, garlic powder, dried Italian herbs, salt, and black pepper. Use a fork or spatula to mix thoroughly until the mixture is smooth and well combined.
- Carefully unroll the crescent roll dough and separate it into individual triangles. If you have a dough sheet, cut it into equal-sized triangles.
- Take a heaping tablespoon of the creamy chicken filling and place it at the wide end of each triangle of dough.
- Starting from the wide end, roll the dough tightly over the filling towards the pointed end to create a pillow shape. Make sure to pinch the ends firmly to ensure they are sealed well to prevent the filling from leaking during baking.
- Arrange the stuffed chicken pillows neatly on the prepared baking sheet. Using a pastry brush, apply the beaten egg to the tops of the pillows for a lovely golden finish when baked.
- Bake them in the preheated oven for 15 to 18 minutes, or until they are puffed up and golden brown in color.
- After baking, remove the chicken pillows from the oven and allow them to cool for a few minutes on the baking sheet. Before serving, sprinkle them generously with freshly chopped parsley for a pop of color and flavor.
![- 1 cup freshly squeezed lemon juice - 3/4 cup granulated sugar - 4 cups cold water - 1/2 cup cranberry juice - Ice cubes - Fresh mint leaves - Lemon slices Pink lemonade is a fun and tasty drink. It packs a punch of flavor, but it's good to know what’s in it. - Calories: A serving has about 100 calories. - Sugars: Each glass has around 24 grams of sugar. - Vitamins: It provides vitamin C from the lemon juice. Using fresh ingredients is key. Fresh lemon juice gives bright flavor and important nutrients. Plus, it has no added preservatives. The cranberry juice adds a nice touch of sweetness and color. This drink not only refreshes but nourishes your body too. Make it with care, and you’ll taste the difference. For the full recipe, check out [Full Recipe]. To make simple syrup, start by cooking sugar in water. In a medium saucepan, mix 1 cup of water with 3/4 cup of granulated sugar. Set the heat to medium. Stir the mixture as it heats up. Keep stirring until the sugar fully dissolves and the liquid looks clear. This means your syrup is ready! Once done, remove it from the heat and let it cool completely. Now for the fun part! Grab a large pitcher. Pour in 1 cup of freshly squeezed lemon juice. This juice gives your pink lemonade its bright flavor. Next, add 1/2 cup of cranberry juice. This juice adds a lovely pink color and a hint of sweetness. Stir gently to blend both juices. Once your simple syrup has cooled, it's time to combine. Pour the syrup into the pitcher with the juices. Stir well to mix everything together. Next, add 3 cups of cold water to the pitcher. Stir again until everything is fully combined. Now, it's time to taste your lemonade. Take a sip! If you want it sweeter, add more sugar slowly. Stir until it dissolves. If it’s too strong, add a bit more water. To make your drink extra refreshing, chill it in the fridge for at least 30 minutes. This step is key! When ready to serve, fill glasses with ice cubes. Pour the chilled lemonade over the ice. Garnish each glass with a lemon slice and a sprig of fresh mint. Your refreshing pink lemonade is ready to enjoy! For the full recipe, check out the [Full Recipe]. To get the right taste, you can adjust the sweetness and tartness of your pink lemonade. Start with the basic recipe, but feel free to tweak it. If you want it sweeter, add more sugar slowly and stir. If it tastes too sweet, squeeze in more lemon juice. This balance makes a drink that everyone enjoys. Using fresh lemon juice is key to good flavor. When you squeeze lemons, use a citrus juicer to get the most juice. Choose ripe lemons that feel heavy for their size. This means they are juicy and full of flavor. Avoid using bottled lemon juice, as it lacks the fresh taste that makes pink lemonade special. Garnishing adds fun and flair to your pink lemonade. A simple slice of lemon on the glass rim looks nice. You can also add fresh mint leaves on top. This not only makes your drink pretty but gives it a burst of fresh aroma. For serving, consider the occasion. Use clear glasses to show off the lovely pink color. At a picnic, add ice to keep it cool. For parties, consider a large pitcher with a ladle for easy serving. Each guest can fill their glass and enjoy this refreshing drink. {{image_4}} You can make pink lemonade even more fun by adding different fruit juices. For example, try mixing in fresh raspberry or strawberry juice. These fruits add a bold taste and deep color. You can also mix in other juices like peach or watermelon for unique flavors. Sweeteners are another area to explore. Instead of regular sugar, try honey or agave syrup. These options can give your drink a distinct taste. Adjust the sweetness to fit your own preference. Play around until you find the perfect mix for you! If you want a cool treat, make a frozen pink lemonade slush. Here’s what you need: - 1 batch of pink lemonade (from the Full Recipe) - 2 cups ice cubes To prepare, start by blending the pink lemonade and ice in a blender. Blend until the ice is finely crushed and the mixture is smooth. You may need to add more ice or lemonade to reach your desired consistency. Serve it in a tall glass with a straw for a fun twist on this classic drink. Enjoy the refreshing chill! To keep your leftover pink lemonade fresh, use an airtight container. Glass jars or plastic pitchers work well. Make sure to seal it tightly to avoid any odors from your fridge. You can store it for up to five days in the refrigerator. Always check for signs of spoilage before you drink it. If you want to save pink lemonade for later, freezing is a great choice. Pour the lemonade into ice cube trays or freezer-safe bags. Leave some space in the containers for expansion. When you’re ready to enjoy your drink, take out the lemonade and thaw it in the fridge overnight. For a fun twist, serve the thawed lemonade over ice. You can also blend it with fresh fruit for a slushy treat. You can sweeten pink lemonade with sugar, honey, or agave. Each sweetener has its perks. Sugar is the most common choice. It dissolves easily in water. Honey adds a floral taste. It also provides some health benefits. Agave syrup is sweeter than sugar. You use less of it, making it a smart choice for those cutting calories. Remember, you can mix and match sweeteners to find your perfect balance. Yes, you can use bottled lemon juice. However, fresh lemon juice tastes better. Fresh juice has a bright flavor. Bottled juice often lacks that vibrant taste. It may also have preservatives. These can change the flavor a bit. If you have time, always go for fresh lemons. They make your pink lemonade taste just right. Pink lemonade can stay fresh for about 5 to 7 days in the fridge. Make sure to keep it in a sealed container. This helps to lock in the flavor. Always check for signs of spoilage. If it smells off or shows changes in color, toss it out. Enjoy your pink lemonade fresh for the best taste! You learned how to make a tasty pink lemonade from fresh ingredients. We covered the key steps, from making simple syrup to mixing flavors. You now know how to customize it for any event. Remember to taste and adjust for the right sweetness. Store leftovers properly and enjoy them later. With this guide, you can create a delightful drink everyone will love. Have fun experimenting with different flavors and serving ideas!](https://fastmealmate.com/wp-content/uploads/2025/07/2b3f39fc-3ccf-4ffd-a241-1286b33a74a3-768x768.webp)

![- 1 cup coconut milk - 1 tablespoon chai tea leaves (or 1 chai tea bag) - 1/4 cup granulated sugar (adjust based on desired sweetness) - 1/2 teaspoon pure vanilla extract - 1 cup sparkling water - 1/4 teaspoon ground cinnamon - Ice cubes - Toasted coconut flakes, for garnish To make Coconut Chai Cream Soda, you need a few simple ingredients. Each one plays a key role in the drink's flavor. First, coconut milk gives a creamy base. I love how it adds a rich taste. You can find it in cans or cartons at most stores. Next, chai tea leaves, or a tea bag, bring warmth and spice. Chai is a blend of tea and spices like cinnamon and cardamom. It makes the drink cozy and inviting. Sugar sweetens the drink. You can adjust the amount based on your taste. A little sugar goes a long way in balancing the flavors. Vanilla extract adds depth. It mixes well with the coconut and chai. Sparkling water brings a fizzy lift. It makes the drink refreshing and fun. Ground cinnamon adds a lovely aroma. It also enhances the chai's spice notes. Lastly, ice cubes cool the drink down. To top it off, toasted coconut flakes add a crunchy texture. They also make the drink look beautiful. Gather these ingredients, and you're ready to make this lovely drink. For the full recipe, check out the [Full Recipe]. - First, gently heat 1 cup of coconut milk in a small saucepan. Use medium heat, making sure it doesn’t boil. Stir it occasionally. - Once warm, add 1 tablespoon of chai tea leaves or 1 chai tea bag to the coconut milk. Let it steep for 5-7 minutes. This helps get the best flavor. If you used loose tea, strain it through a fine mesh sieve after steeping. - Now, stir in 1/4 cup of granulated sugar and 1/2 teaspoon of pure vanilla extract. Mix until fully dissolved. This creates a creamy and sweet base. - After the mixture cools to room temperature, fill two glasses with ice cubes. - Pour the cooled coconut chai mixture over the ice, filling each glass halfway. - Carefully add 1 cup of sparkling water to each glass. Stir gently to mix the flavors. - To finish, sprinkle a dash of ground cinnamon on top of each drink. - Garnish with toasted coconut flakes for a crunchy touch. This adds both flavor and a nice look to your drink. For the full recipe, refer to the earlier section. Enjoy your refreshing Coconut Chai Cream Soda! Adjusting sweetness levels Start with the basic recipe. Use 1/4 cup of sugar. If you like it sweeter, add more. If you prefer it less sweet, use less sugar. You can also try honey or maple syrup instead. Each sweetener gives a different taste. Taste as you go to find your perfect level. Choosing the right chai blend Not all chai is the same. Some blends are spicier, while others are milder. I love using a masala chai blend. It adds warmth and depth. You can use loose tea leaves or tea bags. Try different brands to find your favorite. Ideal glassware for presentation Use clear glasses to showcase the drink. The layers and colors look beautiful. Tall glasses are great for a refreshing look. You can also use mason jars for a rustic vibe. Add a colorful straw for fun. Pairing with snacks or light bites This drink pairs well with light snacks. Think about coconut macaroons or cinnamon cookies. Cheese and crackers also work nicely. These snacks enhance the flavors of the drink. Nutritional aspects of coconut milk Coconut milk is creamy and rich. It contains healthy fats that are good for your heart. It also has vitamins and minerals. Coconut milk can help with hydration. It's a great dairy-free option for many recipes. Benefits of chai tea Chai tea is packed with spices. These spices have health benefits. Ginger can help digestion, while cinnamon may help with blood sugar. Chai also contains antioxidants that protect your body. Enjoying this drink not only tastes good, but it can also be good for you. {{image_4}} You can switch coconut milk for almond or oat milk. Each option adds its own flavor. For a nut-free choice, oat milk works great. It keeps the drink creamy without the nut taste. Want to spice things up? Add a pinch of nutmeg or cardamom. These spices bring warmth and depth. You might also try adding fruit flavors. Pineapple adds a tropical twist that pairs well with chai. Just blend it into the coconut milk before serving. You can serve Coconut Chai Cream Soda hot for a cozy drink. Just skip the ice and pour it warm into your glass. For iced versions, use plenty of ice. The ice helps keep it cool and refreshing. You can even blend it for a frosty treat. For more details, be sure to check the Full Recipe. To keep your coconut milk fresh, store it in the fridge. Use an airtight container. It lasts about 5 to 7 days. Always shake well before use since it can separate. For spices like chai tea, store them in a cool, dark place. A sealed jar works best. This keeps them flavorful and fresh. Check the expiration dates regularly to avoid stale spices. You can make the coconut chai mixture ahead of time. Just follow the recipe steps, then cool the mixture. Transfer it to a clean container. Store it in the fridge for up to three days. When you’re ready to serve, pour it over ice and add sparkling water. This keeps the drink bubbly and fresh. You can also prepare the drink one day ahead. Just store it without ice. Add ice right before serving for the best taste. For the full recipe, check the earlier section. Enjoy your Coconut Chai Cream Soda! Coconut Chai Cream Soda is a fun and fizzy drink. It combines rich coconut milk with the warm spices of chai tea. The key flavors come from: - Coconut milk - Chai tea (with spices like cinnamon and cardamom) - Sweet sugar - Sparkling water This drink is creamy, sweet, and refreshing. It’s perfect for warm days or as a unique treat. Yes, you can easily make Coconut Chai Cream Soda vegan. The main ingredient, coconut milk, is already vegan. Just use a plant-based sweetener if needed. You can swap the sugar for agave or maple syrup. This way, you keep the drink tasty and plant-based. You can find coconut milk at most grocery stores. Look in the international aisle or near dairy alternatives. For chai tea, visit the tea section. If you prefer online shopping, websites like Amazon or specialty tea shops have both coconut milk and chai tea. This makes it easy to get the best ingredients. Coconut Chai Cream Soda is best enjoyed fresh. If you store it, keep it in the fridge for up to two days. The flavors may change a bit, but it will still taste good. Just give it a stir before serving again. Enjoy this drink right after making it for the best taste. Coconut Chai Cream Soda blends rich flavors into a refreshing drink. We looked at the key ingredients and the simple steps to create it. I shared tips for enhancing the taste and health benefits of each component. You can even adjust recipes for your preferences. Have fun experimenting with variations, and store leftovers correctly for future enjoyment. This drink can delight your taste buds and impress guests. Enjoy making it today!](https://fastmealmate.com/wp-content/uploads/2025/06/117a7c4a-19db-4251-9c08-7fd2f96708ea-768x768.webp)