
Peruvian Roasted Chicken Flavorful and Savory Delight


If you’re craving a dish that bursts with flavor, you need to try Peruvian roasted chicken! This savory delight combines juicy, marinated chicken with a mix of spices that create an unforgettable meal. In this guide, I will walk you through the ingredients, cooking steps, and even some tips to help you serve up the perfect plate. Let’s dive into the delicious world of Peruvian roasted chicken together!
Why I Love This Recipe
- Bold Flavors: This recipe is packed with vibrant spices and fresh ingredients that elevate the flavor of the chicken, making each bite a delicious experience.
- Easy Preparation: With simple ingredients and straightforward steps, this recipe is perfect for home cooks of all skill levels, ensuring a stress-free cooking experience.
- Impressive Presentation: The colorful garnishes of cilantro and lime wedges not only enhance the flavor but also make for an attractive dish that’s perfect for entertaining.
- Healthy and Wholesome: Using a whole chicken and fresh herbs, this recipe is not only delicious but also a nutritious option for family meals.
Ingredients
Main Ingredients for Peruvian Roasted Chicken
– Whole chicken (4-5 lbs)
– Garlic, minced
– Fresh lime juice
– Extra virgin olive oil
Spices and Seasonings
– Ground cumin
– Smoked paprika
– Dried oregano
– Black pepper
– Kosher salt
– Chili powder
Garnishes and Side Ingredients
– Fresh cilantro, finely chopped
– Limes, cut into wedges
– Red onion, sliced into wedges for roasting
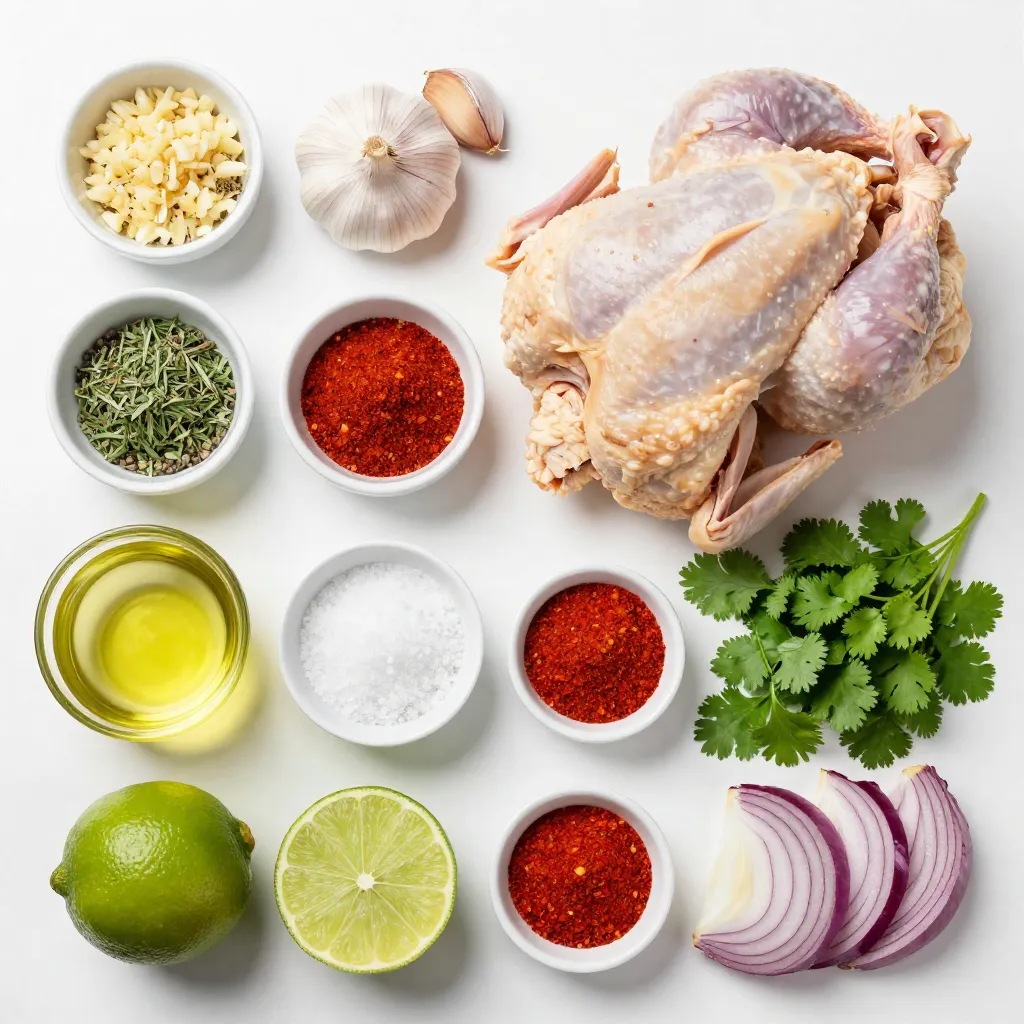
For the main ingredients, the whole chicken is the star. It gives us juicy meat and crispy skin. I love using fresh garlic and lime juice to add zest. Extra virgin olive oil helps keep it moist during cooking.
The spices are where the magic happens. Ground cumin adds warmth. Smoked paprika gives a lovely color and a hint of smokiness. Dried oregano brings in earthy notes. Black pepper and kosher salt enhance the flavors. Chili powder adds a bit of heat.
For garnishes, fresh cilantro brightens up the dish. Lime wedges let you add a tangy kick. The red onion, roasted alongside the chicken, adds sweetness and depth. This mix of ingredients creates a truly flavorful and savory delight.
Step-by-Step Instructions
Prepping the Oven
First, preheat your oven to 425°F (220°C). This hot temperature helps the chicken skin get nice and crispy.
Creating the Marinade
Next, create your marinade. In a bowl, mix together:
– 4 cloves garlic, minced
– 2 teaspoons ground cumin
– 2 teaspoons smoked paprika
– 1 teaspoon dried oregano
– 1 teaspoon freshly ground black pepper
– 2 teaspoons kosher salt
– 1/4 cup freshly squeezed lime juice
– 1/4 cup extra virgin olive oil
– 1 teaspoon chili powder
Stir well until everything blends nicely. This mix will give your chicken great flavor.
Marinating the Chicken
Now, it’s time to marinate the chicken. Place your whole chicken in a large ziplock bag or a deep dish. Pour the marinade over the chicken. Make sure to coat it well inside and out. Seal the bag or cover the dish tightly. Refrigerate for at least 1 hour. For the best taste, let it marinate overnight.
Roasting the Chicken
After marinating, take the chicken out of the fridge. Let it sit at room temperature for about 30 minutes. This helps it cook evenly. Place the chicken on a roasting pan with the breast side up. Scatter red onion wedges around the chicken.
Put the pan in your preheated oven. Roast for about 1 hour and 15 minutes. The chicken is done when it reaches 165°F (75°C) inside. Baste it with the pan juices halfway through to keep it moist.
Resting and Serving
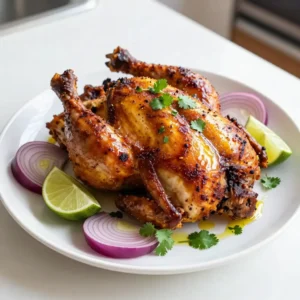
Once cooked, take the chicken out of the oven. Let it rest for 10-15 minutes before carving. This step is very important. It allows the juices to settle, making the chicken juicier.
When ready to serve, sprinkle chopped cilantro over the chicken. Serve with lime wedges. Guests can squeeze fresh lime juice on their portions for extra flavor. Enjoy your delicious Peruvian roasted chicken!
Tips & Tricks
Achieving Crispy Skin
To get that perfect crispy skin, bake your chicken at a high temperature of 425°F. This heat helps render the fat and crisp the skin. While roasting, baste the chicken with its own juices halfway through. This adds flavor and keeps the skin moist.
Marination Duration
Marinating your chicken is key to great taste. I recommend marinating for at least 1 hour. However, letting it sit overnight gives the best flavor. The longer the chicken sits in the marinade, the more it absorbs those tasty spices.
Temperature Checks
A meat thermometer is your best friend for perfect doneness. Insert it into the thickest part of the chicken. It should read 165°F. This ensures your chicken is safe to eat and juicy. Use this tool to avoid undercooking or overcooking.
Pro Tips
- Marinate Longer for Deeper Flavor: For the best flavor, marinate the chicken overnight. This allows the spices to penetrate the meat more thoroughly, enhancing the overall taste.
- Use a Meat Thermometer: To ensure perfectly cooked chicken, use a meat thermometer. The internal temperature should reach 165°F (75°C) for safe consumption.
- Baste for Moisture: Basting the chicken with its own juices halfway through roasting will keep it moist and flavorful, resulting in a tender texture.
- Rest Before Carving: Allow the roasted chicken to rest for 10-15 minutes after cooking. This step helps the juices redistribute, making for a juicier and more delicious serving.
Variations
Spicy Peruvian Roasted Chicken
To make your Peruvian roasted chicken spicy, add extra chili or hot sauce to the marinade. This will bring a kick that many enjoy. Simply mix in your favorite hot sauce when you combine the marinade ingredients. Try using jalapeño or cayenne for a more intense heat. If you like heat, this variation will surely please your taste buds.
Herb-Infused Options
For a fresh twist, you can incorporate herbs like thyme or rosemary. These herbs add a fragrant aroma and a rich taste. When mixing the marinade, chop the herbs finely and stir them in thoroughly. This herb-infused option complements the chicken beautifully. You might find that the mix of herbs pairs well with the lime juice.
Cooking Methods
If you want to try something different, consider alternatives to oven roasting like grilling or air-frying. Grilling gives your chicken a smoky flavor, while air-frying makes it crispy with less oil. For grilling, keep the chicken on medium heat and turn it often. If using an air fryer, cook the chicken at 375°F for about 30-40 minutes. Both methods provide delicious results.
Storage Info
Refrigerating Leftovers
Store your Peruvian roasted chicken in the fridge within two hours of cooking. Use an airtight container to keep it fresh. You can also wrap the chicken in plastic wrap. The chicken stays good for three to four days in the fridge. Make sure to separate any leftover sides to keep everything fresh.
Freezing Instructions
To freeze the chicken, let it cool down first. Cut it into pieces for easier storage. Wrap each piece tightly in plastic wrap, then place them in a freezer bag. Label the bag with the date. Frozen chicken lasts up to three months. To reheat, thaw it in the fridge overnight. Then, warm it in the oven at 350°F (175°C) until heated through.
Using Leftovers
Get creative with leftover chicken! You can shred it for tacos or burritos. Add it to salads for extra protein. Mix it into soups or stir-fries. Leftover chicken can also be added to pasta dishes or sandwiches. The options are endless, and it keeps meals exciting!
FAQs
What is the best way to ensure my chicken is cooked thoroughly?
To cook your chicken well, aim for an internal temperature of 165°F (75°C). Use a meat thermometer to check the thickest part of the chicken, usually the breast or thigh. Insert the thermometer without touching bone for an accurate reading. If the juices run clear when you cut into the chicken, it’s ready to serve. Always let it rest after cooking for juicy meat!
Can I use chicken parts instead of a whole chicken?
Yes, you can use chicken parts like thighs or breasts. Adjust the cooking time to about 30-40 minutes for parts. Check the internal temperature as mentioned earlier. Chicken parts will cook faster, so keep an eye on them. This method allows for varied seasoning and easier serving.
What sides pair well with Peruvian Roasted Chicken?
Peruvian roasted chicken shines with many sides. Try serving it with:
– Rice and beans
– Roasted vegetables
– A fresh salad
– Fried plantains
Consider adding aji verde, a spicy green sauce, for an extra kick. These sides complement the chicken’s flavors and create a hearty meal.
Peruvian roasted chicken uses simple ingredients for bold flavors. You learned about marinating, roasting, and tips for extra crispy skin. Remember, resting the chicken after cooking makes it juicy. You can explore spicy variations or herb-infused options to mix things up. Lastly, don’t forget to store leftovers properly for future meals. With these steps, you can create a delicious dish that impresses everyone. Enjoy cooking and sharing your roasted chicken masterpiec
Zesty Peruvian Roasted Chicken
Ingredients
- 1 whole chicken (approximately 4-5 lbs)
- 4 cloves garlic, minced
- 2 teaspoons ground cumin
- 2 teaspoons smoked paprika
- 1 teaspoon dried oregano
- 1 teaspoon freshly ground black pepper
- 2 teaspoons kosher salt
- 0.25 cup freshly squeezed lime juice
- 0.25 cup extra virgin olive oil
- 1 teaspoon chili powder
- 0.25 cup fresh cilantro, finely chopped
- 2 limes cut into wedges (for serving)
- 1 red onion sliced into wedges (for roasting)
Instructions
- Preheat your oven to 425°F (220°C).
- In a mixing bowl, combine minced garlic, cumin, smoked paprika, oregano, black pepper, kosher salt, lime juice, olive oil, and chili powder to create a marinade.
- Place the chicken in a large ziplock bag or deep dish and pour the marinade over it, ensuring it is well-coated. Seal the bag or cover the dish and refrigerate for at least 1 hour, preferably overnight.
- After marination, let the chicken rest at room temperature for about 30 minutes. Arrange it on a roasting pan with the breast side up and scatter onion wedges around it.
- Roast the chicken in the preheated oven for about 1 hour and 15 minutes, or until the internal temperature reaches 165°F (75°C). Baste halfway through with pan juices.
- Remove the chicken from the oven and let it rest for 10-15 minutes before carving.
- Sprinkle freshly chopped cilantro over the chicken and serve with lime wedges for guests to squeeze over their portions.
![- 1 cup coconut milk - 1 tablespoon chai tea leaves (or 1 chai tea bag) - 1/4 cup granulated sugar (adjust based on desired sweetness) - 1/2 teaspoon pure vanilla extract - 1 cup sparkling water - 1/4 teaspoon ground cinnamon - Ice cubes - Toasted coconut flakes, for garnish To make Coconut Chai Cream Soda, you need a few simple ingredients. Each one plays a key role in the drink's flavor. First, coconut milk gives a creamy base. I love how it adds a rich taste. You can find it in cans or cartons at most stores. Next, chai tea leaves, or a tea bag, bring warmth and spice. Chai is a blend of tea and spices like cinnamon and cardamom. It makes the drink cozy and inviting. Sugar sweetens the drink. You can adjust the amount based on your taste. A little sugar goes a long way in balancing the flavors. Vanilla extract adds depth. It mixes well with the coconut and chai. Sparkling water brings a fizzy lift. It makes the drink refreshing and fun. Ground cinnamon adds a lovely aroma. It also enhances the chai's spice notes. Lastly, ice cubes cool the drink down. To top it off, toasted coconut flakes add a crunchy texture. They also make the drink look beautiful. Gather these ingredients, and you're ready to make this lovely drink. For the full recipe, check out the [Full Recipe]. - First, gently heat 1 cup of coconut milk in a small saucepan. Use medium heat, making sure it doesn’t boil. Stir it occasionally. - Once warm, add 1 tablespoon of chai tea leaves or 1 chai tea bag to the coconut milk. Let it steep for 5-7 minutes. This helps get the best flavor. If you used loose tea, strain it through a fine mesh sieve after steeping. - Now, stir in 1/4 cup of granulated sugar and 1/2 teaspoon of pure vanilla extract. Mix until fully dissolved. This creates a creamy and sweet base. - After the mixture cools to room temperature, fill two glasses with ice cubes. - Pour the cooled coconut chai mixture over the ice, filling each glass halfway. - Carefully add 1 cup of sparkling water to each glass. Stir gently to mix the flavors. - To finish, sprinkle a dash of ground cinnamon on top of each drink. - Garnish with toasted coconut flakes for a crunchy touch. This adds both flavor and a nice look to your drink. For the full recipe, refer to the earlier section. Enjoy your refreshing Coconut Chai Cream Soda! Adjusting sweetness levels Start with the basic recipe. Use 1/4 cup of sugar. If you like it sweeter, add more. If you prefer it less sweet, use less sugar. You can also try honey or maple syrup instead. Each sweetener gives a different taste. Taste as you go to find your perfect level. Choosing the right chai blend Not all chai is the same. Some blends are spicier, while others are milder. I love using a masala chai blend. It adds warmth and depth. You can use loose tea leaves or tea bags. Try different brands to find your favorite. Ideal glassware for presentation Use clear glasses to showcase the drink. The layers and colors look beautiful. Tall glasses are great for a refreshing look. You can also use mason jars for a rustic vibe. Add a colorful straw for fun. Pairing with snacks or light bites This drink pairs well with light snacks. Think about coconut macaroons or cinnamon cookies. Cheese and crackers also work nicely. These snacks enhance the flavors of the drink. Nutritional aspects of coconut milk Coconut milk is creamy and rich. It contains healthy fats that are good for your heart. It also has vitamins and minerals. Coconut milk can help with hydration. It's a great dairy-free option for many recipes. Benefits of chai tea Chai tea is packed with spices. These spices have health benefits. Ginger can help digestion, while cinnamon may help with blood sugar. Chai also contains antioxidants that protect your body. Enjoying this drink not only tastes good, but it can also be good for you. {{image_4}} You can switch coconut milk for almond or oat milk. Each option adds its own flavor. For a nut-free choice, oat milk works great. It keeps the drink creamy without the nut taste. Want to spice things up? Add a pinch of nutmeg or cardamom. These spices bring warmth and depth. You might also try adding fruit flavors. Pineapple adds a tropical twist that pairs well with chai. Just blend it into the coconut milk before serving. You can serve Coconut Chai Cream Soda hot for a cozy drink. Just skip the ice and pour it warm into your glass. For iced versions, use plenty of ice. The ice helps keep it cool and refreshing. You can even blend it for a frosty treat. For more details, be sure to check the Full Recipe. To keep your coconut milk fresh, store it in the fridge. Use an airtight container. It lasts about 5 to 7 days. Always shake well before use since it can separate. For spices like chai tea, store them in a cool, dark place. A sealed jar works best. This keeps them flavorful and fresh. Check the expiration dates regularly to avoid stale spices. You can make the coconut chai mixture ahead of time. Just follow the recipe steps, then cool the mixture. Transfer it to a clean container. Store it in the fridge for up to three days. When you’re ready to serve, pour it over ice and add sparkling water. This keeps the drink bubbly and fresh. You can also prepare the drink one day ahead. Just store it without ice. Add ice right before serving for the best taste. For the full recipe, check the earlier section. Enjoy your Coconut Chai Cream Soda! Coconut Chai Cream Soda is a fun and fizzy drink. It combines rich coconut milk with the warm spices of chai tea. The key flavors come from: - Coconut milk - Chai tea (with spices like cinnamon and cardamom) - Sweet sugar - Sparkling water This drink is creamy, sweet, and refreshing. It’s perfect for warm days or as a unique treat. Yes, you can easily make Coconut Chai Cream Soda vegan. The main ingredient, coconut milk, is already vegan. Just use a plant-based sweetener if needed. You can swap the sugar for agave or maple syrup. This way, you keep the drink tasty and plant-based. You can find coconut milk at most grocery stores. Look in the international aisle or near dairy alternatives. For chai tea, visit the tea section. If you prefer online shopping, websites like Amazon or specialty tea shops have both coconut milk and chai tea. This makes it easy to get the best ingredients. Coconut Chai Cream Soda is best enjoyed fresh. If you store it, keep it in the fridge for up to two days. The flavors may change a bit, but it will still taste good. Just give it a stir before serving again. Enjoy this drink right after making it for the best taste. Coconut Chai Cream Soda blends rich flavors into a refreshing drink. We looked at the key ingredients and the simple steps to create it. I shared tips for enhancing the taste and health benefits of each component. You can even adjust recipes for your preferences. Have fun experimenting with variations, and store leftovers correctly for future enjoyment. This drink can delight your taste buds and impress guests. Enjoy making it today!](https://fastmealmate.com/wp-content/uploads/2025/06/117a7c4a-19db-4251-9c08-7fd2f96708ea-768x768.webp)