
Smoked Salmon Bruschetta Wreath Festive and Flavorful
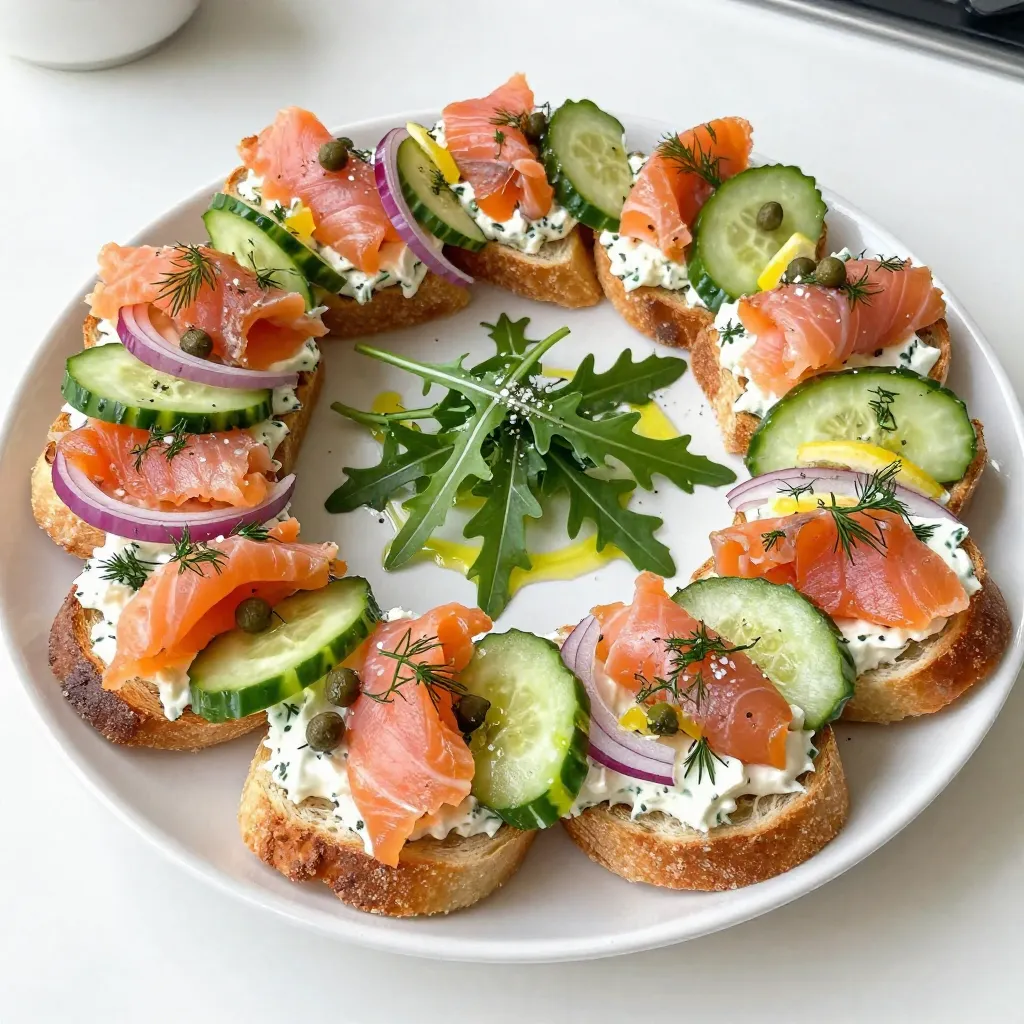

Get ready to impress your guests with a stunning Smoked Salmon Bruschetta Wreath! This festive treat is both easy to make and full of flavor, featuring creamy cheese, fresh herbs, and delicious smoked salmon. Perfect for parties or special occasions, this dish is as beautiful as it is tasty. Dive into my step-by-step guide and surprise everyone with a show-stopping appetizer that will leave them asking for seconds!
Why I Love This Recipe
- Festive Presentation: This wreath shape not only looks stunning on the table, but it also brings a festive spirit to any gathering, making it perfect for holiday celebrations.
- Easy to Assemble: With simple ingredients and straightforward steps, this recipe is quick to prepare, allowing you more time to enjoy the festivities with your guests.
- Flavorful and Fresh: The combination of creamy cheese, smoky salmon, and fresh vegetables creates a delicious balance of flavors that everyone will love.
- Customizable: This bruschetta can easily be tailored to suit your taste preferences or dietary needs by swapping out ingredients or adding new toppings.
Ingredients
Main Ingredients
– 1 baguette, sliced into 1/2-inch rounds
– 8 oz cream cheese, softened at room temperature
– 8 oz smoked salmon, cut into bite-sized pieces
Seasoning and Garnish
– 1 tablespoon fresh dill, finely chopped
– 1 tablespoon capers, rinsed and minced
– 1 teaspoon lemon zest (from about half a lemon)
Accompaniments
– 1/2 red onion, thinly sliced
– 1 cucumber, thinly sliced
– Fresh arugula (for garnish)
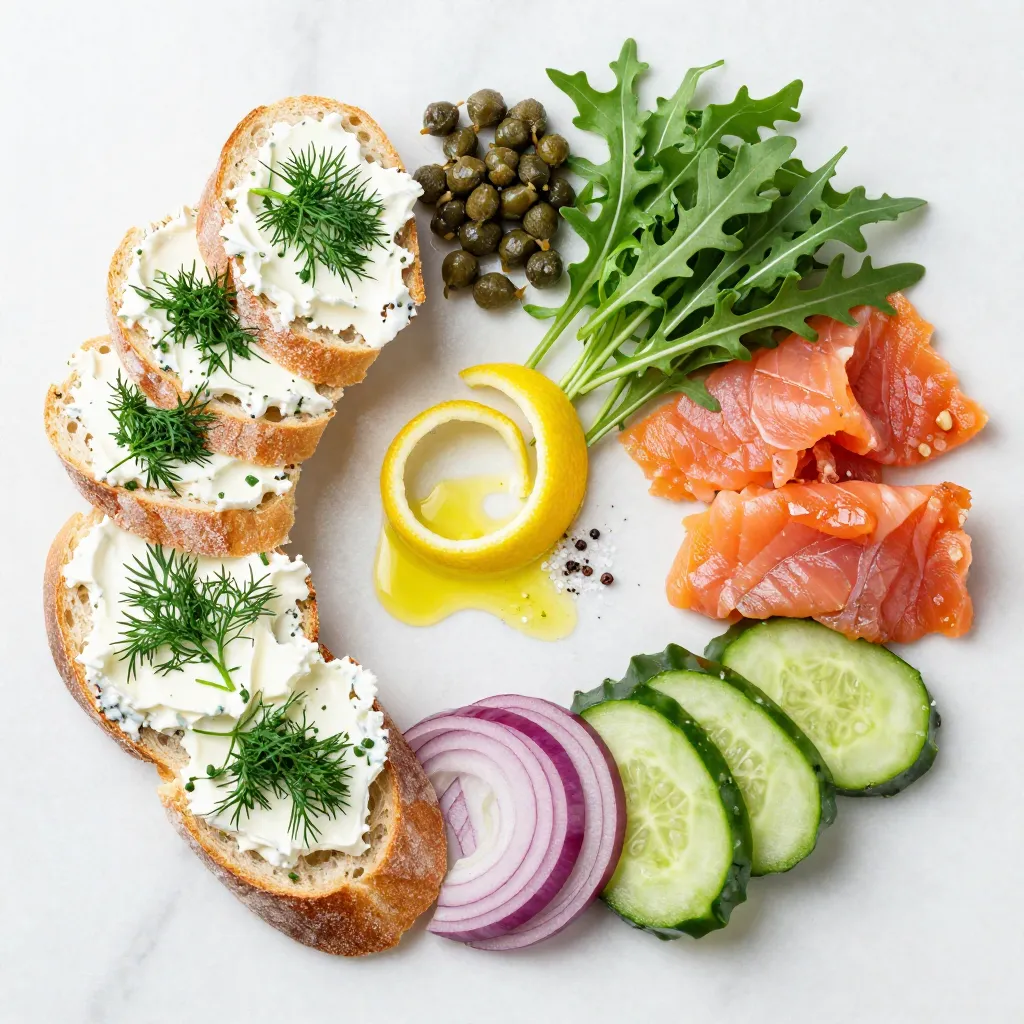
The main ingredients make this dish shine. The baguette provides a crispy base. Cream cheese adds a rich, smooth layer. Smoked salmon brings a savory bite that elevates the whole dish.
For seasoning and garnish, fresh dill adds a bright touch. Capers give a pop of briny flavor. Lemon zest brings a hint of citrus that brightens everything up.
The accompaniments are just as important. Red onion adds crunch and sharpness. Cucumber brings refreshing coolness. Fresh arugula adds color and a peppery bite, making your wreath look festive and inviting.
Each ingredient plays a role in making this smoked salmon bruschetta wreath a delightful treat. When you combine these flavors, you create a dish that is both beautiful and delicious.
Step-by-Step Instructions
Preheating and Preparing
– Preheat the oven to 400°F (200°C).
– Prepare the baguette slices by cutting them into 1/2-inch rounds.
Start by laying the baguette slices flat on a large baking sheet. This setup will make your work easier when it’s time to bake.
Baking the Baguette
– Brush with olive oil.
– Bake until golden brown.
Next, take a brush and lightly coat each slice with extra virgin olive oil. This step adds flavor and helps with crispness. Sprinkle a tiny pinch of salt over the slices to enhance their taste. Place the baking sheet in the preheated oven and bake for about 5 to 7 minutes. Keep an eye on them until they turn a lovely golden brown. Once they are done, take them out and let them cool just a bit.
Preparing the Cream Cheese Mixture
– Combine cream cheese, dill, capers, and lemon zest.
– Mix until smooth.
In a medium bowl, combine the softened cream cheese, finely chopped dill, rinsed and minced capers, and the zest of half a lemon. Use a spatula or a spoon to mix these ingredients well until the mixture is smooth and creamy. This mixture will provide a rich base for your bruschetta.
Assembling the Wreath
– Spread the cream cheese mixture on baguette slices.
– Layer with smoked salmon, onion, and cucumber.
Now comes the fun part—assembling the wreath! Take each toasted baguette slice and spread a generous layer of your cream cheese mixture on top. Make sure to cover each slice evenly. Next, take your bite-sized pieces of smoked salmon and layer them on half of the bruschetta. Distribute them evenly for balanced flavor.
Add a few slices of red onion and cucumber on top for a nice crunch and freshness. To create the festive wreath shape, arrange the bruschetta in a circular formation on a large platter. Interleave with cream cheese-only slices for a visual treat. Finally, add a handful of fresh arugula in the center of the wreath for a pop of color. Drizzle a bit of olive oil and finish with salt and pepper to taste. Enjoy your beautiful, festive creation!
Tips & Tricks
Perfecting the Bake
To get the best baguette, timing is key. I bake mine for just 5-7 minutes. This time lets the slices crisp up without burning. Watch closely! When they turn golden brown, it’s time to take them out.
For the right texture, make sure to brush each slice with olive oil. This step adds flavor and helps them become crispy. The oil creates a lovely crust that holds the toppings well.
Flavor Enhancements
I love to play with flavors. Try adding herbs like chives or basil. These herbs can bring a fresh twist to the dish. You can also sprinkle some smoked paprika for a bit of heat.
If you want more toppings, consider adding avocado or a slice of radish. These add a creamy or crunchy bite. Mixing flavors keeps each bite exciting.
Presentation Advice
Presentation matters, especially for festive occasions. I like to arrange the bruschetta in a circular wreath shape. It looks beautiful and inviting.
For garnishing, add fresh arugula in the center. It brings color and freshness. You can also place lemon wedges around the platter. This adds a pop of yellow and gives guests a tangy option.
Remember, a well-presented dish makes a lasting impression!
Pro Tips
- Choose Fresh Ingredients: Use the freshest smoked salmon and herbs you can find to enhance the flavors of your bruschetta.
- Perfectly Toasted Bread: Keep an eye on the baguette slices while they bake to ensure they don’t burn; golden brown is the goal!
- Layering for Balance: Distribute the toppings evenly across each bruschetta to ensure every bite is packed with flavor.
- Make Ahead: Prepare the cream cheese mixture in advance and store it in the fridge. Assemble the bruschetta just before serving for the best texture.
Variations
Dietary Adaptations
If you need a gluten-free option, look for gluten-free baguettes. Many brands offer tasty choices. You can also use rice cakes or corn tortillas. These will hold up well under the toppings.
For vegan alternatives, swap the cream cheese for a nut-based spread. Cashew cream or store-bought vegan cream cheese works great. You can also use hummus for a fresh twist. Instead of smoked salmon, try marinated tofu or roasted vegetables. These will add flavor and texture.
Seasonal Twists
Seasonal ingredients can make your wreath unique. In spring, add thinly sliced radishes and fresh herbs like basil. In fall, consider using apple slices and walnuts for crunch. For winter holidays, pomegranate seeds add color and sweetness. You can even use cranberries for a festive touch.
For a holiday variation, serve with lemon wedges and sprigs of rosemary. This not only looks pretty but also adds a lovely aroma. You can also mix in seasonal cheeses, like goat cheese or feta, for added flavor.
Flavor Profiles
There are many types of smoked fish you can explore. Try trout or mackerel for a different taste. Each fish brings a unique flavor, enhancing your dish. You can also use smoked tofu for a plant-based option.
For spreads, try flavored cream cheeses or pesto. A dill or garlic cream cheese can elevate the taste. You can even add a spicy element with a sriracha cream cheese. These alternatives can add depth and variety to your wreath.
Storage Info
Leftovers Management
To keep your smoked salmon bruschetta fresh, store leftovers in an airtight container. Place the bruschetta in the fridge. If you have leftover cream cheese, store it separately. This helps maintain the texture of the bread. For the best taste, consume leftovers within two days.
To refresh baguette slices before serving, preheat your oven to 350°F (175°C). Place the slices on a baking sheet and warm them for about 5 minutes. This will crisp them up nicely again. You can also brush on a little olive oil for extra flavor.
Meal Prep Ideas
You can prepare components of the bruschetta in advance. Make the cream cheese mixture a day before and store it in the fridge. Slice the baguette and veggies ahead of time, too. Store them in separate containers to keep them fresh.
Assemble the wreath just before serving. This keeps the bread from getting soggy and helps maintain its crunch. Layer the cream cheese, smoked salmon, and veggies right before your guests arrive. Enjoy the fresh taste and festive look!
FAQs
How long does the Smoked Salmon Bruschetta Wreath last?
The Smoked Salmon Bruschetta Wreath tastes best when fresh. It stays good for about 1-2 days in the fridge. After that, the baguette may get soggy. Store it in an airtight container to keep it fresh as long as possible.
Can I make this recipe in advance?
Yes, you can prepare some parts ahead of time. You can bake the baguette slices and store them. Keep them in a sealed bag at room temperature. You can also mix the cream cheese, dill, capers, and lemon zest in advance. Just spread the mixture on the baguette slices and add the toppings just before serving. This helps keep everything fresh and tasty.
What can I substitute for smoked salmon?
If you want a change, you can use other proteins. Try smoked trout or grilled chicken. For a vegetarian option, you can use roasted red peppers or marinated artichokes. These toppings still give you great flavor and fit well on the bruschetta.
This blog post covered a simple recipe for a smoked salmon bruschetta wreath. We explored key ingredients like baguettes, cream cheese, and smoked salmon. You learned steps to prepare, bake, and assemble the dish. Tips and variations provided ideas for flavor and dietary needs. To finish, this wreath is perfect for any gathering. It offers flexibility in ingredients and presentation. Don’t be afraid to experiment and enjoy your creatio

Smoked Salmon Bruschetta Wreath
Ingredients
- 1 baguette sliced into 1/2-inch rounds
- 8 oz cream cheese, softened at room temperature
- 1 tablespoon fresh dill, finely chopped
- 1 tablespoon capers, rinsed and minced
- 1 teaspoon lemon zest (from about half a lemon)
- 8 oz smoked salmon, cut into bite-sized pieces
- 1 2 red onion, thinly sliced
- 1 cucumber thinly sliced
- to taste fresh arugula (for garnish)
- to taste extra virgin olive oil (for drizzling)
- to taste salt and freshly ground black pepper
Instructions
- Begin by preheating your oven to 400°F (200°C). While the oven is warming, arrange the sliced baguette on a large baking sheet in a single layer.
- Lightly brush each baguette slice with extra virgin olive oil, ensuring they are evenly coated. Sprinkle a small pinch of salt over the slices for flavor enhancement.
- Place the baking sheet in the preheated oven and bake for 5-7 minutes, or until the baguette slices are crispy and turn a lovely golden brown. Once baked, remove them from the oven and allow to cool slightly.
- In a medium-sized mixing bowl, combine the softened cream cheese, freshly chopped dill, minced capers, and lemon zest. Use a spatula or a spoon to mix the ingredients together until they are well incorporated and smooth.
- Take each toasted baguette slice and spread a generous layer of the cream cheese mixture on top, making sure to cover the surface evenly.
- On half of the prepared bruschetta, carefully layer the pieces of smoked salmon, distributing them evenly across each slice for balanced flavor.
- Top the smoked salmon with a few slices of red onion and cucumber for added texture and freshness.
- To create a festive wreath shape, arrange the bruschetta in a circular formation on a large serving platter. Interleave the bruschetta with some plain cream cheese-topped slices to enhance the visual appeal.
- Once arranged, place a handful of fresh arugula in the center of the wreath for a pop of color and a touch of freshness.
- Complete your creation by drizzling a bit of extra virgin olive oil over the bruschetta and finishing with a sprinkle of additional fresh dill, along with salt and pepper to taste.

![- 4 medium-sized russet potatoes - 1 small onion - 2 large eggs - 1/4 cup all-purpose flour - 1 teaspoon baking powder - 1 teaspoon garlic powder - Salt and pepper to taste - 1/4 cup fresh parsley - Vegetable oil for frying Gather these simple ingredients. They are key to making crispy potato pancakes. The russet potatoes give a nice texture. The onion adds flavor. Eggs help bind everything together. Next, we need some dry ingredients. The flour gives structure. Baking powder helps them rise a bit. Garlic powder adds a tasty kick. For seasoning, use salt and pepper to taste. Fresh parsley brings a pop of color and freshness. Finally, vegetable oil is essential for frying. It helps achieve that golden crispiness. To see the full recipe, you can refer to the [Full Recipe]. Start by peeling four medium-sized russet potatoes. Grate them finely using a box grater. Next, do the same with one small onion. After grating, you need to remove moisture. Place the grated potatoes and onions in a clean kitchen towel. Wring out the mixture gently until it is dry. This step is key for crispy pancakes. In a large bowl, combine the grated potatoes and onions. Now, add two large beaten eggs. Stir until the eggs mix well with the potatoes and onions. In a separate bowl, whisk together the dry ingredients. You need 1/4 cup of all-purpose flour, 1 teaspoon of baking powder, and 1 teaspoon of garlic powder. Add salt and pepper to taste. Once well mixed, gradually fold this dry mixture into the potato mixture. Be gentle when folding to keep the texture light. Finally, stir in 1/4 cup of freshly chopped parsley for a burst of flavor. Heat a generous amount of vegetable oil in a skillet over medium-high heat. You want the oil to shimmer. Using a tablespoon or ice cream scoop, take the potato mixture and drop it into the hot oil. Flatten each scoop slightly with a spatula. Fry the pancakes for about 3-4 minutes on each side. Look for a golden brown color to know they are ready. Avoid overcrowding the skillet; cook them in batches if needed. Once done, transfer the pancakes to a plate lined with paper towels to absorb excess oil. Enjoy the crispy potato pancakes hot! For the full recipe, check out the [Full Recipe]. To make crispy potato pancakes, moisture control is key. After grating the potatoes and onion, place the mixture in a clean kitchen towel. Wring it out to remove extra moisture. This step is vital for crispiness. Next, heat your oil properly. Aim for medium-high heat. If the oil is too cool, the pancakes will absorb it and become soggy. If it's too hot, they may burn. You want that perfect shimmer before frying. When you cook your pancakes, avoid overcrowding the skillet. If you add too many at once, the temperature drops. This can lead to soggy pancakes. Cook them in small batches for the best results. To keep the pancakes warm, place them on a plate in an oven set to low heat. This way, they stay crispy while you finish cooking the rest. For garnishes, I love serving crispy potato pancakes with sour cream or applesauce. These toppings add a nice contrast to the crispy texture. You can also sprinkle fresh parsley on top for a pop of color. As for side dishes, consider serving them with a simple salad or sautéed greens. These pair well and balance the meal. For the full recipe, check out the detailed instructions. {{image_4}} You can boost your crispy potato pancakes with cheese. Cheddar adds a sharp bite, while feta gives a tangy twist. Just mix in some crumbled cheese before frying. Herbs and spices also enhance flavor. Chives add a mild onion taste, while dill brings a fresh note. Feel free to experiment with your favorite herbs. You can use different types of potatoes for unique flavors. Yukon Gold potatoes offer a buttery taste, while sweet potatoes add sweetness. If you want gluten-free options, try almond flour or chickpea flour. These swaps keep the pancakes crispy while adding new flavors. Serving styles can change the whole vibe of your dish. Make mini pancakes for appetizers at parties. They are easy to grab and enjoy. For brunch, stack them high and serve with toppings like sour cream or applesauce. This adds a fun twist to your meal. For the full recipe, check out the Crispy Potato Pancakes section above. To keep your crispy potato pancakes fresh, store them in an airtight container. Place parchment paper between each layer to avoid sticking. They stay good in the fridge for about 3 to 5 days. Always let them cool down before storing. This helps keep them crispy for later. If you want to save some for later, freezing is a great option. Let the cooked pancakes cool first. Then, place them in a single layer on a baking sheet. Freeze until solid, then transfer them to a freezer bag. They last about 2 to 3 months in the freezer. To reheat frozen pancakes, you can use an oven or a skillet. For the oven, preheat to 400°F and bake for about 10 to 15 minutes. If using a skillet, heat a bit of oil over medium heat and cook each pancake until warm and crispy. Enjoy them again with your favorite toppings! To keep your potato pancakes crispy, the key is moisture control. Always wring out the grated potatoes and onions to remove excess water. Use a hot pan with enough oil. Fry in small batches so the pancakes don't steam. After frying, place them on a wire rack instead of paper towels. This lets air circulate and keeps them from getting soggy. Yes, you can make potato pancakes ahead of time. Cook them, then store them in an airtight container. They will last up to two days in the fridge. To reheat, place them in a hot skillet for a few minutes on each side. This brings back their crispiness. You can also bake them in the oven at 375°F for about 10 minutes. Crispy potato pancakes pair well with many sides. Sour cream and applesauce are classic choices. You can also try Greek yogurt or a spicy sauce for a twist. Fresh herbs like chives or parsley add color and flavor. For a heartier meal, serve with a side salad or smoked salmon. You can customize potato pancakes in many ways. Add cheese like cheddar or feta for a rich taste. Fresh herbs like dill or chives add a nice touch. You can even mix in grated vegetables, like carrots or zucchini, for extra nutrition. Feel free to play with spices too, like paprika or cumin. Yes, you can bake potato pancakes. Preheat your oven to 425°F. Place the pancakes on a baking sheet lined with parchment paper. Brush them lightly with oil. Bake for about 20 minutes, flipping halfway through. They will be less greasy but still tasty. You may not get the same crispiness as frying, but they will still be good. Check the [Full Recipe] for more tips. Making crispy potato pancakes is simple and fun. We covered the key ingredients, like russet potatoes and eggs, and the steps for perfecting the mixture. I shared tips for achieving that golden, crispy texture and serving suggestions to elevate your dish. Remember, you can always customize your pancakes with different flavors or serving styles. Enjoy your cooking adventure and make these delicious pancakes your own. They’re sure to impress at any meal!](https://fastmealmate.com/wp-content/uploads/2025/06/8dba9489-4fe0-451f-83c3-8d1f72bb8948-768x768.webp)


![- 2 medium yellow squashes - 1 small onion - 1 cup whole wheat breadcrumbs - 2 large eggs - 1/2 cup freshly grated Parmesan cheese - 1/4 cup fresh parsley - 1 teaspoon garlic powder - 1 teaspoon paprika - Salt and pepper to taste - Cooking spray or olive oil Using fresh ingredients makes a big difference in flavor. The yellow squash adds a nice sweetness. The onion gives it a sharp bite. Whole wheat breadcrumbs help bind the fritters while adding fiber. Eggs are key for holding everything together while baking. Herbs and spices really boost the taste. Fresh parsley adds a pop of color and flavor. Garlic powder gives a nice depth, and paprika adds warmth. Don't forget to season with salt and pepper to make flavors shine. For greasing, using cooking spray or olive oil helps the fritters brown nicely. You want a golden crust that contrasts with the soft inside. For a full recipe, check out the [Full Recipe]. - Preheat the oven to 400°F (200°C). - Prepare and grease the baking sheet. Use cooking spray or a drizzle of olive oil. - Grate the yellow squash. - Chop the onion finely and remove excess moisture. Wrap it in a towel, twist, and squeeze gently. - Mix all the ingredients in a bowl. - Form fritters and place them on the baking sheet. Aim for patties about 2-3 inches wide. - Spray or drizzle the fritters with olive oil. - Bake for 20-25 minutes, flipping halfway. This ensures they cook evenly and get crispy. Follow these steps to make your fritters tasty and enjoyable. You can find the Full Recipe for more details. To get your fritters nice and crispy, start by removing excess moisture from the squash. Moisture makes them soggy. After grating the squash, wrap it in a clean kitchen towel. Twist and squeeze the towel to remove as much liquid as you can. This step is key to crispiness. Next, use cooking spray wisely. Lightly spray the tops of the fritters before baking. This helps them brown evenly and adds a nice crunch. You can also drizzle olive oil for a richer flavor. Garnish your fritters with fresh parsley for a pop of color. It adds a fresh taste that pairs well with the fritters. You can also serve them with dips. Creamy yogurt or tzatziki works great. These dips add another layer of flavor and make your dish more fun. Oven types may vary, so cooking times can change. If you use a convection oven, check your fritters a few minutes early. They may cook faster. For standard ovens, stick to 20-25 minutes. To ensure even baking, flip the fritters halfway through cooking. This helps both sides become golden and crispy. Enjoy your perfectly baked fritters from the [Full Recipe]. {{image_4}} You can change the recipe by using different vegetables. Zucchini works well, too. It has a similar texture and taste. Carrots can add a sweet touch. Sweet potatoes bring a nice flavor and color. For cheese, you can swap the Parmesan for feta or cheddar. Feta gives a tangy twist, while cheddar offers a rich taste. This simple change can make your fritters unique. To boost the flavor, you can add spices. Try cumin for a warm taste. Chili flakes can bring some heat. Just a pinch can change the whole dish. Adding fresh herbs can also enhance the flavor. Basil gives a sweet note, while thyme adds earthiness. Mixing in any of these can make your fritters even better. If you need a gluten-free option, use gluten-free breadcrumbs. These work just as well in the recipe. You can also use ground oats or almond flour. Both are great substitutes. For binding, you can add more eggs or use mashed beans. Beans add protein and help hold the fritters together. These easy swaps keep the dish tasty and friendly for all diets. For the full recipe, check out the main article. To keep your fritters fresh, refrigerate them quickly. Place them in a single layer on a plate. Cover them with plastic wrap or foil. If you have many fritters, stack them with parchment paper in between layers. The best containers for storage are airtight ones. Use glass or plastic containers with tight lids. This helps keep moisture out and preserves flavor. For the best texture, reheat fritters in the oven. Set it to 350°F (175°C). Place fritters on a baking sheet for about 10 minutes. This method keeps them crispy. If you want to freeze fritters, let them cool first. Place them in a single layer on a baking sheet and freeze for about an hour. Once frozen, transfer them to a freezer bag. They can last up to three months in the freezer. Baked fritters last about 3 to 4 days in the fridge. Always check for signs of spoilage. If they smell sour or look slimy, throw them away. Fresh fritters should smell like squash and herbs. Enjoy your delicious oven-baked yellow squash fritters! For the full recipe, check out the section above. Yes, you can prepare these fritters ahead of time. To do this, follow these steps: - Prepare the Mixture: Make the fritter mix as per the Full Recipe. - Storage: Place the mixture in an airtight container. You can keep it in the fridge for up to two days. - Form the Fritters: When ready to cook, form the fritters and bake them. This method saves time on busy days and keeps the flavor fresh. Yes, yellow squash fritters offer great health benefits. Here are some reasons they are good for you: - Low in Calories: Yellow squash is low in calories, making it a great choice for light meals. - High in Fiber: It helps with digestion and keeps you full longer. - Rich in Vitamins: Yellow squash is packed with vitamins A and C, which support your immune system. Incorporating these fritters into your meals can add nutrition without sacrificing taste. If you want a healthier fritter, try these substitutes for breadcrumbs: - Oats: Use ground oats for a gluten-free option. - Chickpea Flour: This adds protein and a nutty flavor. - Crushed Nuts: Almonds or walnuts can give a crunchy texture. These alternatives can change the taste and texture, making your fritters unique. Absolutely! Baking in an air fryer is simple and fast. Here’s how to adjust the recipe: - Temperature: Set your air fryer to 375°F (190°C). - Cooking Time: Cook for about 12-15 minutes, flipping halfway through. Using an air fryer makes the fritters extra crispy while using less oil. Oven-baked yellow squash fritters are easy and fun to make. We covered key ingredients like squash, onion, and Parmesan. You learned how to prep, mix, bake, and even store leftovers. Remember to remove moisture for crispiness and try different spices for added flavor. These fritters are not just tasty; they're a healthy choice too. With simple steps, you can impress anyone. Enjoy experimenting with variations that suit your taste. Now, get cooking and savor your delicious fritters!](https://fastmealmate.com/wp-content/uploads/2025/06/228bb01e-104c-4728-9be6-f22ec78a35c6-768x768.webp)