Easy Comfort Lasagna Simple Guide to Deliciousness
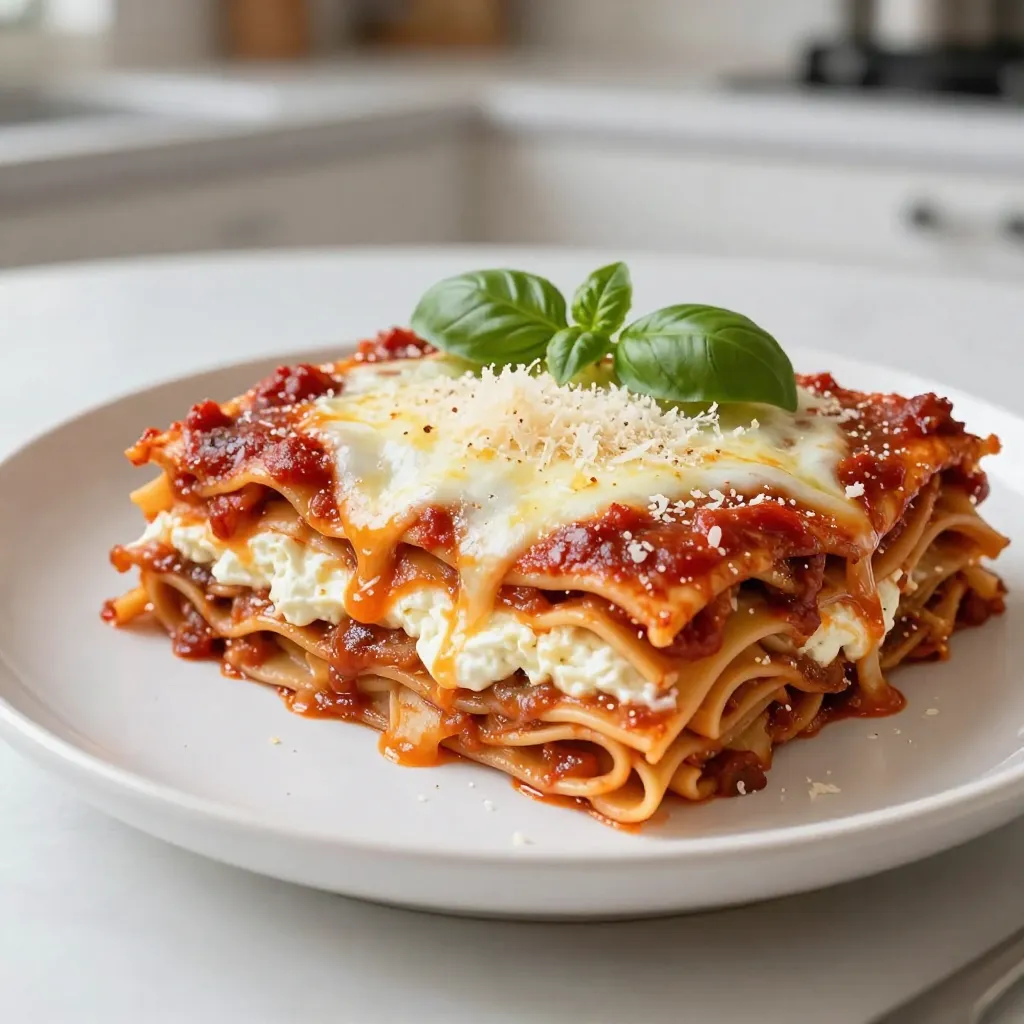

Welcome to my simple guide to easy comfort lasagna! If you crave a warm, cheesy dish that feels like a big hug, you’re in the right place. I’ll share my favorite ingredients, steps, and tips to make lasagna at home. You don’t need to be a chef—just follow along, and you’ll create a delicious meal. Let’s dive into the joy of making lasagna together!
Why I Love This Recipe
- Comforting Layers: This lasagna is a warm embrace on a plate, perfect for cozy family dinners or gatherings.
- Rich Flavor: The combination of creamy ricotta, savory marinara, and melted mozzarella creates an irresistible taste sensation.
- Customizable Options: Whether you prefer beef, turkey, or a vegetarian version, this recipe can easily adapt to your dietary preferences.
- Make Ahead: This lasagna can be prepared in advance and stored in the fridge, making it a convenient option for busy weeknights.
Ingredients
List of Main Ingredients
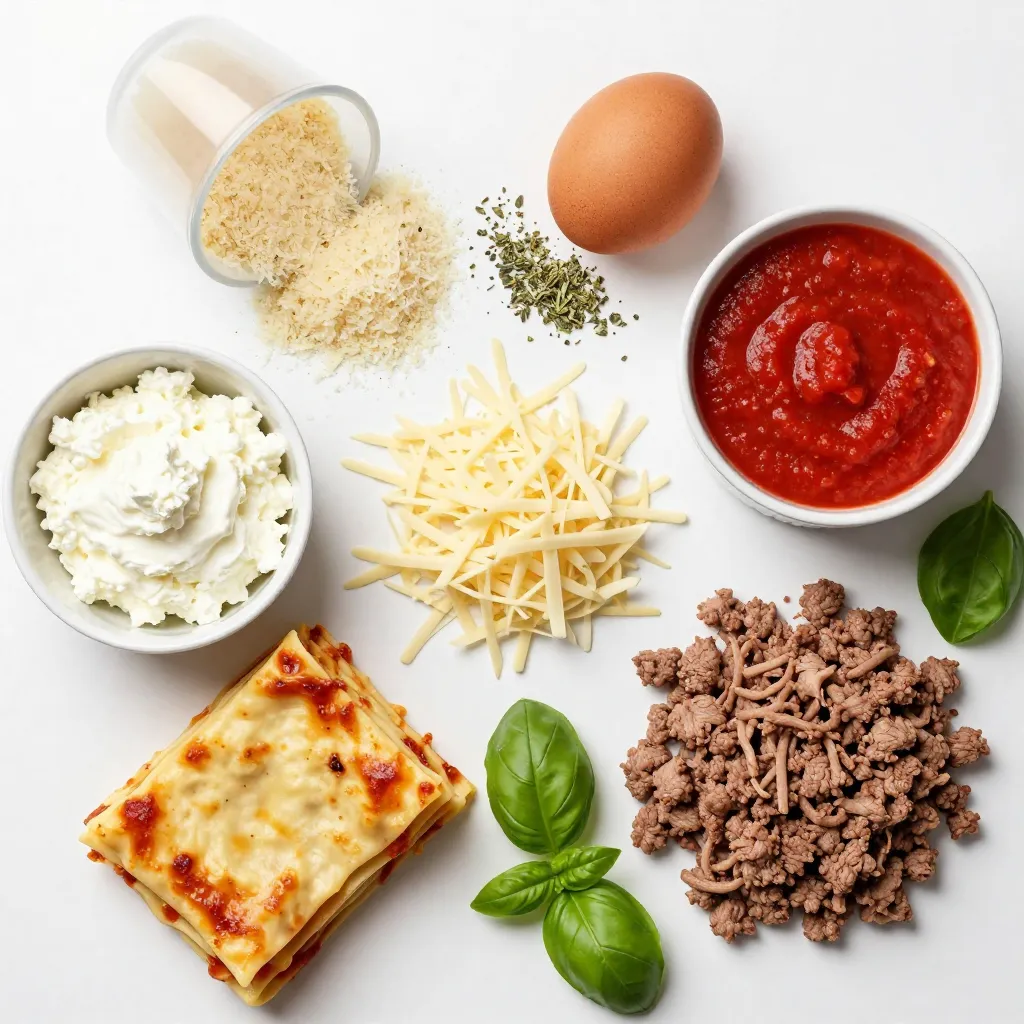
To make your Easy Comfort Lasagna, gather these key ingredients:
– 9 lasagna noodles
– 2 cups creamy ricotta cheese
– 1 cup shredded mozzarella cheese
– 1 cup finely grated Parmesan cheese
– 3 cups marinara sauce (store-bought or homemade)
– 1 large egg, beaten
– 1 tablespoon dried Italian herbs (basil, oregano, and thyme)
– 2 cups cooked ground beef or turkey (optional)
– Salt and freshly ground black pepper
– Fresh basil leaves for garnish
These ingredients create a rich and tasty lasagna. Each part adds to the overall flavor and texture.
Optional Add-ins and Variations
You can customize your lasagna with these fun add-ins:
– Spinach or kale for greens
– Mushrooms for extra depth
– Zucchini or eggplant for a veggie boost
– Different cheeses like goat cheese or cheddar
– A splash of red wine in the sauce for flavor
These options let you play with tastes and textures. Feel free to experiment until you find your favorite mix!
Recommended Tools and Equipment
Having the right tools makes cooking easier. Here’s what you need:
– A 9×13 inch baking dish
– A medium mixing bowl
– A spatula for spreading
– Aluminum foil to cover the dish
– A large pot for boiling noodles
– A colander for draining
These tools help you prepare, layer, and bake your lasagna. With the right setup, you will enjoy the process even more!
Step-by-Step Instructions
Preparing the Oven and Noodles
First, set your oven to 375°F (190°C). This warm heat creates a cozy space for baking. Next, cook the lasagna noodles. Follow the package instructions until they are al dente. Drain them well and let them cool a bit. This step helps keep the noodles from sticking together.
Mixing the Ricotta Filling
Grab a medium mixing bowl. Add 2 cups of creamy ricotta cheese. Now, beat 1 large egg and mix it in. Add half of the grated Parmesan cheese—about ½ cup. Toss in 1 tablespoon of dried Italian herbs, along with salt and pepper to taste. Stir all the ingredients until they blend into a smooth, creamy filling.
Layering the Lasagna
Take a 9×13 inch baking dish. Pour a little marinara sauce at the bottom to prevent sticking. Lay down 3 lasagna noodles next. Spread half of your ricotta mixture over them. If you want, add half of the cooked ground beef or turkey for extra protein. Drizzle some marinara sauce over this layer and sprinkle a handful of mozzarella cheese on top.
Next, add another layer. Place 3 more noodles down. Spread the rest of the ricotta mixture over them. If using meat, add another layer of ground beef or turkey. Follow with more marinara sauce and another handful of mozzarella cheese.
For the final layer, arrange the last 3 noodles on top. Pour the remaining marinara sauce over them. Sprinkle the rest of the mozzarella and Parmesan cheese generously.
Baking and Final Touches
Cover the baking dish tightly with aluminum foil. This step traps steam and helps cook the lasagna evenly. Place it in your preheated oven and bake for 25 minutes. After that, take off the foil and bake for another 15 minutes. Look for bubbly cheese and a golden brown top.
Let the lasagna cool for about 10 minutes before cutting. Garnish with fresh basil leaves for a lovely touch. Now, you’re ready to serve a delicious, homemade lasagna!
Tips & Tricks
How to Prevent Soggy Lasagna
Soggy lasagna happens when too much moisture builds up. To avoid this, start by draining your noodles well after cooking. Use a colander and let them cool. You can also bake your noodles for a few minutes to dry them out. Additionally, do not add too much sauce. A light layer keeps everything moist without drowning the dish.
Best Practices for Layering
Layering is key to a great lasagna. Start with a layer of sauce at the bottom to prevent sticking. Then, place three noodles in a straight line. Spread half of the ricotta mix over the noodles, followed by sauce, meat, and cheese. Repeat this process for each layer. Finish with noodles, sauce, and a generous cheese topping. This order keeps flavors balanced and creates a beautiful dish.
Using Store-Bought vs. Homemade Marinara Sauce
Both store-bought and homemade marinara sauce work well in lasagna. Store-bought sauce is quick and easy. Look for brands with no added sugars or preservatives for a better taste. Homemade sauce gives you full control of flavors. You can add herbs or spices to match your taste. If you have the time, I recommend making your own for a richer flavor.
Pro Tips
- Perfect Noodle Texture: Ensure the lasagna noodles are cooked al dente; this prevents them from becoming mushy during baking.
- Cheese Layering: For an extra cheesy pull, mix some of the mozzarella into the ricotta mixture and reserve some for the top layer.
- Resting Time: Allow the lasagna to rest for at least 10 minutes after baking; this helps the layers set and makes for cleaner slices.
- Herb Freshness: For a fresher flavor, consider adding fresh herbs like basil or parsley to the ricotta mixture or as a garnish.
Variations
Vegetarian Lasagna Options
You can easily make a vegetarian lasagna. Use veggies like spinach, zucchini, or mushrooms. Replace meat with extra layers of veggies. Blend in ricotta cheese for creaminess. You can also add spinach for color and taste. This makes it healthy and tasty.
Dairy-Free Alternatives
If you need a dairy-free lasagna, swap the cheese. Use cashew cheese or tofu. These options taste great and give a creamy texture. You can also use dairy-free mozzarella for a cheesy flavor. Check labels to ensure all ingredients are dairy-free.
Switching Up the Proteins
Want to change up the protein? Try ground chicken or sausage. Each option adds a unique flavor. You can even mix different proteins for a fun twist. Beans are a great choice for a filling, plant-based protein. Feel free to experiment and find what you like best.
Storage Info
How to Store Leftover Lasagna
To store leftover lasagna, let it cool first. Once it’s cool, place it in an airtight container. You can also wrap it tightly in plastic wrap. This keeps it fresh in the fridge. Leftover lasagna can last up to four days in the fridge.
Make sure to label your container with the date. This helps you remember when it was made. If you’re not sure when to eat it, check for any off smells or mold before eating.
Freezing Tips for Lasagna
You can freeze lasagna for longer storage. First, cool it completely. Then, cut it into portions. This makes it easier to reheat later. Wrap each piece tightly in plastic wrap. After that, place the wrapped pieces in a freezer-safe bag.
Label the bags with the date. Frozen lasagna is best enjoyed within three months. When you’re ready to eat, thaw it in the fridge overnight before reheating.
Reheating Instructions
To reheat lasagna, preheat your oven to 350°F (175°C). If frozen, fully thaw it first. Place the lasagna in an oven-safe dish. Cover it with foil to keep it moist. Bake for about 20-30 minutes.
Check the center to ensure it’s hot. You can also reheat individual slices in the microwave. Heat in 1-minute intervals until warm. Always let it sit for a minute before enjoying. This helps prevent burns and makes it easier to eat.
FAQs
Can I prepare lasagna in advance?
Yes, you can prepare lasagna ahead of time. You can layer it all in a baking dish and keep it in the fridge. Just cover it tightly with foil. This way, the flavors can meld together. You can bake it the next day or even freeze it for later. If you freeze it, just remember to thaw it overnight in the fridge before baking.
How long does lasagna last in the fridge?
Lasagna can last up to 3 to 5 days in the fridge. Make sure to store it in an airtight container. If you see any signs of spoilage, like an off smell or mold, it’s best to toss it out.
What can I serve with lasagna?
Lasagna pairs well with many side dishes. Here are some ideas:
– Garlic bread for a crunchy side.
– A fresh salad to add crunch.
– Roasted vegetables for a healthy touch.
– A classic Caesar salad for a twist.
Feel free to mix and match based on your preference!
This blog post covered all the essentials for making lasagna. We explored key ingredients, tools, and step-by-step instructions to ensure your cooking is easy. I shared tips to avoid soggy layers and offered different variations to fit your needs. Storage and reheating methods will help you enjoy leftovers too.
Lasagna is a dish full of options. With practice, you can make it your own. Enjoy cooking and sharing your delicious lasagna creation

Cozy Comfort Lasagna
Ingredients
- 9 pieces lasagna noodles
- 2 cups creamy ricotta cheese
- 1 cup shredded mozzarella cheese
- 1 cup finely grated Parmesan cheese
- 3 cups marinara sauce
- 1 large egg, beaten
- 1 tablespoon dried Italian herbs
- 2 cups cooked ground beef or turkey
- to taste Salt
- to taste freshly ground black pepper
- for garnish Fresh basil leaves
Instructions
- Preheat your oven to 375°F (190°C) to create a warm baking environment for the lasagna.
- Cook the lasagna noodles as per the package instructions until they are al dente. Drain them well, and set aside to cool slightly.
- In a medium mixing bowl, blend together the ricotta cheese, the beaten egg, half of the grated Parmesan cheese, the dried Italian herbs, along with salt and pepper. Mix until the ingredients are fully incorporated and creamy.
- Pour a small amount of marinara sauce into the bottom of a 9x13 inch baking dish, spreading it evenly to prevent sticking.
- Lay down 3 lasagna noodles over the sauce, ensuring they are neatly aligned. Spread half of the ricotta mixture over the noodles, smoothing it out with a spatula. If including protein, layer half of the cooked ground beef or turkey on top. Drizzle a layer of marinara sauce followed by a generous sprinkle of mozzarella cheese.
- Create a second layer by adding another 3 noodles, spreading the remaining ricotta mixture over the top. If using meat, add another layer of the cooked ground beef or turkey, followed by more marinara sauce and another handful of mozzarella cheese.
- For the final layer, arrange the last 3 noodles on top, then pour the remaining marinara sauce over them, generously sprinkling with mozzarella cheese and the remaining Parmesan cheese.
- Cover the entire baking dish tightly with aluminum foil to trap steam during cooking, then place it in the preheated oven and bake for 25 minutes.
- After 25 minutes, carefully remove the foil and continue baking for an additional 15 minutes, or until the cheese is beautifully bubbly and a golden brown color has formed on top.
- Allow the lasagna to cool for approximately 10 minutes before carefully slicing into servings. For a lovely finishing touch, garnish with fresh basil leaves to enhance the presentation and aroma before serving.
![- 1 cup grated zucchini - ½ cup unsweetened applesauce - ½ cup brown sugar - ¼ cup white sugar The main ingredients in these brownies are simple and nutritious. Zucchini adds moisture and keeps the brownies soft. The applesauce replaces some fat while adding sweetness. Using both brown and white sugar gives the brownies a rich flavor and a nice texture. - ⅓ cup vegetable oil or melted coconut oil - 2 large eggs - 1 teaspoon vanilla extract - 1 cup all-purpose flour - ⅓ cup unsweetened cocoa powder - ½ teaspoon baking soda - ¼ teaspoon baking powder - ¼ teaspoon salt - ½ cup chocolate chips - Optional: ¼ cup chopped nuts (e.g., walnuts or pecans) The additional ingredients help create a great structure in the brownies. The oil keeps them moist, while the eggs bind everything together. Flour and cocoa powder provide the base, giving that rich, chocolate flavor. Baking soda and baking powder help the brownies rise. The chocolate chips melt into sweet pockets of goodness. If you like nuts, they add a nice crunch and flavor. You can find the complete list of ingredients in the Full Recipe section for more details on how to get started. - Preheat your oven to 350°F (175°C). - Prepare an 8x8 inch baking pan. You can grease it or line it with parchment paper. - In a large bowl, combine the wet ingredients. Mix grated zucchini, applesauce, brown sugar, white sugar, oil, eggs, and vanilla extract until well blended. - In another bowl, mix the dry ingredients. Whisk flour, cocoa powder, baking soda, baking powder, and salt together. - Now, add the dry mixture to the wet ingredients. Stir gently until just combined. Be careful not to overmix. - Pour the brownie batter into the prepared pan. Use a spatula to smooth the top. - Bake in the preheated oven for 25-30 minutes. Check for doneness by inserting a toothpick. It should come out with a few moist crumbs. - Let the brownies cool in the pan for about 10 minutes. Then transfer them to a wire rack to cool completely. You can find the full recipe in the earlier sections. Enjoy your delicious zucchini brownies! To make perfect zucchini brownies, focus on two key tips: - Avoid overmixing: Mix just enough until the dry and wet ingredients blend. Overmixing can make brownies tough. - Drain excess moisture from zucchini: Zucchini holds a lot of water. Grate it, then put it in a clean cloth. Squeeze out the extra moisture. This step helps achieve a fudgy texture. Baking these brownies is simple. Here are two tips to ensure the best results: - Check for doneness with a toothpick: Insert a toothpick into the center. If it comes out with moist crumbs, your brownies are done. If it comes out clean, they might be overbaked. - Cooling suggestions for optimal texture: After baking, let the brownies cool in the pan for about 10 minutes. Then, transfer them to a wire rack to cool completely. This cooling method helps keep the brownies soft and chewy. For more details, check the Full Recipe. {{image_4}} You can make these brownies gluten-free! Just swap regular flour for a gluten-free flour blend. This simple change works well without affecting taste. Look for blends that contain rice flour, almond flour, or coconut flour. These options hold moisture and keep the brownies soft. Want to mix it up? Try different types of chocolate in your brownies. You can use milk chocolate, dark chocolate, or even white chocolate. Each type adds its own unique taste. Adding spices like cinnamon or nutmeg can enhance the flavor too. A pinch of cinnamon gives warmth, while nutmeg adds a hint of sweetness. You can also add dried fruits or seeds for more texture. Try mixing in chopped nuts, like walnuts or pecans, for a nice crunch. Dried cherries or raisins can add a burst of sweetness. These additions make your brownies even more delightful and fun to eat. For the full recipe, check out the Chocolate Zucchini Brownies Full Recipe! To keep your zucchini brownies fresh, use an airtight container. This helps seal in moisture and flavor. Place them in the container after they cool down. You can store them at room temperature for up to four days. If you want them to last longer, keep them in the fridge. They can stay fresh for about a week in the fridge. Just make sure they are well-covered to avoid drying out. Freezing zucchini brownies is a great way to save some for later. First, let the brownies cool completely. Then, cut them into squares. Wrap each square in plastic wrap, and place them in a freezer bag. Make sure to remove as much air as possible from the bag. You can freeze them for up to three months. When you're ready to eat them, simply thaw them in the fridge overnight. This way, they will keep their great taste and soft texture. For the full recipe, check out the Chocolate Zucchini Brownies full recipe. Yes, you can use sugar substitutes. Common options are stevia, erythritol, or monk fruit. These substitutes can make your brownies lower in calories. However, they may change the taste and texture. Some might be sweeter, so adjust the amount. Always check the package for the right measurement. This way, your brownies will still taste great. To check if your brownies are done, look for a few signs. The edges will pull away from the pan. The top should look set and have a slight sheen. You can also use a toothpick. Insert it into the center of the brownies. If it comes out with a few moist crumbs, they are ready. If it has wet batter, bake a few more minutes. Yes, you can make these brownies vegan. Replace eggs with flax eggs or applesauce. Use 1 tablespoon of flaxseed meal mixed with 2.5 tablespoons of water for each egg. For dairy, substitute with plant-based milk or yogurt. You can also use coconut oil instead of butter. These swaps will keep the brownies moist and tasty. Each brownie has about 150 calories. They contain around 6 grams of fat and 20 grams of sugar. The exact numbers can change based on the ingredients used. For example, using less sugar or different oils can lower calories. Adding nuts can increase healthy fats and protein. Always check the recipe for detailed info. Zucchini brownies can last up to a week when stored properly. Keep them in an airtight container at room temperature. If you want them to last longer, freeze them. They can stay fresh in the freezer for up to three months. Just remember to wrap them well in plastic wrap or foil. For the complete recipe, check out the Chocolate Zucchini Brownies [Full Recipe]. Zucchini brownies blend health and taste. We covered key ingredients, easy steps, and tips. Think alternatives like gluten-free flour or added spices for fun flavors. Proper storage keeps them fresh, while freezing maintains taste and texture. With answers to common questions, you now have all you need for success. Try making these tasty brownies soon! You'll enjoy a delicious treat that also sneaks in some veggies.](https://fastmealmate.com/wp-content/uploads/2025/06/6955e8e8-deef-478f-bc92-a4114a14f9ca-768x768.webp)

![- 1 pound boneless, skinless chicken thighs, cut into 1-inch cubes - 1/4 cup soy sauce - 1/4 cup honey - 2 tablespoons rice vinegar - 1 tablespoon sesame oil - 2 cloves garlic, finely minced - 1 teaspoon fresh ginger, grated - 1 red bell pepper, cut into 1-inch squares - 1 yellow bell pepper, cut into 1-inch squares - 1 zucchini, sliced into thick rounds The main ingredients are key to a great teriyaki dish. Chicken thighs are juicy and flavorful. The soy sauce and honey create a sweet and salty marinade. Rice vinegar adds a slight tang. Garlic and ginger bring warmth and depth to the flavor. The colorful veggies add crunch and a fresh touch. - 1 teaspoon cornstarch mixed with 1 tablespoon cold water (optional, for thickening the sauce) - Sesame seeds, for garnish - Fresh cilantro, for garnish Cornstarch helps thicken the teriyaki sauce. This makes it stick better to the chicken. Sesame seeds and cilantro are perfect for garnishing. They add a nice look and extra flavor. - Bamboo skewers (soaked in water for at least 30 minutes) - Grill or grill pan You need skewers to hold the chicken and veggies. Soaking them in water prevents burning. A grill or grill pan cooks the skewers evenly. It gives the chicken those beautiful grill marks. For the full recipe and more tips, check out the Full Recipe section. To start, we need to mix the marinade. In a medium bowl, combine the soy sauce, honey, rice vinegar, sesame oil, minced garlic, and grated ginger. Whisk these ingredients together until they blend well. This mixture is key to our teriyaki chicken skewers. Marinating is very important. It lets the chicken soak up all the nice flavors. Aim for at least 30 minutes. For the best taste, try to marinate for 1 to 2 hours. This makes a big difference in flavor. Now, it’s time to thread the chicken and veggies onto the skewers. First, take your soaked bamboo skewers and start with a piece of chicken. Then, add a square of red bell pepper, followed by a piece of yellow pepper. Next, add a thick slice of zucchini. Repeat this pattern. This colorful arrangement is not just tasty; it looks great too! Make sure the pieces fit snugly but not so tightly that they can't cook well. A nice visual appeal will impress everyone at the table. When it’s time to cook, we can grill the skewers. Preheat your grill or grill pan to medium-high heat. Place the skewers on the grill and cook them for about 10 to 12 minutes. Turn them occasionally for even cooking. If you prefer, you can also bake or broil the skewers. Just adjust the cooking time. Cook until the chicken is fully done and has lovely grill marks. For added flavor, brush the skewers with the thickened teriyaki sauce while they cook. Check the Full Recipe for more details on each step! To make a great teriyaki marinade, you need balance. Start with soy sauce for saltiness. Add honey for sweetness. Rice vinegar brings in acidity, which brightens the flavors. Garlic and ginger give depth. Ensure you mix these well. A good marinade coats the chicken evenly. For extra flavor, let the chicken sit in the marinade for longer. Aim for 1 to 2 hours for the best taste. If you want more richness, try adding a splash of orange juice. This will enhance the flavor profile. Grilling your skewers right is key. First, preheat your grill to medium-high heat. This helps get those beautiful grill marks. Place the skewers on the grill and leave them alone for a few minutes. Avoid moving them too much; let them sear. Flip them only once or twice. If you brush them with the thickened sauce, it adds a nice glaze. Keep an eye on the time; cook them for about 10-12 minutes. Common mistakes include overcrowding the grill. Give each skewer space so they cook evenly. Also, don’t skip the resting time after grilling; it helps the juices redistribute. When serving, presentation matters. Lay the skewers on a big platter. Drizzle with any leftover teriyaki sauce for extra flavor. Sprinkle sesame seeds and chopped cilantro on top. It adds color and looks inviting. For side dishes, think simple. Steamed rice or a fresh salad pairs well. You could also serve grilled veggies for a complete meal. These combinations elevate your dish and make for a delicious feast. Remember, the Full Recipe will guide you through the process! {{image_4}} You can swap chicken for other proteins like beef or tofu. Beef gives a rich, hearty taste. Tofu offers a plant-based option that absorbs flavors well. Adjust cooking times depending on what you use. Beef may need longer than chicken, while tofu cooks quicker. Always check for doneness to keep your meal safe. Feel free to include seasonal vegetables. Bell peppers, zucchini, and onions add color and crunch. Try mushrooms or cherry tomatoes for even more variety. These colorful additions not only taste great but also make your dish visually appealing. Mixing different veggies can create a vibrant plate that excites the eyes. You can use store-bought teriyaki sauce for speed. Homemade sauce allows you to control flavors better. If you want a kick, try adding chili flakes for spice. For a sweeter twist, mix in some pineapple juice. These variations help you customize the sauce to fit your taste. Check the [Full Recipe] for details on how to make your own sauce! After enjoying your teriyaki chicken skewers, you may have some leftovers. It’s best to store them right away. Place the skewers in an airtight container. This keeps them fresh and prevents odors. You can refrigerate them for up to four days. For longer storage, wrap them tightly in plastic wrap and place them in a freezer bag. You can freeze them for up to three months. Just remember to label the bag with the date. When it’s time to enjoy leftovers, reheating correctly matters. You want to keep the chicken moist. The oven works best for this. Preheat it to 350°F (175°C). Place the skewers on a baking sheet and cover them with foil. Heat for about 10-15 minutes until warm. The microwave is quicker but can dry out the chicken. If you use it, heat in short bursts of 30 seconds. Check often to avoid overcooking. Leftover teriyaki chicken skewers can last up to four days in the fridge. If frozen, they remain safe for three months. Always check for signs of spoilage before eating. If the chicken smells bad or looks off, don’t eat it. Look for a change in color or texture too. When in doubt, throw it out. Enjoying your teriyaki chicken skewers fresh is the best way to experience their flavor. For the full recipe, refer to the earlier sections. The best chicken for skewers is thighs. They stay juicy and tender when cooked. Breasts can dry out quickly. They have less fat, which makes them less forgiving. Thighs are more flavorful and can handle marinating well. Yes, you can make teriyaki chicken skewers in advance. Marinate the chicken for at least 30 minutes. For the best taste, marinate for 1 to 2 hours. You can even marinate them overnight. Cook them right before serving for the best results. You can serve teriyaki chicken skewers with many tasty sides. Rice, like jasmine or brown rice, pairs well. You can also offer stir-fried veggies for crunch. A fresh salad with sesame dressing adds a nice touch. Consider serving with grilled pineapple for a sweet twist. Explore these options to find what you love! This article covered making delicious teriyaki chicken skewers. We explored key ingredients like chicken, marinade, and vegetables. You learned how to prepare the marinade, assemble skewers, and cook on the grill. We also shared tips for flavor, grilling techniques, and serving ideas. You can mix in different proteins or vegetables and make it your own. Remember to store any leftovers properly to enjoy later. Now, get ready to impress with your new skewering skills!](https://fastmealmate.com/wp-content/uploads/2025/06/9b1dc869-68dc-4727-be9c-b0e6615ca1ac-768x768.webp)