
Savory Slow Cooker Chili Simple and Heartwarming Dish


Looking for a cozy meal that warms both body and soul? My Savory Slow Cooker Chili is the perfect dish! Packed with ground turkey, hearty beans, and aromatic spices, it’s simple to make and perfect for any gathering. Let your slow cooker do the work while you relax. Join me as I share my expert tips, step-by-step instructions, and delicious variations to customize this beloved classic just for you!
Why I Love This Recipe
- Healthy Ingredients: This chili is packed with lean protein and fiber-rich beans, making it a nutritious option for any meal.
- Easy Preparation: With minimal prep time and the convenience of a slow cooker, you can set it and forget it while it develops amazing flavors.
- Customizable Spice Level: You have the option to add jalapeños for heat or skip them for a milder chili, catering to everyone’s taste preferences.
- Perfect for Meal Prep: This chili stores well, making it ideal for meal prep or leftovers, and it tastes even better the next day!
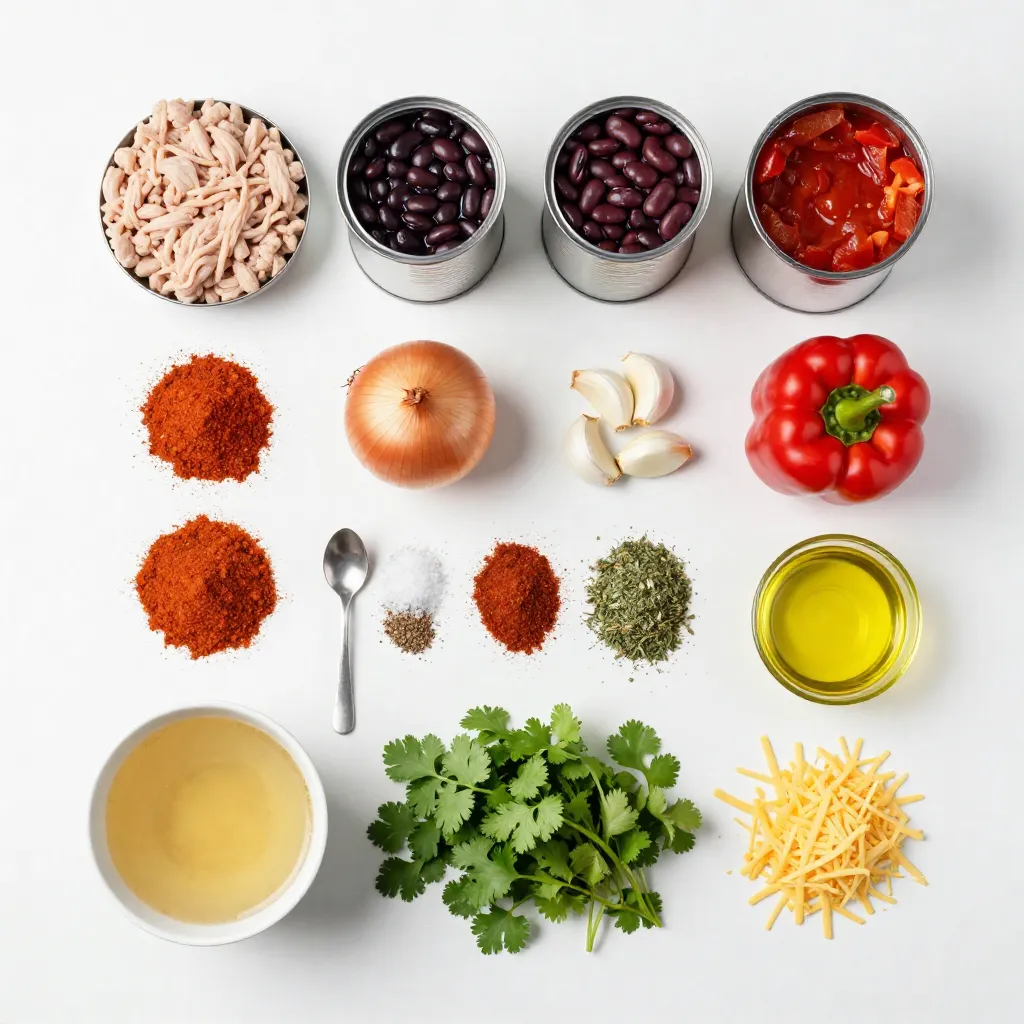
Ingredients
Main Ingredients
– 1 lb ground turkey or chicken
– 1 can (15 oz) black beans, rinsed and drained
– 1 can (15 oz) kidney beans, rinsed and drained
– 1 can (28 oz) crushed tomatoes
You start with the main ingredients for a hearty chili. The ground turkey or chicken gives a lean protein base. The black and kidney beans add fiber and texture. Crushed tomatoes create a rich, savory sauce that ties everything together.
Aromatic and Spice Ingredients
– 1 large onion, finely diced
– 2 cloves garlic, finely minced
– 1 bell pepper, diced
– 1 jalapeño, finely minced (optional for extra heat)
– 2 tablespoons chili powder
– 1 teaspoon ground cumin
– 1 teaspoon smoked paprika
– 1 teaspoon dried oregano
– Salt and black pepper to taste
Next, we add aromatic ingredients. Onion and garlic bring a sweet, savory smell. Bell pepper adds a slight crunch. The jalapeño is optional but gives a nice kick. Chili powder, cumin, and smoked paprika add depth. Oregano rounds out the flavor profile. Salt and pepper enhance everything.
Broth and Garnishes
– 1 cup low-sodium vegetable or chicken broth
– 1 tablespoon olive oil
– Fresh cilantro, chopped (for garnish)
– Shredded cheese (optional, for serving)
For broth, use either vegetable or chicken. This keeps the chili moist while it cooks. Olive oil adds richness and helps sauté the aromatics. Fresh cilantro is perfect for a bright finish. If you like cheese, sprinkle some on top when serving.
These ingredients create a warm, comforting dish. You can adjust them based on your taste.
Step-by-Step Instructions
Preparing Aromatics and Meat
1. Sautéing onion, garlic, and bell pepper
Start by heating 1 tablespoon of olive oil in a large skillet over medium heat. Add 1 large diced onion, 2 minced garlic cloves, and 1 diced bell pepper. Cook for about 5 minutes. Stir often until the veggies soften and the onion turns clear.
2. Browning the ground meat
Next, add 1 pound of ground turkey or chicken to the skillet. Cook and stir for 5 to 7 minutes. The meat should be lightly browned and fully cooked. Season with salt, pepper, 2 tablespoons of chili powder, 1 teaspoon of ground cumin, 1 teaspoon of smoked paprika, and 1 teaspoon of dried oregano. Mix well and let it cook for an extra minute. This will boost the flavor.
Combining Ingredients in the Slow Cooker
1. Transferring cooked mixture to the slow cooker
Once the meat and veggies are ready, pour this mixture into your slow cooker.
2. Adding remaining ingredients
Now, add 1 can of crushed tomatoes, 1 can of black beans, and 1 can of kidney beans, rinsed and drained. If you like heat, add 1 minced jalapeño. Pour in 1 cup of low-sodium vegetable or chicken broth. Stir everything well to combine.
Cooking Time and Temperature
1. Setting slow cooker to low or high
Cover the slow cooker. Set it to low for 6 to 8 hours or high for 3 to 4 hours.
2. Understanding cooking duration for flavors to meld
Cooking slowly helps all the flavors blend. When done, taste your chili. Adjust the seasoning with more salt, pepper, or spices if needed.
Tips & Tricks
Enhancing Flavor
To boost flavor, adjust spices to fit your taste. You can add more chili powder for heat or more cumin for warmth. Feel free to experiment! A secret ingredient can elevate your chili. Try adding a bit of dark chocolate or a splash of beer. These ingredients add depth and richness.
Presentation Suggestions
Garnish your chili with fresh cilantro and shredded cheese. These toppings add color and flavor. Serve your chili in deep bowls. For a complete meal, pair it with warm cornbread or crispy tortilla chips. The crunch of chips complements the chili’s smoothness.
Time-Saving Tips
Prep ingredients ahead of time to save effort. Chop onions, garlic, and peppers the night before. Store them in the fridge for easy access. Batch cooking is also smart. Make a large pot of chili and freeze leftovers. This way, you have a tasty meal ready for busy days.
Pro Tips
- Enhance the Flavor: Consider adding a tablespoon of cocoa powder or dark chocolate to the chili while it cooks for a rich depth of flavor.
- Make it Vegetarian: Substitute the ground turkey or chicken with a mix of lentils or add more beans for a hearty vegetarian option.
- Customize the Heat: Adjust the level of spiciness by using more or fewer jalapeños or by adding a dash of hot sauce to taste.
- Prep Ahead: This chili freezes well! Make a double batch and store leftovers in airtight containers for a quick meal later.
Variations
Vegetarian Chili Option
You can easily make a vegetarian chili. First, substitute the ground meat with beans or lentils. Black beans, kidney beans, or chickpeas all work well. If you want a thicker texture, add more beans. You can also add lentils for added protein.
Next, think about more veggies. Diced carrots, zucchini, or corn add great flavor and color. You can even toss in some sweet potatoes. This way, you get a hearty and healthy meal.
Spicy Chili Alternative
For a spicy chili, add different chilies or hot sauce. You can use fresh jalapeños or even serrano peppers. Adjust how many you add based on your heat preference. If you like it really hot, add a dash of cayenne pepper.
You can also try different hot sauces for unique flavors. A few drops of your favorite sauce can change the whole dish. Just remember to taste as you go.
Unique Flavor Combinations
To mix it up, try different meats like beef or pork. Each type of meat gives a new flavor. You can also use ground lamb for a twist.
Don’t be afraid to add unexpected ingredients. A bit of dark chocolate or cocoa powder can deepen the flavor. Also, try adding a splash of beer for a rich taste. These small changes make your chili truly one-of-a-kind.
Storage Info
Refrigerating Leftovers
To cool your chili, let it sit at room temperature for about 30 minutes. This helps it cool down safely. Once cooled, transfer the chili into airtight containers. Glass or plastic containers work well. Make sure to leave some space at the top. This allows for any expansion when freezing. Store the chili in the fridge for up to four days.
Freezing Chili
For long-term storage, freezing is a great option. First, let the chili cool completely. Then, portion it into freezer-safe bags or containers. Remove as much air as possible from bags. This prevents freezer burn. Label your containers with the date. You can freeze the chili for up to three months. When ready to eat, thaw the chili in the fridge overnight. Reheat it on the stove or in the microwave until hot.
Shelf Life
In the fridge, your chili lasts for about four days. In the freezer, it stays good for three months. To check for spoilage, look for off smells or unusual colors. If you see any mold, toss it out. Always trust your senses when it comes to food safety.
FAQs
Can I use different types of meat for this chili?
Yes, you can use different types of meat for this chili. Ground beef or pork works well. You can also use a mix of meats for a richer flavor. If you want a lighter option, ground turkey or chicken is great. For a vegetarian version, consider lentils or mushrooms. Both options add nice texture and taste.
How do I make this recipe spicier?
To make this chili spicier, add more jalapeños. You can also use hotter peppers like serrano or habanero. Another option is to include chili powder or cayenne pepper. Start with small amounts and taste as you go. This way, you can find your perfect heat level.
Is it possible to cook this recipe without a slow cooker?
Yes, you can cook this chili on the stovetop. Brown the meat and sauté the vegetables in a large pot. Then, add the remaining ingredients. Bring everything to a boil, then reduce heat to low. Let it simmer for 30 to 45 minutes, stirring occasionally. The flavors will still meld beautifully, just like in the slow cooker.
This blog post covered a delicious chili recipe with ground turkey and beans. We explored key ingredients, cooking steps, and flavor tips. You learned how to use your slow cooker effectively, along with storage methods.
In closing, this chili is easy to customize and share. Enjoy experimenting with different flavors and ingredients to suit your taste. With these tips, you can create a satisfying dish for any occasion. Happy cookin

Hearty Savory Slow Cooker Chili
Ingredients
- 1 lb ground turkey or chicken
- 1 can (15 oz) black beans, rinsed and drained
- 1 can (15 oz) kidney beans, rinsed and drained
- 1 can (28 oz) crushed tomatoes
- 1 large onion, finely diced
- 2 cloves garlic, finely minced
- 1 bell pepper diced
- 1 jalapeño finely minced (optional for extra heat)
- 2 tablespoons chili powder
- 1 teaspoon ground cumin
- 1 teaspoon smoked paprika
- 1 teaspoon dried oregano
- to taste salt and black pepper
- 1 cup low-sodium vegetable or chicken broth
- 1 tablespoon olive oil
- for garnish fresh cilantro, chopped
- optional shredded cheese, for serving
Instructions
- In a large skillet, heat the olive oil over medium heat. Add the diced onion and garlic, along with the bell pepper. Sauté for approximately 5 minutes, stirring occasionally, until the vegetables have softened and the onion is translucent.
- Add the ground turkey or chicken to the skillet. Cook and stir until the meat is lightly browned and fully cooked, which should take about 5-7 minutes. While cooking, season with salt, black pepper, chili powder, cumin, smoked paprika, and oregano. Mix well to ensure the spices coat the meat, and let cook for an additional minute to enhance the flavors.
- Transfer the cooked meat and vegetable mixture to your slow cooker. Pour in the crushed tomatoes, rinsed black beans, kidney beans, and minced jalapeño (if you enjoy the heat). Add the vegetable or chicken broth and give everything a good stir to ensure all ingredients are evenly combined.
- Cover the slow cooker and set it to low for 6-8 hours or high for 3-4 hours. This slow cooking process allows the flavors to meld and develop beautifully.
- Once cooking time is complete, taste your chili and adjust the seasoning with more salt, pepper, or spices if desired.


![This Chocolate Tres Leches Cake uses simple ingredients. Each one works together to create a rich flavor. - 1 cup all-purpose flour - 1/2 cup unsweetened cocoa powder - 1 1/2 teaspoons baking powder - 1/2 teaspoon baking soda - 1/4 teaspoon salt - 1/2 cup unsalted butter, softened - 1 cup granulated sugar - 3 large eggs, at room temperature - 1 teaspoon vanilla extract - 1/2 cup buttermilk, at room temperature - 1 cup sweetened condensed milk - 1 cup evaporated milk - 1 cup whole milk - 1 cup heavy cream, chilled - 2 tablespoons powdered sugar (for whipped cream) - Chocolate shavings or cocoa powder for garnish (optional) These ingredients create a soft cake soaked in a sweet milk mixture. The heavy cream topping adds a light and airy touch. Using room temperature ingredients helps everything mix well. I recommend using fresh milk for the best taste. For a unique twist, sprinkle chocolate shavings on top before serving. Enjoy making this delicious treat! For the complete recipe, check the [Full Recipe]. Start by preheating your oven to 350°F (175°C). Grab a 9x13 inch baking pan. Grease it with butter to make sure your cake won’t stick. Dust the pan lightly with flour. This quick step helps the cake come out clean and perfect. In a medium bowl, sift together the all-purpose flour, cocoa powder, baking powder, baking soda, and salt. This helps mix everything well. In a large bowl, use an electric mixer to beat the softened butter and sugar until it is light and fluffy. This takes about 3-5 minutes. Then, add the eggs one at a time. Mix well after each egg. Finally, stir in the vanilla extract. Slowly fold the dry ingredients into the wet mixture. Alternate with the buttermilk. Start and finish with the dry mix. Be gentle; mix until you see no flour streaks. Pour the batter into your prepared pan. Smooth the top with a spatula. Bake for 30-35 minutes. Check if it’s done by inserting a toothpick into the center; it should come out clean. Let it cool for 10 minutes, then turn it out onto a wire rack. In a separate bowl, mix the sweetened condensed milk, evaporated milk, and whole milk. Whisk this mixture until blended. This will soak into your cake, making it rich and moist. Once the cake is cool, poke holes in the top with a fork. Pour the tres leches mixture evenly over the cake. This helps the cake absorb the milk. Cover it with plastic wrap and let it soak for at least one hour. This step is key for flavor. In a large bowl, beat the chilled heavy cream with powdered sugar until stiff peaks form. Spread this whipped cream over the soaked cake. For a nice touch, sprinkle chocolate shavings or cocoa powder on top. Refrigerate the cake for at least 2 hours before serving. This waiting time mixes the flavors and makes each bite delicious. For the full recipe, check the details in the earlier sections. To get a moist cake, follow a few simple steps. Start by using room temperature ingredients. This helps the batter mix well. Next, do not overmix the batter. Mix until just combined. Overmixing adds air, which can dry the cake out. Finally, bake the cake just until a toothpick comes out clean. If you bake too long, the cake will dry out. Soaking the cake properly is key. First, let the cake cool completely before soaking it. This helps the cake absorb the milk mixture better. Use a fork to poke holes all over the top of the cake. This allows the milk to seep in. Then, pour the tres leches mixture evenly over the cake. Let it sit for at least one hour. For best results, cover it with plastic wrap and refrigerate. This ensures the cake soaks up all the flavor. Whipped cream adds a light touch to the cake. Start by chilling your mixing bowl and beaters. This keeps the cream cold and helps it whip better. Beat the heavy cream until it forms stiff peaks. This means it should hold its shape when you lift the whisk. Add the powdered sugar gradually for sweetness. Spread the whipped cream gently over the soaked cake. For a fun twist, add chocolate shavings or a sprinkle of cocoa powder on top. For the complete recipe, check the Full Recipe section. {{image_4}} You can make a gluten-free version of this cake easily. Just swap the all-purpose flour for a gluten-free flour blend. Look for a blend that works well for baking. This change keeps the cake moist and delicious. You may also add a pinch of xanthan gum to help the texture. To create a vegan chocolate tres leches cake, replace the eggs with flax eggs. Mix 1 tablespoon of ground flaxseed with 2.5 tablespoons of water for each egg. For the milk mixture, use coconut milk, almond milk, or any plant-based milk. Use coconut cream instead of heavy cream for topping. This way, you keep the rich flavor while going dairy-free. You can also play with flavors to make this cake unique. For a minty twist, add mint extract to the batter and whipping cream. Just a teaspoon will do. If you love coffee, add espresso powder to the batter for a rich, coffee flavor. You can also fold in chocolate chips for more texture and taste. Each variation brings a new fun experience to this classic dessert. For the full recipe, check the source to get all the details you need. To keep your Chocolate Tres Leches Cake fresh, always store it in the fridge. Use an airtight container to prevent it from drying out. If you have not yet topped it with whipped cream, store the cream separately. This keeps the cake moist and the cream fluffy. When stored properly, the cake lasts about 3 to 5 days in the fridge. The flavors will continue to blend, making each bite even better. Always check for any signs of spoilage, like a strange smell or changes in texture. You can freeze the cake if you want to keep it longer. Wrap it tightly in plastic wrap, then place it in a freezer-safe bag. This way, it can last up to 3 months in the freezer. When you're ready to enjoy it, let it thaw in the fridge overnight. Add the whipped cream topping just before serving for the freshest taste. For the complete recipe, you can refer to the Full Recipe section. Yes, you can! This cake is great for planning ahead. You can bake the cake, soak it, and then chill it in the fridge. It tastes even better after a day. Just cover it well so it stays fresh. Tres leches cake is soaked in three types of milk. Regular cake usually has no soaking. Tres leches is moist and rich. Regular cake is often lighter. The extra milk makes tres leches creamy and sweet. To keep the cake from being too soggy, let it cool completely first. After soaking, cover the cake and chill it. Serve it within a few days. This way, it stays moist without getting overly wet. Yes, you can use cake mix. Just follow the package instructions for baking. Make sure to adjust the milk mixture. This way, you get the rich flavor of tres leches without starting from scratch. You can use sweetened condensed milk, evaporated milk, and whole milk. If you want, you can try alternatives like almond milk or oat milk. Each choice will give a different taste, but they will still work well. For the full recipe, check out the Heavenly Chocolate Tres Leches Cake recipe above! In this post, we covered the essential steps to make a Chocolate Tres Leches Cake. You learned about the key ingredients and how to mix them. We detailed how to bake the cake and prepare the soaking mix. You got tips on keeping your cake moist and explored tasty variations. Finally, we discussed storing leftovers to enjoy later. Baking is fun and rewarding. Try this recipe to impress friends and family. Enjoy every delicious bite!](https://fastmealmate.com/wp-content/uploads/2025/06/83784e58-e7f6-4d4b-aebc-0bf8177d26de-768x768.webp)
![- Dried hibiscus flowers - Water - Honey or agave syrup - Freshly squeezed lime juice - Sparkling water - Fresh mint leaves - Lime slices To create a hibiscus mocktail, you need simple ingredients. Dried hibiscus flowers are the star of the drink. They give a deep red color and a tart flavor. You will also need water to steep the flowers. Honey or agave syrup adds sweetness, so choose what you prefer. Freshly squeezed lime juice brings in a zesty kick. Sparkling water gives it a bubbly touch that makes it refreshing. For garnishing, fresh mint leaves and lime slices add a nice look and extra flavor. This recipe is easy to follow, and you can find the full recipe above for more details. Each ingredient plays a role in making the mocktail vibrant and tasty. Enjoy crafting this delightful drink! 1. Boiling the water Start by boiling 4 cups of water in a medium pot. This gets the process rolling and ensures you have hot water for steeping. 2. Steeping the hibiscus flowers Once the water boils, add 2 cups of dried hibiscus flowers. Reduce the heat to a simmer. Let these flowers steep for about 15 minutes. This step is key to getting that rich color and flavor. 3. Straining the mixture After steeping, remove the pot from the heat. Use a fine mesh sieve to strain the tea into a large bowl. Discard the used flowers. You’ll be left with a beautiful, deep red liquid. 4. Sweetening the tea While the tea is warm, add in 1/2 cup of honey or agave syrup. Stir until it fully dissolves. Adjust the sweetness to fit your taste. 5. Chilling the mocktail Let the sweetened tea cool to room temperature. For a refreshing drink, chill it in the fridge for at least 30 minutes. This helps all the flavors blend nicely. 6. Serving suggestions To serve, fill glasses with ice. Pour the chilled hibiscus mixture until it’s about 3/4 full. Add 1-2 cups of sparkling water on top. This adds a fun fizz! Garnish Finish off with fresh mint leaves and a slice of lime. This adds a pop of color and a zesty aroma. This recipe is a fun way to make a delicious drink at home. Check out the Full Recipe for a detailed guide. Enjoy your refreshing hibiscus mocktail! - Adjusting sweetness levels The key to a great hibiscus mocktail is balance. You can tweak the sweetness to your taste. Start with half a cup of honey or agave syrup. Taste it after mixing in the lime juice. If it’s too tart, add more sweetener slowly. Mix well after each addition. Remember, everyone has different preferences! - Choosing the right garnish Garnishes can elevate your drink. Fresh mint leaves add a pop of green and a lovely aroma. Lime slices make it bright and colorful. You can also use edible flowers for a stunning look. Choose what you love and what fits your vibe. A well-garnished mocktail looks as good as it tastes! - Serving suggestions for gatherings When serving at a party, think about presentation. Use tall glasses filled with ice for a cool effect. A pitcher of the hibiscus mix makes it easy to serve. Guests can add their own sparkling water to taste. This way, everyone can enjoy a refreshing drink made just for them. Plus, it’s a fun way to get people involved! You can find the full recipe to make this refreshing drink in the earlier sections. Enjoy crafting your perfect hibiscus mocktail! {{image_4}} You can make the hibiscus mocktail even more exciting. Adding different flavors can create fun twists. Here are some great ideas. - Adding fruit blends: You can mix in berries like strawberries or blueberries. Orange juice also works well and adds a sweet touch. Just blend these fruits into the hibiscus tea. They will give your drink a fruity punch and vibrant color. - Herbal modifications: Herbs can add a unique taste. Try including fresh basil or rosemary. Add a few leaves to your glass before pouring the drink. The aroma from the herbs will enhance your experience. - Using flavored sparkling water: Instead of plain sparkling water, try flavored versions. Options like lime, lemon, or berry-flavored sparkling water can boost the flavor. This small change can make your mocktail stand out. Feel free to mix and match these ideas. Experimenting can lead to your new favorite drink! For an easy start, check out the Full Recipe. Storing your hibiscus mocktail properly keeps it fresh and tasty. Here’s how to do it: - Refrigeration tips: First, pour any leftover mocktail into a clean glass jar. Seal it tightly with a lid. You can store it in the fridge for up to three days. The cold will help maintain its bright flavor. - Freezing options for hibiscus tea: If you want to keep it longer, freeze the hibiscus tea. Pour the tea into ice cube trays. Once frozen, transfer the cubes to a freezer bag. This way, you can add them to drinks later. - Best practices for maintaining freshness: Always keep your mocktail in an airtight container. Avoid direct sunlight and heat. This helps prevent spoilage and keeps the flavor bright. You can find the [Full Recipe] to make this delightful drink at any time! What is a hibiscus mocktail? A hibiscus mocktail is a non-alcoholic drink made with hibiscus tea. It is bright red and has a tart, fruity flavor. You can enjoy it on hot days or at parties. This drink is refreshing and easy to make. What are the health benefits of hibiscus? Hibiscus is rich in vitamins and minerals. It can help lower blood pressure and improve heart health. It also has antioxidants that support overall wellness. Plus, it is low in calories, making it a great choice for a healthy drink. Can I make hibiscus tea ahead of time? Yes, you can make hibiscus tea ahead of time. Prepare it, cool it, and store it in the fridge. It will stay fresh for about three to five days. This way, you can have it ready for your mocktail anytime. Is there a caffeine content in hibiscus? No, hibiscus is caffeine-free. This makes it a perfect choice for anyone avoiding caffeine. You can enjoy a hibiscus mocktail at any time of day without worrying about keeping you awake. For the complete recipe, check out the Full Recipe section. This blog post covered how to make a refreshing hibiscus mocktail. We discussed the key ingredients and steps to create it, from boiling water to sweetening and chilling. I shared tips to adjust sweetness and serve the perfect drink at gatherings. You also learned some fun variations to mix up flavors. Finally, I offered storage advice to keep leftovers fresh. Enjoy making this fun drink and experimenting with your own twists! It's a great way to stay cool and healthy.](https://fastmealmate.com/wp-content/uploads/2025/07/6370854b-b453-4acd-b9ab-c5472d702266-768x768.webp)