Creamy Garlic Tuscan Chicken Flavorful Dinner Recipe


Craving a warm, satisfying meal? Let me introduce you to Creamy Garlic Tuscan Chicken, a dish bursting with flavor! You’ll love how tender chicken combines with rich cream, garlic, and fresh spinach. In this article, I’ll guide you through every step, from easy ingredients to cooking tips that enhance your dish. Get ready to impress your family and friends with this quick and delicious dinner recipe!
Why I Love This Recipe
- Flavorful and Rich: This dish combines the savory taste of garlic with the creaminess of the sauce, creating a mouthwatering experience that’s hard to resist.
- Quick and Easy: With just 30 minutes from prep to plate, this recipe is perfect for busy weeknights when you want something delicious without spending hours in the kitchen.
- Versatile Serving Options: It pairs wonderfully with pasta, rice, or even crusty bread, making it a flexible dish for any occasion.
- Healthy Ingredients: Packed with fresh spinach and tomatoes, this dish not only tastes great but also adds a touch of nutrition to your meal.
Ingredients
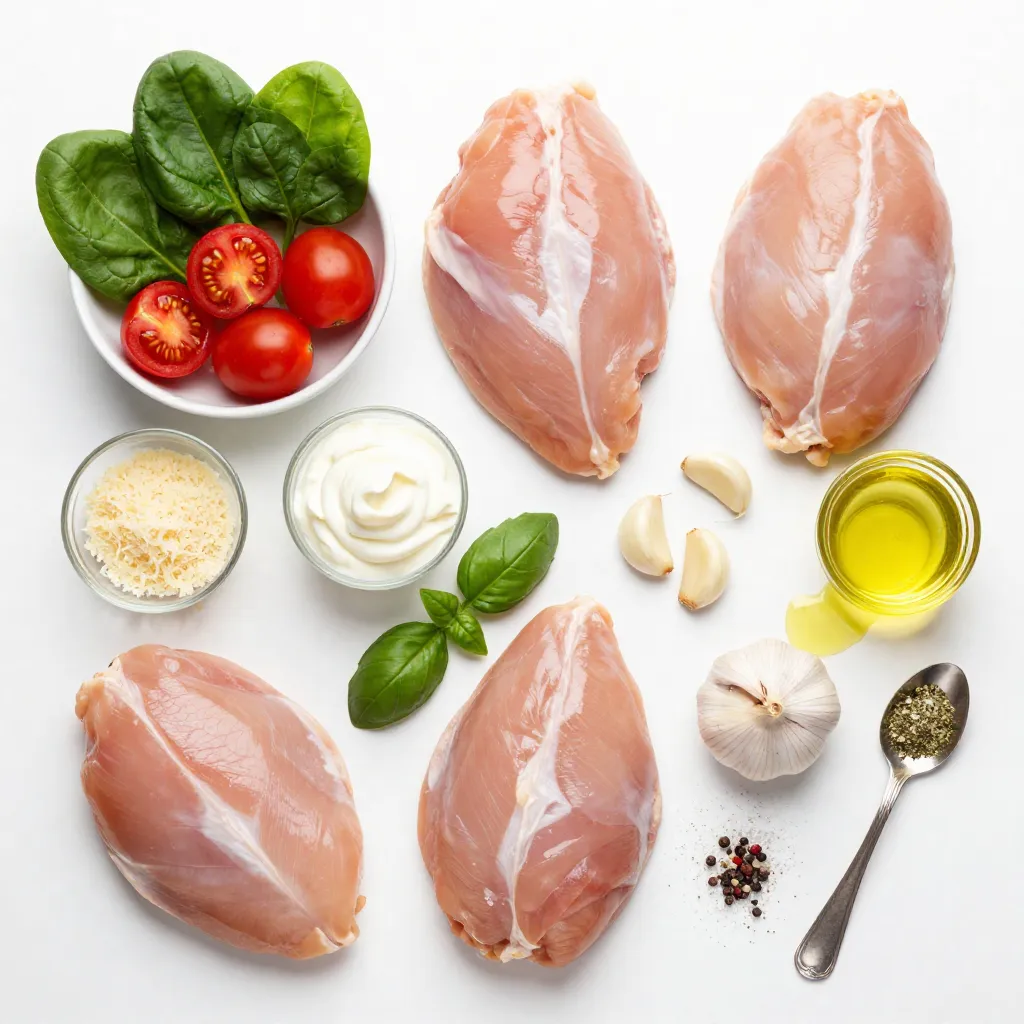
Main Ingredients
– 4 boneless, skinless chicken breasts
– 2 tablespoons extra virgin olive oil
– 4 cloves fresh garlic, minced
– 1 cup cherry tomatoes, halved
– 2 cups fresh baby spinach
– 1 cup heavy whipping cream
– ½ cup grated Parmesan cheese
The main ingredients create the heart of this dish. Chicken breasts provide a nice base. The olive oil adds flavor and helps cook the chicken. Garlic gives a wonderful aroma and taste. Cherry tomatoes bring a touch of sweetness. Fresh spinach adds color and nutrients. Heavy cream and Parmesan cheese create that rich, creamy sauce.
Seasoning
– 1 teaspoon Italian seasoning blend
– Salt and black pepper to taste
Seasoning is key to great flavor. The Italian seasoning blend adds herbs that brighten the dish. Salt enhances all the flavors, while black pepper adds a little heat.
Garnish
– Fresh basil leaves, torn, for garnish
Fresh basil leaves are the perfect garnish. They add a pop of color and a fresh flavor. You can tear them by hand for a rustic look. This small touch makes your meal more inviting.
Step-by-Step Instructions
Chicken Preparation
Seasoning the chicken
Start with four boneless, skinless chicken breasts. Season them well with salt, black pepper, and Italian seasoning. Make sure to cover both sides. This adds great flavor and makes the chicken tasty.
Searing the chicken
Next, heat up two tablespoons of extra virgin olive oil in a large skillet. Keep it on medium-high heat until it shines. Add the seasoned chicken breasts. Cook each side for about 5 to 7 minutes. Look for a golden brown color. Check that the internal temperature hits 165°F (75°C). Once done, move the chicken to a plate. Cover it to stay warm.
Making the Sauce
Sautéing garlic and vegetables
In the same skillet, add four cloves of minced garlic. Sauté it for about 30 seconds. Stir it often so it doesn’t burn. When the garlic smells great, toss in one cup of halved cherry tomatoes. Cook them for about 2 minutes. They should begin to soften. Now, add two cups of fresh baby spinach. Stir until it wilts, which takes about 1 to 2 minutes.
Incorporating cream and cheese
Turn the heat down to low. Slowly pour in one cup of heavy cream. Stir it until it blends well. Gradually add in ½ cup of grated Parmesan cheese. Keep mixing until the cheese melts, and the sauce becomes creamy and smooth.
Final Assembly
Combining chicken with sauce
Gently place the seared chicken breasts back in the skillet. Spoon the rich cream sauce over the top. Let the chicken simmer in the sauce for 2 to 3 minutes. This helps the chicken soak in all the delicious flavors.
Simmering for flavor infusion
After simmering, check that everything is combined well. Remove the skillet from the heat. Your Creamy Garlic Tuscan Chicken is now ready for the plate!
Tips & Tricks
Flavor Enhancements
For a twist, try using lemon zest. It adds a fresh taste. You can also mix in red pepper flakes for a little heat. If you want a richer flavor, add a bit of white wine to the sauce. Adjust the creaminess by adding more or less heavy cream. Use chicken broth for a lighter sauce.
Cooking Techniques
Searing chicken well is key. Make sure your skillet is hot. This helps the chicken brown nicely. Cook for about 5-7 minutes on each side. Check the internal temperature; it should be 165°F. For a perfect sauce, keep the heat low when adding cream. Stir constantly to avoid lumps.
Presentation Ideas
Serve the chicken over pasta or with crusty bread. It soaks up the sauce perfectly. Use a large white plate for a clean look. Drizzle extra sauce on top and sprinkle with more Parmesan cheese. Scatter basil leaves around for color. This makes your dish look gourmet and inviting.
Pro Tips
- Perfectly Sear the Chicken: Ensure your skillet is hot enough before adding the chicken. This will give it a beautiful golden crust while keeping the inside juicy.
- Use Fresh Ingredients: For the best flavor, use fresh garlic and spinach. Fresh ingredients make a significant difference in this creamy sauce.
- Customize the Cream Sauce: Feel free to add other vegetables like mushrooms or bell peppers to the sauce for added flavor and nutrition.
- Let It Rest: After cooking, let the chicken rest for a few minutes before serving. This allows the juices to redistribute, making for a tender bite.
Variations
Ingredient Swaps
You can change the protein in this dish to fit your needs. Shrimp works great in place of chicken. Just cook it until pink and add it to the sauce. If you prefer plant-based options, try tofu. Press and cube the tofu, then sauté it until golden.
For those watching carbs, swap pasta for zucchini noodles. They add freshness and cut down on carbs. Just spiralize the zucchini and lightly sauté it before serving.
Flavor Profiles
To spice things up, consider adding red pepper flakes. This will give a nice kick to the creamy sauce. You can also add lemon zest for a bright, fresh taste. Just a little can lift the flavors beautifully.
Adding different veggies can change the dish too. Mushrooms bring an earthy tone, while bell peppers add sweetness. Sauté them with the garlic for a tasty mix. These variations can make your meal more exciting while keeping the core flavors intact.
Storage Info
Refrigeration
After you enjoy your Creamy Garlic Tuscan Chicken, store leftovers in an airtight container. This keeps the dish fresh and tasty. Aim to refrigerate within two hours of cooking. Proper storage helps prevent spoilage. You can keep it in the fridge for up to three days.
Reheating Tips
To reheat your chicken, avoid losing its creaminess. The best method is on the stove. Heat it over low heat, stirring gently. This helps maintain the creamy texture. If you’re short on time, a microwave works too. Use a microwave-safe dish and cover it. Heat in short bursts, stirring in between.
Freezing Instructions
You can freeze Creamy Garlic Tuscan Chicken for later enjoyment. Let it cool completely before freezing. Place it in a freezer-safe container or bag. This helps keep out air and frost. It will stay fresh for up to three months in the freezer. When ready to eat, thaw it overnight in the fridge. Reheat using your preferred method.
FAQs
What can I serve with Creamy Garlic Tuscan Chicken?
You can pair this dish with many sides. Here are some great options:
– Pasta: Fettuccine or spaghetti work well. The sauce clings nicely to the noodles.
– Rice: White or brown rice soaks up the sauce. It’s a simple, tasty choice.
– Crusty bread: Use it to dip into the creamy sauce. It adds a nice texture.
– Steamed vegetables: Broccoli or green beans add color and crunch. They balance the meal.
– Salad: A fresh garden salad can lighten the dish and add freshness.
These sides bring out the flavors of the chicken and make a complete meal.
Can I make this dish ahead of time?
Yes, you can prepare this meal in advance. Here are some tips:
– Cook the chicken: You can sear the chicken early in the day. Store it in the fridge.
– Make the sauce: Prepare the creamy sauce and keep it in a separate container.
– Combine before serving: When ready to eat, reheat both the chicken and the sauce.
For reheating, warm them on low heat on the stove. This helps keep the sauce creamy.
Is this recipe gluten-free?
Yes, this recipe is naturally gluten-free. However, here are some points to consider:
– Check ingredients: Ensure your chicken broth or seasoning does not contain gluten.
– Pasta choice: If you choose to serve it with pasta, select gluten-free pasta.
– Avoid croutons: If adding to salads, skip croutons to keep the meal gluten-free.
With these tips, you can enjoy Creamy Garlic Tuscan Chicken without gluten concerns.
This blog post showed you how to make a Creamy Garlic Tuscan Chicken dish. We covered all the main ingredients, from chicken breasts to heavy cream and seasoning. You learned step-by-step how to prepare the chicken, make the sauce, and assemble everything perfectly. Tips on storage and meal variations added even more value.
In the end, this recipe is tasty and easy to customize. Whether you want a quick dinner or a special meal, this dish fits it all. Enjoy your cooking adventur

Creamy Garlic Tuscan Chicken
Ingredients
- 4 pieces boneless, skinless chicken breasts
- 2 tablespoons extra virgin olive oil
- 4 cloves fresh garlic, minced
- 1 cup cherry tomatoes, halved
- 2 cups fresh baby spinach
- 1 cup heavy whipping cream
- 0.5 cup grated Parmesan cheese
- 1 teaspoon Italian seasoning blend
- to taste Salt and black pepper
- for garnish Fresh basil leaves, torn
Instructions
- Prepare the Chicken: Start by seasoning the chicken breasts generously on both sides with salt, black pepper, and the Italian seasoning.
- Sear the Chicken: Pour the olive oil into a large skillet and heat it on medium-high until shimmering. Add the seasoned chicken breasts to the skillet, cooking for 5-7 minutes on each side, or until they achieve a beautiful golden brown color and reach an internal temperature of 165°F (75°C). Once cooked, transfer the chicken to a plate and cover to keep warm.
- Sauté the Garlic: In the same skillet where you cooked the chicken, add the minced garlic. Sauté for about 30 seconds, stirring constantly, until the garlic becomes fragrant but be cautious not to let it burn.
- Add Tomatoes and Spinach: Next, toss in the halved cherry tomatoes and sauté for about 2 minutes until they start to soften. Then, add the fresh spinach, stirring until wilted and vibrant in color, which should take roughly 1-2 minutes.
- Make the Cream Sauce: Reduce the heat to low and slowly pour in the heavy cream. Stir continuously until well combined, then gradually sprinkle in the grated Parmesan cheese, mixing until the cheese melts into the sauce and the mixture becomes creamy and smooth.
- Combine Chicken and Sauce: Gently place the seared chicken breasts back into the skillet, spooning the rich cream sauce over the top. Allow the chicken to simmer in the sauce for an additional 2-3 minutes.
- Serve: Once ready, remove from heat and garnish your dish with freshly torn basil leaves for a pop of color and flavor. Serve immediately over a bed of pasta or alongside crusty bread.
![To make Greek Chickpea Cucumber Feta Salad, you will need: - 1 can (15 oz) chickpeas, thoroughly drained and rinsed - 1 medium cucumber, diced into bite-sized pieces - 1 cup cherry tomatoes, halved - 1/2 medium red onion, finely chopped - 1 cup feta cheese, crumbled - 1/4 cup Kalamata olives, pitted and halved - 1/4 cup fresh parsley, finely chopped - 3 tablespoons extra virgin olive oil - 2 tablespoons red wine vinegar (or substitute with apple cider vinegar) - 1 teaspoon dried oregano - Salt and freshly ground black pepper to taste You can swap out some ingredients based on what you have. No feta cheese? Use goat cheese or a dairy-free option. If you don’t like Kalamata olives, green olives work well too. For a crunchier salad, add bell peppers or radishes. You can also mix in some avocados for a creamy twist. Don't have red wine vinegar? Use lemon juice or apple cider vinegar instead. Fresh ingredients make this salad shine. When you use ripe tomatoes and crisp cucumbers, you enhance the flavor and texture. Fresh herbs like parsley brighten the dish. They add a pop of color and a burst of flavor. The quality of your olive oil matters too. A good extra virgin olive oil brings depth to the dressing. Using fresh produce not only boosts taste but also adds vital nutrients. Enjoying this salad means savoring the vibrant flavors of the Mediterranean. Start by gathering all your ingredients. You will need: - 1 can (15 oz) chickpeas, thoroughly drained and rinsed - 1 medium cucumber, diced into bite-sized pieces - 1 cup cherry tomatoes, halved - 1/2 medium red onion, finely chopped - 1 cup feta cheese, crumbled - 1/4 cup Kalamata olives, pitted and halved - 1/4 cup fresh parsley, finely chopped In a large mixing bowl, add the chickpeas, cucumber, cherry tomatoes, and red onion. Stir gently to mix everything well. Next, it’s time to add flavor and texture. Carefully fold in the crumbled feta cheese, Kalamata olives, and fresh parsley. Use a gentle hand to keep the feta intact. This adds creaminess to the salad. Now, let’s whip up the dressing. In a small bowl, combine: - 3 tablespoons extra virgin olive oil - 2 tablespoons red wine vinegar (or apple cider vinegar) - 1 teaspoon dried oregano - Salt and freshly ground black pepper to taste Whisk these ingredients together until the mixture is smooth and well blended. The dressing will enhance the salad's taste. Drizzle the dressing over the salad mixture in the large bowl. Using a gentle folding motion, toss everything together. You want all the ingredients to be nicely coated. Let the salad sit at room temperature for 10-15 minutes. This resting time allows the flavors to meld beautifully. For the full recipe, check the Mediterranean Chickpea Cucumber Feta Delight. To keep your Greek Chickpea Cucumber Feta Salad fresh, choose the best ingredients. Use ripe cherry tomatoes and crisp cucumbers. Look for bright green, firm cucumbers. Always rinse canned chickpeas well to remove any canning liquid. This step helps reduce sodium and enhances flavor. Store leftover salad in an airtight container in the fridge. This will help maintain its freshness for up to 2 days. Serve your salad at room temperature for the best taste. This allows the flavors to shine. If you store it in the fridge, take it out about 20 minutes before serving. Letting it warm slightly helps enhance the taste and makes for a more enjoyable meal. To boost the flavor of your salad, try adding fresh herbs. Basil or mint can add a nice twist. A squeeze of fresh lemon juice can brighten the dish even more. For a spicy kick, add a pinch of red pepper flakes. Mixing in different olives can also create a unique taste. If you want to change the dressing, add a touch of honey or Dijon mustard for extra depth. These small changes can make your salad even more exciting. For the full recipe, check out the Mediterranean Chickpea Cucumber Feta Delight. {{image_4}} You can easily boost the protein in your Greek chickpea cucumber feta salad. Grilled chicken, shrimp, or even tofu work well. Just cut them into bite-sized pieces. Mix them in with the chickpeas. This adds flavor and makes the salad more filling. If you want a vegan version, swap the feta cheese for avocado or a plant-based cheese. Avocado gives a creamy texture and healthy fats. You can also add hemp seeds for more protein. This keeps the salad fresh and tasty without any animal products. Feel free to change up the ingredients based on the season. In spring, add fresh radishes for a crunchy bite. In summer, diced bell peppers add sweetness. In fall, try roasted butternut squash for warmth. Each swap keeps your salad exciting and full of flavor. Explore the [Full Recipe] for more ideas on how to make this dish your own! To keep your Greek chickpea cucumber feta salad fresh, store it in an airtight container. This will help keep the flavors strong and the ingredients crisp. If you have leftovers, it’s best to separate the dressing from the salad. This way, the salad won’t get soggy. Just toss the dressing in when you’re ready to enjoy it again. When stored properly, the salad lasts about 3 to 5 days in the fridge. The chickpeas and feta cheese hold up well. However, the cucumber and tomatoes start to lose their crunch after a couple of days. Make sure to check for any signs of spoilage, like a funky smell or slimy texture. I do not recommend freezing this salad. The textures change, and the fresh ingredients do not thaw well. If you want to prep ahead, consider freezing the chickpeas separately. They can last up to 3 months in the freezer. Just thaw them in the fridge overnight before mixing them back into your salad. For the best taste, always enjoy your salad fresh! For the full recipe, refer back to the Mediterranean Chickpea Cucumber Feta Delight. Yes, you can make this salad the night before. Just keep it in the fridge. The flavors will blend well overnight. However, the salad may lose some crunch. To keep it fresh, add the cucumber and feta just before serving. If you don’t have feta, try using goat cheese or ricotta. Both options bring a creamy taste. You can also use a dairy-free cheese for a vegan twist. Just choose a cheese that crumbles well to mimic feta. To spice up your salad, add chopped jalapeños or red pepper flakes. You can also mix in a spicy dressing. Try adding a dash of hot sauce to the olive oil and vinegar mix. This will give your salad a nice kick. Yes, this salad is gluten-free! All the ingredients are naturally free of gluten. Chickpeas, cucumber, tomatoes, and feta are all safe for a gluten-free diet. It's a great choice for those with gluten sensitivity. Enjoy this fresh and tasty salad without worry. In this blog post, I covered the core ingredients and their importance. We explored how to prepare, mix, and dress the salad. I also shared tips for freshness and serving. You learned about different variations to suit your taste and how to store your salad properly. Eating fresh, tasty food is fun and easy. Enjoy your Greek Chickpea Cucumber Feta Salad, and don’t be afraid to experiment with new flavors!](https://fastmealmate.com/wp-content/uploads/2025/07/24431354-d8c0-436c-9845-ce85b88e9160-768x768.webp)
![For this no-bake strawberry cheesecake cups, you will need: - 1 cup graham cracker crumbs - 2 tablespoons granulated sugar - 1/2 cup unsalted butter, melted - 1 cup cream cheese, softened - 1/2 cup powdered sugar - 1 teaspoon pure vanilla extract - 1 cup heavy whipping cream - 1 cup fresh strawberries, diced - Additional fresh strawberries, sliced for topping You can swap some ingredients if needed: - Use chocolate cookies instead of graham crackers for a twist. - Swap granulated sugar with brown sugar for a deeper flavor. - Low-fat cream cheese works well if you're watching calories. - Coconut cream can replace heavy cream for a dairy-free option. - If fresh strawberries are not available, try using raspberries or blueberries. When using fresh strawberries, choose ripe ones for the best taste. Look for bright red berries without any green spots. Wash them gently and pat them dry before dicing. If you want to enhance their flavor, sprinkle a little sugar on the diced strawberries and let them sit for about 10 minutes. This draws out the juices and creates a sweet syrup, making your cheesecake cups even more delicious. For the full recipe and step-by-step instructions, check out the [Full Recipe]. To make the crust, start with a mixing bowl. Add 1 cup of graham cracker crumbs and 2 tablespoons of granulated sugar. Pour in 1/2 cup of melted unsalted butter. Mix it well until the crumbs look like wet sand. This will give your crust a great flavor and texture. Next, take about two tablespoons of this crumb mixture and spoon it into each cup. Use your fingers or the back of a spoon to press it down gently. This step helps form a solid base for your cheesecake. For the cream cheese filling, grab another bowl. Beat 1 cup of softened cream cheese with an electric mixer. Keep mixing until it is smooth and creamy. Once it looks good, add 1/2 cup of powdered sugar and 1 teaspoon of pure vanilla extract. Mix until everything is silky and combined. In a separate bowl, whip 1 cup of heavy cream. Use the mixer until stiff peaks form. Be careful not to over-whip it. You want the cream to be light and fluffy. Now, gently fold the whipped cream into the cream cheese mixture. Use a spatula and mix until just combined. This folding keeps the mixture airy. Spoon the cream cheese filling over the crust in each cup. Fill them about three-quarters full. Use the spatula to smooth the tops. Next, top each cup with diced strawberries. Press them gently into the cream cheese layer. This step spreads their flavor throughout the dessert. For the final touch, add a dollop of remaining cream cheese mixture on top. Garnish each cup with a fresh strawberry slice. Now, place the cups in the refrigerator. Chill them for at least 2 hours. This step lets the layers set and enhances the flavors. Enjoy your no-bake strawberry cheesecake cups! For the full recipe, refer to the section above. To get a smooth and creamy filling, make sure your cream cheese is at room temperature. If it’s too cold, it will clump. Use an electric mixer to beat the cream cheese until it is silky. Slowly add in the powdered sugar and vanilla while mixing. This step helps blend everything perfectly. When whipping the heavy cream, stop when you see stiff peaks. Over-whipping makes it grainy. Finally, gently fold the whipped cream into the cream cheese mixture. This keeps it light and fluffy. Serve these cheesecake cups in clear glass dishes. This way, everyone can see the beautiful layers. For a fun twist, try adding a layer of chocolate sauce or a fruit puree. You can also sprinkle crushed graham crackers on top for added crunch. If you want to impress your guests, use fresh mint leaves as a garnish. It adds a nice pop of color and flavor. You’ll need a few basic tools. A mixing bowl is key for combining ingredients. An electric mixer is best for whipping the cream and mixing the filling. Use a spatula to gently fold mixtures together. For serving, small glass cups or jars work wonderfully. They show off the layers and make for a pretty presentation. Lastly, have a measuring cup and spoons on hand for accuracy. Don't forget to check out the Full Recipe to perfect your technique! {{image_4}} You can switch up the flavor of your no-bake cheesecake cups. Try chocolate by adding cocoa powder to the cream cheese mix. For mango, blend fresh mango into the cream cheese before mixing. You can even use lemon zest for a bright, citrusy kick. These simple changes keep your dessert fun and fresh. Want a lighter cheesecake? Use low-fat cream cheese instead of regular cream cheese. You can also swap out heavy cream for Greek yogurt. This keeps the taste rich but lowers the fat. Using honey or agave syrup instead of sugar can add sweetness without the extra calories. Layering is key to a stunning dessert. Start with a crust layer, then add your creamy filling. You can add a layer of fruit between the cream cheese and whipped cream. This adds texture and flavor. For a fun twist, try layering different fillings. You could alternate between plain and flavored mixes. This creates a beautiful, colorful effect in your cups. For the full recipe, check out the [Full Recipe]. To store your no-bake strawberry cheesecake cups, use airtight containers. Place the cups in the fridge right after they set. This keeps them fresh and tasty. If you make them ahead of time, cover each cup with plastic wrap or a lid. This helps avoid any weird smells from other foods in the fridge. These cheesecake cups last in the fridge for about 3 to 5 days. After that, the texture may change. You want to enjoy them when they are at their best. Always check for any signs of spoilage before serving. If you see any mold or the smell seems off, it’s best to throw them away. You can freeze these cheesecake cups if you want to save them for later. First, let them chill in the fridge for at least 2 hours. After that, cover each cup tightly with plastic wrap and foil. This extra layer helps prevent freezer burn. You can freeze them for up to 2 months. When you’re ready to enjoy, take them out and let them thaw in the fridge overnight. Remember, the texture may change a bit after thawing. For the full recipe, check back for more details! No-Bake Strawberry Cheesecake Cups last about three days in the fridge. Store them in an airtight container to keep them fresh. You want to enjoy the creamy texture and berry flavor at their best. After three days, the strawberries may lose their crispness and the filling might not be as fresh. Yes, you can use frozen strawberries. Just make sure to thaw and drain them first. This helps avoid extra moisture in your cups. Frozen strawberries can still taste great and add sweetness. However, fresh strawberries give a better texture and brightness to the dish. If you need a substitute for heavy cream, you can use coconut cream or Greek yogurt. Coconut cream adds a rich flavor, while Greek yogurt keeps it light. You may also mix milk with butter for a quick fix. Use a 3:1 ratio of milk to butter for a creamy texture. Just remember, these swaps may change the overall taste slightly. You learned how to make no-bake strawberry cheesecake cups. We covered ingredients, tips, and storage methods. Remember to choose fresh berries for the best taste. Use my tips for a creamy texture and fun flavor twists. Store them right to enjoy later. With these steps, you can craft a delicious treat easily. Embrace your creativity, and have fun making these cheesecake cups!](https://fastmealmate.com/wp-content/uploads/2025/06/462f42fe-2b9d-4e42-aace-05b4fd02c510-768x768.webp)