Creamy Roasted Vegetable Soup Rich and Flavorful Recipe


Welcome to the warm embrace of comfort food! This Creamy Roasted Vegetable Soup is rich, flavorful, and easy to make. With cozy ingredients like butternut squash and red bell pepper, you’ll delight in every spoonful. I’ll guide you step-by-step in creating this creamy, nutritious dish. Perfect for chilly nights or a quick meal, it’s sure to impress. Ready to dive into a bowl of goodness? Let’s get cooking!
Why I Love This Recipe
- Health Benefits: This soup is packed with vitamins and nutrients from a variety of colorful vegetables, making it a nutritious choice for any meal.
- Comforting Flavor: The creamy texture combined with roasted flavors creates a warm and comforting dish that is perfect for chilly days.
- Easy to Make: With simple ingredients and straightforward steps, this recipe is accessible for cooks of all skill levels.
- Versatile Options: You can customize this soup by adding your favorite herbs or spices, making it unique to your taste preferences.
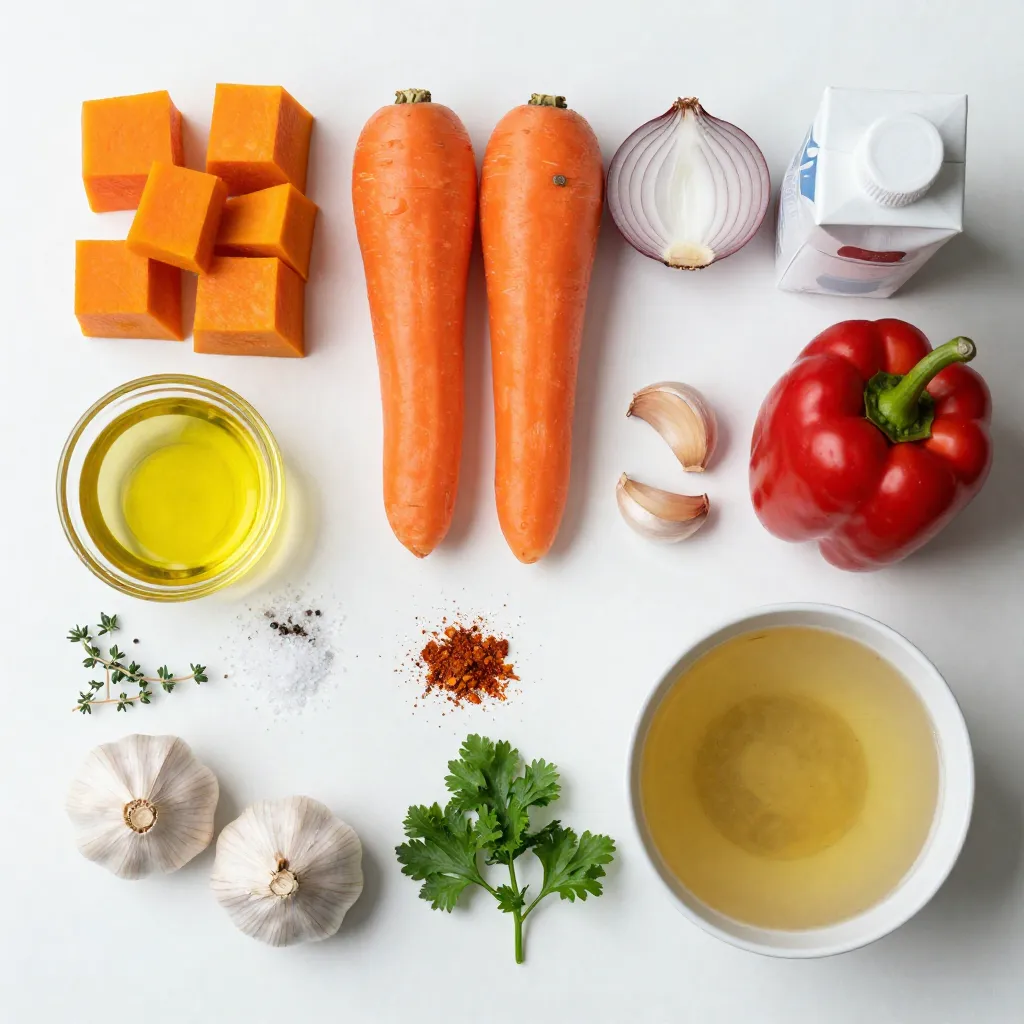
Ingredients
To make creamy roasted vegetable soup, you need fresh and tasty ingredients. Here’s the list to get you started:
– 2 cups butternut squash, peeled and cubed
– 2 cups carrots, peeled and chopped
– 1 red bell pepper, diced
– 1 onion, peeled and quartered
– 4 cloves garlic, skins left on
– 2 tablespoons extra virgin olive oil
– Sea salt and freshly cracked black pepper to taste
– 4 cups vegetable broth
– 1 cup full-fat coconut milk
– 1 teaspoon smoked paprika
– Fresh herbs for garnish (like thyme, parsley, or cilantro)
These ingredients work together to create a rich and flavorful soup. The butternut squash and carrots add natural sweetness. The red bell pepper and onion bring depth of flavor. Garlic gives it a warm, aromatic touch. Olive oil helps roast the veggies perfectly. Vegetable broth and coconut milk create a creamy texture. Smoked paprika adds a hint of smokiness that rounds out the taste. Finally, fresh herbs add a bright finish.
Gather these ingredients, and you’re ready to make a delicious meal. Enjoy the process of cooking, and let the wonderful smells fill your kitchen!
Step-by-Step Instructions
Preheat the Oven
First, set your oven to 400°F (200°C). Preheating helps the vegetables cook evenly and get nice and tender.
Prepare the Vegetables
Next, take a large baking sheet. Add 2 cups of butternut squash, 2 cups of carrots, 1 diced red bell pepper, and 1 quartered onion. Don’t forget to add 4 unpeeled garlic cloves. This mix will give your soup a great flavor.
Season and Toss
Now, drizzle 2 tablespoons of extra virgin olive oil over the veggies. Sprinkle them with sea salt, freshly cracked black pepper, and 1 teaspoon of smoked paprika. Toss everything well so that the oil and spices coat the vegetables evenly.
Roasting the Vegetables
Place the baking sheet in your preheated oven. Roast the vegetables for about 30 to 35 minutes. Stir them halfway through the time. You want them soft and slightly caramelized.
Cool and Blend
After roasting, take the pan out of the oven. Let the vegetables cool for about 5 minutes. Squeeze the roasted garlic from its skins into a high-powered blender.
Blend to Perfection
Add the roasted vegetables to your blender. Pour in 4 cups of vegetable broth and 1 cup of full-fat coconut milk. Blend everything on high until it’s smooth and creamy. Check for any lumps; you want it silky!
Heat and Season
Pour the blended soup into a large pot. Heat it over medium heat until warm. Taste and adjust the seasoning with more salt and pepper if needed.
Serve and Garnish
Ladle the soup into bowls. For a lovely touch, sprinkle fresh herbs like thyme, parsley, or cilantro on top. Enjoy every delicious spoonful!
Tips & Tricks
Best Ways to Roast Vegetables
To get the best flavor from your veggies, start with fresh ones. Cut them into even sizes. This helps them cook at the same pace. Spread them out on the baking sheet. Make sure there is space between them. If they touch, they will steam instead of roast. Use olive oil to coat them well. This adds flavor and helps them brown.
Achieving Creaminess
For a creamy texture, use full-fat coconut milk. It makes the soup rich and smooth. After roasting, blend the veggies while they’re still warm. This helps them break down better. If you want it extra creamy, add more coconut milk. You can also try adding cashews. Soak them in water for an hour, then blend with the soup.
Seasoning Alternatives
Feel free to switch up the spices. Instead of smoked paprika, use ground cumin for a warm flavor. You could also try curry powder for a different twist. If you want some heat, add red pepper flakes or a dash of hot sauce. Fresh herbs like basil or cilantro can brighten the taste, too. Experiment with what you like best!
Pro Tips
- Roasting for Flavor: Roasting brings out the natural sweetness of the vegetables. Don’t skip this step for a richer flavor profile.
- Adjusting Consistency: If the soup is too thick, add more vegetable broth or coconut milk until you reach your desired consistency.
- Herb Variations: Experiment with different herbs for garnishing, such as dill or basil, to give the soup a unique twist.
- Storage Tips: This soup stores well in the fridge for up to 5 days. Reheat gently on the stove for best results.
Variations
Other Vegetable Combinations
You can switch up the veggies in this soup. Try sweet potatoes or parsnips for a different taste. Cauliflower or zucchini also work well. Mix and match to find your favorite blend! Just remember to keep the roasting time similar. This helps all the vegetables cook evenly.
Dairy-Free Options
If you want a dairy-free version, use coconut milk as in the original recipe. Almond milk can also work, but it may change the flavor. For added creaminess, you can also add soaked cashews. Just blend them with the other ingredients for a rich texture.
Spicy Version Suggestions
For a spicy kick, add chili powder or cayenne pepper. You can also toss in some fresh jalapeños before roasting. This gives the soup a nice heat. Adjust the spice level based on your taste. Enjoy experimenting to find the right balance for you!
Storage Info
Refrigerating the Soup
You can store creamy roasted vegetable soup in the fridge. Let it cool first. Place it in an airtight container. It stays fresh for about 3 to 5 days. When you want to eat it, just take it out and reheat.
Freezing Instructions
To freeze the soup, let it cool completely. Pour it into freezer-safe bags or containers. Remove as much air as possible. The soup can last for up to 3 months in the freezer. Label the bags with the date. This way, you always know when you made it.
Reheating Guidelines
When you’re ready to eat the soup, there are a few easy ways to reheat. If it’s frozen, let it thaw in the fridge overnight. You can also heat it on the stove. Pour the soup into a pot and warm it over medium heat. Stir often to keep it smooth. If it’s too thick, add a little water or broth. You can also use a microwave. Heat in short bursts, stirring in between, until it’s hot. Enjoy your delicious soup again!
FAQs
How to make creamy soup without dairy?
You can use coconut milk for a creamy texture. It adds richness without dairy. Almond milk is another option but may not be as creamy. Blend it well with roasted veggies for a smooth finish. This keeps the soup light yet satisfying. You can also add soaked cashews for a nutty flavor.
Can I use frozen vegetables?
Yes, you can use frozen vegetables if fresh ones are not available. Just make sure to thaw them before roasting. This helps them cook evenly. Keep in mind, frozen veggies may have more water, so adjust the broth accordingly. They still provide great flavor and nutrition.
What can I serve with creamy roasted vegetable soup?
This soup pairs well with crusty bread or a fresh salad. A grilled cheese sandwich is also a classic choice. You can serve it with a sprinkle of fresh herbs on top for color. Try adding a dollop of extra coconut milk for a creamy touch.
How long does creamy roasted vegetable soup last?
The soup lasts up to five days in the fridge when stored in an airtight container. You can also freeze it for up to three months. Just make sure to let it cool down before freezing. When reheating, stir well to keep the texture smooth.
This blog post covered the key ingredients for a delicious creamy roasted vegetable soup. You learned about butternut squash, carrots, and more. I explained each step, from preheating the oven to blending the soup. Tips helped ensure perfect results, and variations opened up new flavors. Remember, storing and reheating is easy! This soup can fit into many diets. Experiment with the ingredients and add your twist. You can create a tasty, creamy bowl of goodness every time. Enjoy your cookin

Creamy Roasted Vegetable Soup
Ingredients
- 2 cups butternut squash, peeled and cubed
- 2 cups carrots, peeled and chopped
- 1 unit red bell pepper, diced
- 1 unit onion, peeled and quartered
- 4 cloves garlic, skins left on
- 2 tablespoons extra virgin olive oil
- to taste sea salt and freshly cracked black pepper
- 4 cups vegetable broth
- 1 cup full-fat coconut milk
- 1 teaspoon smoked paprika
- for garnish fresh herbs (like thyme, parsley, or cilantro)
Instructions
- Preheat the oven to 400°F (200°C).
- On a large baking sheet, combine the cubed butternut squash, chopped carrots, diced red bell pepper, quartered onion, and the unpeeled garlic cloves.
- Drizzle the vegetables with olive oil, then sprinkle with sea salt, freshly cracked black pepper, and smoked paprika. Toss until evenly coated.
- Roast the seasoned vegetable mix in the preheated oven for approximately 30-35 minutes, stirring halfway through, until tender and caramelized.
- Allow the vegetables to cool slightly for about 5 minutes. Squeeze the roasted garlic from its skin into a high-powered blender.
- Add the roasted vegetables, vegetable broth, and coconut milk to the blender. Blend on high until smooth and creamy.
- Pour the blended soup into a large pot. Heat over medium until warmed through. Taste and adjust seasoning with additional salt and pepper if needed.
- Ladle the soup into bowls and garnish with fresh herbs.

![Here are the ingredients you need for Peach Blueberry Greek Yogurt Cake. Gather these items before you start. - 1 cup plain Greek yogurt - 1 cup granulated sugar - 1/2 cup vegetable oil - 3 large eggs - 1 teaspoon vanilla extract - 2 cups all-purpose flour - 1 tablespoon baking powder - 1/2 teaspoon baking soda - 1/4 teaspoon salt - 1 cup fresh peaches, diced - 1 cup fresh blueberries - Zest of 1 lemon - Powdered sugar for dusting (optional) Using Greek yogurt makes this cake moist and adds a nice tang. Fresh peaches and blueberries bring sweetness and color. The lemon zest brightens the flavor, making each bite delightful. You can easily find most of these ingredients at your local store. For the full recipe, check the section on instructions. Enjoy baking this tasty treat! - Preheat your oven to 350°F (175°C). - Prepare and grease the cake pan. Use butter or oil and a little flour. This helps the cake come out easily. - Combine wet ingredients. In a large bowl, mix Greek yogurt, sugar, oil, eggs, and vanilla. Whisk until smooth. - Sift and combine dry ingredients. In another bowl, sift flour, baking powder, baking soda, and salt. This makes the cake light and fluffy. - Fold in the fruits. Gently add diced peaches, blueberries, and lemon zest to the batter. Be careful not to break the fruit. - Bake and check for doneness. Pour the batter into the pan. Bake for 35-40 minutes. Your cake is done when it is golden brown and a toothpick comes out clean. Enjoy making this delicious Peach Blueberry Greek Yogurt Cake by following the [Full Recipe]. - Avoiding overmixing: When you mix the wet and dry ingredients, stir just until combined. Overmixing can make your cake tough. The batter should look a bit lumpy, and that's okay! - Signs your cake is done: Your cake is ready when it turns golden brown. A toothpick inserted in the center should come out clean or have a few moist crumbs. This tells you it’s perfectly baked. - Presentation ideas: Serve your cake on a lovely cake stand. Top it with whole blueberries and thin peach slices. This adds color and charm to your dish. - Pairing with whipped cream: A dollop of fresh whipped cream takes this cake to another level. The cream’s richness balances the fruity flavors and makes each bite heavenly. - Incorrect ingredient ratios: Always measure your ingredients carefully. Too much flour or too little sugar can ruin the cake's texture and taste. - Not greasing the cake pan properly: Make sure to grease your pan well. Use butter or oil and dust it with flour. This step helps the cake come out easily after baking, preventing any tears. For the Full Recipe, be sure to check out the detailed instructions on how to make this delightful cake! {{image_4}} You can change fruits in this cake. Raspberries and strawberries work well. They add a nice flavor. You can also use flavored yogurt. Try vanilla or peach yogurt for a twist. This will change the taste slightly but keep it tasty. If you need gluten-free options, use a gluten-free flour blend. This keeps the cake light. For lower sugar choices, you can use a sugar substitute. This will keep the cake sweet without the extra sugar. Always check the package for the best ratio. Making cupcakes or mini cakes is fun and easy. Use a muffin tin to create individual servings. Bake them for about 20-25 minutes. Check for doneness with a toothpick. This way, you can share with friends or enjoy them yourself! You can store the Peach Blueberry Greek Yogurt Cake in two ways. If you plan to eat it quickly, keep it at room temperature. Just wrap it in plastic wrap or place it in an airtight container. This keeps the cake moist. If you want to save it longer, put it in the fridge. The cold will help it stay fresh for days. This cake stays fresh for about 3 days at room temperature. If you store it in the fridge, it can last up to a week. The flavors will deepen over time, which is a nice bonus! Just make sure to check for any signs of spoilage before enjoying. If you have leftover cake, freezing is a great option. Cut the cake into slices for easy serving later. Wrap each slice in plastic wrap tightly. Then, place the wrapped slices in a freezer bag. Make sure you remove the air. This way, the cake can last up to 3 months in the freezer. When you’re ready to eat it, just thaw it in the fridge overnight. Enjoy your delicious Peach Blueberry Greek Yogurt Cake again! For the full recipe, check out the earlier section. To make this cake, follow these steps: 1. Preheat the oven to 350°F (175°C). Grease a 9-inch cake pan. 2. In a bowl, mix Greek yogurt, sugar, oil, eggs, and vanilla. Whisk until smooth. 3. In another bowl, sift flour, baking powder, baking soda, and salt. 4. Gradually add the dry mix to the wet mix. Stir gently to combine. 5. Fold in diced peaches, blueberries, and lemon zest. 6. Pour the batter into the pan and smooth the top. 7. Bake for 35-40 minutes until golden. Check for doneness. 8. Cool the cake for 10 minutes in the pan, then transfer to a wire rack. You can find the full recipe in the earlier sections. Yes, you can use canned peaches. However, they may change the cake's texture. Canned peaches are softer and wetter than fresh ones. This extra moisture may make the cake denser. If you use canned peaches, drain them well. This will help keep the cake light and fluffy. You can make this cake dairy-free. Use coconut yogurt or almond yogurt instead of Greek yogurt. For eggs, try flaxseed meal or applesauce. Mix 1 tablespoon of flaxseed meal with 3 tablespoons of water per egg. Let it sit until it thickens. This will help bind the ingredients together. If you don’t have a toothpick, check the cake by pressing lightly on the top. If it springs back, it’s done. You can also look for a golden-brown top. The sides should pull away from the pan slightly. These signs mean your cake is ready to be taken out of the oven. This blog post showed you how to make a delicious Peach Blueberry Greek Yogurt Cake. You learned about the simple ingredients, step-by-step instructions, and some helpful tips. Remember to avoid overmixing and choose the right baking time. Feel free to customize the recipe with different fruits or dietary changes. Store your cake properly to keep it fresh. Enjoy your baking adventure and impress your friends with this tasty treat!](https://fastmealmate.com/wp-content/uploads/2025/06/b601b86f-d636-457f-a46c-3ca961086cb7-768x768.webp)

![- 1 pound ground beef (80/20 blend) - ½ teaspoon salt - ½ teaspoon black pepper - ½ cup cheddar cheese, shredded - ½ cup mozzarella cheese, shredded - 4 large flour tortillas - 4 tablespoons cream cheese, softened - ¼ cup dill pickles, diced - ¼ cup diced tomatoes - ¼ cup onion, minced - 2 tablespoons ketchup - 2 tablespoons mustard - Olive oil, for cooking Creating Cheeseburger Quesadilla Smash Sliders is a fun way to enjoy flavors. With the right ingredients, your sliders burst with taste. First, let’s start with the beef. I like using an 80/20 blend. This mix gives a juicy bite. Next, season it well with salt and pepper. Don't skip this step; flavor is key. For the cheese, I use both cheddar and mozzarella. The cheddar brings a sharp taste, while mozzarella melts beautifully. You can feel the cheese stretch in every bite. The flour tortillas are the base for these sliders. They hold everything together and crisp up nicely when cooked. I recommend using large tortillas for easier assembly. Cream cheese adds richness. Spread it on the tortillas for a creamy layer. Then, top it off with diced dill pickles, tomatoes, and onions. These toppings add crunch and freshness. Finally, drizzle some ketchup and mustard for that classic burger taste. Use olive oil to cook the quesadillas. It helps create a golden brown crust while keeping everything moist inside. For the full recipe, check the details above. This will guide you step by step to create your own Cheeseburger Quesadilla Smash Sliders. Enjoy the flavor explosion! To start, grab a medium mixing bowl. Add 1 pound of ground beef, ½ teaspoon of salt, ½ teaspoon of black pepper, and 1 teaspoon of garlic powder. Use your hands to mix everything gently. Once mixed, divide the beef into small patties, each about 2-3 ounces. Next, heat a skillet on medium heat. Add a drizzle of olive oil. When the pan is hot, place the patties in the skillet. Cook for 3-4 minutes until they turn brown. Flip them over and cook for another 3-4 minutes. Once done, remove the patties and set them aside on a plate. Now it's time to build your quesadilla! Lower the skillet heat to medium-low. Take 4 large flour tortillas and spread 1 tablespoon of softened cream cheese on one side of each tortilla. Place one tortilla in the skillet with the cream cheese-side facing up. Add a generous amount of cheddar cheese, then stack half of the cooked burger patties on top. Next, sprinkle on the diced pickles, diced tomatoes, and minced onions. Drizzle a bit of ketchup and mustard over this. Finish by adding a layer of shredded mozzarella cheese. Carefully place another tortilla on top, cream cheese-side down. Press it gently with a spatula to hold everything together. Cook the quesadilla for about 2-3 minutes. Look for a golden-brown color on the bottom tortilla and melted cheese. Now, flip the quesadilla gently and cook the other side for another 2-3 minutes. When both sides are browned, take the quesadilla off the heat. Let it cool for a minute, then slice it into quarters or sliders. Repeat this for the rest of your tortillas and filling ingredients. Serve the warm cheeseburger quesadilla sliders on a platter. I like to add extra diced pickles and some ketchup and mustard for dipping on the side. Enjoy this flavor explosion! For the full recipe, check out the [Full Recipe]. To make the best burger texture, use ground beef that is 80/20. This mix provides the right fat content for juicy patties. When you form the patties, handle the meat gently. Overworking it can make the burgers tough. Aim for small patties, about 2-3 ounces, for sliders. For seasoning, keep it simple. A mix of salt, black pepper, and garlic powder works great. These flavors enhance the beef without overpowering it. Be sure to season both sides of each patty before cooking. This will help lock in the taste. To get that perfect cheese melt, use a mix of cheeses. Cheddar and mozzarella are my go-tos. Cheddar adds sharpness, while mozzarella brings stretchiness. Spread cheese evenly, so it melts all the way through. For a fun twist, try pepper jack cheese for a spicy kick. You can also experiment with gouda or fontina. These will add richness and depth. Just remember to slice the cheese thinly for quicker melting. Cooking your quesadillas to a perfect golden brown is key. Use medium-low heat for even cooking. This prevents burning while letting the cheese melt fully. When flipping quesadillas, use a large spatula. Slide it under the quesadilla gently to avoid spills. If you're nervous about flipping, consider using a plate. Simply slide one side onto the plate, then flip it back into the pan. This method keeps your fillings intact. {{image_4}} You can switch up the meat in this dish. Ground turkey or chicken works well. Both have a lighter flavor but still taste great. For a plant-based option, try lentils or black beans. These give you a nice texture and flavor. Using these options can help you cater to different diets. To boost taste, add spices like paprika or cumin. These spices add warmth and depth. You can also mix in sauces, like barbecue or sriracha, for a kick. Experimenting with different cheeses can change the flavor too. Pepper jack adds heat, while gouda brings a smoky taste. Topping with fresh herbs, like cilantro or chives, can brighten each bite. You can serve these quesadilla sliders in many ways. They work as a classic quesadilla or as fun sliders. For parties, cut them into smaller pieces. Arrange them on a colorful platter to impress your guests. You might also serve them with dips, like guacamole or salsa, for extra flavor. Each style can make your meal exciting and unique. To keep your cheeseburger quesadilla sliders fresh, place them in an airtight container. This helps lock in flavor and moisture. Store them in the fridge for up to three days. After that, the taste may decline, and the texture could change. If you want to save them longer, freezing is a good option. Wrap each quesadilla slider tightly in plastic wrap. Then, place them in a freezer-safe bag or container. This keeps them safe from freezer burn. You can freeze them for up to three months. When you're ready to eat, let them thaw overnight in the fridge before reheating. For the best taste, reheat using the oven. Preheat it to 350°F (175°C). Place the quesadilla sliders on a baking sheet. Heat for about 10-15 minutes, until warm and crispy. If you use a microwave, put them on a plate. Heat for 30-60 seconds. This method is faster but may not keep the crunch. To restore crunchiness, consider finishing in a hot pan for a minute. Yes, you can prepare these sliders ahead. Make the patties and cook them. Let them cool. Then, store them in the fridge. When ready to serve, assemble the quesadillas. You can use either fresh tortillas or pre-made ones. If you use pre-made tortillas, spread cream cheese and layer the fillings. Cook them quickly in a hot skillet. This way, they stay crispy and warm. You can serve many tasty sides with these sliders. Consider some crispy fries or sweet potato fries. They pair well with the cheesy sliders. A fresh salad can balance the richness. You might also try dipping sauces like ranch or spicy mayo. These add extra flavor and fun. You could even serve a zesty salsa for a fresh kick. To make these sliders vegetarian, swap out the beef for a meat alternative. You could use black beans or lentils as a base. Another option is to use plant-based burger patties. Just season them like the beef. Add your favorite toppings, like cheese and veggies. You can still enjoy the same great flavors without meat. Just make sure all the other ingredients are vegetarian-friendly. You can make tasty Cheeseburger Quesadilla Smash Sliders easily. Start with classic ingredients and follow straightforward steps for delicious results. Don’t forget to try different proteins and toppings to suit your taste. Storing any leftovers is simple, and reheating them will keep them just as good. With these tips, you can impress guests or enjoy a fun meal at home. Making this dish lets you explore flavors while fitting right into your busy day. Enjoy your cooking adventure!](https://fastmealmate.com/wp-content/uploads/2025/07/3ea5f9d6-0f24-4765-99ee-1beab0673b04-768x768.webp)