
Grinch Christmas Truffles Delightful Holiday Treats


Get ready to bring joy to your holiday season with Grinch Christmas Truffles! These delightful treats are easy to make and perfect for parties or gifts. You’ll learn how to blend simple ingredients into fun, green truffles that look just like the Grinch. Follow me as we explore the best tips, tricks, and variations to make your holiday treats shine. Let’s get started on this festive adventure!
Why I Love This Recipe
- Festive Flavor: These truffles combine the sweet taste of vanilla Oreos with a creamy texture, creating a delightful holiday treat that everyone loves.
- Simple to Make: With just a few ingredients and straightforward steps, these truffles are easy enough for anyone to whip up, even last-minute!
- Visual Appeal: The vibrant green coating and cheerful red sprinkles make these truffles a visually stunning addition to any holiday spread.
- Customizable Fun: Feel free to get creative with decorations, like adding mini chocolate chips for eyes, making them a whimsical treat for all ages.
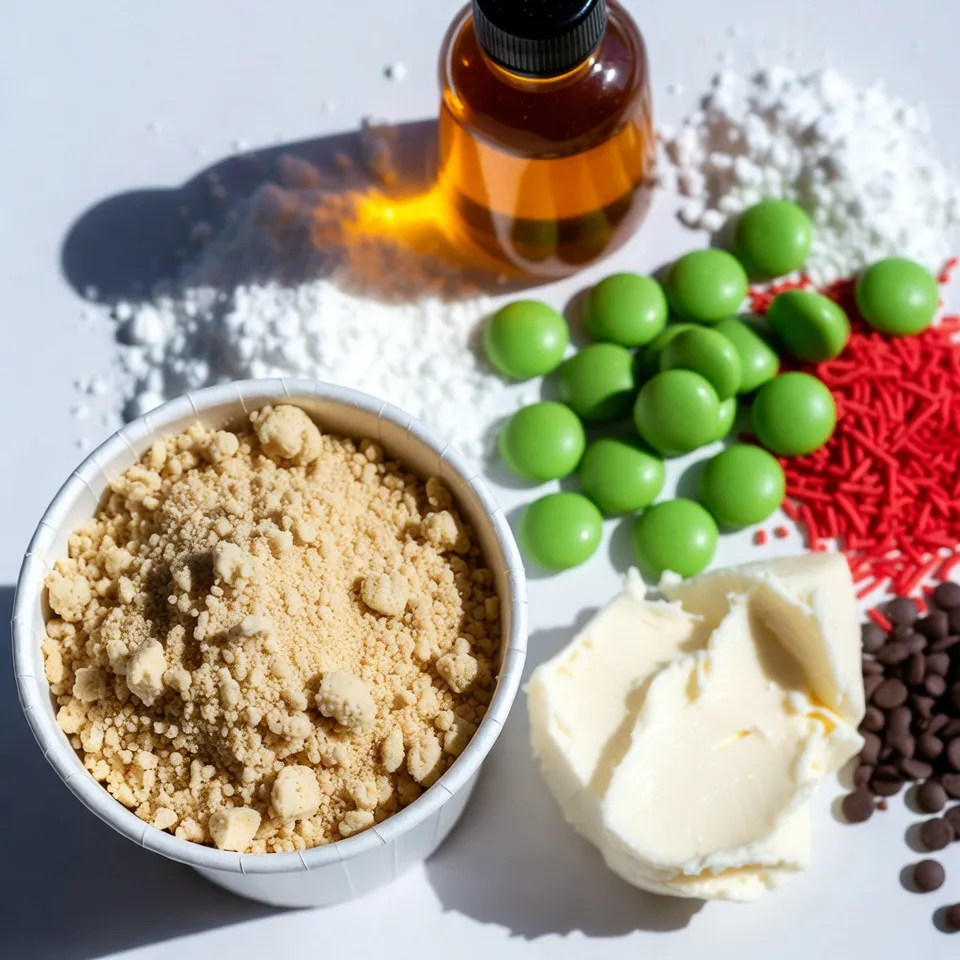
Ingredients
Essential Ingredients for Grinch Christmas Truffles
To make Grinch Christmas truffles, you need some key items. These ingredients create the perfect blend of taste and fun. Here’s what you will need:
– 1 cup finely crushed vanilla Oreos
– 4 oz cream cheese, softened to room temperature
– 1 cup vibrant green candy melts
– 1/2 cup powdered sugar
– 1 teaspoon pure vanilla extract
– Red sprinkles for cheerful decoration
Each ingredient plays a role in making these truffles a treat. The Oreos give them a sweet base. The cream cheese adds creaminess. The candy melts create the fun green coating.
Optional Ingredients for Personal Touches
You can also add some optional items for extra fun. Consider these:
– Mini chocolate chips for playful eyes
Adding mini chocolate chips makes your truffles look like the Grinch. It gives them a cute face. You can customize your truffles to fit your style!
Tips for Choosing Quality Ingredients
When picking these ingredients, quality matters. Here are some tips to help you:
– Choose fresh cream cheese. Make sure it is soft for easy mixing.
– Use good quality Oreos for better flavor.
– Look for bright green candy melts. They make your truffles pop!
– Select pure vanilla extract for the best taste. Avoid imitation.
Using quality ingredients can change your truffles from good to great. It’s worth the effort to find the best!
Step-by-Step Instructions
Mixing the Oreo and Cream Cheese Base
To start, take a medium mixing bowl. Add 1 cup of finely crushed vanilla Oreos. Then, add 4 ounces of softened cream cheese. Use a spatula or your hands to mix the two together. Keep mixing until the blend holds well when pressed. This mix should feel soft and sticky.
Shaping and Chilling the Truffles
Next, scoop out small portions using your hands. Roll each into a ball about 1 inch wide. Place the truffles on a baking sheet lined with parchment paper. Make sure they are spaced evenly apart. After shaping, transfer the baking sheet to the fridge. Chill the truffles for about 30 minutes. This helps them firm up before coating.
Melting the Candy Coating and Dipping
While the truffles chill, prepare the green candy melts. Follow the package instructions to melt them. Stir until smooth and glossy. Once melted, remove the truffles from the fridge. Dip each one into the green candy coating. Use a fork to lift it out and let excess drip off. Place it back on the lined sheet. While the coating is still wet, sprinkle red sprinkles on top. For fun, add mini chocolate chips for eyes. Allow the coating to set at room temperature or chill for about 15 minutes until firm.
Tips & Tricks
How to Achieve the Perfect Truffle Consistency
To get the right truffle texture, mix the crushed Oreos and cream cheese well. Use your hands or a spatula. It should feel sticky but firm. If it’s too dry, add a little more cream cheese. If it’s too wet, add more crushed Oreos. Forming the balls is key. Make them about one inch wide. This size helps them hold their shape and makes them easy to eat.
Best Way to Decorate for a Cheerful Look
Once the green candy melts are ready, dip each truffle carefully. Make sure to coat them fully. Let the extra coating drip off. While the coating is still wet, sprinkle red sprinkles on top. For a fun touch, add mini chocolate chips for eyes. This gives each truffle a playful Grinch face. Display them on a festive plate for a cheerful holiday look.
Avoiding Common Mistakes
One common mistake is not chilling the truffles before dipping. Chilling keeps them firm and helps the coating stick. Be careful not to overheat the candy melts. If they get too hot, they can burn or clump. Lastly, work quickly when decorating. The coating sets fast, so sprinkle right after dipping. This ensures the sprinkles stick well.
Pro Tips
- Chill for Better Coating: Ensure your truffles are well-chilled before dipping them in the candy melts; this helps the coating adhere better and keeps the truffles from melting.
- Use Parchment Paper: Line your baking sheet with parchment paper to prevent the truffles from sticking, making it easier to remove them once set.
- Experiment with Flavors: Feel free to add different flavor extracts, like almond or peppermint, to the cream cheese mixture for a unique twist on these festive treats.
- Storage Tips: Store your truffles in an airtight container in the refrigerator for up to a week; allow them to come to room temperature before serving for the best taste.

Variations
Flavor Variations: Adding Other Extracts
You can create fun flavor twists by adding other extracts. Try almond extract for a sweet nutty taste. You can also use peppermint extract for a holiday touch. Simply mix in half a teaspoon of your chosen extract with the cream cheese and crushed Oreos. This small change makes a big difference in flavor. You can match the flavor to your holiday theme, making each truffle unique.
Dietary Modifications: Vegan or Gluten-Free Options
Want to make these truffles vegan or gluten-free? Start by using vegan cream cheese. Check labels on Oreos, as many are naturally gluten-free. You can also use gluten-free cookie options like gluten-free vanilla cookies. For the candy melts, choose brands that offer vegan choices. This way, everyone can enjoy these festive treats without worry.
Different Decorative Ideas: Beyond Red Sprinkles
While red sprinkles are fun, consider other decorating options. Use shredded coconut for a snowy effect. You can also melt white chocolate and drizzle it for a lovely contrast. Try adding edible glitter for some sparkle. Mini candy canes make great decorations too. Let your creativity shine and make your truffles stand out on the holiday table!
Storage Info
Best Practices for Storing Grinch Truffles
To keep your Grinch Christmas truffles fresh, store them in an airtight container. Line the container with parchment paper. This will help prevent sticking. Place a layer of truffles at the bottom and add parchment between layers. Keep the container in the fridge. The cool air will help them stay firm.
How Long Do They Last?
Grinch truffles can last up to one week in the fridge. They will stay tasty and fresh during this time. After a week, the flavors may fade. If you notice any odd smell or texture, it is best to throw them away. Always check before indulging!
Freezing Instructions for Longer Storage
To enjoy these treats later, you can freeze them. First, let the truffles cool completely. Then, place them on a baking sheet. Freeze them for about an hour until firm. Next, transfer the truffles to an airtight container or freezer bag. They can last up to three months in the freezer. When ready to eat, thaw them in the fridge overnight for the best taste.
FAQs
Can I use other cookies besides Oreos?
Yes, you can use other cookies. Try vanilla wafers or chocolate cookies. You want cookies that blend well with cream cheese. Each cookie adds a unique taste. Experimenting can lead to fun new flavors!
What can I use instead of candy melts?
If you don’t have candy melts, use white chocolate. Just melt it like you would candy melts. You can also try almond bark for a nice coating. Keep in mind, the color will change. Add food coloring if you want that Grinch green hue!
How do I make these truffles in advance for a party?
You can make these truffles a day or two early. After coating them, store the truffles in an airtight container. Keep them in the fridge to maintain freshness. This way, they stay firm and ready to impress your guests!
You learned how to make Grinch Christmas truffles from my guide. I shared key ingredients, steps, and creative ideas to help you. Remember, using quality ingredients makes a big difference.
With the tips and tricks, you can avoid errors and achieve the best results. Feel free to mix flavors or try new decorations. Enjoy making these fun, festive treats, and share them with family and friends. Happy truffle makin

Grinch Christmas Truffles
Ingredients
- 1 cup finely crushed vanilla Oreos
- 4 oz cream cheese, softened to room temperature
- 1 cup vibrant green candy melts
- 1 2 powdered sugar
- 1 teaspoon pure vanilla extract
- to taste red sprinkles for decoration
- optional mini chocolate chips for eyes
Instructions
- In a medium mixing bowl, combine the finely crushed vanilla Oreos and the softened cream cheese. Use a spatula or your hands to mix until the ingredients are thoroughly blended and the mixture holds together well when pressed.
- With your hands, scoop out small portions of the mixture and roll them into bite-sized balls, about 1 inch in diameter. Place the truffles onto a baking sheet lined with parchment paper, ensuring they are spaced evenly apart.
- Transfer the baking sheet to the refrigerator and chill the truffles for approximately 30 minutes, allowing them to firm up for coating.
- Meanwhile, prepare the green candy melts by following the package instructions for melting. Stir the melted candy until it reaches a smooth and glossy consistency.
- Remove the chilled truffles from the refrigerator. One at a time, dip each truffle into the melted green candy, ensuring it is completely coated. Use a fork to lift the truffle out, allowing any excess coating to drip off before placing it back on the lined baking sheet.
- While the coating is still wet, generously sprinkle the tops with red sprinkles. If you’d like to add a whimsical touch, place mini chocolate chips on each truffle to create eyes, forming a Grinch-like face.
- Allow the candy coating to set completely either at room temperature or by returning them to the refrigerator for about 15 minutes until firm.
![Here are the ingredients you need for Peach Blueberry Greek Yogurt Cake. Gather these items before you start. - 1 cup plain Greek yogurt - 1 cup granulated sugar - 1/2 cup vegetable oil - 3 large eggs - 1 teaspoon vanilla extract - 2 cups all-purpose flour - 1 tablespoon baking powder - 1/2 teaspoon baking soda - 1/4 teaspoon salt - 1 cup fresh peaches, diced - 1 cup fresh blueberries - Zest of 1 lemon - Powdered sugar for dusting (optional) Using Greek yogurt makes this cake moist and adds a nice tang. Fresh peaches and blueberries bring sweetness and color. The lemon zest brightens the flavor, making each bite delightful. You can easily find most of these ingredients at your local store. For the full recipe, check the section on instructions. Enjoy baking this tasty treat! - Preheat your oven to 350°F (175°C). - Prepare and grease the cake pan. Use butter or oil and a little flour. This helps the cake come out easily. - Combine wet ingredients. In a large bowl, mix Greek yogurt, sugar, oil, eggs, and vanilla. Whisk until smooth. - Sift and combine dry ingredients. In another bowl, sift flour, baking powder, baking soda, and salt. This makes the cake light and fluffy. - Fold in the fruits. Gently add diced peaches, blueberries, and lemon zest to the batter. Be careful not to break the fruit. - Bake and check for doneness. Pour the batter into the pan. Bake for 35-40 minutes. Your cake is done when it is golden brown and a toothpick comes out clean. Enjoy making this delicious Peach Blueberry Greek Yogurt Cake by following the [Full Recipe]. - Avoiding overmixing: When you mix the wet and dry ingredients, stir just until combined. Overmixing can make your cake tough. The batter should look a bit lumpy, and that's okay! - Signs your cake is done: Your cake is ready when it turns golden brown. A toothpick inserted in the center should come out clean or have a few moist crumbs. This tells you it’s perfectly baked. - Presentation ideas: Serve your cake on a lovely cake stand. Top it with whole blueberries and thin peach slices. This adds color and charm to your dish. - Pairing with whipped cream: A dollop of fresh whipped cream takes this cake to another level. The cream’s richness balances the fruity flavors and makes each bite heavenly. - Incorrect ingredient ratios: Always measure your ingredients carefully. Too much flour or too little sugar can ruin the cake's texture and taste. - Not greasing the cake pan properly: Make sure to grease your pan well. Use butter or oil and dust it with flour. This step helps the cake come out easily after baking, preventing any tears. For the Full Recipe, be sure to check out the detailed instructions on how to make this delightful cake! {{image_4}} You can change fruits in this cake. Raspberries and strawberries work well. They add a nice flavor. You can also use flavored yogurt. Try vanilla or peach yogurt for a twist. This will change the taste slightly but keep it tasty. If you need gluten-free options, use a gluten-free flour blend. This keeps the cake light. For lower sugar choices, you can use a sugar substitute. This will keep the cake sweet without the extra sugar. Always check the package for the best ratio. Making cupcakes or mini cakes is fun and easy. Use a muffin tin to create individual servings. Bake them for about 20-25 minutes. Check for doneness with a toothpick. This way, you can share with friends or enjoy them yourself! You can store the Peach Blueberry Greek Yogurt Cake in two ways. If you plan to eat it quickly, keep it at room temperature. Just wrap it in plastic wrap or place it in an airtight container. This keeps the cake moist. If you want to save it longer, put it in the fridge. The cold will help it stay fresh for days. This cake stays fresh for about 3 days at room temperature. If you store it in the fridge, it can last up to a week. The flavors will deepen over time, which is a nice bonus! Just make sure to check for any signs of spoilage before enjoying. If you have leftover cake, freezing is a great option. Cut the cake into slices for easy serving later. Wrap each slice in plastic wrap tightly. Then, place the wrapped slices in a freezer bag. Make sure you remove the air. This way, the cake can last up to 3 months in the freezer. When you’re ready to eat it, just thaw it in the fridge overnight. Enjoy your delicious Peach Blueberry Greek Yogurt Cake again! For the full recipe, check out the earlier section. To make this cake, follow these steps: 1. Preheat the oven to 350°F (175°C). Grease a 9-inch cake pan. 2. In a bowl, mix Greek yogurt, sugar, oil, eggs, and vanilla. Whisk until smooth. 3. In another bowl, sift flour, baking powder, baking soda, and salt. 4. Gradually add the dry mix to the wet mix. Stir gently to combine. 5. Fold in diced peaches, blueberries, and lemon zest. 6. Pour the batter into the pan and smooth the top. 7. Bake for 35-40 minutes until golden. Check for doneness. 8. Cool the cake for 10 minutes in the pan, then transfer to a wire rack. You can find the full recipe in the earlier sections. Yes, you can use canned peaches. However, they may change the cake's texture. Canned peaches are softer and wetter than fresh ones. This extra moisture may make the cake denser. If you use canned peaches, drain them well. This will help keep the cake light and fluffy. You can make this cake dairy-free. Use coconut yogurt or almond yogurt instead of Greek yogurt. For eggs, try flaxseed meal or applesauce. Mix 1 tablespoon of flaxseed meal with 3 tablespoons of water per egg. Let it sit until it thickens. This will help bind the ingredients together. If you don’t have a toothpick, check the cake by pressing lightly on the top. If it springs back, it’s done. You can also look for a golden-brown top. The sides should pull away from the pan slightly. These signs mean your cake is ready to be taken out of the oven. This blog post showed you how to make a delicious Peach Blueberry Greek Yogurt Cake. You learned about the simple ingredients, step-by-step instructions, and some helpful tips. Remember to avoid overmixing and choose the right baking time. Feel free to customize the recipe with different fruits or dietary changes. Store your cake properly to keep it fresh. Enjoy your baking adventure and impress your friends with this tasty treat!](https://fastmealmate.com/wp-content/uploads/2025/06/b601b86f-d636-457f-a46c-3ca961086cb7-768x768.webp)
![Fresh peaches are the star of this pie. Choose ripe, sweet peaches for the best flavor. Use about 1 ½ cups of peaches, peeled and sliced. The slices should be thick enough to hold their shape. This will give your pie a lovely texture and taste. You have a few choices for the pie crust. A store-bought 9-inch pie crust is quick and easy. If you want to make it from scratch, use flour, butter, and a pinch of salt. Either way, the crust should be crisp and flaky. This creates a nice contrast with the smooth custard. Here’s a quick look at the other ingredients you’ll need: - ¾ cup granulated sugar - 3 tablespoons cornstarch - 2 large eggs - 1 cup heavy cream - 1 teaspoon pure vanilla extract - ½ teaspoon ground cinnamon - Pinch of salt These ingredients work together to form the rich custard. The sugar adds sweetness, while cornstarch helps it set. Eggs provide structure, and heavy cream gives a creamy texture. Vanilla and cinnamon add depth to the flavor. For the full recipe, check out the details above. To start, preheat your oven to 375°F (190°C). Take your store-bought pie crust and fit it snugly into a 9-inch pie plate. Use a fork to prick the bottom. This helps prevent bubbling. Place the crust in the oven for about 10 minutes. You want it set but not browned. Once done, take it out and let it cool on a wire rack. Next, grab a large mixing bowl. In it, combine the granulated sugar, cornstarch, ground cinnamon, and a pinch of salt. Mix these dry ingredients well to avoid any lumps. In a separate bowl, crack two large eggs and whisk them until well beaten. Add the heavy cream and vanilla extract, whisking until everything blends into a smooth mixture. Gradually pour this egg mixture into the dry ingredients. Stir continuously to create a smooth custard. Now, let's assemble the pie. Start by evenly distributing your sliced fresh peaches over the base of the pre-baked pie crust. Carefully pour the custard mixture over the peaches. Make sure they are all covered. Place the pie in the oven and bake for 30-35 minutes. The custard should be firm and slightly golden. To check if it's set, gently shake the pie. The center should jiggle just a bit. Once baked, let the pie cool on a wire rack for about an hour. This helps the custard firm up nicely. For the best results, refrigerate the pie for at least 2 hours before slicing. This step makes the custard even better. You can find the full recipe here: [Full Recipe]. To get a creamy custard, mix the sugar and cornstarch well. This step avoids lumps. When you add the eggs and cream, whisk until smooth. This ensures a rich texture. Bake until the center slightly jiggles. This tells you the custard is set but still soft. It will firm up as it cools. A soggy crust ruins your pie. To prevent this, bake the crust first. Prick the bottom with a fork to let steam escape. Bake it for about ten minutes until it’s just set. Once out of the oven, let it cool before adding the custard. This keeps the crust crisp and flaky. For a lovely presentation, slice the pie neatly. Serve each piece with whipped cream on top. A sprinkle of ground cinnamon adds warmth and charm. Add a slice of fresh peach on the side. This highlights the fresh flavors in the pie. Enjoy your beautiful creation! For more detailed steps, check the Full Recipe. {{image_4}} You can swap fresh peaches for other fruits. Try ripe nectarines for a similar taste. Plums add a tart kick and are juicy, too. Blueberries give a pop of color and sweetness. Apples offer a crunchy bite, especially if you bake them a bit first. Each fruit brings its own charm to the pie. If you need a gluten-free crust, several options exist. Almond flour is a great choice for a nutty flavor. You can also use a gluten-free pie crust mix from the store. Just follow the package instructions for best results. Make sure to check that all ingredients are gluten-free. This way, everyone can enjoy this tasty treat. To make your pie stand out, try some flavor boosts. A dash of lemon juice brightens the peach flavor. You can mix in some nutmeg for warmth, too. Adding a splash of bourbon or rum gives a nice depth. Experimenting with spices lets you create a unique pie that reflects your taste. Get creative and have fun with it! For the complete recipe, check out the [Full Recipe]. To store leftover pie, let it cool completely. Cover it with plastic wrap or foil. You can also use an airtight container. Keep it in the fridge for up to three days. The pie stays fresh this way. Avoid stacking anything on top to prevent crushing. If you want to freeze the pie, make sure it’s fully cooled. Wrap it tightly in plastic wrap, then in aluminum foil. This helps prevent freezer burn. You can freeze it for up to three months. To enjoy later, just thaw it in the fridge overnight before serving. To reheat the pie, preheat your oven to 350°F (175°C). Place the pie in an oven-safe dish. Cover it with foil to keep it from browning too much. Heat for about 15-20 minutes, or until warm. If you like, you can microwave individual slices for a quick snack. Just heat for 30 seconds, checking often. Enjoy your pie as if it were fresh! Yes, you can use canned peaches. However, fresh peaches taste better. Canned peaches are softer and sweeter. If you choose them, drain the syrup well. Pat them dry with a paper towel. This helps reduce excess moisture. Use the same amount as fresh peaches. But keep in mind that the texture will change. You can use half-and-half or whole milk as a lighter option. For a dairy-free choice, use coconut cream or almond milk. These will alter the flavor slightly. If you want to keep the richness, try a mix of milk and butter. Use 1 cup of milk and 2 tablespoons of melted butter. This gives a similar creamy texture. The custard is set when it has a smooth, firm texture. Give the pie a gentle shake. If the center jiggles slightly, it is ready. You can also insert a knife into the center. If it comes out clean, the custard is done. Let it cool for a bit to firm up further. For the best texture, refrigerate it for at least two hours. Enjoy this pie chilled for the best flavor! You learned how to make a delicious peach pie from scratch. We covered fresh peaches, pie crust options, and key ingredients. I detailed steps for prepping the crust, making the custard, and baking. Plus, I shared tips for a perfect texture and stunning presentation. You can even explore variations with different fruits and gluten-free options. Finally, we talked about storage and reheating to keep the pie tasty. Now, you have all you need to create this delightful treat! Enjoy every bite of your homemade peach pie.](https://fastmealmate.com/wp-content/uploads/2025/06/869ea291-58a7-44e1-8c29-8ce1fa52617f-768x768.webp)