
Creamy Cowboy Butter Chicken Pasta Delightful Dish
Get ready to savor a dish that’s bursting with flavor: Creamy Cowboy Butter Chicken Pasta! This recipe combines tender chicken, rich cream, and zesty spices to create a delightful meal your family will love. With just a few simple ingredients and easy steps, you can whip up a tasty pasta dish that shines at any dinner table. Let’s dive into how to make this creamy delight your new favorite!
Why I Love This Recipe
- Flavor Explosion: The combination of smoked paprika, cayenne pepper, and garlic creates a rich and flavorful sauce that coats the pasta beautifully.
- Quick and Easy: This dish comes together in just 30 minutes, making it perfect for busy weeknights without sacrificing taste.
- Creamy Comfort: The heavy cream and Parmesan cheese provide a satisfying creaminess that comforts the soul and pleases the palate.
- Customizable: You can easily adjust the spice level and add vegetables or different proteins to suit your taste preferences.
Ingredients
Main Ingredients
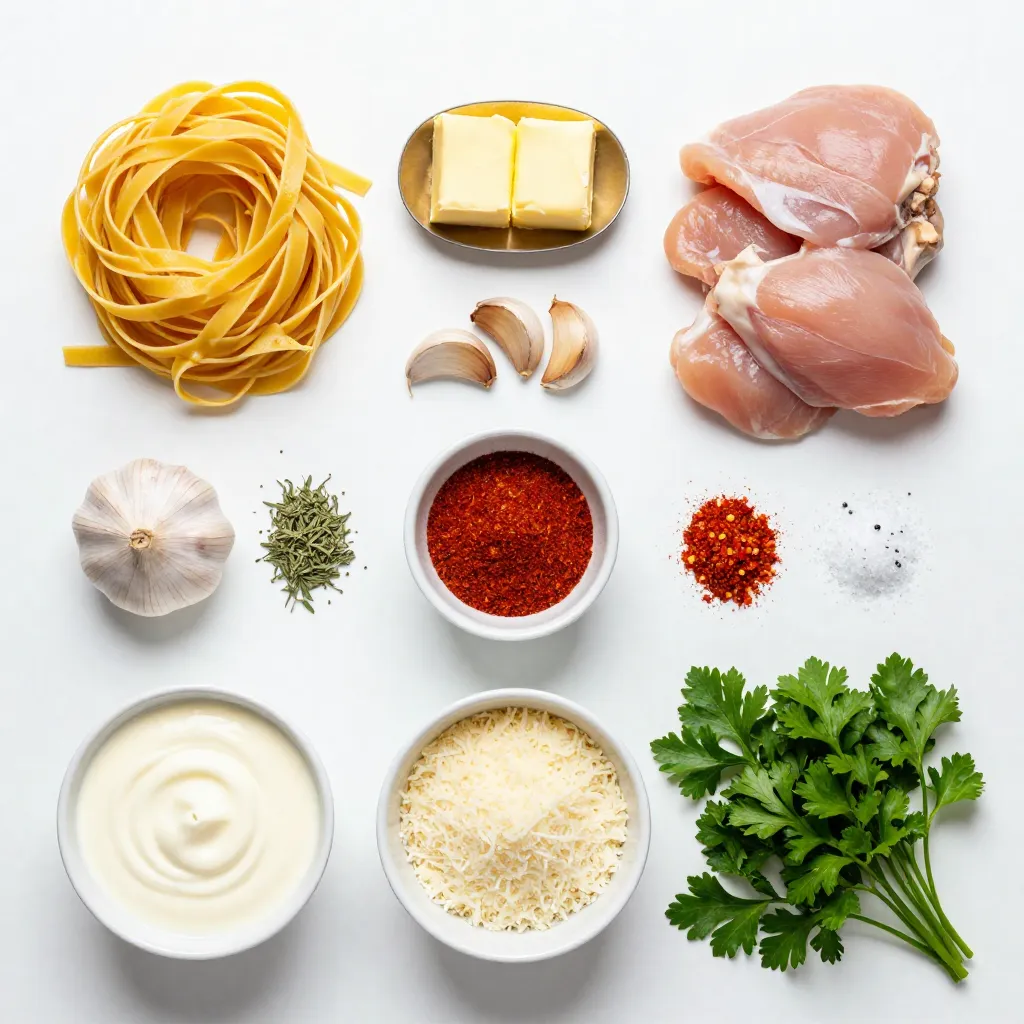
– 12 oz fettuccine or pasta of choice
– 1 pound boneless, skinless chicken thighs
– 3 cloves garlic, minced
– 1 cup heavy cream
– 1 cup freshly grated Parmesan cheese
Seasoning and Garnishes
– 2 tablespoons unsalted butter
– 1 teaspoon smoked paprika
– 1 teaspoon cayenne pepper
– 1 teaspoon dried oregano
– Fresh parsley, chopped
Optional Ingredients
– Additional spices for flavor
– Crusty bread for serving
For this creamy cowboy butter chicken pasta, I focus on simple yet bold flavors. Each ingredient plays a vital role in bringing the dish to life. The fettuccine gives a lovely base, while the chicken thighs add richness.
I love using chicken thighs because they stay juicy during cooking. Minced garlic brings a wonderful aroma. Heavy cream makes the sauce silky smooth. Freshly grated Parmesan adds cheesy depth, creating a satisfying finish.
In terms of seasoning, unsalted butter is a must. It adds a rich flavor that blends well with the spices. Smoked paprika gives a hint of smokiness, while cayenne pepper offers heat. Dried oregano rounds out the taste beautifully.
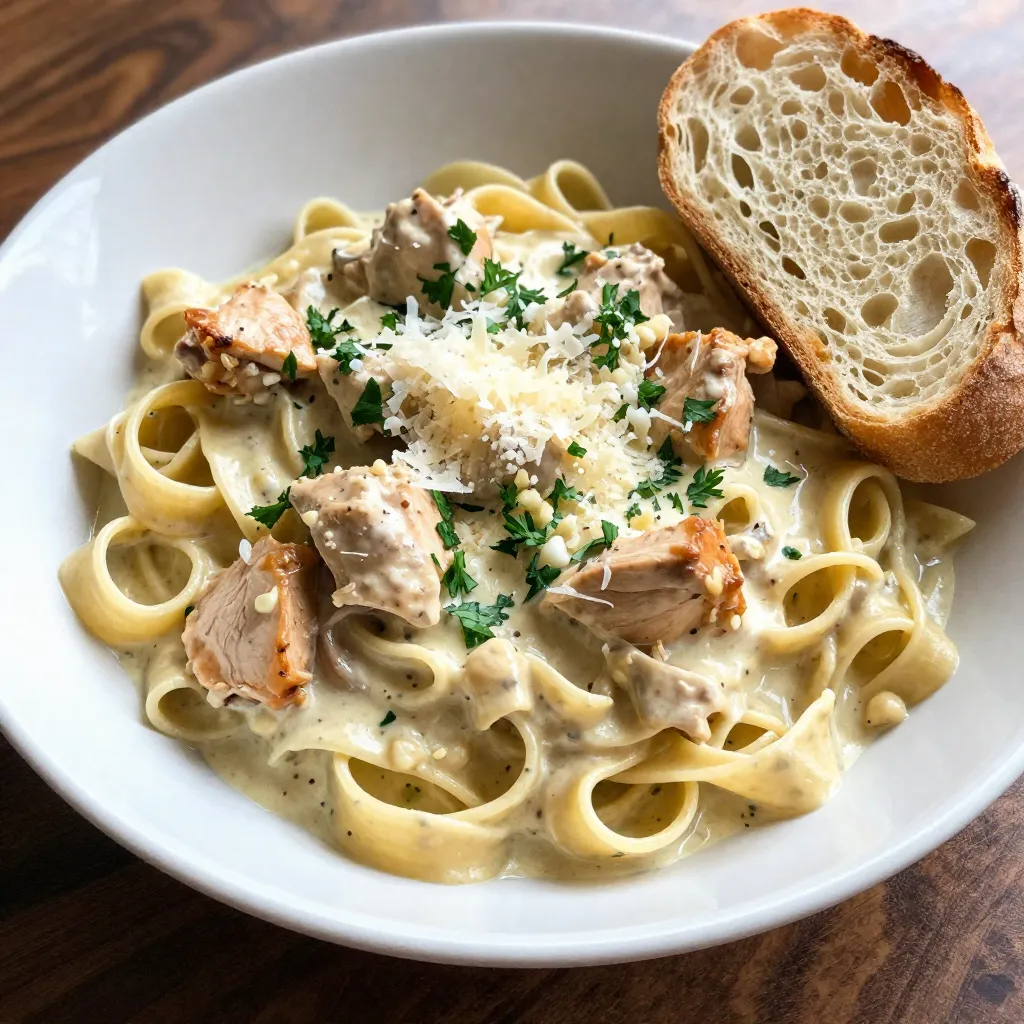
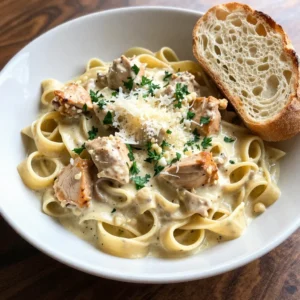
For garnish, I always sprinkle fresh parsley. It adds color and a burst of freshness to the dish. If you want, consider crusty bread as a side for sopping up that delicious sauce.
This dish is not just a meal; it’s an experience. Each ingredient shines through, making it a joy to prepare and eat.
Step-by-Step Instructions
Preparing the Pasta
First, bring a large pot of salted water to a boil. Add 12 oz of your favorite pasta. Cook it until it is al dente, which takes about 8-10 minutes. Drain the pasta but save about 1 cup of the starchy water. This water helps thicken the sauce later.
Cooking the Chicken
Next, take a big skillet and melt 2 tablespoons of unsalted butter over medium-high heat. Add 1 pound of cut chicken thighs to the skillet. Season the chicken with salt, pepper, 1 teaspoon of smoked paprika, and 1 teaspoon of cayenne pepper. Cook the chicken for about 5-7 minutes, stirring often. You want it golden brown and fully cooked.
Making the Sauce
Once the chicken is cooked, lower the heat to medium. Add 3 cloves of minced garlic to the skillet. Sauté it for around 1 minute until it smells great. Be careful not to burn the garlic! Now, gradually pour in 1 cup of heavy cream while stirring. Next, add 1 cup of grated Parmesan cheese. Stir until the cheese melts and the sauce gets creamy. If it’s too thick, mix in some reserved pasta water until you reach the right consistency.
Combining Ingredients
Now, add the cooked pasta to the skillet with the sauce and chicken. Toss everything together gently. Let it simmer for 2-3 minutes. This helps all the flavors come together and warms the pasta.
Final Touches
Taste the pasta and adjust the seasoning if needed. You can add more salt and freshly cracked black pepper. Finally, remove it from the heat and sprinkle chopped fresh parsley on top. You can add extra Parmesan too for a nice finish.
Tips & Tricks
Cooking Tips
– To get the perfect al dente pasta, cook it for 1-2 minutes less than the package says.
– Stir the pasta while it cooks. This helps keep it from sticking together.
– When sautéing chicken, use medium-high heat. This gives a nice golden color.
– Don’t overcrowd the pan. Cook in batches if needed to keep the chicken juicy.
Sauce Consistency
– If your sauce is too thick, add a bit of reserved pasta water. This will help.
– For a thinner sauce, stir in the pasta water slowly until you reach your desired thickness.
– The starchy pasta water is key. It helps the sauce cling to the pasta.
Flavor Enhancements
– Want more spice? Add extra cayenne pepper or a dash of hot sauce.
– Serve this pasta with a side of crusty bread. It’s great for soaking up the sauce.
– A simple salad with fresh veggies pairs well and adds crunch to your meal.
Pro Tips
- Perfect Pasta Texture: Make sure to cook the pasta al dente, as it will continue to cook slightly when mixed with the sauce, ensuring it maintains the perfect bite.
- Butter Before Chicken: For an extra layer of flavor, consider browning the butter slightly before adding the chicken. This will add a nutty aroma to your dish.
- Cheese Quality Matters: Use freshly grated Parmesan cheese instead of pre-grated for a smoother, creamier sauce. Freshly grated cheese melts better and has more flavor.
- Adjust Spice Level: If you prefer a milder dish, reduce the cayenne pepper or omit it altogether. You can always add a pinch later if you desire more heat!
Variations
Protein Alternatives
You can switch up the chicken in this recipe. Shrimp or beef work well too. Both options add unique flavors. If you prefer a vegetarian dish, use mushrooms instead of meat. Mushrooms absorb the creamy sauce nicely and add a great texture.
Pasta Alternatives
Feel free to change the type of pasta. Gluten-free or whole wheat pasta both taste great. You can also use spiralized vegetables, like zucchini or carrots, for a low-carb choice. These add a fun twist and keep the dish light.
Flavor Variations
You can enhance the flavor with different herbs and spices. Adding fresh basil or thyme can make it taste fresh. You can also toss in vegetables like spinach or bell peppers. These add color and nutrition to your meal while keeping it exciting.
Storage Info
How to Store
To keep your creamy cowboy butter chicken pasta fresh, use a good container. I suggest a glass or plastic container with a tight lid. This helps seal in moisture and flavor. Allow the pasta to cool before sealing it. Place it in the fridge for up to three days. If you want to enjoy it later, store it right after it cools.
Reheating Instructions
You can reheat your pasta in two ways: the microwave or stovetop. For the microwave, place it in a bowl, cover it, and heat in short bursts. Stir in between to heat evenly. For stovetop reheating, warm it in a skillet over low heat. Add a splash of water or cream to keep it creamy. This helps avoid dried-out pasta.
Freezing Guidance
To freeze the pasta, let it cool completely. Then, store it in a freezer-safe container. It can last up to two months in the freezer. When you’re ready to eat, thaw it in the fridge overnight. Reheat it on the stovetop or microwave as mentioned. This keeps the flavors fresh and delicious.
FAQs
What is Cowboy Butter?
Cowboy butter is a rich, flavorful sauce. It blends butter with spices and herbs. The taste is creamy, smoky, and slightly spicy. You can find flavors like garlic, paprika, and cayenne. It works well on meats, vegetables, and pasta. Use it as a dipping sauce or topping for grilled foods. Cowboy butter adds a unique twist to any dish.
Can I make this recipe ahead of time?
Yes, you can prep this dish in advance. Cook the pasta and chicken earlier in the day. Store them separately in airtight containers. Keep the creamy sauce in another container. When ready to eat, reheat everything on the stove. Add a splash of reserved pasta water to keep it creamy. This method helps the flavors stay fresh.
How can I make it spicier/milder?
To make it spicier, add more cayenne pepper or red pepper flakes. You can also mix in diced jalapeños for an extra kick. If you prefer a milder dish, cut back on the cayenne. You can replace it with sweet paprika for flavor without the heat. Adding cream can also tone down the spice level. Balance flavors by tasting as you go.
In this post, I covered how to make a rich and creamy chicken pasta dish. We looked at essential ingredients like chicken thighs, garlic, and Parmesan cheese. I shared step-by-step instructions for cooking and combining all elements perfectly. You also learned tips for great flavor and texture. Finally, I discussed variations and how to store leftovers. Whether you’re making it for a special meal or a quick dinner, this dish is sure to impress. Enjoy experimenting with flavors and ingredient


![To make a delightful Raspberry Lemon Loaf, you will need the following ingredients: - 1 ½ cups all-purpose flour - 1 teaspoon baking powder - ½ teaspoon baking soda - ¼ teaspoon salt - ½ cup unsalted butter, softened to room temperature - 1 cup granulated sugar - 2 large eggs, at room temperature - 1 teaspoon pure vanilla extract - Zest of 1 lemon - ½ cup buttermilk, at room temperature - 1 cup fresh raspberries (or frozen, thawed and drained) - 1 tablespoon fresh lemon juice Using quality ingredients makes a big difference. The all-purpose flour gives the loaf a soft texture. Baking powder and baking soda help it rise well, creating a light loaf. The butter and sugar add richness and sweetness. Eggs provide structure and moisture. The vanilla extract enhances the flavor, while lemon zest adds a fresh, bright note. Buttermilk helps keep the loaf moist and tender. Fresh raspberries bring a burst of flavor and color. You can find the full recipe linked above, which includes details on preparation and baking. Each ingredient plays a role in making this loaf a tasty treat. Enjoy the process of gathering and mixing these lovely items! 1. Preheat your oven to 350°F (175°C). This step is key for even baking. 2. Grab a 9x5-inch loaf pan. Grease the sides and line the bottom with parchment paper. This makes removing the loaf easy later. 3. In a medium bowl, whisk together 1 ½ cups of all-purpose flour, 1 teaspoon baking powder, ½ teaspoon baking soda, and ¼ teaspoon salt. Mix well and set aside. 4. In a large bowl, cream ½ cup of softened unsalted butter with 1 cup of granulated sugar. Whip until light and fluffy, which takes about 3-4 minutes. 1. Add 2 large eggs, one at a time. Mix well after each addition. This helps the batter blend smoothly. 2. Stir in 1 teaspoon of pure vanilla extract and the zest of 1 lemon. These flavors are what make this loaf special. 3. Now, pour in half of the dry mixture from earlier. Gently fold it into the butter mix. 4. Add ½ cup of buttermilk and mix until just combined. Avoid over-mixing, as it can make the loaf tough. 5. Gradually fold in the rest of the dry ingredients until no flour streaks are left. 6. Carefully fold in 1 cup of fresh raspberries. Be gentle to keep them whole. 1. Transfer the batter into your prepared loaf pan. Smooth the top with a spatula. 2. Drizzle 1 tablespoon of fresh lemon juice over the batter. This boosts lemon flavor. 3. Bake for 55-60 minutes. Check for doneness by inserting a toothpick into the center. It should come out clean. 4. Once baked, let the loaf cool in the pan for about 10 minutes. After that, move it to a wire rack to cool completely. Enjoy making your Raspberry Lemon Loaf! For detailed measurements, check the Full Recipe. To start, use room temperature ingredients. This helps the batter mix well. Cold butter or eggs can lead to a dense loaf. When mixing, be gentle. Over-mixing can make the loaf tough. Mix just until you see no dry flour. To boost raspberry flavor, try adding a bit of lemon zest. This will brighten the taste. You can also use a splash of raspberry juice if you want more flavor. For slicing, use a sharp knife. This will give you clean cuts. Place the slices on a beautiful platter for a nice look. Garnish with fresh raspberries and a dusting of powdered sugar. This adds color and makes your loaf look appealing. Serve each slice with whipped cream or vanilla ice cream. This makes it feel special and adds a creamy touch. Enjoy every bite! For the full recipe, check the [Full Recipe]. {{image_4}} You can change up the recipe with fun ingredient swaps. - Using different types of berries: Raspberries are great, but try blueberries or strawberries. Each berry adds its own taste and color. - Alternative flours for gluten-free options: If you need a gluten-free loaf, use almond flour or a gluten-free blend. This keeps the loaf soft and tasty. - Variations with citrus zest: Want to switch it up? Use lime or orange zest instead of lemon. This brightens the flavor and gives a twist to the loaf. You can also add extra flavors to make your loaf unique. - Adding spices like cinnamon or nutmeg: A pinch of cinnamon gives warmth. Nutmeg adds a hint of spice. Just a little can change the whole taste. - Incorporating chocolate or nuts: Mix in chocolate chips for a sweet touch. Chopped nuts, like walnuts or pecans, add crunch and richness. - Options for a lemon glaze or icing: Drizzle a lemon glaze on top for added sweetness. Mix powdered sugar with lemon juice to create a simple icing. This makes the loaf even more special. For the complete recipe, check the [Full Recipe]. To keep your raspberry lemon loaf fresh, store it at room temperature. Place it in an airtight container. This helps lock in moisture and flavor. If you have leftovers, the loaf can last about three days on the counter. For longer freshness, you can refrigerate the loaf. Wrap it tightly in plastic wrap or foil. This adds a little chill and keeps it soft. In the fridge, it can last up to a week. If you want to save it for later, freezing is a great option. Slice the loaf first for easy serving. Wrap each slice in plastic wrap and then in foil. This keeps the flavor and texture intact. You can freeze it for up to three months. On the counter, your loaf will stay fresh for about three days. After that, it may start to dry out or lose taste. Look for signs of spoilage, like a change in smell or mold. If the loaf feels hard or dry, it's best to toss it. For thawing frozen slices, take them out of the freezer. Let them sit at room temperature for about 30 minutes. You can also warm them up in a toaster. This brings back that soft texture. For the full recipe, check the link provided. Enjoy your baking! Can I use frozen raspberries? Yes, you can use frozen raspberries. Just thaw and drain them first. This helps keep the batter from getting too wet. How do I know when the loaf is done baking? To check if the loaf is done, insert a toothpick in the center. If it comes out clean, your loaf is ready! What can I serve with Raspberry Lemon Loaf? You can serve it with whipped cream or a scoop of vanilla ice cream. Fresh raspberries on the side add a nice touch too. Why does my loaf sink in the middle? A loaf may sink if you overmix the batter or if the oven is too cool. Ensure to mix just until blended. How to fix dry loaf or dense texture? If your loaf is dry, it may have too much flour. Measure flour carefully and add a bit more buttermilk next time. Adjusting for high-altitude baking differences At high altitudes, reduce sugar and increase liquid. Bake the loaf a bit longer to ensure it cooks through. This raspberry lemon loaf combines bright flavors with simple steps. We discussed the ingredients, from flour to fresh raspberries. Following easy instructions, you can create a delightful loaf. I shared tips to perfect your bake and enhance presentation. You even learned about ingredient swaps and storage methods to keep it fresh. With these insights, you can bake with confidence. Enjoy your delicious raspberry lemon loaf!](https://fastmealmate.com/wp-content/uploads/2025/07/33c21139-c12e-4c78-b65a-e6904fdb8542-768x768.webp)