Christmas Chocolate Mousse Cups Festive Holiday Delight


Get ready to impress your guests with my Christmas Chocolate Mousse Cups! These rich, creamy delights are the perfect festive treat for the holiday season. I’ll guide you through each step, from choosing the best ingredients to gorgeous presentation tips. Whether you want to add extra flavor or stunning decorations, I’ve got helpful ideas for you. Let’s make this holiday sweeter together with these simple yet delicious mousse cups!
Why I Love This Recipe
- Indulgent Flavor: This chocolate mousse is rich and decadent, making it a perfect treat for the holiday season.
- Elegant Presentation: Served in individual cups, these mousse desserts look sophisticated and festive, ideal for holiday gatherings.
- Easy to Make: With straightforward steps, this recipe is accessible even for novice bakers, ensuring everyone can enjoy it.
- Customizable Garnish: The crushed candy canes and fresh mint leaves add a delightful touch, allowing personalization for your guests.
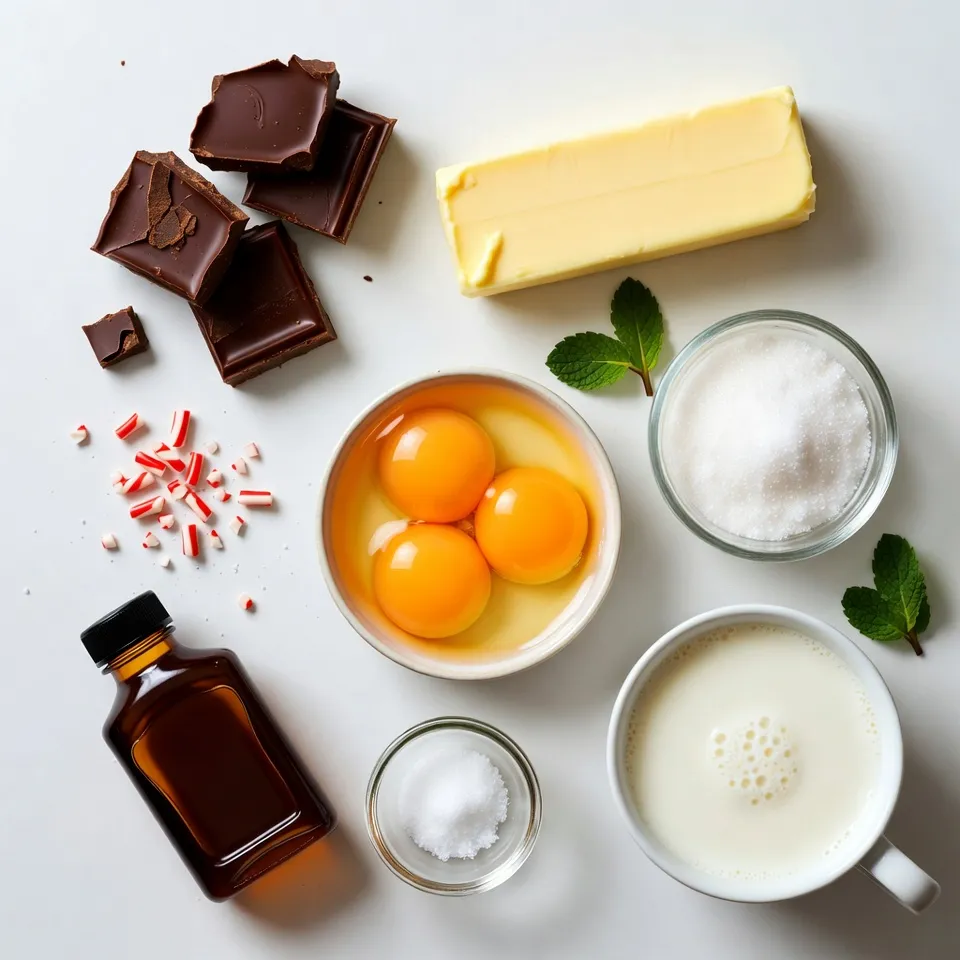
Ingredients
Main Ingredients
– 200g dark chocolate (70% cocoa), finely chopped
– 2 tablespoons unsalted butter, cubed
– 3 large eggs, yolks and whites separated
– 1/4 cup granulated sugar
– 1 teaspoon pure vanilla extract
– 1 cup heavy whipping cream, chilled
– A pinch of salt
I love using dark chocolate because it adds rich flavor. Choose chocolate with 70% cocoa for the best results. The unsalted butter helps make the mousse creamy. You will need three large eggs. Separate the yolks and whites. The yolks add depth, while the whites create a light texture.
Granulated sugar sweetens the mousse just right. A splash of vanilla gives it warmth. Heavy whipping cream is key for a luxurious finish. Don’t forget a pinch of salt. It enhances the chocolate flavor beautifully.
Garnish Options
– Mini candy canes, crushed (for garnish)
– Fresh mint leaves (for garnish)
– Additional festive toppings (e.g., chocolate shavings, sprinkles)
Garnishes can bring your mousse to life. I love using crushed mini candy canes for a festive touch. They add a nice crunch and a hint of peppermint. Fresh mint leaves provide a pop of color and freshness. You can also use chocolate shavings or sprinkles for a fun look. Mix and match your garnishes to fit your holiday spirit!
Step-by-Step Instructions
Melting the Chocolate and Butter
To melt the chocolate, you have two great methods. The first is the double boiler method. Place a heatproof bowl over simmering water. This gentle heat melts the chocolate smoothly. The second method is the microwave. Use short bursts of 20 seconds, stirring after each one. Once melted, let the chocolate mixture cool slightly.
Preparing the Egg Mixture
In a medium bowl, whisk together the egg yolks and granulated sugar. Keep mixing until the blend turns pale and creamy. Next, add the cooled chocolate mixture and a teaspoon of vanilla extract. Mix it all until smooth. The egg mixture is now ready for the next step.
Egg Whites and Whipping Cream
In a clean bowl, beat the egg whites with a pinch of salt. Use a handheld mixer or whisk until stiff peaks form. This gives the mousse a light and airy feel. In another bowl, whip the heavy cream until you see soft peaks. Now, gently fold one-third of the egg whites into the chocolate. Then, add the rest of the egg whites, folding until no streaks remain. Finally, fold in the whipped cream until it is fully mixed.
Portioning and Chilling
Spoon the rich mousse into individual cups or ramekins. Lightly tap each cup on the counter. This helps remove any air bubbles, ensuring smooth servings. Cover the cups with plastic wrap and chill them in the fridge for at least 2 hours. This waiting time allows the mousse to set perfectly.
Tips & Tricks
Achieving Light and Airy Texture
To get that perfect light and airy texture, you must use clean bowls and utensils. Any grease can ruin your whipped egg whites. Be sure to wash them well.
When folding in the egg whites, do it gently. Start by adding a small amount of the whipped whites to the chocolate mixture. This lightens it up. Then, carefully fold in the rest. Use a spatula to scoop from the bottom and turn the mixture over. Do not mix too hard. You want to keep as much air in as possible.
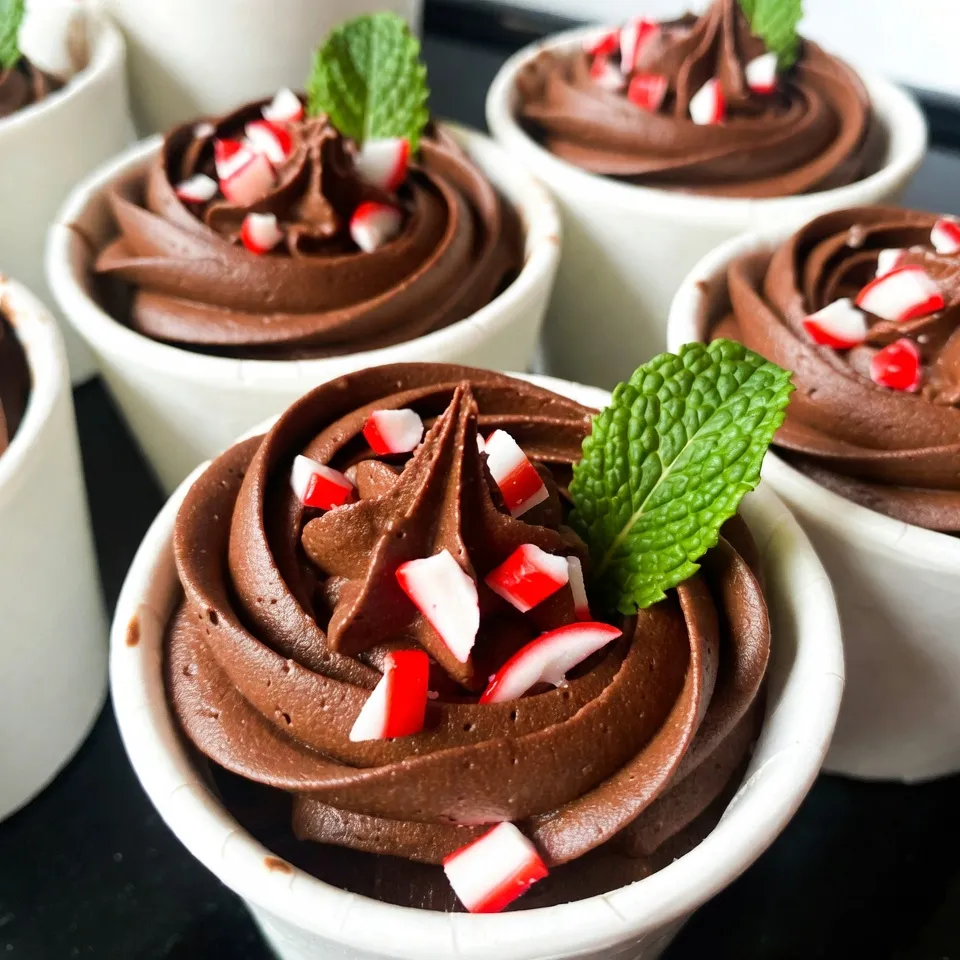
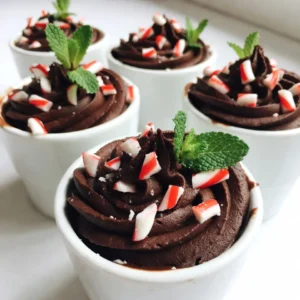
Presentation Tips
Serving your chocolate mousse cups is all about the details. You can decorate the cups with a swirl of whipped cream on top. This adds a nice touch. A sprinkle of crushed mini candy canes gives a festive look and a nice crunch.
For extra holiday flair, place a fresh mint leaf on top. This adds color and a fresh scent. You might also consider using small chocolate shavings or edible glitter to make it even more special.
Common Mistakes to Avoid
Many people make the mistake of overheating the chocolate. This can cause it to seize up, ruining your mousse. Melt it slowly and watch it closely.
Another common error is undermixing the egg ingredients. Make sure the egg yolks and sugar blend well before adding the chocolate. If not mixed enough, your mousse may not set properly. Pay attention to these steps for a perfect dessert.
Pro Tips
- Use High-Quality Chocolate: The flavor of your mousse will largely depend on the quality of the chocolate you use, so opt for a high-quality dark chocolate with at least 70% cocoa for the best results.
- Room Temperature Eggs: Using eggs at room temperature helps to create a smoother and creamier mousse. Take your eggs out of the refrigerator at least 30 minutes before starting.
- Gentle Folding Technique: When incorporating the whipped egg whites and cream, use a gentle folding motion to maintain the airiness of the mousse. Over-mixing can lead to a dense texture.
- Chill Thoroughly: For the best texture, ensure you chill the mousse cups for at least 2 hours or until fully set. This allows the flavors to meld and the mousse to firm up perfectly.
Variations
Flavor Enhancements
To elevate your Christmas chocolate mousse cups, consider adding espresso or coffee flavor. Simply mix in one tablespoon of brewed espresso when you blend the chocolate mixture. This small touch adds depth and richness that pairs perfectly with dark chocolate.
Another fun twist is to infuse the mousse with peppermint extract. Just add half a teaspoon of peppermint extract to the chocolate mixture. This will give your mousse a festive, minty flavor that screams holiday cheer!
Themed Decorations
Decorating your mousse cups can make them even more festive. Use holiday colors like red, green, and gold in your toppings. You can sprinkle crushed candy canes, green mint leaves, or even gold sprinkles on top. They not only look good but also enhance the taste.
You can also switch the toppings based on the occasion. For birthdays, try colorful sprinkles. For more formal events, consider chocolate shavings or fresh berries. This way, your mousse will suit any celebration!
Serving Options
Transforming your mousse cups into a layered dessert is a great idea. Just layer chocolate mousse with whipped cream or fruit in a clear glass. This adds visual appeal and makes each bite exciting.
For events, mini mousse shots work wonders. Use small cups or shot glasses to serve individual portions. This makes it easy for guests to enjoy without the need for utensils. Plus, they look adorable on any dessert table!
Storage Info
Storing Leftovers
To keep your chocolate mousse cups fresh, store them in the fridge. Use airtight containers for best results. This will help prevent the mousse from absorbing other smells and flavors in your fridge. You can also cover the cups with plastic wrap if you prefer. Make sure to eat the mousse within three days for the best taste and texture.
Freezing Tips
Yes, you can freeze chocolate mousse, but it’s not ideal. Freezing may change the texture and make it grainy. If you must freeze it, use a freezer-safe container. Leave some space at the top for expansion. When you’re ready to enjoy, thaw the mousse in the fridge overnight. Avoid microwaving it, as this can ruin the creamy texture.
FAQs
How long can I keep chocolate mousse cups in the fridge?
You can keep chocolate mousse cups in the fridge for about 3 days. After that, the texture may change. Keep them covered with plastic wrap to help maintain freshness. This way, your mousse stays rich and creamy for longer.
Can I make chocolate mousse ahead of time?
Yes, you can make chocolate mousse ahead of time! In fact, I recommend preparing it a day or two before your event. This lets the flavors meld together, giving it a richer taste. Just remember to chill the mousse for at least 2 hours before serving.
Is it safe to use raw eggs in mousse?
Using raw eggs in mousse can raise concerns about food safety. I suggest using pasteurized eggs to reduce risk. Pasteurized eggs are heated gently to kill bacteria without cooking the egg. This keeps your mousse safe while still being delicious and creamy.
This blog covered how to make a delicious chocolate mousse. I shared key ingredients, like dark chocolate and eggs, and showed step-by-step instructions. You learned tips for texture and presentation to avoid common mistakes. Variations, storage, and FAQs helped you with all aspects of your mousse.
Enjoy creating your own mousse. Remember, practice makes perfect. Your sweet treat will impress everyone. Happy cookin
Christmas Chocolate Mousse Cups
Ingredients
- 200 g dark chocolate (70% cocoa), finely chopped
- 2 tablespoons unsalted butter, cubed
- 3 large eggs, yolks and whites separated
- 1/4 cup granulated sugar
- 1 teaspoon pure vanilla extract
- 1 cup heavy whipping cream, chilled
- a pinch salt
- to taste mini candy canes, crushed (for garnish)
- to taste fresh mint leaves (for garnish)
Instructions
- In a heatproof bowl, combine the chopped dark chocolate and cubed butter. Use a double boiler method by placing the bowl over simmering water, or melt in the microwave in 20-second intervals, stirring frequently. Once melted and smooth, remove from heat and let it cool slightly.
- In a medium bowl, whisk together the egg yolks and granulated sugar until the mixture becomes pale and creamy. Gradually add the cooled chocolate mixture and vanilla extract, mixing until thoroughly combined and smooth.
- In a clean, dry bowl, beat the egg whites with a pinch of salt using a handheld mixer or whisk until stiff peaks form.
- Gently fold one-third of the whipped egg whites into the chocolate mixture to lighten it. Carefully incorporate the remaining egg whites, folding just until no white streaks are visible.
- In a separate bowl, whip the heavy cream until soft peaks form. Carefully fold the whipped cream into the chocolate mixture until fully combined.
- Spoon the mousse into individual serving cups or ramekins. Lightly tap the cups on the counter to eliminate any air bubbles.
- Cover the cups with plastic wrap and chill in the refrigerator for at least 2 hours or until set. Just before serving, sprinkle the tops with crushed candy canes and place a fresh mint leaf for garnish.

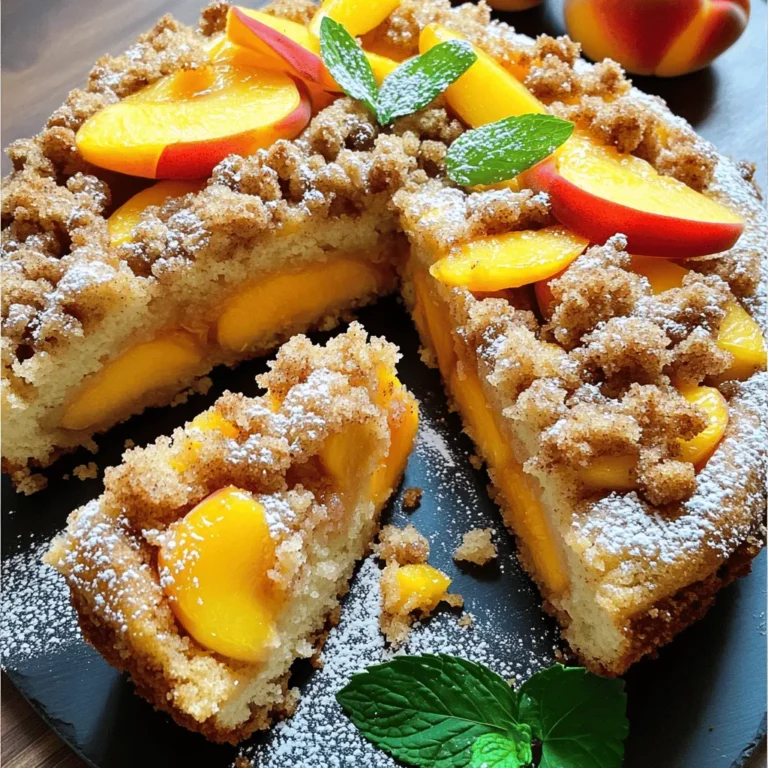
![Here are the ingredients you need for Peach Blueberry Greek Yogurt Cake. Gather these items before you start. - 1 cup plain Greek yogurt - 1 cup granulated sugar - 1/2 cup vegetable oil - 3 large eggs - 1 teaspoon vanilla extract - 2 cups all-purpose flour - 1 tablespoon baking powder - 1/2 teaspoon baking soda - 1/4 teaspoon salt - 1 cup fresh peaches, diced - 1 cup fresh blueberries - Zest of 1 lemon - Powdered sugar for dusting (optional) Using Greek yogurt makes this cake moist and adds a nice tang. Fresh peaches and blueberries bring sweetness and color. The lemon zest brightens the flavor, making each bite delightful. You can easily find most of these ingredients at your local store. For the full recipe, check the section on instructions. Enjoy baking this tasty treat! - Preheat your oven to 350°F (175°C). - Prepare and grease the cake pan. Use butter or oil and a little flour. This helps the cake come out easily. - Combine wet ingredients. In a large bowl, mix Greek yogurt, sugar, oil, eggs, and vanilla. Whisk until smooth. - Sift and combine dry ingredients. In another bowl, sift flour, baking powder, baking soda, and salt. This makes the cake light and fluffy. - Fold in the fruits. Gently add diced peaches, blueberries, and lemon zest to the batter. Be careful not to break the fruit. - Bake and check for doneness. Pour the batter into the pan. Bake for 35-40 minutes. Your cake is done when it is golden brown and a toothpick comes out clean. Enjoy making this delicious Peach Blueberry Greek Yogurt Cake by following the [Full Recipe]. - Avoiding overmixing: When you mix the wet and dry ingredients, stir just until combined. Overmixing can make your cake tough. The batter should look a bit lumpy, and that's okay! - Signs your cake is done: Your cake is ready when it turns golden brown. A toothpick inserted in the center should come out clean or have a few moist crumbs. This tells you it’s perfectly baked. - Presentation ideas: Serve your cake on a lovely cake stand. Top it with whole blueberries and thin peach slices. This adds color and charm to your dish. - Pairing with whipped cream: A dollop of fresh whipped cream takes this cake to another level. The cream’s richness balances the fruity flavors and makes each bite heavenly. - Incorrect ingredient ratios: Always measure your ingredients carefully. Too much flour or too little sugar can ruin the cake's texture and taste. - Not greasing the cake pan properly: Make sure to grease your pan well. Use butter or oil and dust it with flour. This step helps the cake come out easily after baking, preventing any tears. For the Full Recipe, be sure to check out the detailed instructions on how to make this delightful cake! {{image_4}} You can change fruits in this cake. Raspberries and strawberries work well. They add a nice flavor. You can also use flavored yogurt. Try vanilla or peach yogurt for a twist. This will change the taste slightly but keep it tasty. If you need gluten-free options, use a gluten-free flour blend. This keeps the cake light. For lower sugar choices, you can use a sugar substitute. This will keep the cake sweet without the extra sugar. Always check the package for the best ratio. Making cupcakes or mini cakes is fun and easy. Use a muffin tin to create individual servings. Bake them for about 20-25 minutes. Check for doneness with a toothpick. This way, you can share with friends or enjoy them yourself! You can store the Peach Blueberry Greek Yogurt Cake in two ways. If you plan to eat it quickly, keep it at room temperature. Just wrap it in plastic wrap or place it in an airtight container. This keeps the cake moist. If you want to save it longer, put it in the fridge. The cold will help it stay fresh for days. This cake stays fresh for about 3 days at room temperature. If you store it in the fridge, it can last up to a week. The flavors will deepen over time, which is a nice bonus! Just make sure to check for any signs of spoilage before enjoying. If you have leftover cake, freezing is a great option. Cut the cake into slices for easy serving later. Wrap each slice in plastic wrap tightly. Then, place the wrapped slices in a freezer bag. Make sure you remove the air. This way, the cake can last up to 3 months in the freezer. When you’re ready to eat it, just thaw it in the fridge overnight. Enjoy your delicious Peach Blueberry Greek Yogurt Cake again! For the full recipe, check out the earlier section. To make this cake, follow these steps: 1. Preheat the oven to 350°F (175°C). Grease a 9-inch cake pan. 2. In a bowl, mix Greek yogurt, sugar, oil, eggs, and vanilla. Whisk until smooth. 3. In another bowl, sift flour, baking powder, baking soda, and salt. 4. Gradually add the dry mix to the wet mix. Stir gently to combine. 5. Fold in diced peaches, blueberries, and lemon zest. 6. Pour the batter into the pan and smooth the top. 7. Bake for 35-40 minutes until golden. Check for doneness. 8. Cool the cake for 10 minutes in the pan, then transfer to a wire rack. You can find the full recipe in the earlier sections. Yes, you can use canned peaches. However, they may change the cake's texture. Canned peaches are softer and wetter than fresh ones. This extra moisture may make the cake denser. If you use canned peaches, drain them well. This will help keep the cake light and fluffy. You can make this cake dairy-free. Use coconut yogurt or almond yogurt instead of Greek yogurt. For eggs, try flaxseed meal or applesauce. Mix 1 tablespoon of flaxseed meal with 3 tablespoons of water per egg. Let it sit until it thickens. This will help bind the ingredients together. If you don’t have a toothpick, check the cake by pressing lightly on the top. If it springs back, it’s done. You can also look for a golden-brown top. The sides should pull away from the pan slightly. These signs mean your cake is ready to be taken out of the oven. This blog post showed you how to make a delicious Peach Blueberry Greek Yogurt Cake. You learned about the simple ingredients, step-by-step instructions, and some helpful tips. Remember to avoid overmixing and choose the right baking time. Feel free to customize the recipe with different fruits or dietary changes. Store your cake properly to keep it fresh. Enjoy your baking adventure and impress your friends with this tasty treat!](https://fastmealmate.com/wp-content/uploads/2025/06/b601b86f-d636-457f-a46c-3ca961086cb7-768x768.webp)