
Cheesy Sausage Breakfast Casserole Flavorful Delight


Are you ready to start your day with a tasty twist? This Cheesy Sausage Breakfast Casserole packs in bold flavors and hearty ingredients. It’s easy to make and perfect for any morning. With layers of breakfast sausage, eggs, and gooey cheddar cheese, you’ll have everyone coming back for seconds! Let’s dive into the ingredients and get cooking for a breakfast delight that will impress your family and friends!
Why I Love This Recipe
- Easy to Prepare: This casserole is simple to make, allowing you to whip up a delicious breakfast without spending hours in the kitchen.
- Versatile Ingredients: You can easily customize this recipe with your favorite veggies or swap out the sausage for a meat-free option.
- Perfect for Meal Prep: This dish can be made ahead of time, making it ideal for busy mornings or brunch gatherings.
- Cheesy Goodness: The combination of cheddar cheese and savory sausage creates a comforting and satisfying flavor that everyone loves.
Ingredients
Main Ingredients
– 1 pound breakfast sausage
– 6 large eggs
– 2 cups whole milk
– 4 cups cubed bread (sourdough or challah)
Flavor Enhancers
– 2 cups shredded cheddar cheese
– 1 cup diced bell peppers
– 1 cup diced onion
– Garlic powder and paprika
Seasoning
– Salt and freshly ground black pepper
– Fresh parsley for garnish
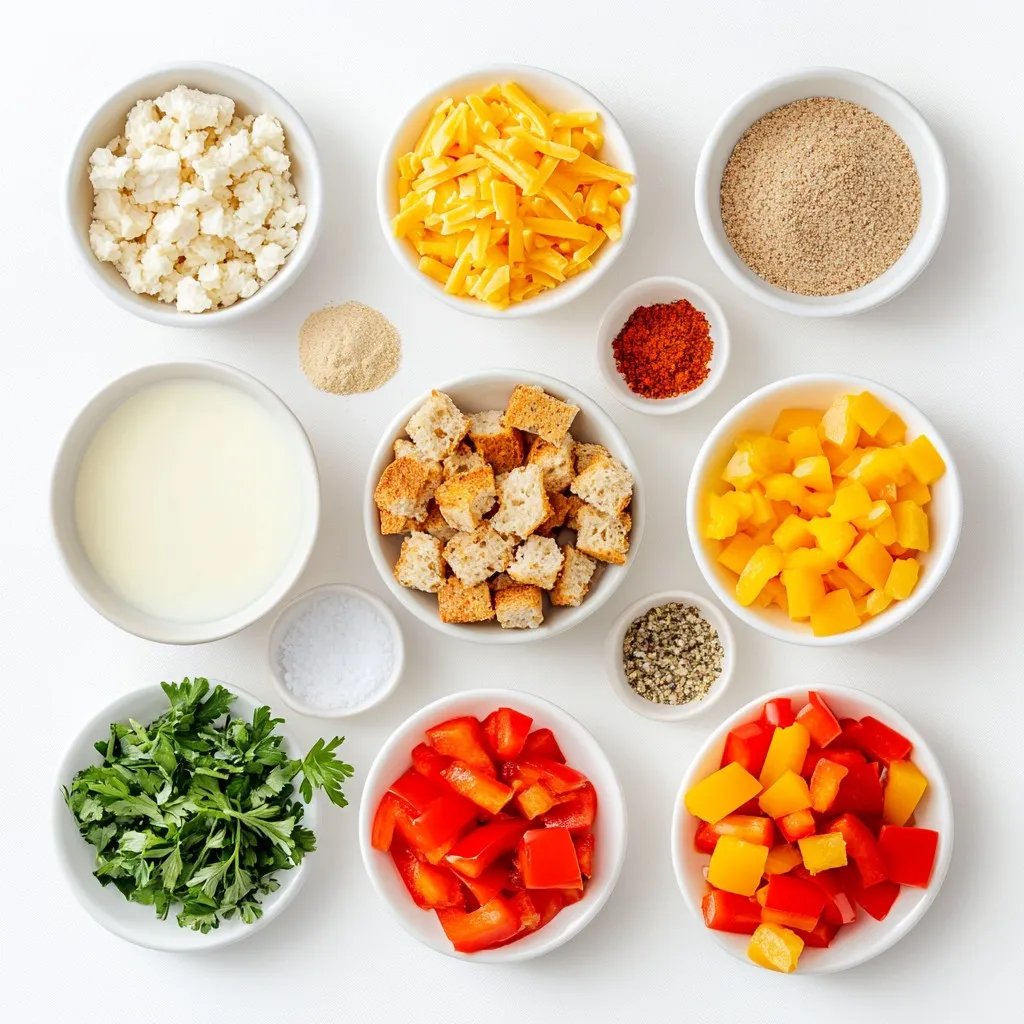
The Cheesy Sausage Breakfast Casserole starts with simple yet tasty main ingredients. First, you need breakfast sausage. I often use bulk sausage for ease. The eggs and milk create a creamy base. The cubed bread adds great texture. Sourdough or challah work best.
Next, we have flavor enhancers. Shredded cheddar cheese gives that rich, cheesy goodness. Diced bell peppers add color and a slight crunch. Diced onion brings sweetness and depth. Garlic powder and paprika give the dish a warm, inviting flavor.
Finally, seasonings complete the dish. Salt and freshly ground black pepper balance the flavors. Fresh parsley makes for a lovely garnish. It adds a pop of color and freshness.
These ingredients combine to create a hearty, satisfying breakfast. Each bite brings a mix of flavors and textures. You can easily adjust the ingredients to fit your taste or dietary needs.
Step-by-Step Instructions
Preparation
1. Preheat your oven to 350°F (175°C). Grease a 9×13 inch baking dish well. This helps the casserole not stick.
2. In a large skillet over medium heat, add 1 pound of breakfast sausage. Cook until it turns brown and crumbles well. This should take about 5-7 minutes. Drain any extra grease from the skillet.
Mixing Ingredients
1. In a big bowl, whisk together 6 large eggs and 2 cups of whole milk. Make sure it is smooth.
2. Add 1 teaspoon of garlic powder, 1 teaspoon of paprika, and a pinch of salt and pepper. Mix well to combine all ingredients evenly.
3. In the greased dish, layer 4 cups of cubed bread evenly on the bottom. This gives a great base for your casserole.
4. Spread the browned sausage over the bread. Next, add 1 cup of diced bell peppers and 1 cup of diced onion. This will add color and flavor to your dish.
Baking and Serving
1. Carefully pour the egg mixture over the sausage and bread layers. Make sure it soaks into the bread nicely.
2. Sprinkle 2 cups of shredded cheddar cheese on top. This cheese will melt beautifully while baking.
3. Place the dish in your preheated oven and bake for 35-40 minutes. Look for a golden brown color on the edges. To test if it’s done, insert a knife in the middle. If it comes out clean, it’s ready!
4. After baking, let it cool for about 5-10 minutes. This makes slicing easier.
5. Before serving, garnish with fresh parsley for a pop of color. Serve warm, cut into squares, and enjoy!
Tips & Tricks
Cooking Tips
To evenly distribute the sausage and veggies, layer them carefully. Start with the bread cubes, then add sausage, bell peppers, and onions in a single, even layer. This way, each bite has a mix of flavors. The colors will also pop, making it look appealing.
Soaking bread cubes in the egg mixture is key. This step allows the bread to absorb the flavors. It helps bind the casserole together when it bakes. Make sure every piece gets soaked. This will keep the dish moist.
Serving Suggestions
For great sides to complement the casserole, think fresh fruit or a light salad. They add a nice balance to the rich flavors. You can also serve it with a dollop of sour cream or a side of yogurt for added creaminess.
For a beautiful breakfast table, cut the casserole into generous squares. Top each piece with fresh parsley for a pop of color. Arrange it on a large platter with fruit on the side. This makes for an inviting and vibrant spread that everyone will enjoy.
Pro Tips
- Use Day-Old Bread: For the best texture, use slightly stale bread. It absorbs the egg mixture without becoming too soggy.
- Customize Your Veggies: Feel free to add or substitute other vegetables like spinach, mushrooms, or zucchini for added flavor and nutrition.
- Spice it Up: Add a pinch of red pepper flakes or your favorite hot sauce to the egg mixture for a spicy kick.
- Make Ahead: Assemble the casserole the night before and refrigerate it. Just bake it in the morning for a quick and easy breakfast.

Variations
Ingredient Swaps
You can switch up the cheese to find your favorite. Try mozzarella for a milder taste. Pepper jack adds a nice kick. Both melt well and bring different flavors.
If you want to change the sausage, turkey sausage is a good choice. It’s lighter but still tasty. For a vegetarian option, use plant-based sausage. It gives you the same great flavor without meat.
Flavor Variations
Adding herbs or spices can make this dish more exciting. Italian seasoning brings warmth and depth. Chives add a fresh taste that brightens the casserole. Just sprinkle them in when mixing the egg and milk.
You can also add other veggies for more color and nutrition. Spinach is a great choice; it cooks down nicely and adds a rich green color. Mushrooms give a nice, earthy flavor. Just be sure to cook them a bit before adding to the casserole. This way, they won’t make the dish soggy.
Storage Info
Refrigeration
To store leftover casserole, first let it cool. Then, cover it tightly with plastic wrap or foil. You can also place it in an airtight container. This keeps it fresh and tasty. In the fridge, the casserole stays good for about 3 to 4 days.
Freezing Instructions
For freezing, cut the casserole into portions. Wrap each piece in plastic wrap, then in foil. This helps to prevent freezer burn. You can freeze it for up to 3 months. When you’re ready to eat, thaw it in the fridge overnight.
To reheat frozen portions, place them in a baking dish. Cover with foil and heat in a preheated oven at 350°F (175°C). Bake for about 25-30 minutes, or until warmed through. Enjoy your tasty Cheesy Sausage Breakfast Casserole even after freezing!
FAQs
How to make a Cheesy Sausage Breakfast Casserole without eggs?
You can replace eggs with silken tofu or a mix of flaxseed and water. Use 1 tablespoon of flaxseed mixed with 2.5 tablespoons of water for each egg. Blend until smooth, then follow the recipe as usual. The texture may differ slightly, but it will still be tasty!
Can this casserole be prepared ahead of time?
Yes, you can prepare this casserole the night before. Simply follow the recipe and cover the dish tightly with plastic wrap. Store it in the fridge overnight. In the morning, bake it straight from the fridge. Just add a few extra minutes to the baking time.
What’s the best way to reheat leftovers?
To reheat leftovers, place them in a preheated oven at 350°F (175°C). Cover the dish with foil to keep it moist. Heat for about 15-20 minutes or until warmed through. You can also use the microwave, heating in short intervals until hot.
This breakfast casserole is a tasty blend of sausage, eggs, and bread. You learned how to prepare it step by step. Keeping our tips in mind will make cooking easier and more fun. With flavor swaps and storage tips, you can customize your dish. Enjoy your meal and share it with others. This simple recipe can become a breakfast favorite in your hom

Cheesy Sausage Breakfast Casserole
Ingredients
- 1 pound breakfast sausage (bulk or casing removed)
- 6 large eggs
- 2 cups whole milk
- 4 cups cubed bread (preferably sourdough or challah)
- 2 cups shredded cheddar cheese
- 1 cup diced bell peppers (mix of colors)
- 1 cup diced onion
- 1 teaspoon garlic powder
- 1 teaspoon paprika
- to taste salt and freshly ground black pepper
- for garnish fresh parsley, finely chopped
Instructions
- Preheat your oven to 350°F (175°C). Generously grease a 9x13 inch baking dish with cooking spray or a light coating of olive oil to prevent sticking.
- In a large skillet set over medium heat, add the breakfast sausage. Cook until it is browned and completely cooked through, using a spatula to crumble it into smaller pieces as it browns. Once done, drain any excess grease and set the skillet aside.
- In a separate, large mixing bowl, whisk together the eggs and whole milk until smooth. Then, stir in the garlic powder, paprika, and a pinch of salt and freshly ground black pepper. Mix thoroughly to ensure all ingredients are evenly combined.
- In the greased baking dish, layer the bread cubes evenly across the bottom, filling it up to create a base.
- Spread the cooked sausage evenly over the layer of bread cubes, followed by an even distribution of the diced bell peppers and onions, creating colorful layers.
- Carefully pour the egg mixture over the layered ingredients, ensuring that everything is well soaked. This will help bind the casserole together once baked.
- Finish by sprinkling the shredded cheddar cheese evenly across the top, making sure it covers all the ingredients.
- Place the baking dish in the preheated oven and bake uncovered for 35-40 minutes, or until the casserole has puffed up and the edges turn a golden brown. To check for doneness, insert a knife into the center—when it comes out clean, your casserole is ready.
- Allow the casserole to cool for 5-10 minutes after removing it from the oven. This helps it to set and makes slicing easier. Before serving, garnish with the freshly chopped parsley.


![To make honey garlic chicken breasts, gather these items: - 4 boneless, skinless chicken breasts - 1/3 cup honey - 1/4 cup low-sodium soy sauce - 4 cloves garlic, finely minced - 1 tablespoon fresh ginger, grated - 1 tablespoon olive oil (for cooking) - 1 teaspoon sesame oil - 1 teaspoon apple cider vinegar - Salt and freshly cracked black pepper, to taste - Chopped green onions (for garnish) - Sesame seeds (for garnish) If you want to switch things up, you can make some simple changes: - Use chicken thighs instead of breasts for more flavor and tenderness. - Swap honey for maple syrup for a different sweet taste. - Choose coconut aminos instead of soy sauce for a gluten-free option. - Replace fresh ginger with powdered ginger in a pinch. - Use canola oil instead of olive oil for frying. Measuring helps your dish taste just right. Here are some tips: - Use a liquid measuring cup for honey and soy sauce. Pour slowly for accuracy. - Use a dry measuring cup for solid ingredients like ginger and garlic. - Level off dry ingredients with a straight edge for a perfect measure. - For sticky ingredients like honey, spray the measuring cup with cooking oil first. This makes it easier to pour out. Get ready for a flavorful dinner delight with these simple ingredients! For the full recipe, check the details above. To start, gather all your ingredients. You need four boneless, skinless chicken breasts, honey, soy sauce, garlic, ginger, olive oil, sesame oil, apple cider vinegar, salt, and pepper. Chop the garlic and grate the ginger. In a medium bowl, mix the honey, soy sauce, garlic, ginger, olive oil, sesame oil, and apple cider vinegar. Whisk the mixture until it is smooth and well combined. Pat the chicken dry with paper towels. Season both sides with salt and freshly cracked black pepper. This step adds flavor to the chicken. Heat a drizzle of olive oil in a large skillet over medium-high heat. Once the oil is hot and shimmering, place the seasoned chicken breasts in the skillet. Cook each side for about 5-7 minutes. You want a rich, golden-brown crust. Use a meat thermometer to check if the chicken has reached 165°F (75°C). When the chicken is golden, pour the honey garlic sauce over the top. Reduce the heat to medium-low and cover the skillet. Let it simmer for 10-15 minutes. This allows the sauce to thicken and flavor the chicken. To check if your chicken is done, use a meat thermometer. Insert it into the thickest part of the chicken. It should read 165°F (75°C). If you don’t have a thermometer, you can cut into the chicken. The juices should run clear, not pink. Make sure to check all pieces, as they can cook unevenly. After cooking, let the chicken rest for a few minutes before serving. This helps keep it juicy. For a great presentation, drizzle extra sauce on top and garnish with green onions and sesame seeds. Enjoy this flavorful dinner delight from the Full Recipe! To make your honey garlic chicken truly shine, use fresh ingredients. Fresh garlic and ginger pack a punch and enhance the dish's flavor. If you want more depth, let the chicken marinate. A 30-minute soak in the sauce will increase flavor. You can also add a splash of lime juice to brighten the taste. Remember, balance is key! Use salt to enhance sweetness and acidity to cut through richness. Cooking chicken breasts can be tricky. To keep them juicy, avoid overcooking. Use a meat thermometer to check for an internal temperature of 165°F (75°C). Start on high heat to get a nice crust, then lower the heat. This helps the inside cook without drying out. Covering the skillet while simmering allows the chicken to absorb sauce flavors. Here are some tools that can help you cook like a pro: - Large skillet - Meat thermometer - Whisk for mixing - Cutting board - Sharp knife for slicing These tools make cooking smoother and more enjoyable. Having the right equipment allows you to focus on creating a delicious meal. For the full recipe, check out the details above! {{image_4}} You can add more colors and flavors to your honey garlic chicken. Try mixing in vegetables like bell peppers, broccoli, or snap peas. Cut them into bite-sized pieces. Add them to the skillet after the chicken has cooked for about 5 minutes. This way, the veggies soak up the sauce and stay crisp. It makes the dish healthy and fun. If you like heat, spice up your honey garlic chicken. Add red pepper flakes or chili paste to the sauce. Start with half a teaspoon and adjust to your taste. This spicy kick pairs well with the sweetness of honey. It gives you a nice balance of flavors. You can also use sriracha for a different heat profile. You don’t have to cook the chicken on the stove. Grilling gives it a smoky flavor. Marinate the chicken in the honey garlic sauce for at least one hour. Then, grill it on medium heat for about 6-8 minutes per side. If you prefer baking, preheat your oven to 400°F (200°C). Place the chicken in a baking dish, pour the sauce over it, and bake for 20-25 minutes. This keeps the chicken juicy and full of flavor. For the full recipe, check the [Full Recipe]. After your meal, let the chicken cool down. Place leftovers in an airtight container. This keeps them fresh and tasty. Store the container in the fridge. Honey garlic chicken can last for up to four days. If you plan to eat it later, consider freezing it. To reheat, you have a few options. The best way is to use the oven. Preheat it to 350°F (175°C). Place the chicken in a baking dish and cover it. Heat for about 15-20 minutes. Check that the chicken is hot all the way through. You can also use a microwave. Heat in short bursts, checking often. This keeps the chicken juicy. If you want to freeze the chicken, it’s simple. Wrap each piece tightly in plastic wrap. Then, place them in a freezer bag. Squeeze out as much air as possible. This helps prevent freezer burn. You can freeze the chicken for up to three months. When you’re ready to eat, thaw it overnight in the fridge. Then, reheat using the oven or microwave. This way, you enjoy a delicious meal later. You can serve many sides with honey garlic chicken breasts. Here are some great options: - Steamed rice: This absorbs the sauce well and adds a nice balance. - Sautéed vegetables: Try broccoli, bell peppers, or carrots for color and crunch. - Mashed potatoes: Creamy potatoes enhance the meal and add comfort. - Quinoa: A healthy grain that pairs perfectly with the sauce. - Salad: A fresh green salad can lighten up the meal. These sides complement the flavors of the chicken and make a complete meal. Yes! You can prepare honey garlic chicken breasts ahead of time. Here’s how: - Marinate: You can marinate the chicken in the sauce for up to 24 hours. This adds flavor and tenderizes the meat. - Cook and store: After cooking, let the chicken cool. Store it in an airtight container in the fridge for up to 3 days. - Reheat: When you’re ready to eat, simply reheat in a skillet or microwave. Add a splash of water if the sauce thickens too much. This method saves time and keeps dinner stress-free. You can easily change the sweetness of the honey garlic sauce. Here are some tips: - Add more honey: For a sweeter sauce, increase the honey a bit. - Use less honey: If you prefer less sweetness, reduce the honey. - Try other sweeteners: Maple syrup or agave can be good substitutes. They offer a different flavor while keeping it sweet. - Balance with acid: If it gets too sweet, add a splash of apple cider vinegar for a tangy touch. Adjusting the sweetness helps you tailor the dish to your taste. You learned about the ingredients, steps, and tips for cooking honey garlic chicken. We covered ingredient substitutions, measuring tips, and how to check doneness. I shared best practices for enhancing flavor and cooking juicy chicken. You also saw variations and how to store leftovers properly. Cooking can be simple and fun. Use these tips to make your meals taste great. Enjoy your cooking experience!](https://fastmealmate.com/wp-content/uploads/2025/06/7fed451b-ca95-459f-be21-3e50f3436304-768x768.webp)
![For a great crispy tofu panini, you need: - 1 block firm tofu, well-pressed and sliced into 1/2 inch slabs - 1 tablespoon soy sauce - 1 tablespoon sesame oil - 1 tablespoon cornstarch - 1 large round ciabatta or focaccia bread, sliced in half horizontally - 1/2 cup fresh spinach leaves, washed and dried - 1/2 red bell pepper, roasted, peeled, and sliced thin - 1 small ripe avocado, sliced - 2 tablespoons hummus or vegan mayonnaise - Salt and freshly ground black pepper to taste - Olive oil, for grilling These ingredients work together to create a crispy, tasty panini that is both filling and healthy. You can add some extra flavor with these ingredients: - Sliced tomatoes for freshness - Red onion for a bit of bite - Fresh herbs like basil or cilantro - A dash of hot sauce for heat If you want to mix things up, these optional ingredients can make your panini even better. To make your meal complete, consider these sides: - A light salad with lemon vinaigrette - Sweet potato fries for crunch - A bowl of soup, like tomato or lentil These sides balance the flavors and add variety to your meal. Plus, they are easy to prepare! For the full recipe, check out the detailed steps to bring your crispy tofu panini to life. To start, we need to prepare the tofu. First, press the block of firm tofu. Use a clean kitchen towel or tofu press. This step removes excess moisture. Removing moisture is key for achieving crispiness later. Once pressed, slice the tofu into even slabs, each about 1/2 inch thick. This ensures even cooking and crispiness. Next, we will marinate the tofu. In a mixing bowl, whisk together soy sauce, sesame oil, and a pinch of salt and pepper. Then, add your tofu slices to this mixture. Make sure each piece gets coated well. Let the tofu soak in the marinade for about 15 minutes. This allows the tofu to absorb all those tasty flavors. Now, it’s time to cook the tofu. After marinating, take the slices out and sprinkle cornstarch on both sides. This coating is crucial for that nice, crispy texture. Heat a non-stick skillet over medium heat. Add a drizzle of olive oil to the pan. When the oil shimmers, carefully lay the coated tofu slices in the skillet. Cook each slice for about 4-5 minutes on each side. Look for a golden brown color and a crispy texture. Once done, transfer the tofu to a plate and set it aside. Let’s move on to assembling the panini. Take your ciabatta or focaccia bread and cut it in half horizontally. Spread hummus or vegan mayo on the inside of both halves. This adds moisture and flavor to the sandwich. On the bottom half, layer fresh spinach leaves first. Then add the crispy tofu slices, followed by roasted red bell pepper slices. Finally, place avocado slices on top. Now, close the sandwich with the top half of the bread. Press it down gently to hold everything in place. Next, we grill the panini. Preheat your panini press or another skillet over medium heat. Brush the outside of the sandwich with olive oil. This helps to create a crunchy crust while grilling. If using a skillet, place a heavy pan on top of the sandwich. This presses it down as it cooks. Grill for about 3-4 minutes on each side. Look for a beautiful golden brown color and a crispy texture. Once grilled to perfection, remove the panini from the heat. Slice it in half with a sharp knife and serve warm for the best taste. Enjoy your crispy tofu panini, a flavorful and satisfying delight! For the full recipe, check out the earlier sections. To make your tofu crispy, follow these tips: - Press the tofu well: Remove as much water as possible. This helps the tofu absorb flavors better. - Use cornstarch: Coat both sides of the tofu slices with cornstarch. This creates a crunchy crust. - Heat your skillet properly: Use medium heat and wait for the oil to shimmer before adding the tofu. - Do not overcrowd the pan: Cook in batches if needed. This allows each piece to get crisp. Here are some mistakes to watch out for: - Skipping the marination: Marinating adds flavor. Don’t rush this step. - Using too little oil: A light drizzle helps achieve that golden color and crisp texture. - Not slicing evenly: Make sure your tofu slabs are even. This ensures consistent cooking. - Opening the panini too soon: Let it grill fully to get the best texture. Having the right tools makes a big difference. Here are my top picks: - Panini press: This tool cooks evenly and gives perfect grill marks. - Non-stick skillet: If you don’t have a press, a good skillet works too. - Heavy pan: Use it to press down the sandwich while it cooks in a skillet. - Sharp knife: A sharp knife helps slice your panini without squishing it. Using these tips and tools, you can create a delicious crispy tofu panini. For the full recipe, check out the earlier sections. {{image_4}} When making a crispy tofu panini, you can switch up the ingredients to match your taste. This adds fun and keeps things interesting. You can use different sauces or spreads. Try using pesto or spicy mustard instead of hummus. Swap spinach for kale or arugula for a bolder flavor. For added crunch, add sliced cucumbers or pickles. You can also replace the red bell pepper with grilled zucchini or eggplant. Each swap brings a new twist to your panini. To keep this dish vegan, stick with plant-based ingredients. Use gluten-free bread to make it gluten-free. Many brands offer delicious options that taste great. Check labels to ensure they have no animal products. This allows everyone to enjoy the crispy tofu panini without worry. Fresh produce can change with the seasons. In spring, try adding fresh asparagus or sprouts. In summer, include ripe tomatoes or zucchini. In fall, swap in roasted butternut squash for a sweet flavor. Winter might call for roasted root vegetables like carrots or sweet potatoes. These seasonal swaps help you enjoy fresh tastes all year long. This recipe offers endless possibilities for creativity. Use the [Full Recipe] as your base, and let your imagination run wild with variations! To keep your crispy tofu panini fresh, wrap it tightly. Use plastic wrap or foil for best results. Store it in the fridge for up to three days. Avoid leaving it out at room temperature. This helps prevent sogginess and keeps the flavors intact. To reheat, use a skillet over medium heat. Place the panini in the skillet and cover it. Heat for about 4-5 minutes on each side. This method helps restore the crispiness. You can also use a toaster oven for a similar effect. Avoid the microwave, as it can make the bread soft. If you want to freeze your panini, wrap it well in plastic wrap and foil. It can last for up to a month in the freezer. When you’re ready to eat, thaw it in the fridge overnight. Reheat it in a skillet for the best texture. This way, you can enjoy a quick meal without losing flavor. To make tofu extra crispy, start with firm tofu. Press it well to remove water. Slice it into even slabs. Marinate the slices in soy sauce and sesame oil. Let them soak for at least 15 minutes. After marinating, coat each slice with cornstarch. This coating helps create that crunchy texture you want. Cook the tofu in a hot skillet with olive oil. Flip it until golden brown on both sides. Yes, you can use many types of bread. Ciabatta and focaccia work great, but others can too. Try sourdough or whole grain for a different taste. Each bread type adds its own flavor and texture. Choose one that you love, and enjoy your panini in a new way. Dipping sauces can enhance your panini experience. Hummus is a classic choice. It adds creaminess and flavor. Vegan mayo also works well for a smooth dip. You can try spicy salsa for a kick. Another option is a tangy vinaigrette. Each sauce complements the crispy tofu and adds fun flavors. For more ideas, check out the Full Recipe for inspiration. In summary, we explored how to make a crispy tofu panini. We covered the main and optional ingredients, step-by-step cooking tips, and even some fun variations. Remember to store leftovers well and reheat them correctly for the best taste. Experiment with flavors and enjoy this dish as part of your meals. With a few simple steps, you can have a delicious, crispy tofu panini that satisfies your cravings. Enjoy your cooking journey!](https://fastmealmate.com/wp-content/uploads/2025/06/c0074219-6fc3-4ba3-a1d2-dcd469194d4e-768x768.webp)