Beet & Feta Citrus Salad Fresh and Vibrant Delight
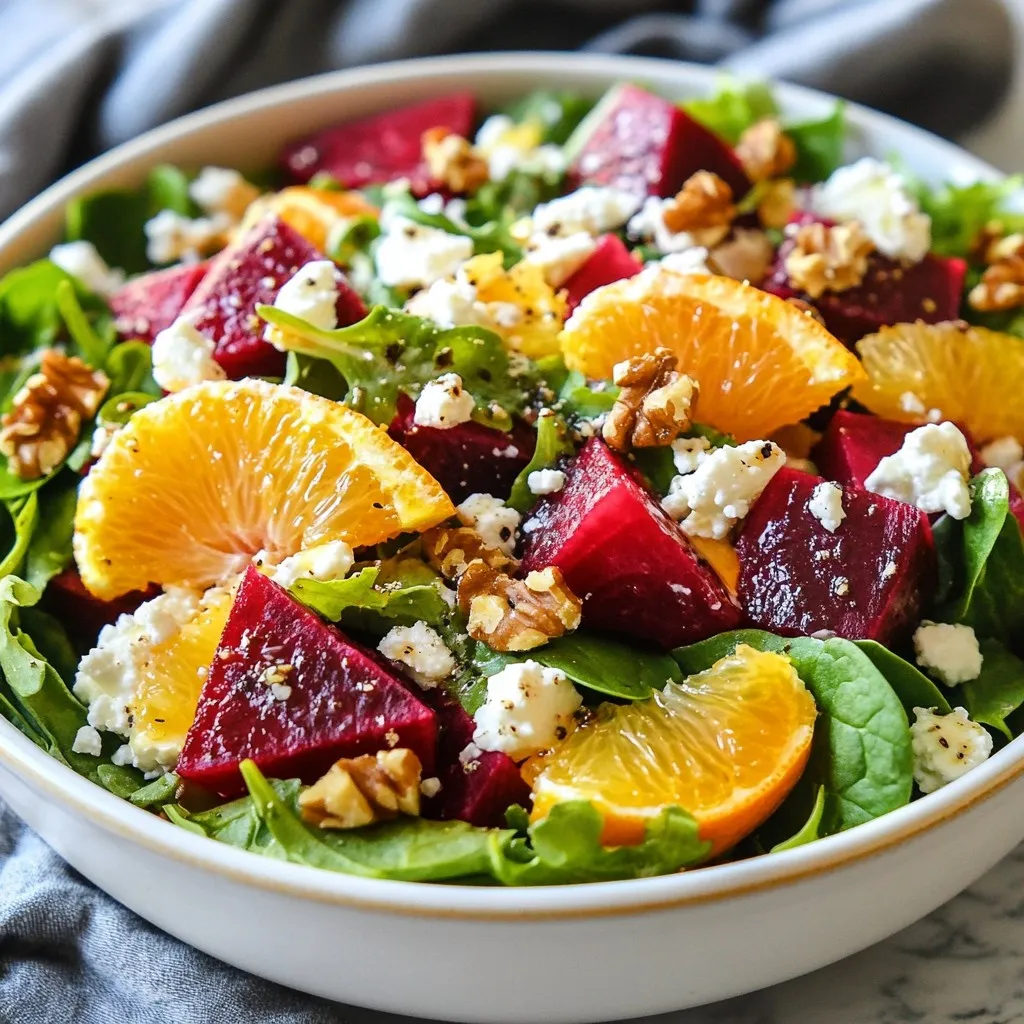

Are you ready to freshen up your meals with a vibrant twist? This Beet & Feta Citrus Salad is a colorful blend that packs flavor and nutrients. You can easily prepare it with simple steps that make it shine. In this post, I’ll guide you through selecting fresh ingredients, roasting beets perfectly, and creating a delicious dressing. Let’s dive into this delightful recipe that will impress your taste buds!
Why I Love This Recipe
- Vibrant Flavors: This salad combines the earthy sweetness of roasted beets with the bright citrus notes of orange and grapefruit, creating a fresh and exciting flavor profile.
- Nutritious Ingredients: Packed with vitamins and minerals, this salad is a healthy option that provides a variety of nutrients from the greens, fruits, and walnuts.
- Easy to Prepare: With simple steps and minimal prep time, this recipe is perfect for both quick lunches and elegant dinner parties.
- Beautiful Presentation: The colorful ingredients make for an eye-catching dish that can elevate any meal and impress your guests.
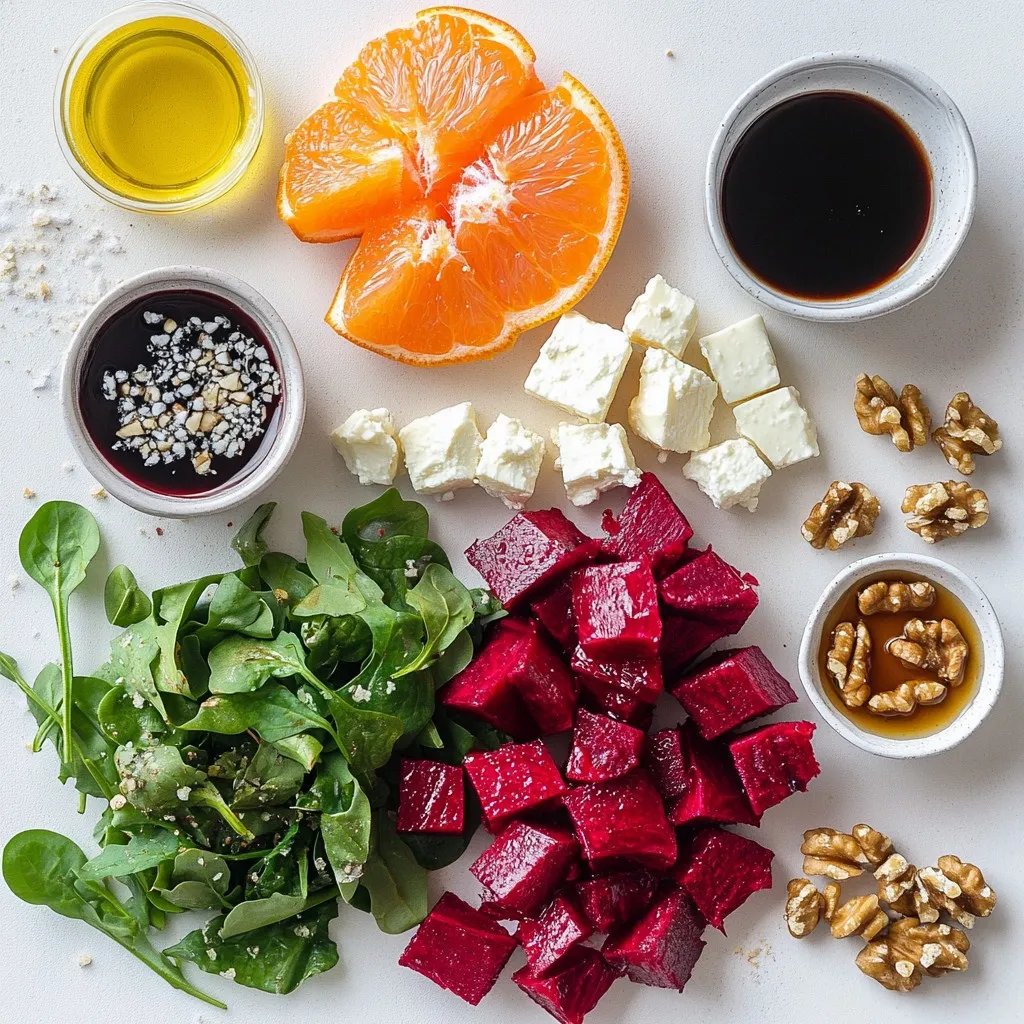
Ingredients
List of Ingredients for Beet & Feta Citrus Salad
To make this salad, gather these fresh ingredients:
– 2 medium-sized beets, roasted and diced
– 4 cups of mixed greens (spinach, arugula, and romaine)
– 1 cup of feta cheese, crumbled
– 1 large orange, segmented into pieces
– 1 large grapefruit, segmented into pieces
– 1/4 cup of walnuts, toasted and roughly chopped
– 2 tablespoons of extra-virgin olive oil
– 1 tablespoon of balsamic vinegar
– 1 tablespoon of honey
– Salt and freshly ground black pepper, to taste
Tips for Selecting Fresh Ingredients
Choosing fresh ingredients is key for great flavor. Here are my tips:
– Beets: Look for firm, smooth, and unblemished beets. Avoid soft or shriveled ones.
– Greens: Choose vibrant, crisp greens without brown spots. Freshness matters!
– Feta Cheese: Opt for blocks of feta over crumbled for better texture.
– Citrus: Select oranges and grapefruits that feel heavy for their size. They should have smooth skin.
– Walnuts: Buy unsalted and raw walnuts for the best crunch.
Nutritional Information Breakdown
This salad not only tastes great but also offers many nutrients. Here’s a quick look:
– Beets: High in fiber and vitamins A and C.
– Mixed Greens: Provide vital vitamins and minerals.
– Feta Cheese: Adds calcium and protein.
– Citrus: Packed with vitamin C and antioxidants.
– Walnuts: Good source of healthy fats and protein.
This salad gives you a balance of flavors and nutrients. Enjoy every bite!
Step-by-Step Instructions
Preparing the Roasted Beets
Start by preheating your oven to 400°F (200°C).
Wrap each unpeeled beet in aluminum foil.
Place the wrapped beets on a baking sheet.
Roast them for 45-60 minutes.
Check if they’re done by piercing with a fork.
Let the beets cool slightly before peeling.
Once cool, dice the beets into bite-sized cubes.
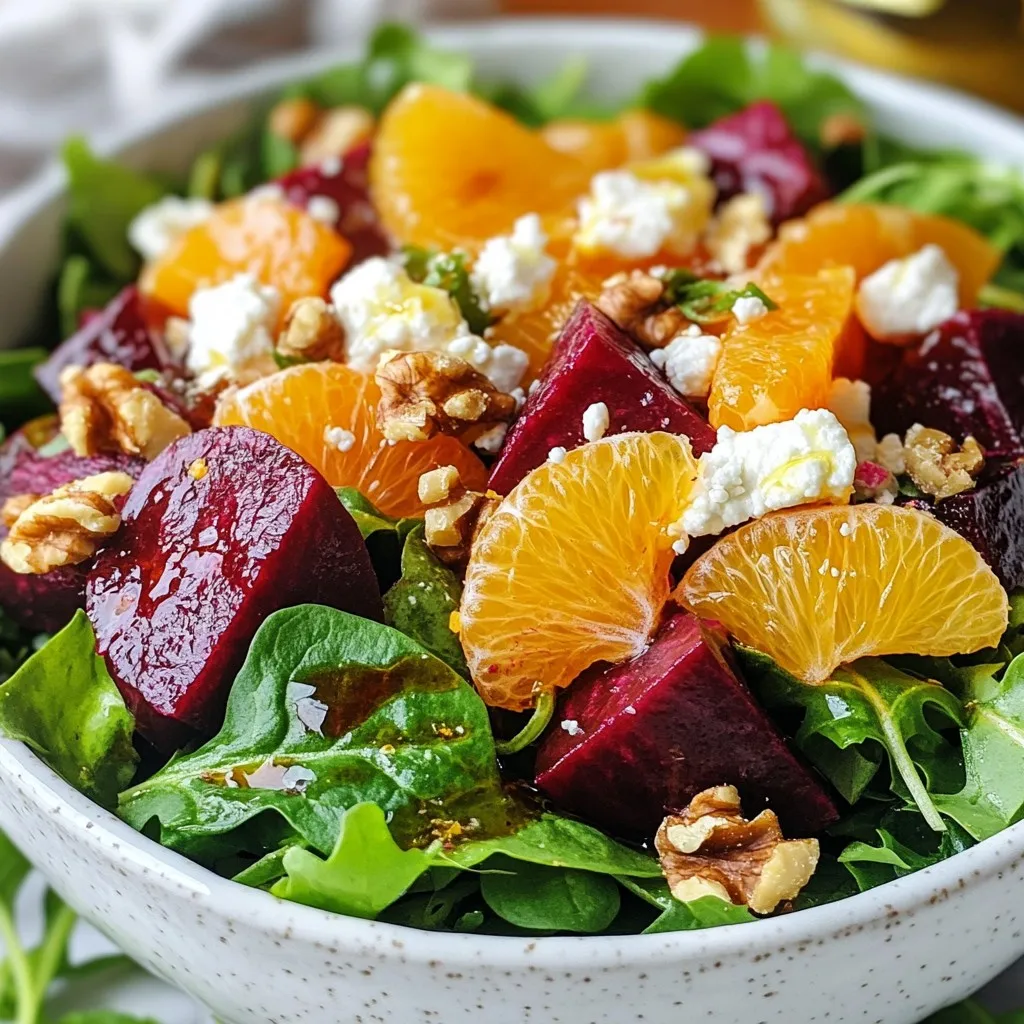
Assembling the Salad Ingredients
In a large bowl, mix the greens.
Add the diced roasted beets to the greens.
Next, add the orange and grapefruit segments.
Then, crumble the feta cheese over the top.
Gently fold all the ingredients together.
Be careful not to crush the feta as you mix.
Making the Dressing
In a small bowl, whisk together the olive oil.
Add the balsamic vinegar and honey to the bowl.
Season with salt and freshly cracked black pepper.
Mix until the dressing is well combined.
Drizzle the dressing over the salad.
Using tongs, gently toss to coat the salad evenly.
Finally, top with toasted walnuts for crunch.
Tips & Tricks
How to Perfectly Roast Beets
Roasting beets is simple. First, preheat your oven to 400°F (200°C). Wrap each beet in foil. This keeps moisture in. Place them on a baking sheet. Roast for 45 to 60 minutes. You’ll know they are done when a fork slides in easily. Let them cool before peeling. The skin comes off easily once they are cool. Dice them into small cubes to add to your salad. This method brings out their sweet flavor.
Serving Suggestions for Beet & Feta Salad
This salad shines when served fresh. Use a large platter to display it beautifully. Start with a base of mixed greens. Layer the roasted beets and citrus segments on top. Crumble feta cheese over it all. Finally, sprinkle with toasted walnuts for crunch. For extra flair, garnish with citrus slices or fresh herbs like mint. This adds color and a fresh twist. Serve your salad alongside grilled chicken or fish for a complete meal.
Common Mistakes to Avoid
Avoid cooking beets too long; they can become mushy. Check them at 45 minutes to avoid this. Don’t skip peeling them before dicing; the skin can taste bitter. When mixing the salad, handle the feta gently. Crushing it can make the salad less appealing. Lastly, dress the salad just before serving. This keeps the greens crisp and fresh. Following these tips ensures a delightful beet and feta salad every time!
Pro Tips
- Roasting Beets: To enhance the natural sweetness of beets, roast them until they’re tender. Wrapping them in foil helps retain moisture and flavor.
- Segmenting Citrus: For perfectly segmented citrus, use a sharp knife to cut away the peel and pith, then slice between the membranes to release the segments without any bitter bits.
- Preparing Ahead: Assemble all ingredients except the dressing and walnuts ahead of time. Toss everything together right before serving to keep the greens crisp.
- Choosing Greens: Mixing different types of greens, like spinach, arugula, and romaine, adds a variety of textures and flavors, making your salad more interesting.
Variations
Substitutions for Beet & Feta Citrus Salad
You can easily swap some ingredients in this salad. For the beets, try roasted sweet potatoes. They add a sweet touch. If you don’t have feta, goat cheese works well. It adds a nice creaminess too. For greens, any sturdy leafy vegetable can work. Think kale or Swiss chard for a different flavor.
Adding Protein Options
Want to make this salad heartier? Add protein! Grilled chicken or shrimp pairs nicely with the flavors. For a plant-based option, use chickpeas or lentils. They add texture and nutrients without changing the taste much. Tofu or tempeh are great choices too. Just marinate them for extra flavor.
Seasonal Variations to Try
Change this salad with the seasons! In spring, add fresh peas or asparagus. They bring a crisp bite. Summer is perfect for berries. Strawberries or blueberries add a fun twist. In fall, try adding roasted pumpkin. It gives a warm, earthy flavor. Winter is great for pomegranate seeds. Their burst of juice brightens up any plate.
Storage Info
Best Practices for Storing Leftover Salad
To keep your beet and feta salad fresh, store it in an airtight container. Make sure to separate the dressing if you have leftovers. The greens can wilt if mixed with the dressing. Place the salad in the fridge. It will stay good for about 2 days.
How to Keep Ingredients Fresh
For the best taste, store the beets and feta separately. Beets can last in the fridge for up to a week. Keep feta cheese in its brine or a small amount of water. This helps keep it fresh. Citrus fruits can last for about a week at room temperature or longer in the fridge.
Reheating and Serving Leftovers
This salad is best served cold. If you want to enjoy it warm, heat the beets separately. Use a microwave or a stove. Once warm, let them cool a bit before mixing them back into the salad. Add fresh greens and nuts just before serving to keep them crisp.
FAQs
Can I use canned beets instead of roasting?
Yes, you can use canned beets. They save time and still taste good. Just drain and rinse them first. Cut them into bite-sized pieces. This makes your salad quick and easy.
What other greens can I use in this salad?
You can switch up the greens for variety. Try using kale, baby spinach, or even mixed spring greens. Each adds a unique taste and texture. Just make sure they are fresh and crisp for the best bite.
How can I make this salad vegan?
To make this salad vegan, skip the feta cheese. You can use avocado for creaminess or replace it with tahini dressing. This keeps the salad rich and tasty while staying plant-based.
This blog post covered how to make a Beet & Feta Citrus Salad. We discussed key ingredients, like fresh beets and feta cheese. You learned how to prep the beets and make a tasty dressing.
I shared tips on avoiding common mistakes and ideas for variations. Storing leftovers and keeping ingredients fresh are also important points. Experiment with this salad to suit your taste. Enjoy your cooking and the vibrant flavors this dish bring

Beet & Feta Citrus Salad
Ingredients
- 2 medium-sized beets, roasted and diced
- 4 cups mixed greens (combination of spinach, arugula, and romaine)
- 1 cup feta cheese, crumbled
- 1 large orange, segmented into pieces
- 1 large grapefruit, segmented into pieces
- 1/4 cup walnuts, toasted and roughly chopped
- 2 tablespoons extra-virgin olive oil
- 1 tablespoon balsamic vinegar
- 1 tablespoon honey
- to taste salt and freshly ground black pepper
Instructions
- Begin by preheating your oven to 400°F (200°C). Wrap the unpeeled beets individually in aluminum foil. Place them on a baking sheet and roast in the oven for 45-60 minutes, or until they can be easily pierced with a fork. Once cooked, allow the beets to cool slightly before peeling away the skin; then, dice them into bite-sized cubes.
- In a large mixing bowl, combine the mixed greens, diced roasted beets, orange segments, grapefruit segments, and crumbled feta cheese. Gently fold the ingredients together to avoid crushing the feta.
- In a separate small bowl, prepare the dressing by whisking together the olive oil, balsamic vinegar, honey, a pinch of salt, and freshly cracked black pepper until the mixture is well combined and slightly emulsified.
- Drizzle the dressing over the assembled salad in the mixing bowl. Using tongs or salad servers, gently toss the mixture to ensure that the greens and beets are lightly coated with the dressing, being careful not to break apart the feta.
- Top the salad with the toasted walnuts, adding a delightful crunch and nutty flavor that contrasts beautifully with the creamy feta and juicy citrus.
- Serve the salad immediately for the freshest taste, or cover and refrigerate it for up to 30 minutes to let the flavors meld together beautifully before serving.
![- 4 cups of juicy watermelon (cut into cubes) - 2 cups of crisp cucumber (diced) - 1 cup of creamy feta cheese (crumbled) - 1/4 cup of fresh mint leaves (finely chopped) - 2 tablespoons of high-quality olive oil - 1 tablespoon of balsamic reduction (optional) - Sea salt to taste - Freshly cracked black pepper to taste - Juice from one fresh lemon The ingredients for this salad create a refreshing blend. The watermelon brings sweetness, while the cucumber adds crunch. Feta cheese gives a creamy touch, making the dish rich and satisfying. Fresh mint adds a burst of flavor that brightens every bite. Using high-quality olive oil enhances the taste, while balsamic reduction adds a sweet twist. You can adjust salt and pepper to fit your taste. The lemon juice lifts the flavors, making everything pop. This salad is perfect for hot days. It’s simple to make and looks great on any table. Plus, it’s a great way to enjoy fresh, seasonal produce. For the full recipe, check out the detailed steps later in this article. To cube watermelon, start with a big, ripe piece. Cut off both ends to make it stable. Stand it up, then slice down the sides to remove the skin. Now, cut the flesh into thick slabs. After that, slice the slabs into cubes. Aim for bite-sized pieces so they are easy to eat. For the cucumber, wash it well. Cut off the ends, then slice it in half lengthwise. Use a spoon to scrape out the seeds if you want a less watery salad. Next, chop it into small, even pieces. This helps the cucumber mix well with other ingredients. When it comes to crumbling feta cheese, first take it out of its packaging. Use your hands or a fork to break it into small pieces. Try to keep the crumbles big enough to stay distinct in the salad. This way, you get that lovely creamy bite. In a large bowl, start by adding the cubed watermelon and diced cucumber. Gently mix them together, ensuring they are evenly combined. Next, sprinkle the crumbled feta cheese over the top. This will add a creamy texture and a salty kick. Add the finely chopped mint leaves next. This herb brightens the salad with its fresh flavor. Now, drizzle the olive oil and squeeze the fresh lemon juice over the salad. This will give it a bright, zesty taste. Using a large spoon, carefully toss the salad. Do this gently to keep the feta from mashing. You want to mix the flavors without losing the feta's shape. Now it's time to season the salad. Add sea salt and freshly cracked black pepper to taste. Start with a little, then adjust as needed. The salt will help enhance all the flavors. Let the salad rest for about 10 minutes before serving. This step is key. It allows the flavors to meld together. The watermelon will release some juice, creating a light dressing. For the complete recipe, check the [Full Recipe]. To create the best flavor in your salad, balance sweetness and acidity. Watermelon is sweet, so you need acidity to cut through that. Fresh lemon juice adds bright notes. You can also try balsamic reduction for a sweet twist. Adjust seasonings to your taste. Add sea salt and black pepper slowly. Taste as you go. This way, the salad fits your personal preference. Presentation matters when serving this salad. For a colorful display, choose a large bowl. Layer the watermelon, cucumber, and feta beautifully. You can also arrange the watermelon cubes in a fun pattern. Lastly, garnish with extra mint leaves. This adds a pop of green and a fresh smell. Having the right tools makes preparation easy. A sharp chef's knife is key for cutting watermelon and cucumber. Use a sturdy mixing bowl to combine all ingredients gently. These tools ensure you maintain the salad's texture and create a lovely dish. For the best results, make sure your tools are clean and ready to go. For a complete guide, check the Full Recipe. {{image_4}} You can swap feta cheese for a vegan option like tofu or almond cheese. These substitutes provide a similar creamy texture. If you want to add more flavor, try using a vegan feta made from cashews. For fruits or vegetables, consider adding berries, mango, or radishes. These additions add color and a unique taste to your salad. Watermelon pairs well with many fruits, so feel free to get creative! Different dressings can enhance your salad. A simple lemon vinaigrette works great. Mix olive oil, lemon juice, salt, and pepper for a fresh taste. You can also make your own balsamic reduction at home. Just simmer balsamic vinegar on low heat until it thickens. This sweet and tangy sauce pairs well with the salad, adding depth to the flavors. Changing the salad with the seasons can keep it fresh. In summer, add fresh basil or strawberries for a sweet twist. In fall, try diced apples or pears for a crunchy bite. For winter, include pomegranate seeds or citrus fruits. These ingredients add a pop of color and flavor to your dish. Always look for seasonal produce to keep your salad exciting and vibrant! To keep your leftover salad fresh, place it in an airtight container. This helps prevent moisture loss and keeps flavors strong. You can use glass or plastic containers. Glass is great for easy cleaning and doesn’t absorb odors. If you want to keep it extra fresh, add a layer of plastic wrap on top before sealing. You can freeze Watermelon Cucumber Feta Salad, but it’s not ideal. Freezing can change the texture of watermelon and cucumber. If you choose to freeze, prepare it without the feta and dressing. Store the fruit and cucumber in a freezer-safe bag. When you're ready to eat, thaw it in the fridge overnight. Add feta and dressing just before serving. In the fridge, this salad lasts about 2 to 3 days. After that, it may start to lose its crispness. Look for signs of spoilage, like a mushy texture or off smell. If the feta starts to look slimy, it’s time to toss it. Always trust your senses when deciding if food is still good to eat. To make this salad heartier, add protein or grains. You can include: - Grilled chicken breast, sliced thin - Cooked quinoa for a nutty flavor - Chickpeas for a plant-based option - Shrimp for a light seafood touch These ingredients mix well with the fresh flavors and keep your salad satisfying. Yes, you can prep ingredients ahead. To keep the salad fresh: - Chop watermelon and cucumber a few hours before serving. - Store the feta separately to avoid sogginess. - Mix everything together just before serving. This way, you enjoy that crisp texture and vibrant taste. Watermelon is hydrating and low in calories. It has vitamins A and C, which support your skin and immune system. Cucumber is also hydrating and offers fiber, which is good for digestion. This salad fits into a healthy diet by providing essential nutrients with low calories. Yes, this salad is gluten-free. All the ingredients, including watermelon, cucumber, and feta, do not contain gluten. For extra options: - Serve it with gluten-free crackers. - Pair it with gluten-free bread for a light meal. Feel free to enjoy this salad without worries about gluten! The Watermelon Cucumber Feta Salad is a refreshingly light dish. You learned about its main ingredients, step-by-step preparation, and unique variations. Remember to balance flavors and let it rest before serving. With tips for storage and healthy options, you can enjoy this salad any time. This recipe is simple, delicious, and perfect for warm days. Now, you have the tools to create a great salad that impresses everyone. Enjoy making it your own!](https://fastmealmate.com/wp-content/uploads/2025/07/b20d6dc1-e7c2-400f-acd5-da5290acfeaa-768x768.webp)

![- Fresh peaches - Red onion - Jalapeño pepper - Red bell pepper - Fresh cilantro - Lime juice - Salt and pepper - Optional honey For this fresh peach salsa, you want to gather simple ingredients that burst with flavor. Start with fresh peaches, as they are the star of this dish. Choose ripe peaches that give slightly when you press them gently. This ensures they are sweet and juicy. Next, chop a red onion finely. This will add a nice crunch and a hint of sharpness. If you prefer a milder taste, soak the onion in cold water for a few minutes before adding it to the salsa. Now, grab a jalapeño pepper. Remove the seeds to control the heat. If you like spicy salsa, leave some seeds in for an extra kick. Finely mince the jalapeño and add it to the mix. For sweetness and crunch, include a red bell pepper. Dice it into small pieces. The bright color will also make the salsa visually appealing. You can't forget the fresh cilantro! Chop about a quarter cup. The cilantro adds a fresh, herbal taste that brightens the whole dish. Next, squeeze the juice of two limes into the bowl. This adds a zesty tang that pairs perfectly with the sweetness of the peaches. Finally, season with salt and pepper to taste. This will help to enhance all the flavors in your salsa. For those who enjoy a hint of sweetness to balance the tang, you can add optional honey. This combination of ingredients creates a colorful, zesty dip that is perfect for any occasion. You can find the complete steps in the Full Recipe. 1. Start by dicing the peaches. Use three ripe peaches. Cut them into small pieces. This gives your salsa a sweet base. 2. Next, chop the red onion. Use one small onion. Finely chop it to enhance the flavor. The onion adds a nice crunch. 3. Now, take a jalapeño pepper. Remove the seeds and mince it. This adds heat to your salsa. If you like it milder, use less. 4. Dice one red bell pepper. This pepper adds sweetness and a nice crunch. It balances the heat from the jalapeño. 5. Finally, slice the cilantro. Use about 1/4 cup. The fresh herb adds lovely notes to your salsa. 1. Combine all your ingredients in a medium mixing bowl. This includes the diced peaches, chopped onion, minced jalapeño, and diced red bell pepper. 2. Add the coarsely chopped cilantro into the bowl. This brightens up the salsa. 3. Squeeze the juice from two limes. Pour the juice directly into the bowl. This adds tang and freshness. 4. If you want a touch of sweetness, drizzle in one teaspoon of honey. Mix well to combine all the flavors. 1. Season your salsa with salt and pepper. Start with a little and taste as you go. Adjust according to your preference. 2. Gently toss all the ingredients together. Be careful not to mash the peaches. This keeps the salsa fresh and vibrant. 3. Let the salsa rest for at least 15 minutes. This helps the flavors meld beautifully. Enjoy this fresh peach salsa with tortilla chips or as a topping on grilled meats. For the full recipe, check [Full Recipe]. When picking peaches, look for a few key signs. They should feel slightly soft when you press them gently. The color should be vibrant, with a golden hue. The sweet aroma is also a good sign of ripeness. For salsa, I recommend these peach varieties: - Freestone peaches: Easy to pit and sweet. - Clingstone peaches: Juicy and flavorful, perfect for fresh dishes. To create a zesty salsa, balance the sweet and spicy flavors. Add just enough jalapeño to give it a kick without overwhelming the sweetness of the peaches. You can also try some optional add-ins: - A dash of cumin for warmth. - Chopped mango for extra sweetness. - A splash of vinegar for brightness. Fresh peach salsa pairs perfectly with crispy tortilla chips. It adds a fun twist to your standard snack. For a creative presentation, serve the salsa in a colorful bowl. You can also place it in hollowed-out peaches for a fun touch. Garnish with a sprig of fresh cilantro to make it pop. Want to try the full recipe? Check out the Peachy Paradise Salsa for all the details! {{image_4}} To make your fresh peach salsa spicy, add more jalapeños or other hot peppers. Start with an extra jalapeño, finely chopped. If you love heat, try serrano or habanero peppers. These peppers give a nice kick. Just remember to adjust the amount based on your spice level. Taste as you mix. You want to enjoy the heat, not overpower it. Try adding mango or pineapple for a tropical twist. These fruits add sweetness and juicy texture. Diced mango blends well with peaches. Pineapple brings a tangy note. Mix about one cup of diced fruit with your peach salsa. This combo makes your salsa even more vibrant and exciting. It's fun to explore different flavors. Herbs can elevate your peach salsa. Experiment with different herbs like basil or mint. Basil adds a sweet, peppery flavor that pairs well with peaches. Mint gives a fresh, cool taste. Use about 1/4 cup of finely chopped herbs. Add them in with the cilantro for a unique twist. This makes your salsa special and refreshing. For the full recipe, check out [Full Recipe]. To keep your fresh peach salsa tasty, store it in the fridge. Use an airtight container. This helps keep the flavors strong and fresh. If you want to keep it longer, freezing is an option. Just place the salsa in a freezer-safe bag. Remove as much air as possible before sealing. It is best to freeze in smaller portions, so you can thaw what you need. In the fridge, fresh peach salsa is good for about 3 to 5 days. After that, it may lose its flavor and freshness. Look for signs of spoilage. If the salsa smells sour or changes color, it's time to toss it. Always trust your senses when checking food. If it looks or smells off, do not eat it. You can use canned peaches, but I prefer fresh ones. Fresh peaches offer better taste and texture. They give your salsa a juicy bite. However, canned peaches are convenient. They save time and are available year-round. Just look for peaches packed in juice, not syrup. This keeps the flavor bright and fresh. If you use canned peaches, drain them well. This helps avoid a watery salsa. To spice up your salsa, add more jalapeño. You can also try serrano or habanero peppers. They bring heat and flavor. Remove the seeds for less heat if needed. You might also mix in some cayenne pepper or hot sauce. Start with a little and taste as you go. This way, you can find the perfect heat level for you. Fresh peach salsa is great with many dishes! Serve it with tortilla chips for a tasty snack. You can also pair it with grilled chicken or fish. It adds a zesty twist to tacos or burritos. Try it on top of a fresh salad. It brings a burst of flavor that brightens any meal. Peach salsa is packed with nutrients! Peaches are rich in vitamins A and C. These vitamins help keep your skin healthy. The red onion adds antioxidants, which protect your cells. Cilantro brings fresh flavor and may aid digestion. Lime juice provides vitamin C and helps with hydration. Overall, this salsa is a delicious way to enjoy healthy ingredients. To make it even healthier, skip the honey or use less. You can find the full recipe [here](#). Fresh peach salsa brings together the perfect blend of flavors. We explored the ingredients, from ripe peaches to zesty lime juice. You learned how to prepare and mix the salsa, and how to enhance its taste. The tips on choosing peaches and serving ideas elevated your dish. Variations and storage advice help you make this salsa a staple. In the end, fresh peach salsa is simple, delicious, and versatile. Enjoy creating your own unique twist and sharing it with others!](https://fastmealmate.com/wp-content/uploads/2025/06/2f0fc8ad-37c3-48ee-80ed-3417aa8b3609-768x768.webp)

. Prepare to impress your friends and family! - In a medium saucepan, combine diced Granny Smith apples, brown sugar, ground cinnamon, ground nutmeg, and fresh lemon juice. - Cook over medium heat for 5-7 minutes. Stir occasionally until the apples are tender and caramelized. Cooking the apples is key. The sugar helps them become sweet, while the spices add warmth. The lemon juice brightens the flavor, making it pop. You want the apples to be soft but not mushy. The perfect mix will smell heavenly! - Take a large serving board and spread softened butter evenly across the surface. - Carefully layer the warm caramelized apples over the butter. The butter acts as a rich base. It helps the apples stick and adds creaminess. Make sure to cover the board well. This step sets the stage for the sweet treats to come. - Generously drizzle caramel sauce over the apples. - If you like, sprinkle chopped pecans or walnuts on top. Finish with a pinch of flaky sea salt. The caramel sauce enhances the sweetness and creates a lovely glossy finish. The nuts give a nice crunch, while the sea salt balances the flavor. This dish looks amazing and tastes even better! You can serve it with toasted crostini or crisp apple slices. Don't forget to check out the Full Recipe for more details! For this recipe, I recommend using tart apple varieties. Granny Smith apples work great. Their tartness balances the sweet caramel. Honeycrisp apples are another excellent choice. They add a nice crunch and flavor. Make sure your butter is at room temperature. Softened butter spreads easily on the board. This creates a smooth base for the apples. If the butter is too cold, it will not spread well. Feel free to experiment with spices. Add a pinch of cloves for warmth. You could also try vanilla extract for extra depth. These little tweaks can elevate the taste. Each bite can become even more delightful. {{image_4}} You can easily add a twist to your butter board. Incorporate chocolate chips. Just sprinkle them over the caramelized apples. You can also drizzle melted chocolate on top. This adds rich flavor and a fun look. Do you have nut allergies? No problem! Replace the nuts with seeds like pumpkin or sunflower seeds. If you prefer, you can skip the nuts entirely. Your butter board will still taste amazing! Feel free to switch up the flavors! Use different nut butters, like almond or cashew. You can also try flavored butter spreads. Each variation brings a new taste and experience. Keep your Caramel Apple Pie Butter Board in the refrigerator. Use an airtight container to keep it fresh. This helps to maintain the flavors and textures. For the best taste, enjoy this treat within 2-3 days. After that, the apples may lose their crispness. If you want to serve it warm, gently warm it in the microwave. Heat it in short bursts to avoid cooking the apples again. This helps to bring back the cozy, warm flavors that make this dish so special. A butter board is a fun and tasty way to serve butter. You take a large board and spread softened butter across it. Then, you add delicious toppings. It’s like a charcuterie board, but with butter! You can use sweet or savory toppings. The Caramel Apple Pie Butter Board uses caramelized apples, cinnamon, and nuts for a sweet treat. It’s perfect for sharing at parties or family gatherings. Yes, you can prep this butter board ahead! Make the caramelized apples and store them in the fridge. Just keep them in an airtight container. You can spread the butter on the board when you are ready to serve. Then, layer the apples and drizzle the caramel sauce. This way, you save time and still enjoy a fresh dish. Yes, you can make a vegan version! For the butter, use coconut oil or vegan butter. You can also make your own caramel using coconut milk and brown sugar. This way, you keep the same flavors but make it vegan-friendly. Enjoy the same delicious taste while being kind to dietary needs! This butter board recipe is simple, fun, and full of flavor. We started with caramelized apples and buttery goodness, then added our favorite toppings. You can adjust the recipe to fit your taste. Use different apples, add nuts, or go nut-free. Remember, store leftovers well to keep them fresh. This dish is perfect for sharing and can fit any diet with easy swaps. Enjoy making your own version of this tasty treat!](https://fastmealmate.com/wp-content/uploads/2025/07/ddf5207e-0125-4d49-a59c-c6b722e82f52-768x768.webp)