Thai Peanut Curry Chicken Flavorful and Easy Recipe
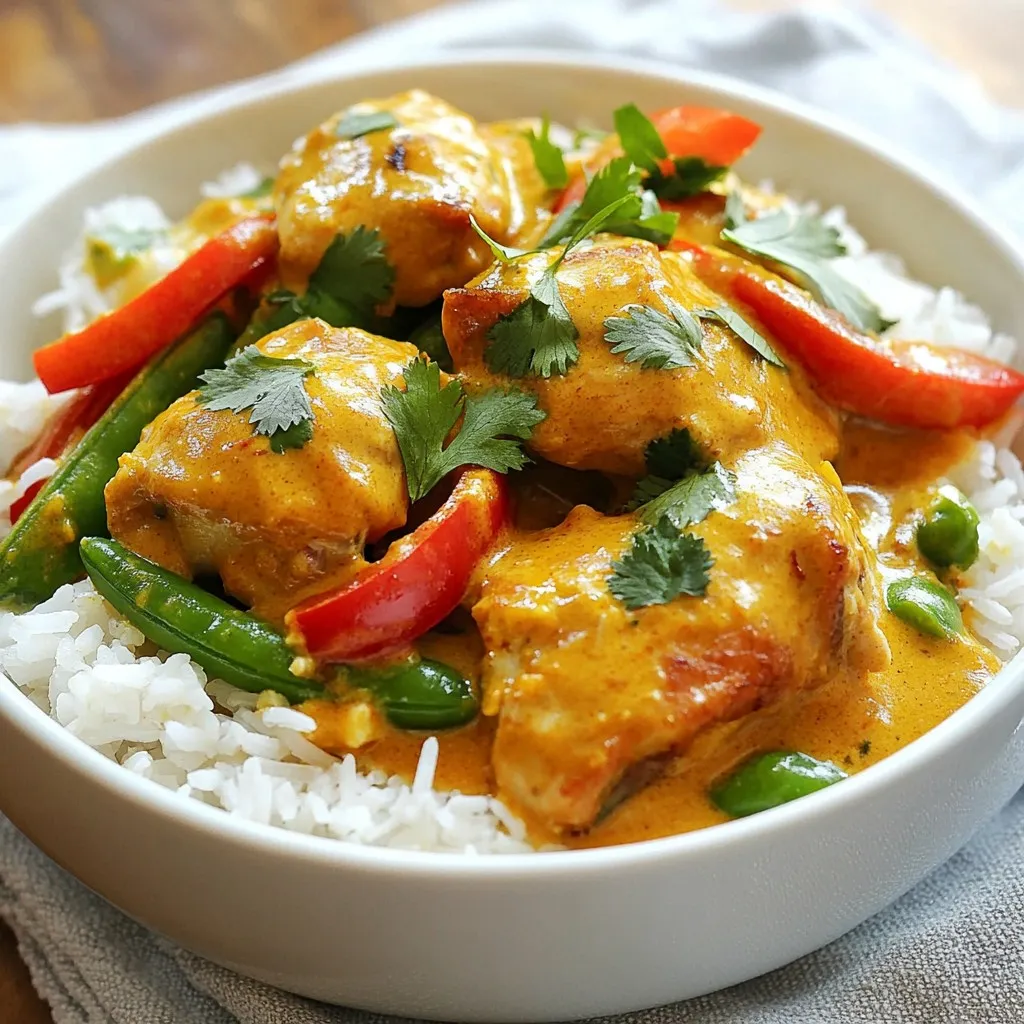
If you crave a dish that’s both simple and bursting with flavor, you’ve come to the right place! Thai Peanut Curry Chicken combines tender chicken, rich coconut milk, and creamy peanut butter for a meal that’s hard to resist. In this easy recipe, I’ll share the key ingredients, step-by-step instructions, and clever tips to make your cooking journey smooth. Trust me, this dish will impress your friends and family!
Why I Love This Recipe
- Delicious Flavor Combination: The rich coconut milk and creamy peanut butter create a perfectly balanced sauce that is both savory and sweet.
- Quick and Easy: This recipe can be prepared in just 30 minutes, making it a perfect weeknight dinner option.
- Healthy Ingredients: Packed with protein from chicken and fiber from vegetables, this dish is not only tasty but also nutritious.
- Customizable: You can easily adjust the spice level and add your favorite vegetables, making it versatile for any palate.
Ingredients
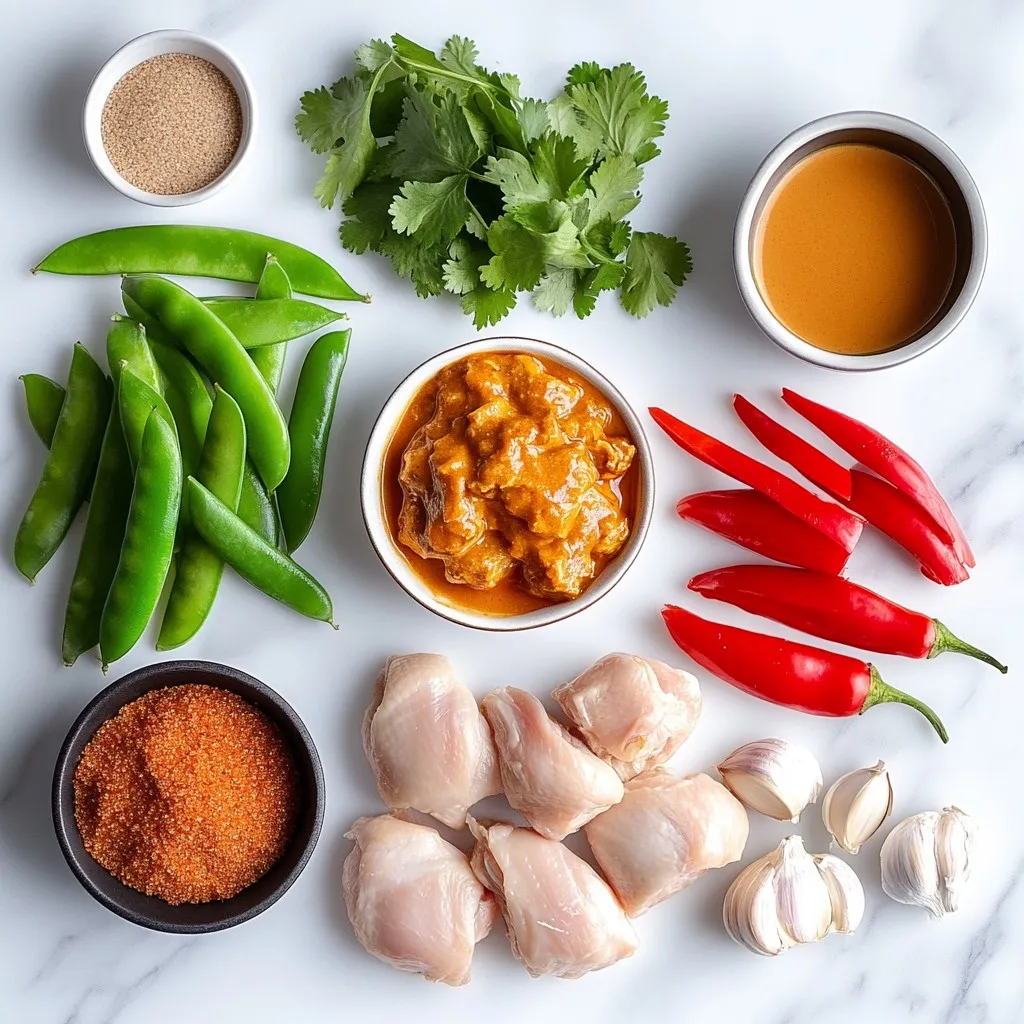
To create this Thai Peanut Curry Chicken, you’ll need a few simple ingredients. Each one brings its own flavor to the dish. Here’s what you will need:
– 1 lb boneless chicken thighs, cut into bite-sized pieces
– 1 cup rich coconut milk
– 1/2 cup smooth creamy peanut butter
– 2 tablespoons red curry paste
– 1 tablespoon soy sauce
– 1 tablespoon brown sugar
– 1 red bell pepper, thinly sliced
– 1 cup snap peas, trimmed
– 2 cloves garlic, finely minced
– 1 tablespoon fresh ginger, grated
– Fresh cilantro leaves, for garnish
– Cooked jasmine rice, for serving
These ingredients blend well together. The chicken provides protein. The coconut milk adds creaminess. Peanut butter enriches the flavor. Red curry paste gives it a nice kick. Soy sauce adds saltiness, while brown sugar balances the taste. Fresh vegetables keep it colorful and crisp.
When you gather these items, you set yourself up for a tasty meal. Each ingredient plays a role in making this curry shine. Enjoy the process of cooking with these fresh ingredients!
Step-by-Step Instructions
Preparation Steps
Sautéing Aromatics
Start by heating 1 tablespoon of oil in a large skillet over medium heat. Add 2 cloves of minced garlic and 1 tablespoon of grated ginger. Sauté these for about 1 minute until they smell great. Be careful not to let them burn. This step adds a lovely base flavor to your curry.
Cooking Chicken
Next, add 1 pound of bite-sized chicken thighs to the skillet. Cook them for 5-7 minutes. Stir occasionally until the chicken turns golden brown and is fully cooked. This gives great texture and flavor to your dish.
Adding Curry Ingredients
Now, it’s time to add the real magic. Toss in 2 tablespoons of red curry paste. Stir it with the chicken for 1 minute to mix the flavors. Then, pour in 1 cup of rich coconut milk, along with 1/2 cup of smooth peanut butter, 1 tablespoon of soy sauce, and 1 tablespoon of brown sugar. Mix until the peanut butter dissolves and everything is smooth.
Simmering the Dish
Fold in 1 sliced red bell pepper and 1 cup of trimmed snap peas. Raise the heat a little and let everything simmer gently. This should take about 10-15 minutes. The chicken should be fully cooked, and the veggies should be tender but still crisp. Taste your curry and adjust the seasoning if needed. You can add more soy sauce for saltiness or more brown sugar for sweetness.
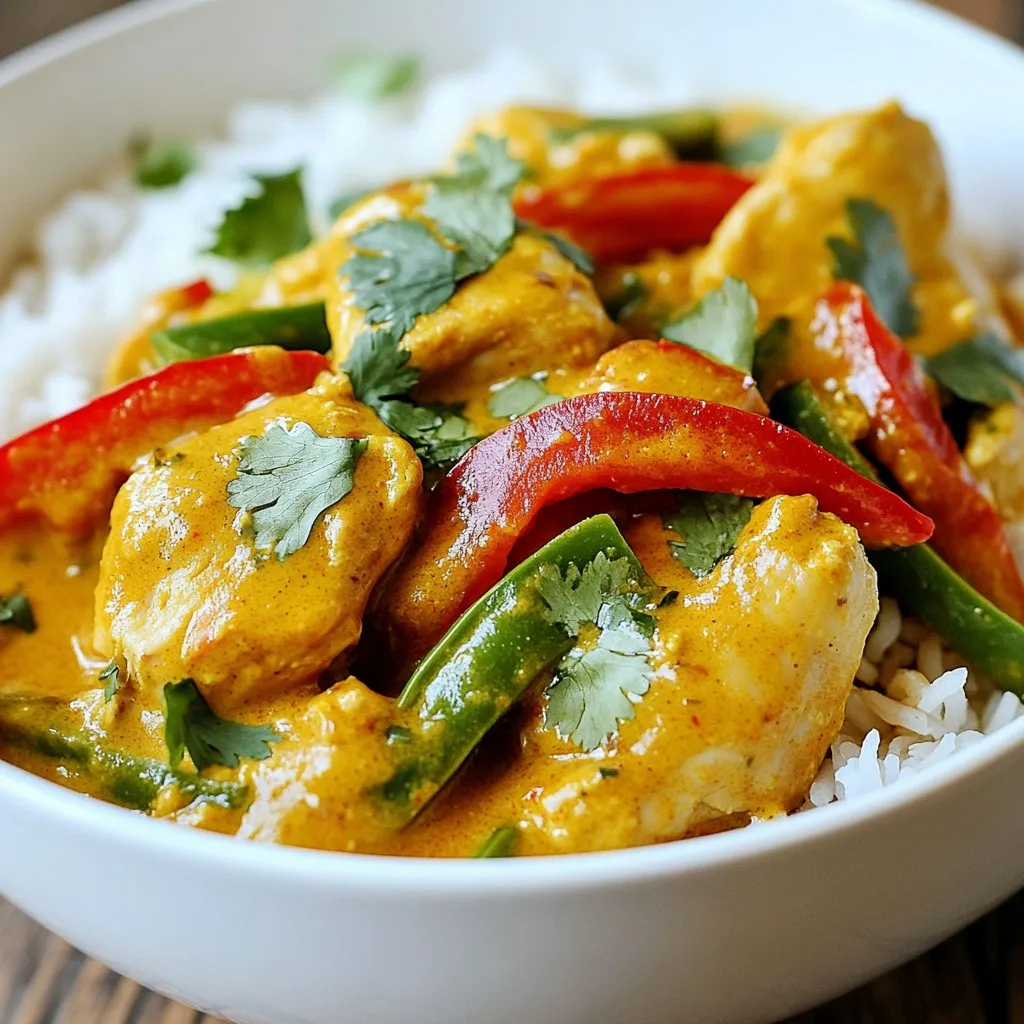
Now, your Thai Peanut Curry Chicken is ready to serve! Enjoy it over warm jasmine rice and garnish with fresh cilantro leaves for a bright finish.
Tips & Tricks
Cooking Tips
Achieving the Perfect Consistency
To get a smooth sauce, mix the peanut butter well with the coconut milk. Start with warm coconut milk for easier blending. If the curry is too thick, add a splash of water or broth. For a thinner sauce, stir in more coconut milk until you reach the right texture.
Flavor Enhancements
Add extra layers of flavor by using fresh herbs. Try adding lime juice or zest for brightness. A dash of fish sauce can boost umami taste. If you love heat, add sliced chili peppers or red pepper flakes. Feel free to adjust the sweetness with more brown sugar or a drizzle of honey.
Avoiding Common Mistakes
Don’t rush the cooking. Sauté garlic and ginger slowly to release their flavors. Avoid adding too much soy sauce at once; it can make the dish too salty. Always taste before serving. Adjust seasoning as needed for a balanced flavor. If you overcook the veggies, they’ll lose their crunch, so keep an eye on them.
Pro Tips
- Use Fresh Ingredients: Fresh garlic and ginger will enhance the flavor profile of your curry, providing a more aromatic and vibrant dish.
- Adjust the Heat: If you prefer a spicier curry, add more red curry paste or include some chopped fresh chili peppers to suit your taste.
- Customize Your Vegetables: Feel free to swap in or add your favorite vegetables like broccoli, carrots, or zucchini for added nutrition and variety.
- Make it Ahead: This curry can be made in advance and stored in the refrigerator for up to 3 days. The flavors will deepen as it sits!
Variations
Ingredient Substitutions
Different Proteins
You can swap chicken thighs for other meats. Chicken breasts work great, too. For a unique twist, try shrimp or pork. If you prefer a lighter option, turkey is also tasty. Each protein adds a different flavor and texture. Cook them just until done for the best results.
Vegetarian/Vegan Options
If you want a plant-based dish, you can use tofu or tempeh. Both absorb flavors well and give great texture. You can also add chickpeas for added protein. For a heartier meal, try adding more veggies, like carrots or zucchini. This makes the curry filling and nutritious.
Spice Level Adjustments
To change the heat, adjust the red curry paste. For milder flavor, use less paste or choose a mild brand. If you like heat, add more paste or some chili flakes. Fresh chilis can also bring a nice kick. Just remember to taste as you go to find your perfect spice level.
Storage Info
Storing Leftovers
Refrigeration Guidelines
You can store leftover Thai Peanut Curry Chicken in the fridge. Use an airtight container to keep it fresh. It will last about three to four days. When you are ready to eat, just take it out and enjoy!
Freezing Instructions
To freeze, place the curry in a freezer-safe container. Make sure to leave some space at the top for expansion. You can freeze it for up to three months. When you want to eat it, thaw it in the fridge overnight.
Reheating Tips
To reheat, place the curry in a saucepan over medium heat. Stir it often to heat it evenly. You can also use the microwave. Heat it in a microwave-safe bowl and cover it loosely. Heat in short bursts, stirring in between, until it is hot. Enjoy your meal again!
FAQs
Common Questions
How to make Thai Peanut Curry Chicken spicier?
To make this dish spicier, add more red curry paste. You can also use fresh chilies. Sliced Thai bird chilies work well. Start with a small amount and taste as you go. This way, you can control the heat level. Some like it hot, while others prefer mild.
Can I use another type of nut butter?
Yes, you can use almond or cashew butter. Each nut butter brings a unique flavor. However, choose a smooth version for the best texture. Be aware that each nut butter may change the flavor slightly. Experiment to find what you enjoy the most.
What to serve with Thai Peanut Curry Chicken?
Serve this curry with warm jasmine rice. The rice soaks up the rich sauce well. You could also pair it with quinoa or rice noodles. For a fresh touch, add a side salad or steamed veggies. This balances the meal and adds extra nutrients.
You now have a clear guide to making Thai Peanut Curry Chicken. We covered the key ingredients, like chicken and coconut milk, and the cooking steps, from sautéing to simmering. Remember the tips for perfecting the dish and consider variations for added flavor. Don’t forget to store leftovers properly for future meals. I hope you feel ready to try this recipe and make it your own. Happy cookin

Thai Peanut Curry Chicken
Ingredients
- 1 lb boneless chicken thighs, cut into bite-sized pieces
- 1 cup rich coconut milk
- 0.5 cup smooth creamy peanut butter
- 2 tablespoons red curry paste
- 1 tablespoon soy sauce
- 1 tablespoon brown sugar
- 1 unit red bell pepper, thinly sliced
- 1 cup snap peas, trimmed
- 2 cloves garlic, finely minced
- 1 tablespoon fresh ginger, grated
- unit fresh cilantro leaves, for garnish
- unit cooked jasmine rice, for serving
Instructions
- Begin by heating 1 tablespoon of oil in a large skillet or saucepan over medium heat. Once hot, add the minced garlic and grated ginger. Sauté for about 1 minute, or until fragrant, taking care not to burn them.
- Incorporate the chicken pieces into the skillet. Cook them for about 5-7 minutes, stirring occasionally, until they are golden brown on all sides and cooked through.
- Next, add the red curry paste to the skillet. Stir it into the chicken for an additional minute to allow the vibrant flavors to fully coat the meat.
- Gradually pour in the coconut milk, followed by the creamy peanut butter, soy sauce, and brown sugar. Mix vigorously until the peanut butter is fully dissolved into the coconut milk and the mixture is smooth and well combined.
- Once blended, fold in the thinly sliced red bell pepper and snap peas. Raise the heat slightly and bring the mixture to a gentle simmer. Allow it to cook for 10-15 minutes, or until the chicken is thoroughly cooked and the vegetables are tender yet crisp.
- After simmering, taste the curry and adjust the seasoning if needed. Feel free to add more soy sauce for saltiness or brown sugar for sweetness, according to your preference.
- To serve, ladle the Thai Peanut Curry Chicken generously over a bed of warm jasmine rice. Garnish with fresh cilantro leaves for a vibrant finish.

![For a perfect classic patty melt, you will need: - 1 lb ground beef - 1 medium onion, thinly sliced - 4 slices of Swiss cheese - 4 slices of hearty rye bread These ingredients bring together the rich flavors that make this dish so special. The ground beef forms the juicy patty, while the onion adds a sweet touch. Swiss cheese melts beautifully, making every bite creamy. Rye bread gives it a unique flavor and crunch. To take your patty melt to the next level, consider adding: - 1 tablespoon Worcestershire sauce - 1 teaspoon garlic powder - 1 tablespoon mayonnaise (for spreading) Worcestershire sauce adds a deep umami flavor. Garlic powder brings a hint of warmth without being overpowering. Mayonnaise can add a nice creamy texture if you choose to spread it on the bread. Don’t forget these key seasonings: - Salt and black pepper to taste - 2 tablespoons unsalted butter, divided Seasoning your beef with salt and pepper ensures that it tastes great. Butter is essential for grilling the bread to a golden crisp. It enhances the flavor and makes the outside crunchy, while the inside stays soft. For the full recipe, check out the details above! To start, I melt 1 tablespoon of butter in a skillet over medium heat. I add thinly sliced onions and a pinch of salt. Stir the onions often. This helps them caramelize nicely. The cooking time is about 15 to 20 minutes. Keep an eye on the heat. You want them golden brown and sweet. Once done, take them off the heat and set them aside. In a mixing bowl, I combine 1 pound of ground beef with Worcestershire sauce and garlic powder. I add salt and pepper for taste. Mix gently to keep the beef tender. Next, I divide the mixture into two equal parts. Shape each part into a patty, about ¾ inch thick. Now, it’s time to cook the patties. I return the skillet to the stove, adding the remaining butter. I turn the heat to medium-high. I cook the patties for about 4 to 5 minutes per side. You can adjust the time based on how you like your meat cooked. During the last minute, I add a slice of Swiss cheese on top of each patty. This makes it melt beautifully. If you like, spread mayonnaise on one side of each slice of rye bread. I take two slices and place a cheesy patty on the unbuttered side of each. Then, I add a generous helping of the caramelized onions. Finally, I close the sandwiches with the other slices of bread, making sure the buttered side is facing up. Next, I wipe the skillet to remove any bits left behind. I heat the skillet over medium-low heat. I grill the assembled sandwiches for about 3 to 4 minutes per side. I want them to be golden brown and crispy. Using a spatula, I press down gently on the sandwiches. This helps everything cook evenly and stay melty inside. For the full recipe, check the main article. - Best cooking temperatures: Start with medium-high heat. This helps to brown the outside and keep the inside juicy. - Checking for doneness: Use a meat thermometer. Aim for 160°F for ground beef. A quick poke with your finger can also help; if it feels firm, it’s likely done. - Choosing the right type of rye bread: Look for hearty rye bread with good texture. The flavor of the rye pairs well with the meat and cheese. - Alternative bread options: If rye isn't your favorite, try sourdough or whole wheat. Both provide a nice crunch and flavor. - Best side dishes to pair with patty melts: Crispy fries or sweet potato fries are classic choices. A fresh side salad adds a nice crunch. - Ideal garnish ideas for presentation: A sprinkle of fresh parsley or dill can brighten up your plate. You can also add pickles on the side for extra tang. For the complete recipe, check the Full Recipe section. {{image_4}} You can switch up the meat in your patty melt. Try ground turkey or even a veggie patty for a healthier twist. Both options keep the sandwich tasty. For cheese, Swiss is classic, but you can use cheddar or pepper jack for a kick. These swaps change the flavor, keeping it fresh and exciting. The patty melt has many faces. In classic forms, it stays true to its roots. But gourmet versions take it to new heights. Chefs add toppings like sautéed mushrooms or spicy sauces. You can find global inspirations too. Some cultures use different breads or spices. Each region puts its own spin on this beloved dish, making it unique. If you need a gluten-free option, choose gluten-free bread. Many brands make great choices that hold up well. For a vegan patty melt, use a plant-based patty and vegan cheese. These swaps keep the spirit of a patty melt while fitting dietary needs. Experiment with these variations to make your patty melt your own. Check out the Full Recipe for more ideas! To keep your leftover patty melts fresh, use proper refrigeration techniques. First, let the patty melts cool down to room temperature. This step helps avoid condensation, which can make your sandwiches soggy. Next, wrap each patty melt tightly in plastic wrap or aluminum foil. You can also place them in an airtight container. The best container types are glass or BPA-free plastic. These containers keep out moisture and protect from odors in the fridge. When you’re ready to enjoy leftovers, reheating correctly is key. You can use a skillet, oven, or microwave. The skillet method brings back the original texture and flavor. Heat the skillet over medium heat. Place the patty melt in the pan and cover it with a lid. This step helps the cheese melt without drying out the bread. Heat for about 3-4 minutes on each side. If you prefer the oven, preheat it to 350°F (175°C). Wrap the patty melt in foil to keep it from drying out. Heat for about 10-15 minutes. This keeps the bread crisp while warming the filling. Avoid the microwave if you want to keep your patty melt from getting soggy. Microwaving can make the bread soft and chewy. If you must use it, heat for only 30 seconds and check if it’s warm enough. Enjoy your delicious patty melts again! For the full recipe, refer back to the classic patty melt section. A burger is usually served on a bun. A patty melt uses bread like rye. In a burger, you find toppings like lettuce and tomato. In a patty melt, you get melted cheese and onions. The cooking method differs too. A burger is grilled, while a patty melt is cooked in a skillet. Yes, you can prepare the meat and onions in advance. Cook the patties and caramelize the onions. Store them in the fridge. When you're ready to eat, just assemble and grill the sandwich. This saves time on busy days. Some great sides include: - Crispy fries - Sweet potato fries - Coleslaw - Salad - Pickles These sides balance the rich flavors of the patty melt. You can use lean ground beef for fewer calories. Try whole grain rye bread instead of regular. Add fresh veggies like spinach or tomato. You can also skip the mayonnaise or use a light version. These changes make your meal tasty and healthier. The patty melt has roots in the United States. It gained popularity in diners during the 1940s. Many believe it started in California. The mix of flavors and textures made it a favorite comfort food. Absolutely! While Swiss is classic, you can try: - Cheddar - Pepper jack - American - Gouda Each cheese adds a unique taste to your patty melt. Experiment to find your favorite! For the complete recipe, check out the [Full Recipe]. A classic patty melt combines simple, tasty ingredients for a satisfying meal. We covered essential items like ground beef, Swiss cheese, and rye bread. You learned steps to prepare, assemble, and grill your sandwich for that perfect finish. Tips on customization and storage enhance your experience. Remember that variations let you make it your own. Enjoy your cooking and the delicious patty melts you create!](https://fastmealmate.com/wp-content/uploads/2025/06/2e833bb9-ccca-4b03-bda9-565aa6b9e8a1-768x768.webp)
. This recipe is friendly for all cooks. The steps are simple and clear. Even beginners can make great tacos. Preparing the ingredients takes a short time. The slow cooker does most of the work. You don't need to worry about constant stirring or checking. It’s an easy way to impress friends and family. - Prep Time: 20 minutes - Cook Time: 8 hours (low) or 4 hours (high) - Servings: 8-10 tacos With a bit of time, you will have a tasty meal ready to enjoy! This blog post guides you through making delicious birria tacos. You learned the key ingredients, like beef, chilies, and spices. I provided step-by-step instructions, including how to prepare chilies and cook the beef. You also discovered tips for storing leftovers and variations to try. Now, you can enjoy tasty birria tacos at home. With practice, you'll create the perfect meal for friends and family. Dive in and savor each bite!](https://fastmealmate.com/wp-content/uploads/2025/07/26480268-fadb-491b-986e-82dbbe9ddeca-768x768.webp)