
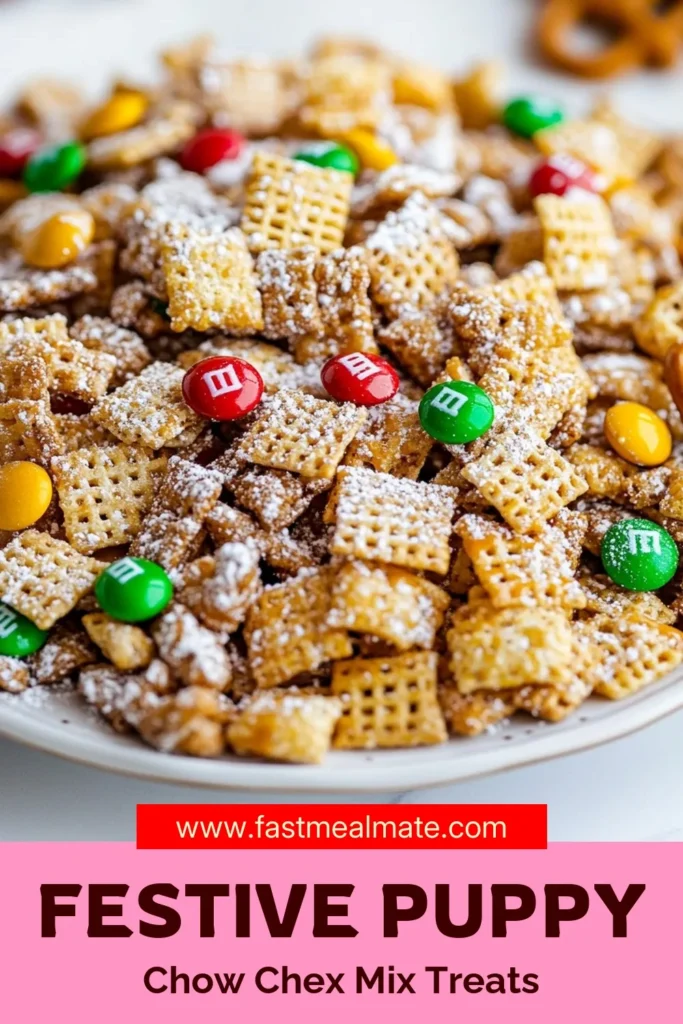
Holiday Puppy Chow Chex Mix Tasty and Simple Recipe
If you’re looking for a fun treat this holiday season, you’ve found it! This Holiday Puppy Chow Chex Mix is both tasty and simple to make. With easy steps, you’ll create a crunchy, sweet snack perfect for parties or cozy nights at home. In this post, I’ll guide you through the ingredients, instructions, and clever tips for making this delightful treat. Let’s get started on a recipe that everyone will love!
Why I Love This Recipe
- Festive Flavor Explosion: This mix combines the rich taste of chocolate and peanut butter with the crunch of cereals and pretzels, making every bite a delightful surprise.
- Quick and Easy: With just 15 minutes of prep time, this recipe is perfect for last-minute holiday gatherings or as a fun project with kids.
- Customizable Treat: You can easily swap out ingredients or add your favorite snacks, making this a versatile recipe for any occasion.
- Great for Gifting: Its charming appearance and delicious taste make it an ideal homemade gift for friends and family during the holidays.
Ingredients
Rice Chex and Corn Chex
For this recipe, you will need:
– 4 cups Rice Chex cereal
– 2 cups Corn Chex cereal
Rice Chex and Corn Chex form the base of your mix. The crunchiness of these cereals adds great texture. They soak up the chocolate and peanut butter mixture, making every bite tasty.
Chocolate and Peanut Butter Mixture
Next, gather these items:
– 1 cup semi-sweet chocolate chips
– 1/2 cup creamy peanut butter
– 1/4 cup unsalted butter
– 1 teaspoon vanilla extract
– Pinch of sea salt
Melt the chocolate chips with peanut butter and butter. This mix becomes smooth and rich. Adding vanilla and salt brings out the flavors. It is the star of the recipe!
Additional Ingredients
Finally, you will need:
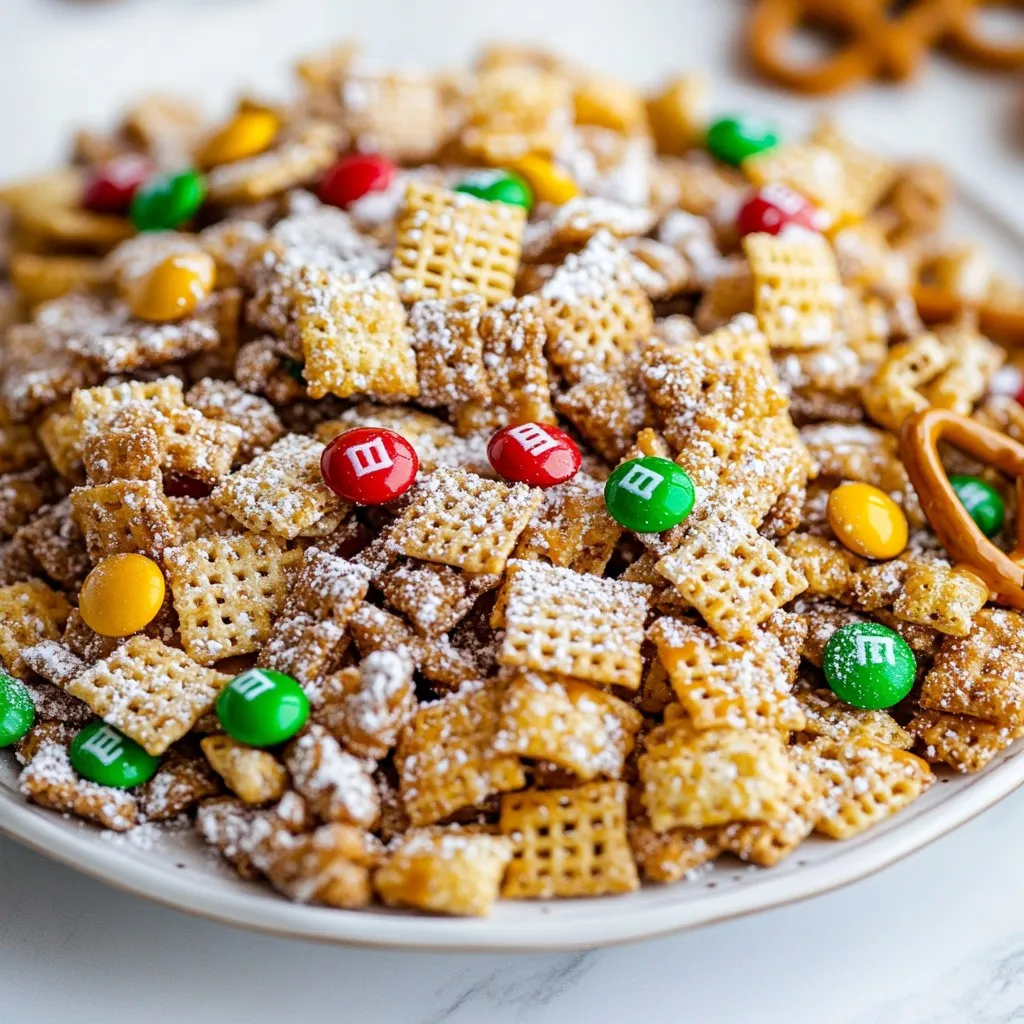
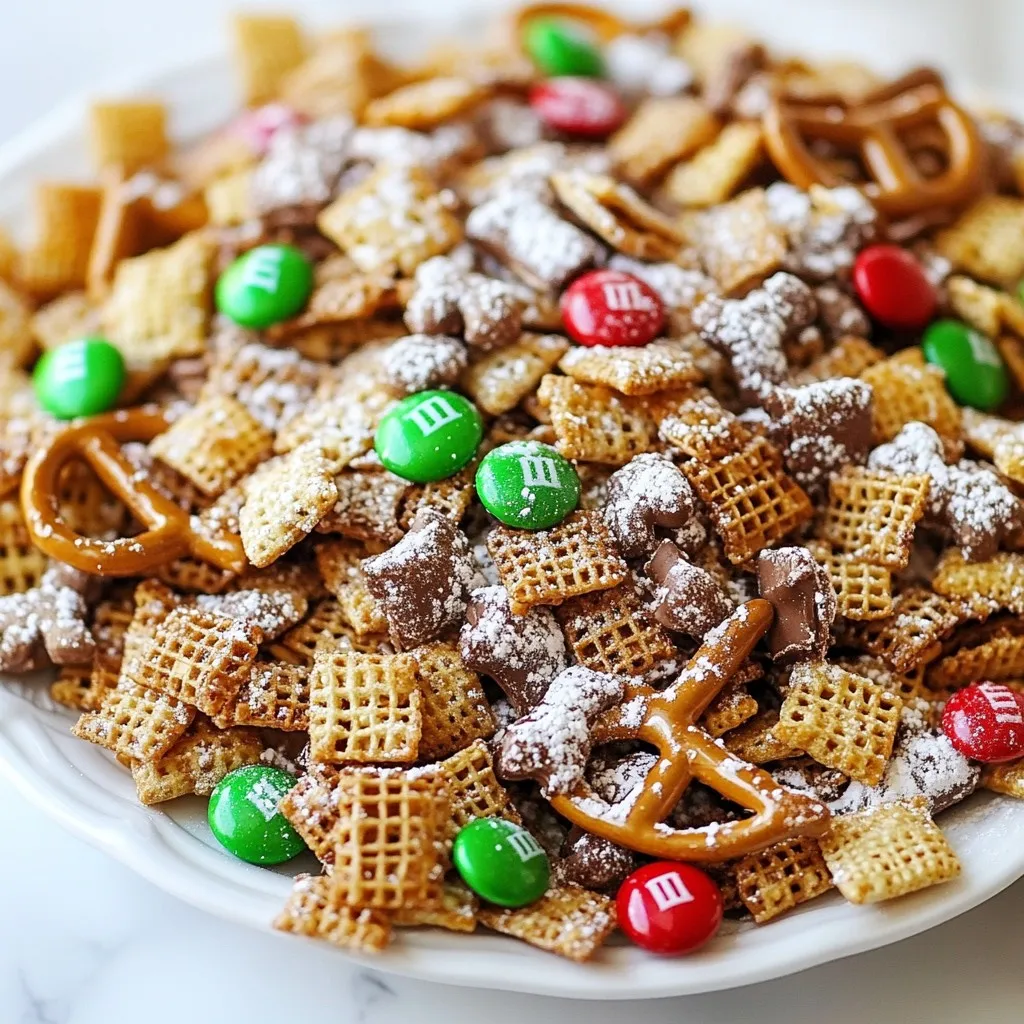
– 1 cup powdered sugar
– 1 cup holiday-themed M&M’s (red and green)
– 1 cup mini pretzels
The powdered sugar coats the mix and makes it sweet. Holiday M&M’s add color and fun. Mini pretzels give a salty crunch that balances the sweetness.

Step-by-Step Instructions
Preparing the Cereal Mixture
Start by taking a large mixing bowl. Add 4 cups of Rice Chex cereal and 2 cups of Corn Chex cereal. Mix them well. Make sure the cereals are evenly combined. This creates a great base for your treat. Set this bowl aside while you prepare the chocolate mix.
Melting the Chocolate and Peanut Butter
Next, grab a medium saucepan and place it on low heat. Add 1/4 cup of unsalted butter, 1 cup of semi-sweet chocolate chips, and 1/2 cup of creamy peanut butter into the pan. Stir these ingredients often. You want the mix to melt smoothly. Once it is melted, take it off the heat. Stir in 1 teaspoon of vanilla extract and a pinch of sea salt. This will make the flavors pop.
Coating the Cereals
Now it’s time to coat the cereals. Carefully pour the melted chocolate mix over the cereals in your large bowl. Use a spatula to fold the cereals gently. Make sure each piece is coated well. After that, add in 1 cup of mini pretzels and 1 cup of holiday-themed M&M’s. Toss everything together to spread them out evenly.
In a large resealable plastic bag, pour in 1 cup of powdered sugar. Slowly place the coated cereal mix into the bag. Seal it tightly and shake gently. This will coat the mix with sugar. Once done, spread the mixture out on a large baking sheet lined with parchment paper. Let it cool so it can set. Enjoy your festive snack!
Tips & Tricks
Ensuring Even Coating
To get a perfect coat on your cereal, follow these steps. First, mix the Rice Chex and Corn Chex well. This way, every piece gets covered. When you pour the melted mix over, do it slowly. Use a spatula to fold gently. This helps avoid breaking the cereal. Make sure to cover all the pieces. If you see dry spots, fold again until it’s even.
Best Practices for Melting Chocolate
Melting chocolate can be tricky. Always use low heat to prevent burning. I like to use a double boiler or a saucepan. If you use a saucepan, keep stirring. This keeps it smooth and creamy. Add the peanut butter and butter right away. This helps the mix melt evenly. Once it looks shiny, take it off the heat. Stir in vanilla and sea salt for flavor.
Creative Serving Suggestions
Presentation matters, especially during the holidays! Use festive bowls to serve your mix. You can also package it in clear bags. Tie them with colorful ribbon for a nice touch. Another idea is to add it to gift baskets. This makes a fun treat for friends and family. You can even sprinkle extra M&M’s on top for a pop of color.
Pro Tips
- Use Fresh Ingredients: Always use fresh cereal and high-quality chocolate chips for the best flavor and texture in your Puppy Chow Chex Mix.
- Cooling Time Matters: Allow the mix to cool completely after coating it with powdered sugar. This enhances the crunchiness and ensures the sugar adheres properly.
- Customize Your Mix: Feel free to add your favorite mix-ins such as nuts, dried fruits, or different seasonal candies for a personalized touch.
- Storage Tips: Store your Puppy Chow in an airtight container to keep it fresh and crunchy for longer. It also makes for a great gift!
Variations
Substitute Ingredients
You can switch up the Rice Chex or Corn Chex. Try using other Chex cereals. For example, Wheat Chex adds a nice flavor. You can also use gluten-free options if needed. Instead of peanut butter, almond butter works well too. You can also use sun butter for a nut-free mix. Swap the semi-sweet chocolate chips for dark chocolate or white chocolate. This change gives your Puppy Chow a new twist.
Seasonal Add-Ins
Adding festive treats can boost the fun. Mix in seasonal candies like holiday-themed sprinkles. You can also use crushed candy canes for a minty flavor. Dried cranberries or raisins can add a fruity touch. If you like nuts, consider adding chopped pecans or walnuts. Each of these options adds a unique flavor and texture to your mix.
Alternative Coatings
If you’re looking for new coatings, try using different sugars. Instead of powdered sugar, use cocoa powder for a richer taste. You can also sprinkle cinnamon or nutmeg for a warm spice flavor. For a fun crunch, coat with crushed graham crackers. This gives a whole new texture and taste to your Puppy Chow.
Storage Info
How to Store Puppy Chow
To keep your Holiday Puppy Chow Chex Mix fresh, store it in an airtight container. This helps lock in flavor and crunch. Place the mix in the container only after it cools completely. If you store it while warm, moisture can form and make it soggy. It will last for about one week at room temperature.
Freezing Instructions
You can freeze your Puppy Chow for longer storage. Use a freezer-safe bag or container. Make sure to remove as much air as possible before sealing. This helps prevent freezer burn. When ready to eat, let it thaw at room temperature for a few hours. Avoid microwaving it, as that can make it lose its crunch.
Best Containers for Long-Lasting Freshness
For the best results, use glass jars or plastic containers with tight lids. These types help maintain the mix’s texture and taste. If you want to share, use clear cellophane bags tied with ribbon. This adds a festive touch while keeping it fresh. Avoid using old chip bags or wrinkled paper bags, as they do not seal well.
FAQs
Can I use other types of Chex cereal?
Yes, you can use other Chex cereals. The mix is flexible. You could try Wheat Chex or Chocolate Chex. Each type gives a unique flavor and texture. Just keep the total amount the same. This way, your mix stays balanced and tasty.
How long does Holiday Puppy Chow last?
Holiday Puppy Chow can last up to two weeks. Store it in an airtight container. Keep it in a cool, dry place. This helps maintain its crunchiness. If you notice any soft pieces, it’s best to enjoy it right away.
Is it safe to gift homemade Puppy Chow?
Yes, it is safe to gift homemade Puppy Chow. Just make sure to keep it fresh. Use clean hands and good containers to pack it. Add a fun note or tag. This makes your gift even more special. People love receiving tasty, homemade treats!
Making Puppy Chow is simple and fun. We covered the best ingredients like Rice Chex and Corn Chex, and a tasty chocolate and peanut butter mix. Following easy steps, you can create a delicious treat. Use my tips to coat your cereal evenly and explore fun variations. Store it well to keep it fresh and tasty. You can safely gift your homemade creation too. Enjoy your treat; it’s perfect for sharin
Holiday Puppy Chow Chex Mix
Ingredients
- 4 cups Rice Chex cereal
- 2 cups Corn Chex cereal
- 1 cup powdered sugar
- 1 cup semi-sweet chocolate chips
- 1 2 creamy peanut butter
- 1 4 unsalted butter
- 1 cup holiday-themed M&M's (red and green)
- 1 cup mini pretzels
- 1 teaspoon vanilla extract
- 1 pinch sea salt
Instructions
- In a large mixing bowl, thoroughly combine the Rice Chex and Corn Chex cereals. Set aside to prepare for coating.
- In a medium saucepan, over low heat, melt the unsalted butter, semi-sweet chocolate chips, and creamy peanut butter together. Stir frequently to ensure the mixture becomes smooth and homogenous.
- Once melted, remove the saucepan from heat and stir in the vanilla extract along with a pinch of sea salt to enhance the flavors.
- Carefully pour the melted chocolate and peanut butter mixture over the combined cereals in the large bowl. Using a spatula, gently fold the cereals until they are well coated, making sure to cover every piece evenly.
- After the cereals are coated, add in the mini pretzels and holiday-themed M&M's. Toss gently to ensure everything is evenly distributed throughout the mix.
- In a large resealable plastic bag, add the powdered sugar. Slowly pour the coated cereal mixture into the bag. Seal the bag tightly and shake gently until the mix is thoroughly coated with powdered sugar.
- Spread the sugar-coated mix out evenly onto a large baking sheet lined with parchment paper, allowing it to cool and set.
- Once cooled, you can store your Holiday Puppy Chow Chex Mix in an airtight container or serve it immediately for a festive treat!
![When making zucchini brownies, you need simple and quality ingredients. Here’s what you will need: - 1 cup shredded zucchini - 1/2 cup unsweetened applesauce - 1/3 cup pure maple syrup or agave nectar - 1/4 cup vegetable oil or melted coconut oil - 1 teaspoon pure vanilla extract - 1/2 cup all-purpose flour or gluten-free flour - 1/4 cup unsweetened cocoa powder - 1/2 teaspoon baking soda - 1/2 teaspoon baking powder - 1/4 teaspoon fine sea salt - 1/2 cup chocolate chips These ingredients come together to create a rich and moist brownie. The zucchini adds moisture without a strong taste. Applesauce keeps the brownies soft. The maple syrup or agave nectar sweetens them naturally. You can use vegetable oil or coconut oil, depending on your preference. Using high-quality cocoa powder makes a big difference in flavor. The baking soda and baking powder help the brownies rise. Finally, the chocolate chips give a delightful chocolate burst in every bite. For the full recipe, check out the [Full Recipe]. - Set temperature to 350°F (175°C). - Prepare your baking pan by greasing it or lining it with parchment paper. - In a large bowl, combine shredded zucchini, applesauce, maple syrup, oil, and vanilla. - Mix until the mixture is smooth and well blended. - In a separate bowl, whisk together flour, cocoa powder, baking soda, baking powder, and salt until mixed well. - Gradually add the dry ingredients to the wet mixture. - Mix gently to avoid overmixing, which can make the brownies dense. - Fold in the chocolate chips. - Make sure they are evenly spread throughout the batter for a rich flavor. - Pour the batter into the prepared pan. - Bake for 25-30 minutes. - After baking, cool in the pan for at least 15 minutes before cutting. Enjoy the delightfully unexpected zucchini boost hidden in every bite with this full recipe! To make your brownies moist, avoid overmixing the batter. Overmixing adds air, which can make them dry. Mix until just combined for a fudgy treat. Using ripe zucchini is key too. Ripe zucchini has more water, which adds moisture and flavor. Shred the zucchini and squeeze out excess water. This keeps your brownies rich and tasty. You can add nuts or spices to boost flavor. Chopped walnuts or pecans add crunch. A sprinkle of cinnamon or nutmeg makes them warm and cozy. You could also mix in chocolate chunks for extra gooeyness. For toppings, serve with ice cream or whipped cream. A scoop of vanilla ice cream on warm brownies is heavenly! Check your brownies for doneness by inserting a toothpick in the center. It should come out with a few moist crumbs. If you live at a high altitude, bake for less time. High altitude can change how baked goods rise and cook. Start checking at the lower end of baking time, around 25 minutes. Adjust as needed. {{image_4}} You can make these brownies gluten-free. Just swap the all-purpose flour for a gluten-free flour blend. Many blends work well. Look for ones that contain rice flour or almond flour. These blends give the brownies a nice texture. Make sure to check the package for the right measurements. This way, you still get that rich, fudgy taste. For a vegan version, you can replace the eggs. Use a flaxseed or chia seed mixture instead. To make this, mix one tablespoon of ground flaxseed or chia seeds with three tablespoons of water. Let it sit for five minutes until it thickens. This works great in the recipe. Your brownies will still be moist and delicious without eggs. If you want a healthier treat, try different sweeteners. You can use stevia or coconut sugar instead of maple syrup. Both options lower the sugar content. Stevia is quite sweet, so use less. Coconut sugar adds a nice caramel flavor. These substitutes keep your brownies tasty while making them a bit healthier. For the full recipe, check out the main article. To keep your zucchini brownies fresh, use an airtight container. This helps seal in moisture and flavor. You can store them at room temperature for up to two days. If you want to keep them longer, refrigerate them for up to a week. If you want to save some for later, freezing is a great option. First, cut the brownies into squares. Wrap each square in plastic wrap, and then place them in a freezer-safe bag. This way, they won’t stick together. You can freeze them for up to three months. When you’re ready to enjoy, take them out and thaw at room temperature. For the best texture, you can also warm them in the microwave for a few seconds. These tips will help you enjoy your zucchini brownies at their best! For the complete recipe, check out the [Full Recipe]. Yes, you can use yellow squash. The texture will be similar, but the flavor differs. Yellow squash has a slightly sweeter taste. Zucchini tends to have a more neutral flavor. This can change how the brownies taste. If you like sweetness, yellow squash is a great choice. To check if brownies are done, insert a toothpick into the center. If it comes out with a few moist crumbs, they are ready. If it comes out wet with batter, they need more time. Brownies should look set but still soft. These brownies can be made ahead of time. Bake them, let them cool, then store them. Wrap them in plastic wrap or place them in an airtight container. They keep well for about three days at room temperature. You can also refrigerate them for up to a week. If your brownies are dense, try a few tips. First, check your mixing. Overmixing can cause density. Mix until just combined. You can also add a bit more liquid. Adding an extra tablespoon of applesauce can help. Lastly, ensure your baking powder is fresh for proper rise. These zucchini brownies are easy to make and taste great. We covered the ingredients, step-by-step instructions, and tips to boost flavor and texture. You learned how to store them and gave answers to common questions. Experiment with different flours or sweeteners to fit your needs. Enjoy these tasty treats that offer a fun twist on the classic brownie! Happy baking!](https://fastmealmate.com/wp-content/uploads/2025/06/384a547d-f08a-42f3-b5f4-9a38b6c4e0e7-768x768.webp)
![- Grated zucchini (approximately 1 medium-sized) - 1 cup all-purpose flour - ½ cup unsweetened cocoa powder - ½ cup granulated sugar - ½ cup packed brown sugar - 2 large eggs - ½ cup vegetable oil Zucchini is the star of this recipe. It adds moisture, making the brownies soft and fudgy. I love using about one medium-sized zucchini, grated. This amount will give you the right texture without making the brownies too wet. Next, we need flour and cocoa powder. The flour gives structure, while cocoa powder adds a rich chocolate flavor. These two ingredients work together for a perfect balance of taste and texture. Sugar is essential for sweetness. I use both granulated and brown sugar. Granulated sugar gives a nice crunch, while brown sugar adds depth and moisture. Eggs are crucial in binding the ingredients and providing lift, making the brownies fluffy. Lastly, vegetable oil adds richness and keeps the brownies soft. - Dark chocolate chips - Additional toppings or mix-ins Dark chocolate chips are an optional treat. They add extra chocolatey goodness to each bite. If you want some crunch, consider adding nuts or even shredded coconut. You can also top the brownies with a sprinkle of sea salt or powdered sugar for a touch of elegance. For the full recipe, refer to the section above. First, preheat your oven to 350°F (175°C). This step is key for even baking. Next, take a 9x9 inch baking pan. Lightly grease it or line it with parchment paper. This makes it easier to remove the brownies later. In a medium bowl, combine the following dry ingredients: - 1 cup all-purpose flour - ½ cup unsweetened cocoa powder - 1 teaspoon baking powder - ½ teaspoon baking soda - ½ teaspoon salt Whisk these together until well mixed. This helps to blend the flavors and ensures the brownies rise nicely. In a large bowl, whisk together these wet ingredients: - ½ cup granulated sugar - ½ cup packed brown sugar - 2 large eggs - ½ cup vegetable oil - 1 teaspoon vanilla extract Mix until smooth and creamy. This will create a rich base for your brownies. Now, carefully fold the grated zucchini into the wet mixture. Make sure it’s evenly spread throughout. Then, gradually add the dry mixture. Stir gently until just combined. Avoid overmixing, as this can make your brownies dense. Pour the brownie batter into your prepared pan. Spread it evenly for uniform baking. Bake in your preheated oven for 25-30 minutes. To check for doneness, insert a toothpick in the center. If it comes out with a few moist crumbs, they are ready! Let the brownies cool in the pan for about 15 minutes. After that, transfer them to a wire rack. This helps them cool completely and set the texture. Once fully cooled, cut them into squares for serving. Enjoy your delicious zucchini brownies! For the full recipe, check out the details above. To make light and fluffy brownies, avoid overmixing your batter. After adding the dry ingredients to the wet mix, stir gently. This keeps the brownies soft. When you overmix, air gets trapped, and they can become dense. Just mix until you see no dry flour. Trust me, this simple step makes a big difference! Boost the flavor of your brownies with spices or extracts. Try adding a pinch of cinnamon or nutmeg for warmth. You can also use almond or peppermint extract for a unique twist. These small additions can elevate your brownies into something special. Experiment with what you like! Garnishing your brownies can make them look and taste better. Lightly dust the top with powdered sugar for a sweet touch. You might also serve them with a scoop of vanilla ice cream. The cold ice cream pairs well with warm brownies. Add fresh berries on the side for a pop of color and flavor. Enjoy these little extras to make your dessert shine. For the complete recipe, check out [Full Recipe]. {{image_4}} You can make your zucchini brownies even better with a few swaps. Instead of regular flour, try whole wheat flour. This change adds fiber and nutrients. You can also use alternative sweeteners like honey or maple syrup. These options cut down on refined sugars while keeping the taste sweet. Want to mix it up? Add some fun flavors! Chopped nuts like walnuts or pecans add crunch. Dried fruits, such as cranberries or raisins, give a nice chew. If you love chocolate, try using milk or white chocolate chips instead of dark chocolate. Each option creates a unique twist on the classic recipe. If you prefer plant-based meals, you can still enjoy these brownies. Replace the eggs with flaxseed meal or applesauce. For oil, use coconut oil or unsweetened applesauce. This way, you create a delicious vegan treat without losing flavor. You can find the full recipe to get started on these delightful variations. To keep your zucchini brownies fresh, store them in an airtight container. This will help prevent them from drying out. If you have leftover brownies, place a piece of parchment paper between layers. This keeps them from sticking together. Make sure to store them at room temperature for the best taste. Freezing is a great way to save zucchini brownies for later. First, let the brownies cool completely. Then, cut them into squares. Wrap each square in plastic wrap. After that, place them in a freezer-safe bag or container. Label the bag with the date. When you want to eat one, take a brownie out and let it thaw in the fridge overnight. You can also warm it in the microwave for about 15 seconds. Zucchini brownies last about 3 days at room temperature. If refrigerated, they can stay fresh for up to a week. However, for the best flavor and texture, enjoy them within the first few days. Keeping them in the fridge helps maintain their moisture and taste. For a delicious treat, don’t forget to check out the Full Recipe! Yes, you can use frozen zucchini. Just remember to thaw it first. After thawing, squeeze out extra water using a clean cloth. This step helps keep your brownies from getting too soggy. Frozen zucchini works well and keeps the flavor intact. To check for doneness, look for a shiny top. The edges should pull away from the pan slightly. You can also gently press the center; it should spring back. For a more precise test, use a toothpick. If it comes out with a few moist crumbs, your brownies are ready. Yes, you can make egg-free brownies! Replace each egg with 1/4 cup of unsweetened applesauce or 1/4 cup of mashed banana. You can also use flaxseed meal. Mix one tablespoon of flaxseed with three tablespoons of water. Let it sit for five minutes before using. These substitutes keep your brownies moist and tasty. Leftover zucchini has many uses. You can add it to soups and salads for extra crunch. You can also make zucchini fritters or stir-fry it with your favorite veggies. Grate it into pasta sauces or bake it in muffins. You can even freeze it for future recipes. Zucchini brownies bring joy with tasty flavors and fun textures. We explored key ingredients, from fresh zucchini to eggs and cocoa. You learned simple steps for mixing and baking that ensure success. Tips helped perfect your texture and flavor, while variations showed how to customize your treat. Storage info means you can enjoy these brownies longer. Remember, these healthy delights are versatile and easy. Enjoy making them for friends and family; they will love your tasty creations!](https://fastmealmate.com/wp-content/uploads/2025/07/63aaaf19-4868-4bd4-a247-41567a0bfd7d-768x768.webp)