
Zuppa Toscana Soup Flavorful Comfort in a Bowl


Welcome to a cozy bowl of Zuppa Toscana soup! This hearty dish warms both your soul and your stomach. With rich flavors from Italian sausage, fresh greens, and creamy broth, it’s comfort food at its best. I’ll share the ingredients you’ll need, simple steps to make it, and tips to enhance the flavor. Get ready to enjoy a delicious meal that will impress your family and friends!
Why I Love This Recipe
- Comforting Flavors: This Zuppa Toscana is the epitome of comfort food, with rich, savory flavors that warm the soul.
- Easy to Prepare: With simple ingredients and straightforward steps, this dish can be whipped up in under an hour!
- Customizable: Whether you prefer it spicy or mild, you can easily adjust the heat and ingredients to suit your taste.
- Nourishing Ingredients: Packed with hearty vegetables and protein, this soup is as nutritious as it is delicious.
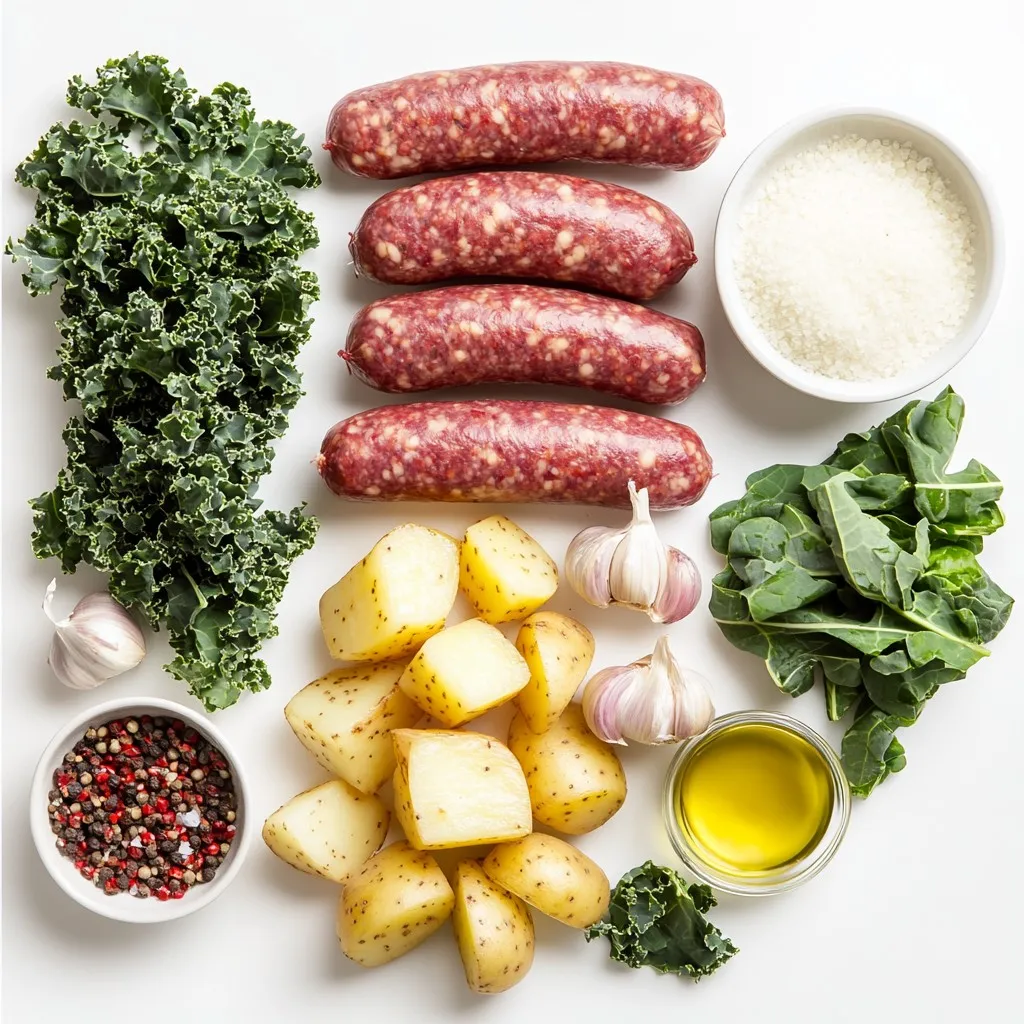
Ingredients
List of Ingredients
To make Zuppa Toscana, gather these simple ingredients:
– 1 lb Italian sausage
– 1 medium onion, finely diced
– 3 cloves garlic, minced
– 4 cups chicken broth
– 2 large potatoes, thinly sliced
– 2 cups kale, chopped
– 1 cup heavy cream
– 1 teaspoon red pepper flakes (optional)
– Salt and pepper to taste
– Olive oil for cooking
– Grated Parmesan cheese for garnish (optional)
Substitutions and Alternatives
You can easily adjust some ingredients based on your taste or needs:
– Use mild or spicy Italian sausage based on your heat preference.
– Swap heavy cream for coconut cream to make it dairy-free.
– If you don’t have kale, spinach is a great alternative.
– For a lighter option, use low-sodium chicken broth.
– Red or Yukon gold potatoes work best, but you can try any type you have.
Nutritional Information Breakdown
Here’s a basic idea of what to expect per serving:
– Calories: About 350
– Protein: 12g
– Carbs: 30g
– Fat: 20g
– Fiber: 3g
– Sodium: Varies based on broth choice
This soup is hearty and filling, making it a great meal option. Enjoy the warmth and flavor packed in each bowl!
Step-by-Step Instructions
Preparation Steps Overview
To make Zuppa Toscana, start by gathering your ingredients. You will need Italian sausage, onion, garlic, chicken broth, potatoes, kale, heavy cream, red pepper flakes, salt, pepper, and olive oil. Hit the grocery store if you don’t have them at home. It helps to have everything ready before cooking. This way, you can move fast in the kitchen.
Cooking Techniques Explained
1. Sautéing: Begin by heating olive oil in a large pot over medium heat. Add the diced onion first. Cook until it turns soft and clear, about 3-4 minutes. Then add minced garlic. Stir it for a minute to bring out its flavor. Be careful not to let it burn.
2. Browning Sausage: Crumble the Italian sausage into the pot next. Use a spatula to break it up. Cook until it is browned and no longer pink, which takes 5-7 minutes. This step gives your soup a rich base.
3. Simmering: Pour in the chicken broth and bring it to a gentle boil. Add thinly sliced potatoes and cook them until they are soft, about 10-12 minutes. After that, mix in the chopped kale. Let it simmer for an extra 5 minutes. This keeps the kale bright and tasty.
4. Creamy Finish: Lower the heat and add the heavy cream. If you want some heat, sprinkle in red pepper flakes. Season with salt and pepper. Stir well to mix everything. Heat it through, but don’t let it boil again.
Tips for Perfectly Cooking Zuppa Toscana
– Use low-sodium chicken broth to control salt levels.
– Choose red or Yukon gold potatoes for the best texture.
– If you want a dairy-free option, substitute heavy cream with coconut cream.
– Garnish with grated Parmesan cheese for extra flavor.
– Serve the soup hot for a cozy meal.
Following these steps will help you make a delicious bowl of Zuppa Toscana every time.
Tips & Tricks
Best Practices for Flavor Enhancement
To boost the flavor of Zuppa Toscana, use fresh ingredients. Fresh garlic and onions add a nice depth. Sauté them until they smell great. Crumble the sausage into the pot for even cooking. This helps it brown nicely and adds flavor to the broth.
Consider the type of potatoes you use. Red or Yukon gold potatoes create a creamy texture. They hold their shape well when cooked. For a touch of heat, add red pepper flakes. Adjust the amount to fit your taste.
Common Mistakes to Avoid
One common mistake is boiling the soup after adding cream. This can make the cream curdle. Instead, keep it on low heat. Stir gently to mix in the cream without boiling.
Another mistake is not seasoning properly. Taste as you cook. Add salt and pepper in small amounts. This helps you control the flavor better.
Also, avoid overcooking the kale. Add it near the end of cooking. This keeps the color bright and the texture tender.
Recommendations for Serving
Serve Zuppa Toscana hot for the best experience. Ladle it into bowls and top with grated Parmesan. This adds a nice salty flavor.
Pair the soup with crusty bread for dipping. A simple green salad makes a great side. Enjoy it with family or friends for a cozy meal.
Pro Tips
- Choose Your Sausage Wisely: Select a high-quality Italian sausage for the best flavor. Freshly ground sausage will enhance the overall taste of the soup.
- Potato Prep: For even cooking, slice the potatoes uniformly. This ensures they cook at the same rate and achieve the perfect tenderness.
- Fresh Kale Matters: Use fresh, vibrant kale for added nutrition and flavor. Avoid wilted or yellowing leaves to maintain the dish’s appealing look.
- Garnish for Greatness: Don’t skip the grated Parmesan cheese on top; it adds a creamy, salty finish that complements the soup beautifully.

Variations
Vegetarian and Vegan Options
To make a vegetarian or vegan Zuppa Toscana, swap the Italian sausage for plant-based sausage. You can choose one made from soy or pea protein. For a rich flavor, add a mix of mushrooms. Use vegetable broth instead of chicken broth. Replace heavy cream with coconut cream or cashew cream for a rich texture. This way, you keep the heartiness and warmth without meat or dairy.
Gluten-Free Adaptations
To ensure your Zuppa Toscana is gluten-free, check your broth and sausage labels. Some brands add gluten as a thickener. Stick to gluten-free sausage and use low-sodium chicken or vegetable broth. The rest of the ingredients, like potatoes and kale, are naturally gluten-free. This makes your soup safe for those with gluten sensitivities.
Ingredient Swaps for Different Flavors
Feel free to mix things up with your ingredients. If you want a smoky taste, use smoked sausage instead of Italian. For a kick, add more red pepper flakes or a splash of hot sauce. You can also try different greens, like spinach or Swiss chard, in place of kale. This will give your soup a unique twist while keeping it delicious.
Storage Info
How to Store Leftovers
To store leftover Zuppa Toscana, let it cool first. Use an airtight container for best results. This soup stays fresh in the fridge for about 3 to 4 days. If you want to keep it longer, consider freezing it.
Reheating Tips for Best Results
When reheating, do it slowly to keep the cream smooth. Use a pot over low heat. Stir often to prevent sticking. You can also use a microwave. Just heat in short bursts and stir in between.
Freezing Zuppa Toscana: What to Know
When freezing Zuppa Toscana, it’s best to leave out the cream. Add it when you reheat the soup. Use freezer-safe containers or bags. The soup can last up to 3 months in the freezer. To serve, thaw overnight in the fridge before reheating.
FAQs
What is Zuppa Toscana made of?
Zuppa Toscana is a warm and hearty soup. It brings together:
– 1 lb Italian sausage
– 1 medium onion
– 3 cloves garlic
– 4 cups chicken broth
– 2 large potatoes
– 2 cups kale
– 1 cup heavy cream
– 1 teaspoon red pepper flakes
– Salt and pepper
– Olive oil
– Grated Parmesan cheese (optional)
This mix creates a rich taste that warms you from the inside.
How can I make Zuppa Toscana healthier?
You can make it lighter and still keep the flavor. Here are some tips:
– Use lean turkey sausage instead of Italian sausage.
– Swap heavy cream for coconut cream or almond milk.
– Add more veggies, like carrots or bell peppers, to boost nutrients.
– Choose low-sodium broth to control salt levels.
These changes keep the soup tasty while making it a bit healthier.
Can I use other meats instead of Italian sausage?
Yes, you can! Try these options:
– Ground turkey or chicken for a leaner choice.
– Bacon or pancetta for a smoky flavor.
– Even veggie sausage works for a meat-free dish.
These alternatives let you play with the flavor while keeping the comfort of Zuppa Toscana.
This blog post covered the key steps to make Zuppa Toscana. We looked at ingredients and tasty options for substitutes. I shared cooking techniques and tips to get the best results. You learned about common mistakes and how to enhance flavors. We also explored variations like vegetarian and gluten-free choices. Lastly, I provided storage tips for leftovers and answers to common questions.
Now, you have all the tools to make a great soup. Enjoy creating your perfect Zuppa Toscan

Hearty Zuppa Toscana
Ingredients
- 1 lb Italian sausage
- 1 medium onion, finely diced
- 3 cloves garlic, minced
- 4 cups chicken broth
- 2 large potatoes, thinly sliced
- 2 cups kale, chopped
- 1 cup heavy cream
- 1 teaspoon red pepper flakes
- to taste salt
- to taste pepper
- as needed olive oil
- as needed grated Parmesan cheese
Instructions
- In a large pot, warm a generous drizzle of olive oil over medium heat. Once the oil is shimmering, add the diced onion and sauté until it becomes translucent, approximately 3-4 minutes.
- Stir in the minced garlic and sauté for another minute, ensuring to stir constantly to prevent the garlic from burning and becoming bitter.
- Crumble the Italian sausage directly into the pot, breaking it up with a spatula as you cook. Allow it to brown completely and lose its pink color, which should take about 5-7 minutes.
- Carefully pour in the chicken broth and bring the mixture to a gentle boil. Once boiling, add the thinly sliced potatoes and cook until they are fork-tender, generally about 10-12 minutes.
- Stir in the chopped kale and continue to simmer for an additional 5 minutes, or until the kale has wilted but retains its vibrant color.
- Lower the heat to a gentle simmer and incorporate the heavy cream. If you’re opting for extra spice, add the red pepper flakes at this stage. Season with salt and pepper to taste, giving it a good stir to combine.
- Allow the soup to gently heat through, ensuring it doesn’t boil after adding the cream to keep it rich and creamy.
- Serve the Zuppa Toscana hot, garnished with grated Parmesan cheese, if desired, for that extra layer of flavor and elegance.


![To make Easy Roasted Tomato Soup, gather these key ingredients: - 2 pounds of ripe, juicy tomatoes, halved - 1 medium onion, cut into quarters - 4 cloves of garlic, left unpeeled - 2 tablespoons of extra virgin olive oil - Sea salt and freshly cracked black pepper, to taste - 1 teaspoon of dried basil - 1 teaspoon of sugar (optional, to counterbalance acidity) - 4 cups of rich vegetable broth - 1/2 cup of heavy cream (optional, for a luscious finish) - Fresh basil leaves, for a lovely garnish These ingredients create a base that bursts with flavor. The tomatoes give the soup its rich taste. The onion adds sweetness, while garlic brings depth. You can add optional ingredients to boost the flavor: - A splash of balsamic vinegar for acidity - A pinch of red pepper flakes for heat - A teaspoon of smoked paprika for a smoky taste These extras can transform the soup into something special. Feel free to experiment and find your favorite combination. To prepare this soup, you’ll need a few handy tools: - A large baking sheet for roasting - A pot for cooking the soup - An immersion blender or a standard countertop blender - A cutting board and sharp knife for prep Having the right tools makes cooking easier. With these, you’ll create a smooth, tasty soup that warms the soul. For the complete recipe, check out the [Full Recipe]. To start, gather all your ingredients. You need: - 2 pounds of ripe, juicy tomatoes, halved - 1 medium onion, cut into quarters - 4 cloves of garlic, left unpeeled - 2 tablespoons of extra virgin olive oil - Sea salt and freshly cracked black pepper, to taste - 1 teaspoon of dried basil - 1 teaspoon of sugar (optional) - 4 cups of rich vegetable broth - 1/2 cup of heavy cream (optional) - Fresh basil leaves for garnish First, wash the tomatoes well. Cut them in half and place them on a baking sheet. Next, quarter the onion and add it to the sheet. Toss in the unpeeled garlic cloves. Now, drizzle the olive oil over the veggies. Sprinkle sea salt, black pepper, and dried basil on top. If you want to balance the soup's acidity, add sugar now. Preheat your oven to 400°F (200°C). Once the oven is ready, slide in your baking sheet. Roast the vegetables for 25-30 minutes. The tomatoes should soften and caramelize. After roasting, take the sheet out and let the veggies cool. Once cool enough to handle, peel off the garlic skins. In a large pot, combine the roasted tomatoes, onion, and garlic. Add the vegetable broth and place the pot over medium heat. Bring the mixture to a gentle simmer. Use an immersion blender to puree the soup until smooth. If you don’t have one, carefully transfer the soup to a blender. Make sure to leave space for steam to escape. If you want a rich finish, stir in the heavy cream now. Taste the soup and adjust the seasoning. Heat until hot throughout. Finally, serve the soup in bowls. Garnish with fresh basil leaves for color and flavor. Enjoy your delicious, comforting bowl of roasted tomato soup! To get a smooth soup, use an immersion blender. It makes blending easy. If you prefer, you can blend in batches with a regular blender. Just leave space for steam. For a thicker texture, add less broth. If you like it thinner, add more broth. You can also stir in heavy cream for extra richness. It adds a nice velvety feel. One mistake is not roasting the tomatoes long enough. They need time to caramelize and develop flavor. Don’t skip the sugar if your tomatoes are very acidic. It balances the taste. Also, remember to peel the garlic after roasting. Skins can affect the smoothness of your soup. Finally, taste your soup before serving. Adjust salt and pepper to match your flavor. Serve your soup hot, garnished with fresh basil leaves. They add color and flavor. Pair it with a grilled cheese sandwich for a classic combo. You can also serve it with crusty bread for dipping. For a twist, add a drizzle of balsamic glaze on top. This adds a sweet tang that enhances the soup. For the full recipe, check the details above. {{image_4}} You can easily make this soup vegan. Just skip the heavy cream. Use more vegetable broth instead. This keeps the soup rich and tasty. The roasted tomatoes give it a great flavor. You won’t miss the cream at all. Add a splash of coconut milk for creaminess if you like. It adds a nice twist! Want to spice things up? Add a pinch of red pepper flakes for heat. A dash of smoked paprika gives a warm flavor. Fresh herbs like thyme or oregano enhance the soup, too. You can also stir in a tablespoon of balsamic vinegar. It adds depth and a little sweetness. Don't forget to taste as you go! This soup is naturally gluten-free. You don’t need any flour or wheat. Just use certified gluten-free vegetable broth. This way, everyone can enjoy it. If you want to thicken the soup, use blended potatoes or a cornstarch slurry. It keeps the soup smooth without gluten. Enjoy this comforting bowl without worries! To store leftover soup, let it cool first. Pour it into an airtight container. Make sure to seal it well. Place it in the fridge. It will stay fresh for about three days. If you want to keep it longer, freezing is better. Freezing is a great way to prepare meals ahead. Use freezer-safe containers or bags. Fill them with soup, leaving some space at the top. This allows for expansion. Label the containers with the date. It can last up to three months in the freezer. When you’re ready to use it, just thaw it in the fridge overnight. To reheat your soup, use a pot on the stove. Heat it gently over medium-low. Stir often to avoid burning. If the soup is too thick, add a splash of broth or water. You can also use a microwave. Heat it in short bursts, stirring in between. Always taste before serving to check the flavor. Adjust seasoning if needed for that perfect bowl of comfort. The best tomatoes for this soup are ripe, juicy varieties. I love using Roma or vine-ripened tomatoes. They have great flavor and are less watery. You can also mix in some heirloom tomatoes for extra depth. Their sweetness adds a lovely touch to the soup. Yes, you can make this soup ahead of time. It keeps well in the fridge for up to four days. Just make sure to cool it completely before storage. You can also freeze it for up to three months. For the best taste, reheat the soup gently on the stove. To make roasted tomato soup without cream, simply skip the heavy cream. Instead, you can add a splash of vegetable broth for richness. For added creaminess, blend in some cooked white beans or cashews. They blend smoothly and give a nice texture without dairy. You’ll still enjoy a flavorful bowl of comfort. For the full recipe, check out the detailed instructions above. In this post, we explored how to make easy roasted tomato soup. We discussed key ingredients, optional flavors, and tools you need. Following the step-by-step instructions ensures success every time. I shared tips for the perfect consistency and common mistakes to avoid. You can even try vegan and gluten-free options. Lastly, I covered storage and reheating for later enjoyment. Enjoy making this warm soup and share it with others.](https://fastmealmate.com/wp-content/uploads/2025/07/8c50acbe-b26b-4fce-9348-24a1062b636d-768x768.webp)
![To make honey garlic chicken breasts, gather these items: - 4 boneless, skinless chicken breasts - 1/3 cup honey - 1/4 cup low-sodium soy sauce - 4 cloves garlic, finely minced - 1 tablespoon fresh ginger, grated - 1 tablespoon olive oil (for cooking) - 1 teaspoon sesame oil - 1 teaspoon apple cider vinegar - Salt and freshly cracked black pepper, to taste - Chopped green onions (for garnish) - Sesame seeds (for garnish) If you want to switch things up, you can make some simple changes: - Use chicken thighs instead of breasts for more flavor and tenderness. - Swap honey for maple syrup for a different sweet taste. - Choose coconut aminos instead of soy sauce for a gluten-free option. - Replace fresh ginger with powdered ginger in a pinch. - Use canola oil instead of olive oil for frying. Measuring helps your dish taste just right. Here are some tips: - Use a liquid measuring cup for honey and soy sauce. Pour slowly for accuracy. - Use a dry measuring cup for solid ingredients like ginger and garlic. - Level off dry ingredients with a straight edge for a perfect measure. - For sticky ingredients like honey, spray the measuring cup with cooking oil first. This makes it easier to pour out. Get ready for a flavorful dinner delight with these simple ingredients! For the full recipe, check the details above. To start, gather all your ingredients. You need four boneless, skinless chicken breasts, honey, soy sauce, garlic, ginger, olive oil, sesame oil, apple cider vinegar, salt, and pepper. Chop the garlic and grate the ginger. In a medium bowl, mix the honey, soy sauce, garlic, ginger, olive oil, sesame oil, and apple cider vinegar. Whisk the mixture until it is smooth and well combined. Pat the chicken dry with paper towels. Season both sides with salt and freshly cracked black pepper. This step adds flavor to the chicken. Heat a drizzle of olive oil in a large skillet over medium-high heat. Once the oil is hot and shimmering, place the seasoned chicken breasts in the skillet. Cook each side for about 5-7 minutes. You want a rich, golden-brown crust. Use a meat thermometer to check if the chicken has reached 165°F (75°C). When the chicken is golden, pour the honey garlic sauce over the top. Reduce the heat to medium-low and cover the skillet. Let it simmer for 10-15 minutes. This allows the sauce to thicken and flavor the chicken. To check if your chicken is done, use a meat thermometer. Insert it into the thickest part of the chicken. It should read 165°F (75°C). If you don’t have a thermometer, you can cut into the chicken. The juices should run clear, not pink. Make sure to check all pieces, as they can cook unevenly. After cooking, let the chicken rest for a few minutes before serving. This helps keep it juicy. For a great presentation, drizzle extra sauce on top and garnish with green onions and sesame seeds. Enjoy this flavorful dinner delight from the Full Recipe! To make your honey garlic chicken truly shine, use fresh ingredients. Fresh garlic and ginger pack a punch and enhance the dish's flavor. If you want more depth, let the chicken marinate. A 30-minute soak in the sauce will increase flavor. You can also add a splash of lime juice to brighten the taste. Remember, balance is key! Use salt to enhance sweetness and acidity to cut through richness. Cooking chicken breasts can be tricky. To keep them juicy, avoid overcooking. Use a meat thermometer to check for an internal temperature of 165°F (75°C). Start on high heat to get a nice crust, then lower the heat. This helps the inside cook without drying out. Covering the skillet while simmering allows the chicken to absorb sauce flavors. Here are some tools that can help you cook like a pro: - Large skillet - Meat thermometer - Whisk for mixing - Cutting board - Sharp knife for slicing These tools make cooking smoother and more enjoyable. Having the right equipment allows you to focus on creating a delicious meal. For the full recipe, check out the details above! {{image_4}} You can add more colors and flavors to your honey garlic chicken. Try mixing in vegetables like bell peppers, broccoli, or snap peas. Cut them into bite-sized pieces. Add them to the skillet after the chicken has cooked for about 5 minutes. This way, the veggies soak up the sauce and stay crisp. It makes the dish healthy and fun. If you like heat, spice up your honey garlic chicken. Add red pepper flakes or chili paste to the sauce. Start with half a teaspoon and adjust to your taste. This spicy kick pairs well with the sweetness of honey. It gives you a nice balance of flavors. You can also use sriracha for a different heat profile. You don’t have to cook the chicken on the stove. Grilling gives it a smoky flavor. Marinate the chicken in the honey garlic sauce for at least one hour. Then, grill it on medium heat for about 6-8 minutes per side. If you prefer baking, preheat your oven to 400°F (200°C). Place the chicken in a baking dish, pour the sauce over it, and bake for 20-25 minutes. This keeps the chicken juicy and full of flavor. For the full recipe, check the [Full Recipe]. After your meal, let the chicken cool down. Place leftovers in an airtight container. This keeps them fresh and tasty. Store the container in the fridge. Honey garlic chicken can last for up to four days. If you plan to eat it later, consider freezing it. To reheat, you have a few options. The best way is to use the oven. Preheat it to 350°F (175°C). Place the chicken in a baking dish and cover it. Heat for about 15-20 minutes. Check that the chicken is hot all the way through. You can also use a microwave. Heat in short bursts, checking often. This keeps the chicken juicy. If you want to freeze the chicken, it’s simple. Wrap each piece tightly in plastic wrap. Then, place them in a freezer bag. Squeeze out as much air as possible. This helps prevent freezer burn. You can freeze the chicken for up to three months. When you’re ready to eat, thaw it overnight in the fridge. Then, reheat using the oven or microwave. This way, you enjoy a delicious meal later. You can serve many sides with honey garlic chicken breasts. Here are some great options: - Steamed rice: This absorbs the sauce well and adds a nice balance. - Sautéed vegetables: Try broccoli, bell peppers, or carrots for color and crunch. - Mashed potatoes: Creamy potatoes enhance the meal and add comfort. - Quinoa: A healthy grain that pairs perfectly with the sauce. - Salad: A fresh green salad can lighten up the meal. These sides complement the flavors of the chicken and make a complete meal. Yes! You can prepare honey garlic chicken breasts ahead of time. Here’s how: - Marinate: You can marinate the chicken in the sauce for up to 24 hours. This adds flavor and tenderizes the meat. - Cook and store: After cooking, let the chicken cool. Store it in an airtight container in the fridge for up to 3 days. - Reheat: When you’re ready to eat, simply reheat in a skillet or microwave. Add a splash of water if the sauce thickens too much. This method saves time and keeps dinner stress-free. You can easily change the sweetness of the honey garlic sauce. Here are some tips: - Add more honey: For a sweeter sauce, increase the honey a bit. - Use less honey: If you prefer less sweetness, reduce the honey. - Try other sweeteners: Maple syrup or agave can be good substitutes. They offer a different flavor while keeping it sweet. - Balance with acid: If it gets too sweet, add a splash of apple cider vinegar for a tangy touch. Adjusting the sweetness helps you tailor the dish to your taste. You learned about the ingredients, steps, and tips for cooking honey garlic chicken. We covered ingredient substitutions, measuring tips, and how to check doneness. I shared best practices for enhancing flavor and cooking juicy chicken. You also saw variations and how to store leftovers properly. Cooking can be simple and fun. Use these tips to make your meals taste great. Enjoy your cooking experience!](https://fastmealmate.com/wp-content/uploads/2025/06/7fed451b-ca95-459f-be21-3e50f3436304-768x768.webp)