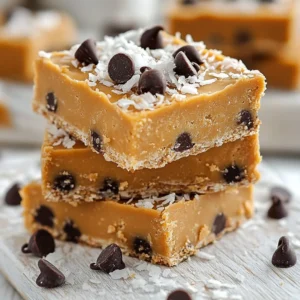
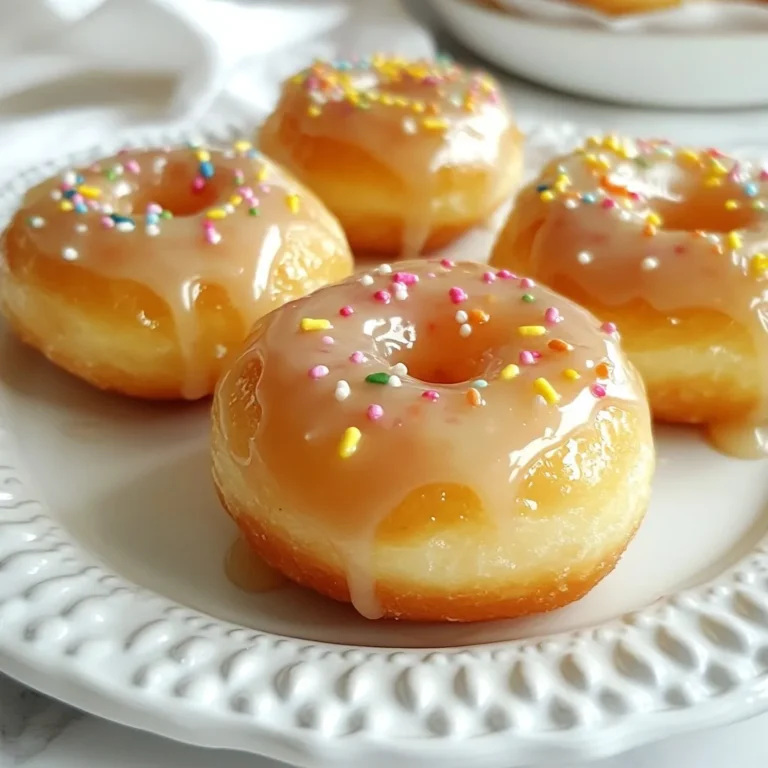
No Bake Peanut Butter Bars Quick and Easy Recipe

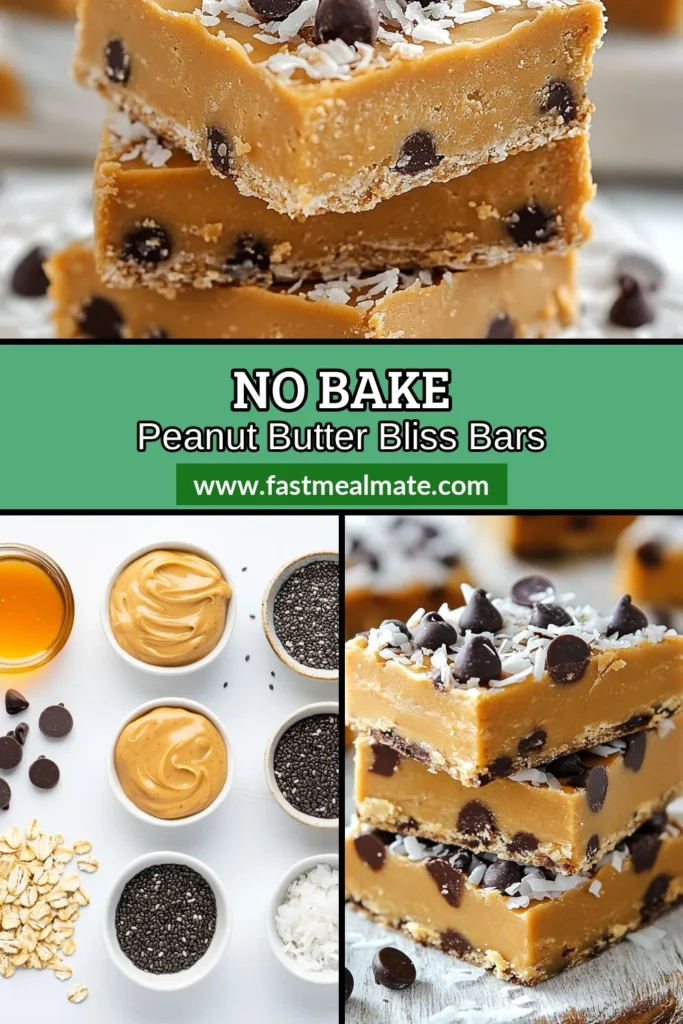
Looking for a delicious snack that’s quick and easy? These No Bake Peanut Butter Bars are perfect for you! With simple ingredients like creamy peanut butter, honey, and oats, you can whip them up in no time. Enjoy a sweet treat that’s healthy too! Let’s dive into this easy recipe and satisfy your cravings without turning on the oven. Your taste buds will thank you!
Why I Love This Recipe
- Quick and Easy: This recipe requires no baking, making it a fast and simple treat to whip up anytime you crave something sweet.
- Healthy Ingredients: With wholesome ingredients like oats, chia seeds, and peanut butter, these bars are packed with nutrients and energy.
- Customizable: You can easily adapt this recipe by adding your favorite nuts, dried fruits, or swapping the chocolate for a different flavor.
- Perfect for Meal Prep: These bars store well in the refrigerator, making them a great option for a quick snack throughout the week.
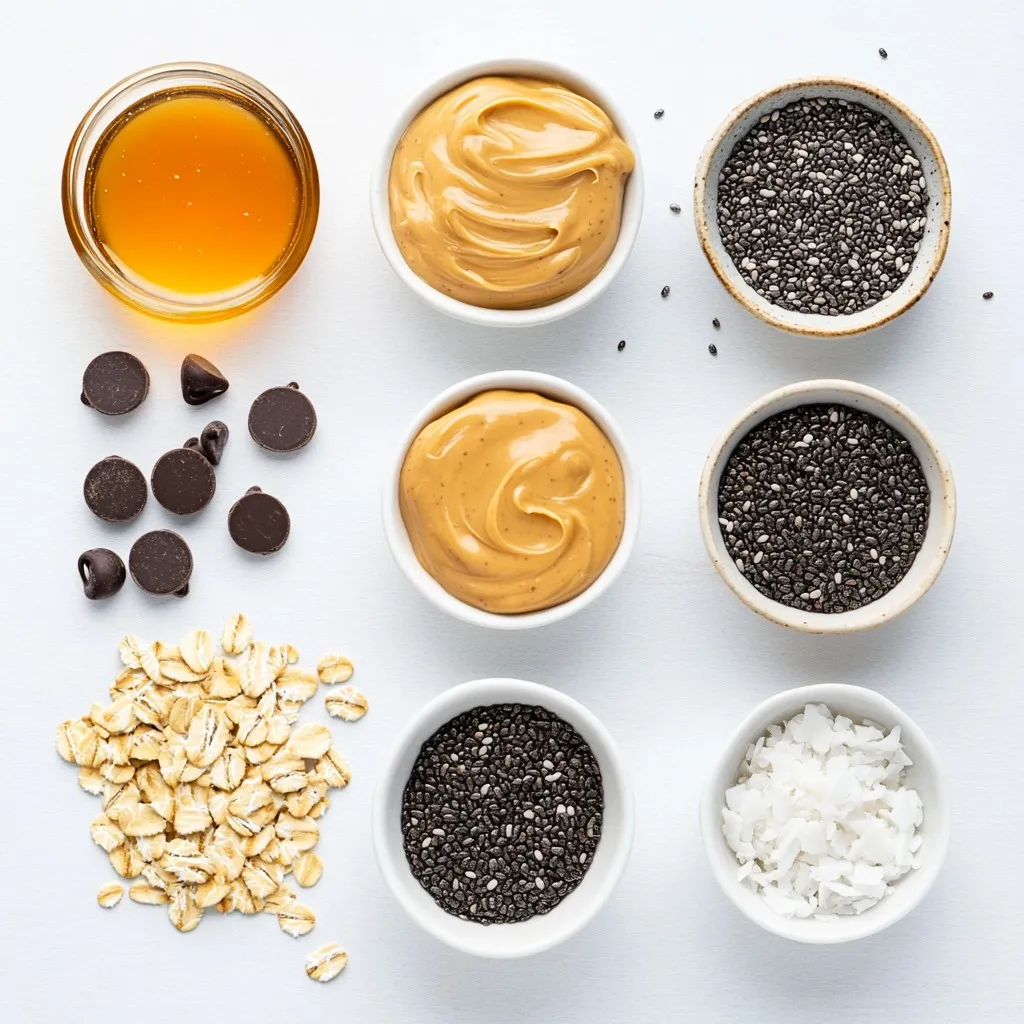
Ingredients
List of Essential Ingredients
– 1 cup creamy peanut butter
– 1/2 cup honey or maple syrup
– 2 cups rolled oats
– 1/2 cup chocolate chips
– 1/2 cup shredded coconut
– 1/4 cup chia seeds
– 1 teaspoon vanilla extract
– A pinch of salt
To make no bake peanut butter bars, you need some key ingredients. Each one plays a role in creating a tasty treat. The creamy peanut butter gives a rich base and flavor. Honey or maple syrup adds sweetness and binds the mixture. Rolled oats provide texture and make the bars filling.
Chocolate chips add a touch of chocolatey goodness, while shredded coconut gives a nice chew. Chia seeds add some crunch and nutrition. Vanilla extract enhances the flavors, and a pinch of salt balances the sweetness.
Optional Add-ins
– Varieties of chocolate chips (dark or semi-sweet)
– Nuts or seeds for added crunch
– Dried fruits for sweetness
You can get creative with optional add-ins. Different chocolate chips can change the taste. Nuts or seeds add a satisfying crunch. Dried fruits can bring extra sweetness and chewiness. Feel free to mix and match based on what you like!
Step-by-Step Instructions
Melting the Peanut Butter Mixture
Start by placing a medium saucepan over low heat. Add 1 cup of creamy peanut butter and 1/2 cup of honey (or maple syrup). Stir gently as it heats. This will help it melt smoothly. Keep stirring until you get a nice, creamy mix. Remove it from heat and add 1 teaspoon of vanilla extract and a pinch of salt. Stir until well blended.
Combining Dry Ingredients
In a big bowl, mix 2 cups of rolled oats, 1/2 cup of chocolate chips, 1/2 cup of shredded coconut, and 1/4 cup of chia seeds. It’s key to mix them evenly. This ensures that every bite has a good mix of flavors and textures. A uniform mix helps the bars hold together better.
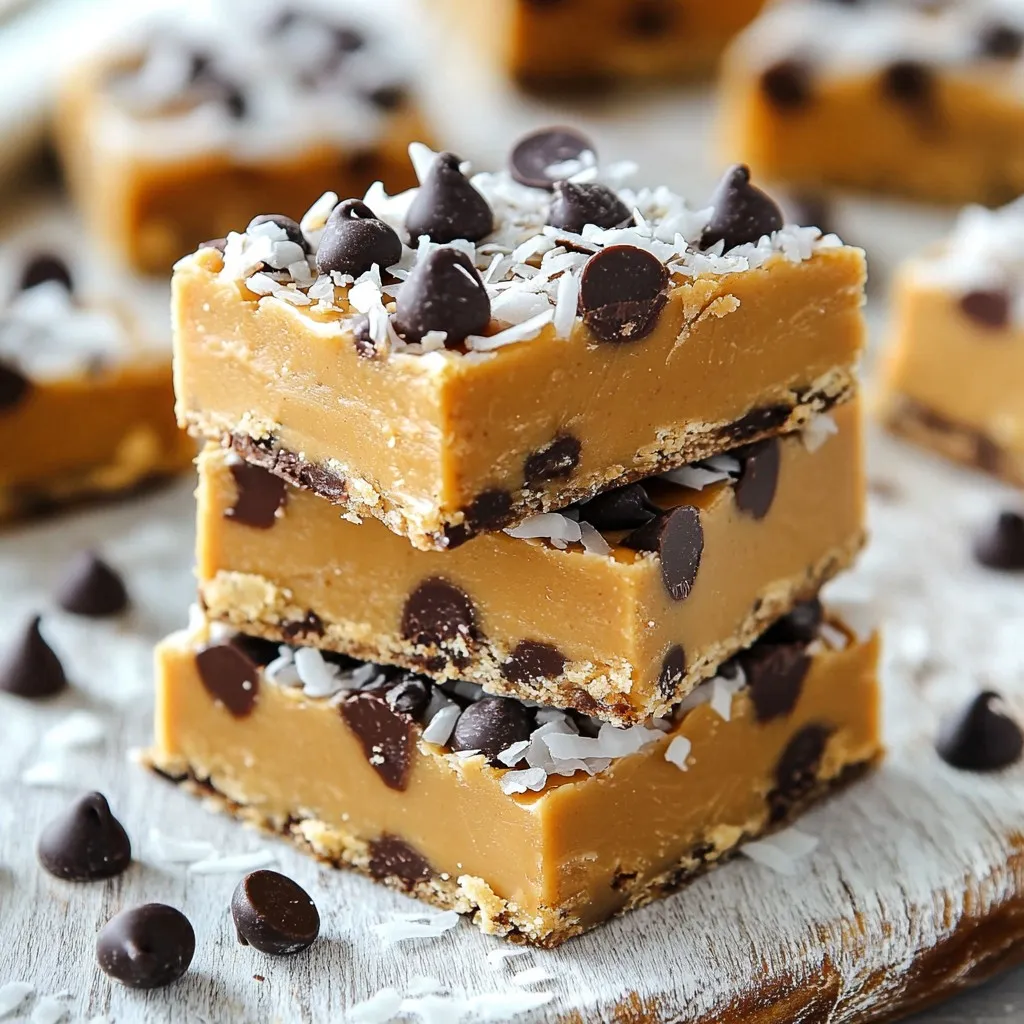
Forming the Bars
Prepare an 8×8-inch baking dish by lining it with parchment paper. Let some paper hang over the edges. This will help you lift the bars out later. Pour the warm peanut butter mix over the dry ingredients. Use a spatula or sturdy spoon to mix everything together. Press the mixture into the baking dish. Use your hands if you want. Make sure it’s an even layer. This helps the bars set well and stay firm.
Tips & Tricks
Perfecting the Texture
To get the right texture for your no bake peanut butter bars, focus on the mixing. Combine the melted peanut butter and honey well. If your mixture feels too dry, add a bit more honey or peanut butter. For a softer bar, let the mixture chill for 1 to 2 hours in the fridge. This helps it firm up nicely.
Presentation Suggestions
Serving your bars can be fun and creative! Place them on a rustic wooden board for a warm touch. Dust them lightly with shredded coconut on top. You can also add a few chocolate chips for a nice finish. This makes the bars look even more appealing.
Troubleshooting Common Issues
If your bars crumble when cutting, they may need more binding. Try adding more peanut butter or honey. If you want a sweeter taste, add a bit more honey or maple syrup. For a chewier texture, consider adding a few more oats. Adjust these ingredients to fit your taste.
Pro Tips
- Use Natural Sweeteners: Opt for raw honey or pure maple syrup for a healthier alternative that adds a unique flavor to your bars.
- Customize Your Mix-ins: Feel free to add nuts, seeds, or dried fruit to the mixture for extra texture and nutritional benefits.
- Chill for Best Results: Allow the bars to chill for longer than 2 hours if you want them to be firmer and easier to cut.
- Storage Tips: Keep the bars in an airtight container in the fridge to maintain freshness and texture for up to a week.
Variations
Flavor Variations
You can make these bars more fun with flavor twists.
– Add cocoa powder: Mix in 1/4 cup of cocoa powder for a chocolatey taste. It gives a rich flavor and pairs well with peanut butter.
– Use different sweeteners: Swap honey for agave nectar or maple syrup. This change adds a unique flavor while keeping it sweet.
Healthier Options
Want to boost the nutrition? Here are some ideas:
– Add protein powder: Mix in 1/4 cup of your favorite protein powder. This makes the bars filling and great for energy.
– Try nut butters: Use almond or cashew butter instead of peanut butter. This gives a different taste while still being healthy.
– Make it low-sugar: Use sugar-free sweeteners like stevia or monk fruit. This helps cut down on sugar while still tasting sweet.
Kid-Friendly Modifications
Make these bars fun for kids!
– Add fun toppings: Let kids sprinkle toppings like mini marshmallows, nuts, or colorful sprinkles. This makes them more appealing.
– Color the bars: Use natural colorings like beet juice or spinach powder. This adds a fun twist and is a great way to sneak in some nutrition.
Storage Info
Recommended Storage Methods
To keep your no bake peanut butter bars fresh, store them in an airtight container. This helps prevent air from getting in and drying them out. Line the container with parchment paper for easy removal. If you stack the bars, add more parchment between layers to avoid sticking.
For the best results, place the container in the refrigerator. This keeps the bars firm and flavorful. Avoid storing them at room temperature, as they may become too soft.
Shelf Life
In the refrigerator, these bars can stay fresh for about one week. Check for any signs of spoilage before eating. If the bars feel sticky or smell off, it’s time to toss them. You want that rich peanut butter scent, not anything sour. Also, look for any mold or discoloration. Keeping an eye on these signs will help you enjoy your bars safely!
FAQs
Can I freeze No Bake Peanut Butter Bars?
Yes, you can freeze these bars. To freeze them, cut the bars into squares. Wrap each square in plastic wrap. Place them in an airtight container. They can last for up to 3 months in the freezer. When ready to eat, take them out and let them thaw in the fridge for a few hours. This keeps them soft and tasty.
What can I substitute for peanut butter?
If you need a substitute, try almond butter or sunflower seed butter. Almond butter has a nice, creamy texture. Sunflower seed butter is a great option if you have nut allergies. Both will work well in this recipe without changing the taste too much.
How to adjust the sweetness in the recipe?
To change the sweetness, you can add less honey or maple syrup. Start by using only 1/3 cup instead of 1/2 cup. Taste the mixture after mixing. If you prefer it sweeter, add a little more sweetener. You can also use a sugar substitute if you want to lower sugar intake.
You now have a complete guide to making no-bake peanut butter bars. We covered essential ingredients, step-by-step instructions, and tips for perfecting your bars. You learned how to adjust flavors and textures for family-friendly versions. Remember, these bars are not only tasty but also versatile. Store them properly to maintain freshness. With this knowledge, you can create delicious snacks that everyone will love! Enjoy experimenting and sharing these treats with other
No Bake Peanut Butter Bars
Ingredients
- 1 cup creamy peanut butter
- 1/2 cup honey or maple syrup
- 2 cups rolled oats
- 1/2 cup chocolate chips (semi-sweet or dark)
- 1/2 cup shredded coconut (unsweetened)
- 1/4 cup chia seeds
- 1 teaspoon vanilla extract
- a pinch salt
Instructions
- Begin by placing a medium saucepan over low heat. Add the creamy peanut butter along with the honey (or maple syrup). Gently stir the mixture as it heats up, ensuring it melts completely and becomes smooth.
- After the mixture has melted, remove the saucepan from the heat. Stir in the vanilla extract and a pinch of salt until well blended.
- In a large mixing bowl, combine the rolled oats, chocolate chips, shredded coconut, and chia seeds, mixing them evenly to ensure distribution of all ingredients.
- Slowly pour the warm peanut butter mixture over the dry ingredients in the bowl. Use a spatula or a sturdy spoon to carefully mix everything together until the dry ingredients are fully coated and the mixture is cohesive.
- Prepare an 8x8-inch baking dish by lining it with parchment paper. Allow some excess parchment to hang over the edges for easy removal of the bars later.
- Transfer the combined mixture into the prepared baking dish. With a spatula (or your hands if you prefer), press the mixture down firmly and evenly across the bottom of the dish to create a compact layer.
- Place the baking dish into the refrigerator and let it chill for at least 2 hours. This will allow the bars to firm up sufficiently for cutting.
- Once the mixture has set, carefully lift the bars out of the dish using the edges of the parchment paper. Place them on a cutting board and slice into squares or rectangles as preferred.
- Store the bars in an airtight container, keeping them in the refrigerator where they will stay fresh for up to a week.
![To make this delicious bread, gather these items: - 1 cup fresh strawberries, hulled and diced - 1 cup rhubarb, diced - 1/2 cup unsalted butter, softened to room temperature - 1 cup granulated sugar, divided - 2 large eggs, at room temperature - 1 teaspoon pure vanilla extract - 1/2 cup Greek yogurt, plain - 2 cups all-purpose flour - 1 teaspoon baking powder - 1/2 teaspoon baking soda - 1/4 teaspoon sea salt - 1/2 teaspoon ground cinnamon (optional) - 1/4 cup chopped walnuts or pecans (optional) Using fresh ingredients is key to good flavor. Fresh strawberries and rhubarb give the bread a tart and sweet taste. They also add moisture, making the bread soft. When you choose fresh fruits, look for vibrant colors and firm textures. This will enhance your final dish. If you can, visit a local farmer’s market for the best produce. It really makes a difference in taste. You can make the bread even better with some optional ingredients. Adding ground cinnamon brings warmth and depth to the flavor. If you like crunch, chopped walnuts or pecans add a nice texture. These nuts also pair well with the fruit. You can mix and match these extras based on your taste. Feel free to experiment and find what you love! For the full recipe, check out the earlier sections. Start by preheating your oven to 350°F (175°C). This warms the oven for even baking. Grease and flour a 9x5-inch loaf pan. This step helps the bread slide out easily after baking. Next, prepare the fruit. In a medium bowl, mix the diced strawberries and rhubarb. Sprinkle 1 tablespoon of sugar over the fruit and toss gently. Let it sit for a few minutes. This draws out moisture and brings out the fruit's flavor. In a large mixing bowl, cream the softened butter with the remaining sugar. Use an electric mixer for about 3-4 minutes. The mixture should look light and fluffy. Add the eggs one at a time, mixing well after each addition. Then, mix in the vanilla extract and Greek yogurt until smooth. In another bowl, whisk together the flour, baking powder, baking soda, sea salt, and ground cinnamon. Gradually add this dry mix to the wet ingredients. Stir gently until just combined to avoid a dense bread. Finally, fold in the prepared strawberries and rhubarb. If you like, add chopped nuts for crunch. Pour the batter into your greased loaf pan. Smooth the top with a spatula for an even surface. Bake in the preheated oven for 55-65 minutes. Check if it’s done by inserting a toothpick in the center. It should come out clean or with a few moist crumbs. Once baked, let the bread cool in the pan for about 10 minutes. Then, transfer it to a wire rack to cool completely. This step is important for the best texture. Now, you can slice and enjoy your strawberry rhubarb delight bread! For the full recipe, refer to the earlier section. To get that soft and fluffy bread, you must mix the batter just right. When you mix the wet and dry ingredients, do it slowly. Stir until just combined. This helps keep air in the batter. Over-mixing makes your bread dense. Remember, a few lumps are okay! One common mistake is using cold ingredients. Always start with eggs and yogurt at room temperature. This helps the batter mix better and rise nicely. Another mistake is not measuring the flour properly. Too much flour can lead to a dry texture. Use a spoon to scoop flour into your measuring cup, then level it off for accuracy. Want to add more flavor? Try adding a bit of lemon zest. It brightens the bread and pairs well with strawberries and rhubarb. You can also mix in spices like nutmeg or ginger for warmth. If you like nuts, fold in walnuts or pecans for crunch. You can find the full recipe for this delicious bread above. {{image_4}} You can easily adapt this recipe for different diets. If you want a dairy-free option, swap the butter for coconut oil or a plant-based butter. Use almond or oat yogurt in place of Greek yogurt. For a gluten-free bread, replace all-purpose flour with a gluten-free blend. Always check the labels to ensure your substitutes fit your needs. This recipe is versatile, allowing you to play with flavors. Instead of strawberries, try blueberries or diced apples. You can mix in lemon zest for a fresh twist. If you love spices, add nutmeg or cardamom for warmth. These changes keep the bread exciting and fun! Get creative with add-ins to enhance your bread. Try adding chocolate chips for a sweet treat. For crunch, include a handful of sunflower seeds or pumpkin seeds. You can also mix in a scoop of shredded coconut for a tropical touch. These add-ins make each slice unique and flavorful. For the complete recipe, check out the [Full Recipe]. To keep your strawberry rhubarb bread fresh, store it at room temperature. Wrap it tightly in plastic wrap or foil. This helps to prevent it from drying out. If you have leftover bread, try to keep it in an airtight container. This way, it stays soft and delicious for a few days. Avoid storing it in the fridge, as that can make it stale faster. If you want to save your bread for later, freezing is a great option. First, let the bread cool completely after baking. Then, slice it into pieces. Wrap each slice in plastic wrap, and then place them in a freezer bag. Make sure to squeeze out any air before sealing. You can freeze it for up to three months. When you're ready to enjoy it, you can thaw it overnight in the fridge or leave it at room temperature for a few hours. To enjoy your strawberry rhubarb bread warm, preheat your oven to 350°F (175°C). Place the slices on a baking sheet and cover with foil. Heat for about 10-15 minutes. This keeps the bread moist and enhances its flavors. You can also use a microwave. Just heat each slice for about 15-20 seconds. However, the oven method gives the best taste and texture. Enjoy your warm slices with a little butter or jam for extra flavor! To keep your bread moist, use fresh fruit. Fresh strawberries and rhubarb add natural moisture. You can also add Greek yogurt. It adds creaminess and keeps the bread soft. Be careful not to over-mix your batter. Over-mixing can cause dense bread. Bake until just done to keep it fluffy. Yes, you can use frozen strawberries and rhubarb. Thaw them and drain excess liquid first. This prevents your bread from getting soggy. The flavor will still be good, but fresh fruit tastes better. Try to use fresh when possible, especially in peak season. This bread is great on its own. For a special treat, serve it with whipped cream. You can also pair it with butter or cream cheese. A sprinkle of powdered sugar adds a nice touch. Serve it warm for the best taste. Enjoy it with your favorite tea or coffee! Strawberry rhubarb bread is simple and fun to make. We covered key ingredients, step-by-step instructions, and helpful tips. Fresh ingredients are vital for great flavor. Remember to avoid common mistakes for the best texture. You can add your own flavors too, which makes it even better. Don’t forget how to store it well, so you can enjoy every bite later. I hope these tips inspire you to bake and savor this delicious bread. Enjoy your time in the kitchen!](https://fastmealmate.com/wp-content/uploads/2025/06/5214b0a0-4654-456a-8121-021057b3e65e-768x768.webp)