
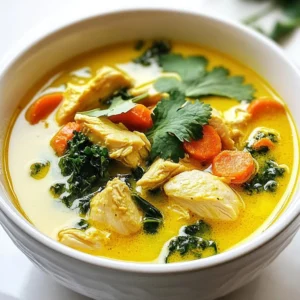
Turmeric Chicken Soup Packed with Flavor and Comfort


Warm up your week with my Turmeric Chicken Soup, a bowl bursting with flavor and comfort. This dish showcases tender chicken thighs, fresh veggies, and the golden goodness of turmeric. Not only does it taste amazing, but it also packs health benefits. So, whether you’re feeling under the weather or just want something cozy, this soup is perfect. Let’s dive into the recipe and savor each spoonful together!
Why I Love This Recipe
- Comforting Warmth: This soup is like a hug in a bowl, perfect for chilly days or when you’re feeling under the weather.
- Nutritious Ingredients: Packed with vegetables, lean protein, and immune-boosting spices, this soup is as healthy as it is delicious.
- Quick and Easy: With a total prep and cook time of just 50 minutes, this recipe is perfect for busy weeknight dinners.
- Flavorful and Aromatic: The combination of turmeric, ginger, and lime creates a vibrant flavor profile that brightens up your meal.
Ingredients
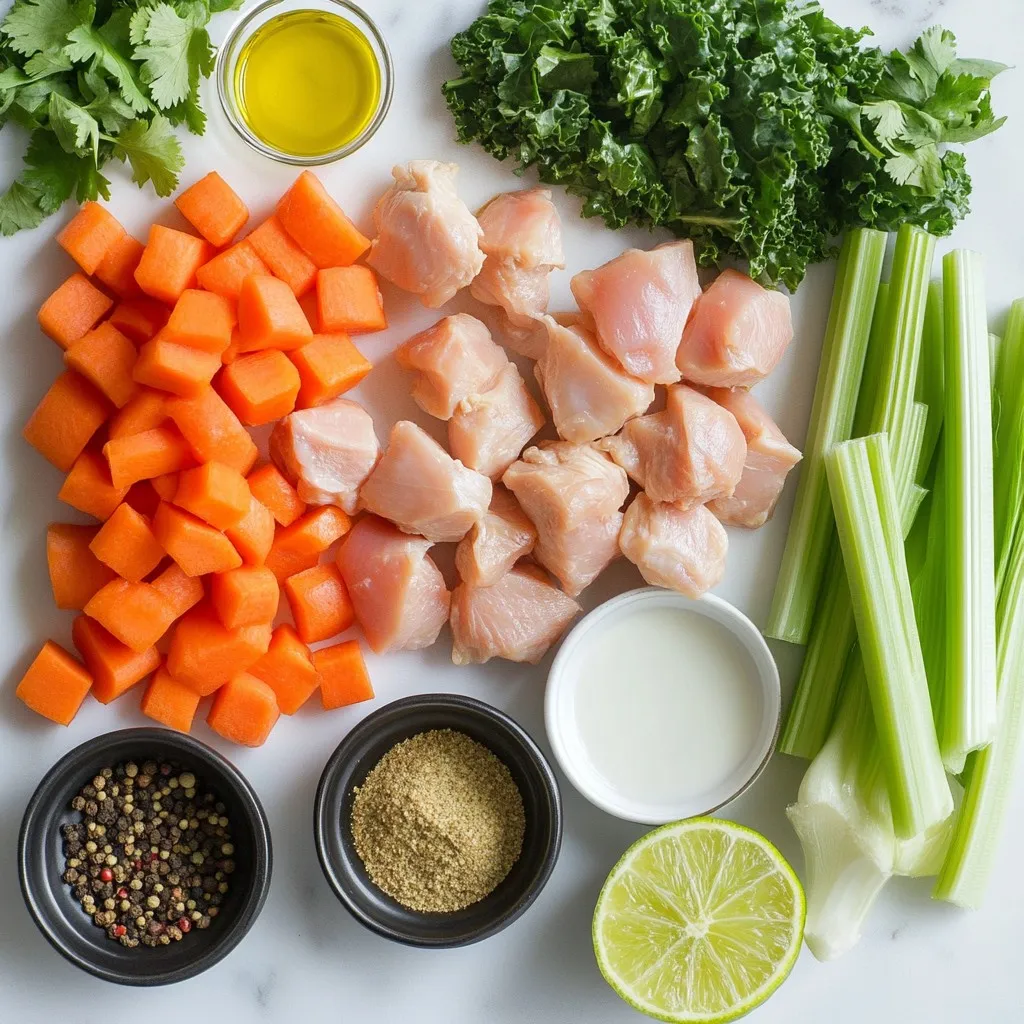
Detailed List of Ingredients
– Chicken Thighs: I use 1 pound of boneless, skinless chicken thighs. They stay juicy and tender while cooking.
– Fresh Vegetables: I add 1 medium onion, 3 cloves of garlic, 1 tablespoon of fresh ginger, 2 large carrots, and 2 stalks of celery. These veggies boost flavor and nutrition.
– Spices and Seasonings: I use 1 teaspoon of ground turmeric, 1 teaspoon of ground cumin, ½ teaspoon of black pepper, and ¼ teaspoon of cayenne pepper (optional). These spices bring warmth and depth to the soup.
– Broth and Cream: For richness, I pour in 6 cups of chicken broth and 1 cup of full-fat coconut milk. This combo makes the soup creamy and vibrant.
– Garnish Options: I finish with fresh cilantro leaves. They add a bright flavor and a lovely color to the soup.
Feel free to mix and match ingredients. You can add your favorite veggies or spices!
Step-by-Step Instructions
Cooking Instructions
1. Sautéing the Aromatics
Start by heating one tablespoon of olive oil in a large pot. Once the oil is hot, add one medium onion that you chopped finely. Cook the onion for about five minutes. Stir it often until it turns soft and clear. Then, add three cloves of minced garlic and one tablespoon of minced ginger. Stir the mix for one minute. You want to smell the fresh scents of garlic and ginger.
2. Browning the Chicken
Next, add one pound of diced chicken thighs into the pot. Sprinkle one teaspoon of ground turmeric, one teaspoon of ground cumin, half a teaspoon of black pepper, and a quarter teaspoon of cayenne pepper if you like some heat. Cook the chicken for five to seven minutes. Stir it every now and then until it turns brown and the spices coat the chicken well.
3. Adding Vegetables and Broth
After browning the chicken, toss in two diced carrots and two diced celery stalks. Stir them in and let them cook for another three to four minutes. This will help them soften a bit. Now, carefully pour in six cups of chicken broth. Stir everything together and bring the soup to a boil over medium-high heat. When it boils, lower the heat and let it simmer uncovered for 15 to 20 minutes. This helps the flavors mix well.
4. Incorporating Coconut Milk and Kale
Now it’s time to make it creamy. Gently stir in one cup of coconut milk and one cup of chopped kale. Let everything cook for about five more minutes. The kale will wilt and become tender, adding lovely color and texture to your soup.
5. Final Touches and Serving
Remove the pot from heat and mix in the juice of one lime. Taste the soup and adjust with salt or more lime juice to get the flavor just right. Serve your soup hot in bowls, and don’t forget to garnish with fresh cilantro leaves. This adds a nice pop of color and flavor that makes the dish shine!
Tips & Tricks
Enhancing Flavor
– Adjusting Seasoning: Taste your soup as you cook. If it needs more flavor, add salt or lime juice. A little extra turmeric can boost color and taste too.
– Spice Level Options: For a gentle warmth, use just black pepper. If you crave heat, add cayenne pepper. Adjust based on your and your guests’ preferences.
Health Benefits of Ingredients
– Turmeric’s Anti-inflammatory Properties: Turmeric is not just a spice; it has health perks. It can help reduce swelling and pain. Regular use may support overall wellness.
– Nutritional Value of Coconut Milk: Coconut milk adds creaminess and good fats. It holds vitamins C and E. This makes your soup rich and satisfying while keeping it healthy.
Presentation Ideas
– Serving Suggestions: Serve the soup in deep bowls. This keeps it warm and looks nice. Pair it with crusty bread for a hearty meal.
– Garnishing Tips: Top each bowl with fresh cilantro. This adds color and flavor. Lime wedges on the side give a fresh burst when squeezed in.
Pro Tips
- Marinate for Flavor: Consider marinating the chicken in a mix of turmeric, cumin, and lime juice for at least 30 minutes before cooking to enhance the flavors.
- Use Fresh Spices: For the best flavor, use freshly ground spices instead of pre-ground ones. This will give your soup a more vibrant taste.
- Customize the Veggies: Feel free to add other vegetables like bell peppers or zucchini to increase nutrition and variety in your soup.
- Storage Tips: This soup can be stored in the refrigerator for up to 3 days or frozen for up to 2 months. Reheat gently to preserve its creamy texture.

Variations
Ingredient Substitutions
Protein Alternatives
If you want to switch the chicken, you can use turkey or tofu. Both options give a nice flavor. Turkey thighs work well for a leaner choice. Tofu is great for a plant-based meal; just make sure to press it first.
Vegetable Options
Feel free to swap in your favorite veggies. Zucchini and bell peppers add nice color and taste. Spinach can replace kale for a softer texture. You can also toss in some peas or sweet potatoes for added sweetness.
Dietary Modifications
Vegan Version
To make this soup vegan, skip the chicken and use chickpeas instead. You can add more veggies like carrots and broccoli for protein and nutrients. Use vegetable broth and coconut milk for creaminess.
Gluten-Free Options
This recipe is already gluten-free! Just ensure that the chicken broth you choose is gluten-free. Avoid any bread served on the side if you want to stick to gluten-free.
Storage Info
How to Store Leftovers
Refrigerator Guidance
Store your leftover turmeric chicken soup in an airtight container. This helps keep it fresh. It can last up to three days in the fridge. Let the soup cool to room temperature before sealing it up. This step prevents moisture build-up, which can spoil the soup faster.
Freezing Tips
If you want to keep it longer, freeze the soup. Use freezer-safe containers or bags. Leave some space at the top since soup expands when frozen. Label the container with the date. The soup stays good for up to three months in the freezer. To use, thaw it overnight in the fridge before reheating.
Reheating Instructions
Best Practices
To reheat, pour the soup into a pot. Heat it over medium heat. Stir often to prevent sticking. If the soup is too thick, you can add a bit of water or broth to thin it out. Heat until it’s hot but not boiling. You can also use a microwave. Place the soup in a microwave-safe bowl. Cover it loosely and heat in short bursts, stirring in between. This method helps heat it evenly. Enjoy your comforting soup!
FAQs
What is the best type of chicken to use?
I recommend using boneless, skinless chicken thighs. They stay juicy and tender. Thighs also absorb flavors well, making your soup rich and tasty.
Can I make this soup ahead of time?
Yes, you can make this soup ahead of time. It tastes even better the next day. Just store it in the fridge for up to three days.
What can I serve with Turmeric Chicken Soup?
You can serve the soup with crusty bread or rice. A fresh salad pairs nicely too. These sides balance the warm, comforting soup.
Is turmeric chicken soup healthy?
Absolutely! This soup is packed with nutrients. Turmeric has anti-inflammatory properties. Chicken provides protein, while veggies add vitamins and fiber.
Can I use fresh turmeric instead of ground?
Yes, you can use fresh turmeric. Grate about one tablespoon of fresh turmeric root. It will add a bright flavor and vibrant color to your soup.
This blog post covered all you need for delicious Turmeric Chicken Soup. We explored the ingredients, from chicken thighs to fresh veggies, along with spices that packed flavor. I gave you step-by-step cooking instructions to create a tasty dish. We looked at tips for enhancing flavor and health benefits that make this meal good for you. Lastly, we discussed variations and storage tips for leftovers.
Enjoy making this soup and share it with friends and family. It’s simple, healthy, and bursting with flavo
Golden Turmeric Chicken Soup
Ingredients
- 1 lb boneless, skinless chicken thighs, diced into bite-sized pieces
- 1 tablespoon olive oil
- 1 medium onion, finely chopped
- 3 cloves garlic, minced
- 1 tablespoon fresh ginger, minced
- 2 large carrots, peeled and diced
- 2 stalks celery, diced
- 1 teaspoon ground turmeric
- 1 teaspoon ground cumin
- 0.5 teaspoon freshly ground black pepper
- 0.25 teaspoon cayenne pepper (optional, for heat)
- 6 cups chicken broth (homemade or low-sodium)
- 1 cup coconut milk (full-fat for creaminess)
- 1 cup kale, stems removed and chopped
- 1 lime Juice of 1 lime (about 2 tablespoons)
- to taste Fresh cilantro leaves, for garnish
Instructions
- In a large pot, heat the olive oil over medium heat. Once hot, add the finely chopped onion. Sauté the onion for about 5 minutes, stirring occasionally, until it becomes translucent and begins to soften.
- Incorporate the minced garlic and ginger into the pot. Sauté for an additional minute, stirring constantly, until the mixture is fragrant.
- Add the diced chicken thighs to the pot. Sprinkle with ground turmeric, cumin, black pepper, and cayenne pepper (if using). Cook the chicken for 5-7 minutes, stirring occasionally, until all sides are browned and the spices are well mixed with the chicken.
- Add the diced carrots and celery to the pot. Stir to combine and cook for another 3-4 minutes, allowing the vegetables to soften slightly.
- Carefully pour in the chicken broth, stirring to combine. Bring the mixture to a boil over medium-high heat. Once it reaches a boil, reduce the heat to low and let it simmer uncovered for 15-20 minutes, allowing the flavors to meld together.
- Gently stir in the coconut milk and chopped kale. Continue to cook for an additional 5 minutes, or until the kale is wilted and tender.
- Remove the soup from heat and mix in the fresh lime juice. Taste the soup, adjusting seasoning with salt or additional lime juice as desired for perfect flavor balance.
- Serve hot in bowls, garnished with fresh cilantro leaves for a pop of color and flavor.
![For a perfect classic patty melt, you will need: - 1 lb ground beef - 1 medium onion, thinly sliced - 4 slices of Swiss cheese - 4 slices of hearty rye bread These ingredients bring together the rich flavors that make this dish so special. The ground beef forms the juicy patty, while the onion adds a sweet touch. Swiss cheese melts beautifully, making every bite creamy. Rye bread gives it a unique flavor and crunch. To take your patty melt to the next level, consider adding: - 1 tablespoon Worcestershire sauce - 1 teaspoon garlic powder - 1 tablespoon mayonnaise (for spreading) Worcestershire sauce adds a deep umami flavor. Garlic powder brings a hint of warmth without being overpowering. Mayonnaise can add a nice creamy texture if you choose to spread it on the bread. Don’t forget these key seasonings: - Salt and black pepper to taste - 2 tablespoons unsalted butter, divided Seasoning your beef with salt and pepper ensures that it tastes great. Butter is essential for grilling the bread to a golden crisp. It enhances the flavor and makes the outside crunchy, while the inside stays soft. For the full recipe, check out the details above! To start, I melt 1 tablespoon of butter in a skillet over medium heat. I add thinly sliced onions and a pinch of salt. Stir the onions often. This helps them caramelize nicely. The cooking time is about 15 to 20 minutes. Keep an eye on the heat. You want them golden brown and sweet. Once done, take them off the heat and set them aside. In a mixing bowl, I combine 1 pound of ground beef with Worcestershire sauce and garlic powder. I add salt and pepper for taste. Mix gently to keep the beef tender. Next, I divide the mixture into two equal parts. Shape each part into a patty, about ¾ inch thick. Now, it’s time to cook the patties. I return the skillet to the stove, adding the remaining butter. I turn the heat to medium-high. I cook the patties for about 4 to 5 minutes per side. You can adjust the time based on how you like your meat cooked. During the last minute, I add a slice of Swiss cheese on top of each patty. This makes it melt beautifully. If you like, spread mayonnaise on one side of each slice of rye bread. I take two slices and place a cheesy patty on the unbuttered side of each. Then, I add a generous helping of the caramelized onions. Finally, I close the sandwiches with the other slices of bread, making sure the buttered side is facing up. Next, I wipe the skillet to remove any bits left behind. I heat the skillet over medium-low heat. I grill the assembled sandwiches for about 3 to 4 minutes per side. I want them to be golden brown and crispy. Using a spatula, I press down gently on the sandwiches. This helps everything cook evenly and stay melty inside. For the full recipe, check the main article. - Best cooking temperatures: Start with medium-high heat. This helps to brown the outside and keep the inside juicy. - Checking for doneness: Use a meat thermometer. Aim for 160°F for ground beef. A quick poke with your finger can also help; if it feels firm, it’s likely done. - Choosing the right type of rye bread: Look for hearty rye bread with good texture. The flavor of the rye pairs well with the meat and cheese. - Alternative bread options: If rye isn't your favorite, try sourdough or whole wheat. Both provide a nice crunch and flavor. - Best side dishes to pair with patty melts: Crispy fries or sweet potato fries are classic choices. A fresh side salad adds a nice crunch. - Ideal garnish ideas for presentation: A sprinkle of fresh parsley or dill can brighten up your plate. You can also add pickles on the side for extra tang. For the complete recipe, check the Full Recipe section. {{image_4}} You can switch up the meat in your patty melt. Try ground turkey or even a veggie patty for a healthier twist. Both options keep the sandwich tasty. For cheese, Swiss is classic, but you can use cheddar or pepper jack for a kick. These swaps change the flavor, keeping it fresh and exciting. The patty melt has many faces. In classic forms, it stays true to its roots. But gourmet versions take it to new heights. Chefs add toppings like sautéed mushrooms or spicy sauces. You can find global inspirations too. Some cultures use different breads or spices. Each region puts its own spin on this beloved dish, making it unique. If you need a gluten-free option, choose gluten-free bread. Many brands make great choices that hold up well. For a vegan patty melt, use a plant-based patty and vegan cheese. These swaps keep the spirit of a patty melt while fitting dietary needs. Experiment with these variations to make your patty melt your own. Check out the Full Recipe for more ideas! To keep your leftover patty melts fresh, use proper refrigeration techniques. First, let the patty melts cool down to room temperature. This step helps avoid condensation, which can make your sandwiches soggy. Next, wrap each patty melt tightly in plastic wrap or aluminum foil. You can also place them in an airtight container. The best container types are glass or BPA-free plastic. These containers keep out moisture and protect from odors in the fridge. When you’re ready to enjoy leftovers, reheating correctly is key. You can use a skillet, oven, or microwave. The skillet method brings back the original texture and flavor. Heat the skillet over medium heat. Place the patty melt in the pan and cover it with a lid. This step helps the cheese melt without drying out the bread. Heat for about 3-4 minutes on each side. If you prefer the oven, preheat it to 350°F (175°C). Wrap the patty melt in foil to keep it from drying out. Heat for about 10-15 minutes. This keeps the bread crisp while warming the filling. Avoid the microwave if you want to keep your patty melt from getting soggy. Microwaving can make the bread soft and chewy. If you must use it, heat for only 30 seconds and check if it’s warm enough. Enjoy your delicious patty melts again! For the full recipe, refer back to the classic patty melt section. A burger is usually served on a bun. A patty melt uses bread like rye. In a burger, you find toppings like lettuce and tomato. In a patty melt, you get melted cheese and onions. The cooking method differs too. A burger is grilled, while a patty melt is cooked in a skillet. Yes, you can prepare the meat and onions in advance. Cook the patties and caramelize the onions. Store them in the fridge. When you're ready to eat, just assemble and grill the sandwich. This saves time on busy days. Some great sides include: - Crispy fries - Sweet potato fries - Coleslaw - Salad - Pickles These sides balance the rich flavors of the patty melt. You can use lean ground beef for fewer calories. Try whole grain rye bread instead of regular. Add fresh veggies like spinach or tomato. You can also skip the mayonnaise or use a light version. These changes make your meal tasty and healthier. The patty melt has roots in the United States. It gained popularity in diners during the 1940s. Many believe it started in California. The mix of flavors and textures made it a favorite comfort food. Absolutely! While Swiss is classic, you can try: - Cheddar - Pepper jack - American - Gouda Each cheese adds a unique taste to your patty melt. Experiment to find your favorite! For the complete recipe, check out the [Full Recipe]. A classic patty melt combines simple, tasty ingredients for a satisfying meal. We covered essential items like ground beef, Swiss cheese, and rye bread. You learned steps to prepare, assemble, and grill your sandwich for that perfect finish. Tips on customization and storage enhance your experience. Remember that variations let you make it your own. Enjoy your cooking and the delicious patty melts you create!](https://fastmealmate.com/wp-content/uploads/2025/06/2e833bb9-ccca-4b03-bda9-565aa6b9e8a1-768x768.webp)

![To make Greek chicken bowls, gather these key items: - 2 large chicken breasts - 2 tablespoons extra virgin olive oil - 1 teaspoon dried oregano - 1 teaspoon garlic powder - 1 teaspoon smoked paprika - Salt and freshly ground black pepper to taste - 1 cup quinoa, rinsed under cold water - 2 cups vegetable broth (or water) - 1 cup cherry tomatoes, halved - 1 cucumber, diced into bite-sized pieces - ½ red onion, thinly sliced - 1 cup kalamata olives, pitted and halved - ½ cup crumbled feta cheese - ½ cup tzatziki sauce - Fresh parsley, finely chopped for garnish Feel free to add more flavor and texture with these extras: - Avocado slices - Roasted red peppers - Spinach or mixed greens - Artichoke hearts For the best results, consider these brands: - Olive Oil: Colavita or Pompeian - Quinoa: TruRoots or Ancient Harvest - Feta Cheese: Athenos or Dodoni - Tzatziki Sauce: Oikos or Fage These ingredients come together to create a healthy, delicious meal. You can find the full recipe for a complete guide on how to prepare these tasty bowls. First, let's marinate the chicken. In a medium bowl, mix together the olive oil, oregano, garlic powder, smoked paprika, salt, and black pepper. Use a whisk to blend them well. Add the chicken breasts and coat them completely with this marinade. Cover the bowl and place it in the fridge. Let the chicken sit for at least 30 minutes or up to 2 hours. This step adds great flavor. While the chicken marinates, it's time to cook the quinoa. In a medium saucepan, combine the rinsed quinoa and vegetable broth. Bring the mixture to a rolling boil. Then, reduce the heat to low and cover the pot. Let it simmer for about 15 minutes. The quinoa should absorb all the liquid and become fluffy. Once done, remove it from heat and let it sit for 5 more minutes while covered. Now, we grill the chicken. Preheat your grill or skillet over medium-high heat. Place the marinated chicken on the grill or skillet. Cook each side for about 6-7 minutes. You want the chicken to reach an internal temperature of 165°F (75°C). Once it’s done, move the chicken to a cutting board. Let it rest for a few minutes before slicing it thin. While the chicken cooks, prepare the veggies. Start by halving the cherry tomatoes. Next, dice the cucumber into bite-sized pieces. Then, thinly slice the red onion. Once done, set the veggies aside. This step adds freshness and crunch to your bowls. Grab four serving bowls to assemble your meal. Begin by spooning a generous scoop of fluffy quinoa into each bowl. Next, layer on the sliced chicken. Follow this with the halved cherry tomatoes, diced cucumber, red onion, and halved kalamata olives. Finally, sprinkle crumbled feta cheese on top for a creamy touch. To finish your bowls, drizzle a good amount of tzatziki sauce over each one. This sauce adds a cool and refreshing flavor. For the final touch, sprinkle finely chopped parsley on top. This adds color and freshness. Now you have a delightful Greek chicken bowl! For the full recipe, check [Full Recipe]. To make Greek chicken bowls shine, focus on marinating the chicken well. A good marinade adds flavor, so let it sit for at least 30 minutes. You can use a grill or skillet for cooking. Both methods yield juicy chicken. For grilling, preheat the grill to medium-high heat. Cook the chicken for about 6-7 minutes on each side. If using a skillet, add a splash of olive oil to keep the chicken moist. You can enhance flavors easily. Try adding lemon zest to the marinade for a fresh twist. Fresh herbs like dill or mint can boost your vegetables. For a spicy kick, sprinkle some red pepper flakes on the chicken. If you love garlic, use fresh minced garlic instead of powder. This small change adds depth to the dish. Presentation matters! Use colorful bowls to make your meal pop. Layer the ingredients nicely. Start with a base of fluffy quinoa. Arrange the sliced chicken and veggies in a circular pattern on top. Add crumbled feta and a drizzle of tzatziki sauce for a beautiful finish. Don’t forget to add a lemon wedge on the side. It makes the dish look fresh and inviting. For more detail, check the Full Recipe. {{image_4}} You can easily swap chicken for other proteins. Try grilled shrimp for a seafood twist. It cooks quickly and adds a nice flavor. Lamb is another great choice for those who want something richer. If you enjoy beef, use thinly sliced steak. Each protein brings its unique taste and texture. If you prefer a plant-based meal, consider chickpeas or lentils. Both are high in protein and very filling. You can roast chickpeas with spices for extra crunch. Another option is marinated tofu. It soaks up flavors well and works perfectly in bowls. While tzatziki is classic, you can mix things up with other sauces. A tahini dressing adds a nutty flavor that complements the veggies. Or, try a lemon herb vinaigrette for bright freshness. You could even drizzle some spicy harissa for a kick. Each option changes the flavor profile and keeps your meals exciting. For a complete recipe, check out the Full Recipe for Mediterranean Bliss Greek Chicken Bowls. To store leftovers, place your Greek chicken bowls in airtight containers. Make sure to separate the chicken, quinoa, and veggies if you can. This keeps everything fresh and tasty. You can store them in the fridge for up to three days. When you’re ready to eat, reheat your bowl in the microwave. Just cover the bowl with a microwave-safe lid or wrap. Heat it in short bursts, about one minute at a time. Stir in between to ensure even warming. You can also reheat everything in a skillet over low heat. If you want to freeze your Greek chicken bowls, do so before adding tzatziki or feta cheese. Freeze the chicken, quinoa, and veggies in airtight bags. They can last for up to three months in the freezer. When ready to eat, thaw overnight in the fridge. Then, reheat and add fresh toppings. This way, you keep the flavors bright! To make Greek chicken bowls, start by marinating the chicken. Mix olive oil, oregano, garlic powder, smoked paprika, salt, and pepper. Coat the chicken breasts and let them sit for at least 30 minutes. Next, cook the quinoa in vegetable broth until fluffy. While it cooks, grill or pan-cook the chicken until it reaches 165°F. Prepare your veggies by chopping cherry tomatoes, cucumber, and red onion. Assemble the bowls with quinoa, chicken, veggies, olives, feta cheese, and tzatziki sauce. For the full recipe, check out the detailed steps above. Yes, using store-bought tzatziki sauce is a great time saver. It can add a nice flavor without extra work. Just make sure to choose a brand you like. Look for fresh options in the refrigerated section for the best taste. If you want to change it up, try brown rice or farro as substitutes for quinoa. Both have great textures and flavors. You can also use couscous or bulgur wheat for a different twist. Just adjust the cooking times based on what you choose. Greek chicken bowls will stay fresh in the fridge for up to four days. Store them in airtight containers to keep them tasty. Always check for any signs of spoilage before eating leftovers. Absolutely! You can marinate the chicken and cook the quinoa a day ahead. Chop your veggies in advance and store them in the fridge. This way, you can assemble and enjoy bowls quickly when you're ready to eat. Greek chicken bowls are simple to make and tasty. We covered ingredients, cooking steps, and clever tips. You can try different proteins or sauces to mix things up. Keep leftovers fresh and reheat them easily. In closing, making these bowls is fun and healthy. You can enjoy cooking while creating delicious meals. Follow these steps, and you’ll impress anyone who eats your food!](https://fastmealmate.com/wp-content/uploads/2025/06/353123fa-fb97-4087-931a-2db7911ed322-768x768.webp)