
No-Bake Christmas Reindeer Treats Festive and Fun


Get ready to bring some cheer to your kitchen this holiday season with my No-Bake Christmas Reindeer Treats! These fun, easy-to-make treats will delight kids and adults alike. No ovens needed, just a bit of mixing and decorating. Whether you’re prepping for a party or a cozy family night, these festive snacks will make your celebration merry. Let’s dive into the ingredients and create some holiday magic together!
Why I Love This Recipe
- Easy to Make: This no-bake recipe is simple and quick, perfect for involving kids or for a last-minute holiday treat.
- Festive Presentation: These treats look adorable and are sure to be a hit at any holiday gathering, adding fun to your dessert table.
- Delicious Combination: The mix of chocolate, peanut butter, and sweet toppings creates a delectable flavor that everyone loves.
- Customizable: Feel free to get creative with the decorations or try different candies for unique variations of the reindeer treats.
Ingredients
List of Ingredients
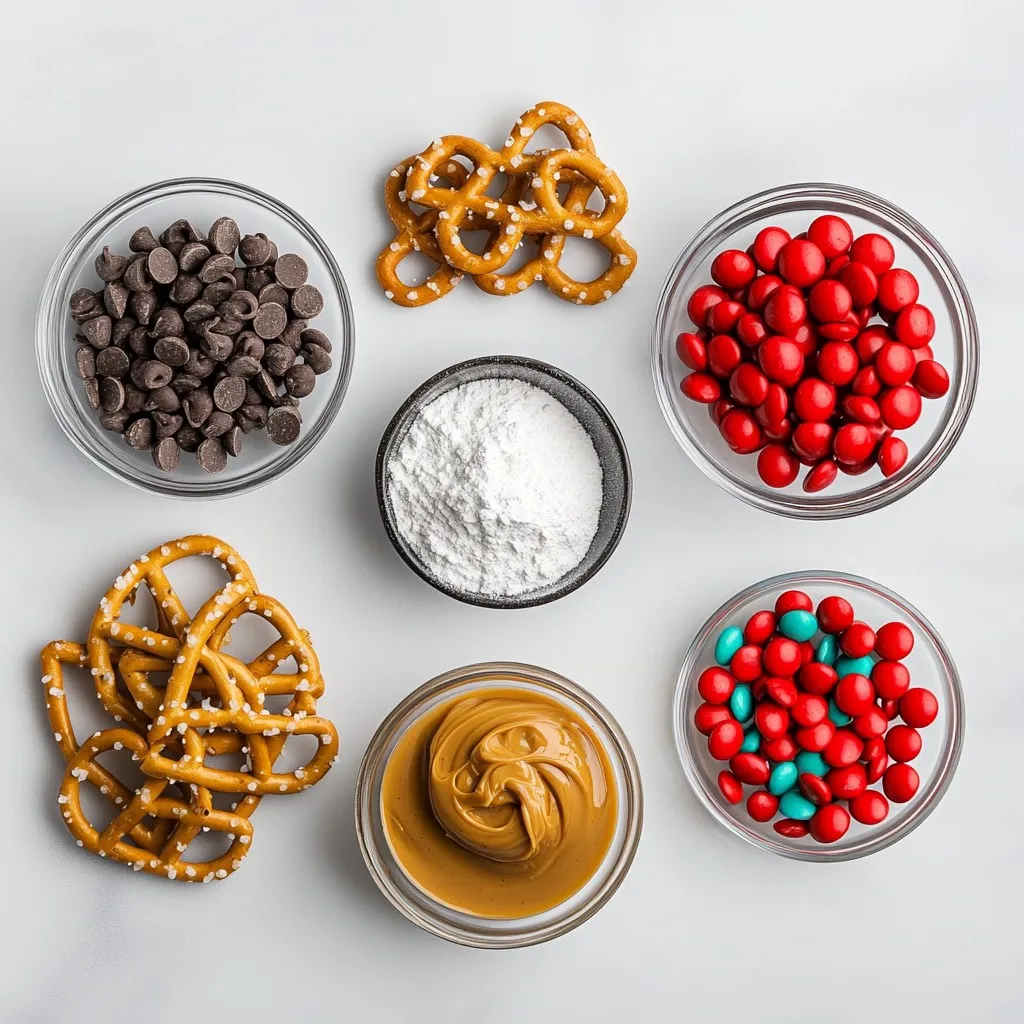
To make No-Bake Christmas Reindeer Treats, you need:
– 2 cups chocolate sandwich cookies, finely crushed
– 1 cup creamy peanut butter
– ½ cup powdered sugar
– 1 cup chocolate chips (for melting)
– 16 pretzel twists (for antlers)
– 16 candy eyes
– 16 red M&M’s (for noses)
– 1 tablespoon vegetable oil (for melting chocolate)
Measurement Conversions
If you need to convert measurements, here’s a quick guide:
– 1 cup = 8 fluid ounces
– ½ cup = 4 fluid ounces
– 2 cups = 16 fluid ounces
– 1 tablespoon = 3 teaspoons
Alternative Ingredients
You can swap some ingredients based on your taste:
– Use almond butter instead of peanut butter for a nutty twist.
– Try using gluten-free cookies for a gluten-free option.
– Dark chocolate chips work well if you prefer a richer taste.
– Mini pretzels can replace pretzel twists for a different look.
These options allow you to customize your treats while keeping the fun and festive spirit alive!
Step-by-Step Instructions
Preparation Overview
Start by gathering all your ingredients. You will need chocolate sandwich cookies, peanut butter, and powdered sugar. Also, have your chocolate chips, pretzels, candy eyes, red M&Ms, and vegetable oil ready. This will help keep things organized.
Mixing the Dough
In a large mixing bowl, combine the crushed chocolate sandwich cookies, peanut butter, and powdered sugar. Use a spatula or your hands to mix until it forms a dough. It should feel sticky but hold together well. Once mixed, scoop out a tablespoon of the dough. Roll it into a ball about 1-inch wide. Repeat this until you shape all the dough into 16 balls.
Chilling and Coating
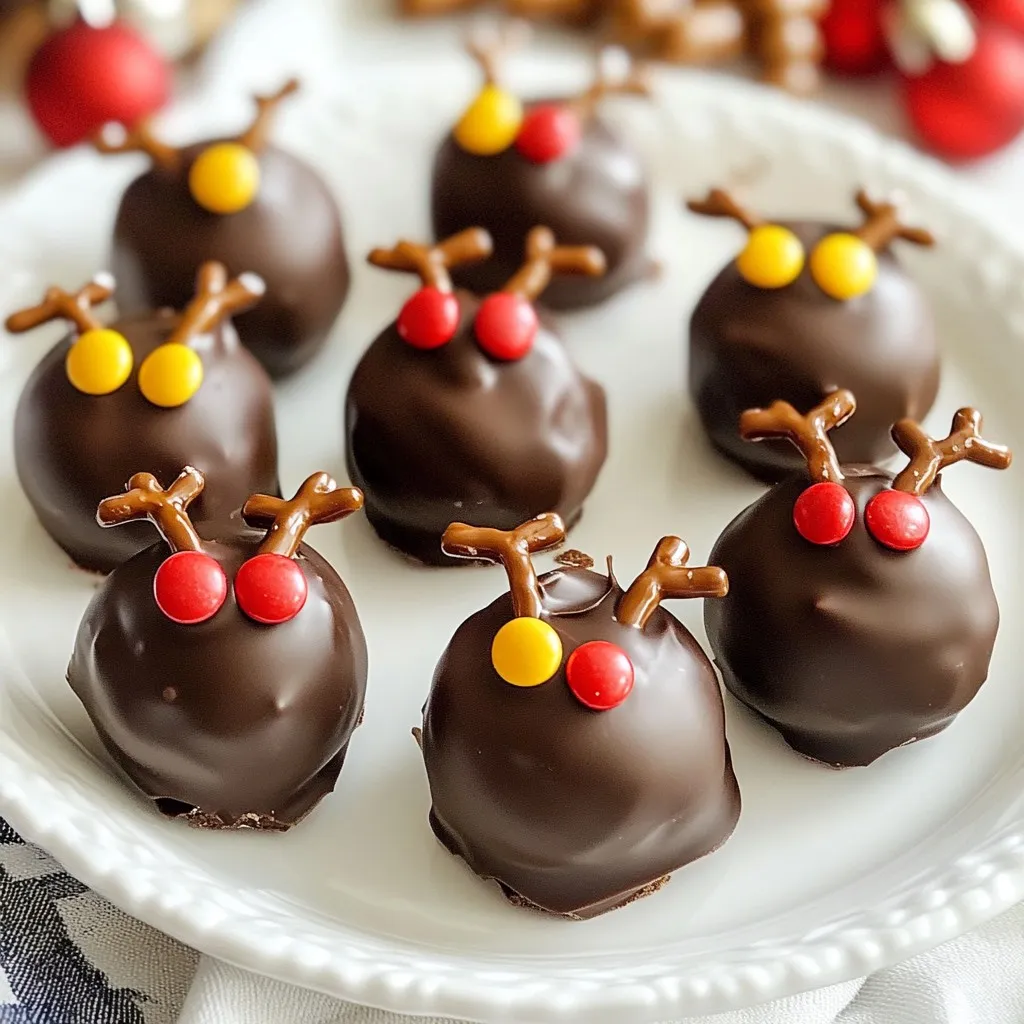
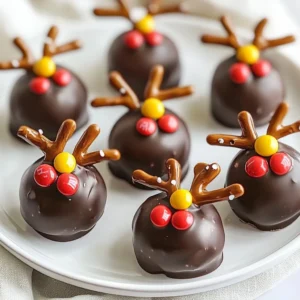
Place the cookie balls on a baking sheet lined with parchment paper. Chill them in the fridge for about 30 minutes. This helps them firm up. While they chill, melt the chocolate. In a microwave-safe bowl, mix chocolate chips and vegetable oil. Microwave for 30 seconds at a time, stirring after each interval. Once smooth, remove the cookie balls from the fridge. Dip each ball into the melted chocolate, ensuring it is fully coated. Then, place them back on the parchment paper. Quickly add pretzel twists for antlers before the chocolate hardens. Press two candy eyes and a red M&M on each ball for faces. Let the chocolate set at room temperature or chill briefly to firm up.
Tips & Tricks
Perfecting the Chocolate Coating
To get a smooth chocolate coat, use good quality chocolate chips. I mix in a bit of vegetable oil. This keeps the chocolate shiny and easy to spread. Melt the chips in short bursts in the microwave. Stir often to avoid burning. After dipping, let excess chocolate drip off before setting the treats down.
Decorating Techniques
When you place the pretzel twists, do it while the chocolate is still wet. This helps them stick well. For the eyes and noses, use a gentle push. It helps them stay in place. You can use mini chocolate chips if you can’t find candy eyes. The red M&M adds a nice pop of color.
Serving Suggestions
These reindeer treats look great on a festive platter. You can add sprinkles for extra flair. Try using green and red sprinkles to match the holiday theme. These treats are perfect for parties or as gifts. Just pack them in a cute box. They will brighten anyone’s day!
Pro Tips
- Chill for Better Coating: Make sure to chill the cookie balls for at least 30 minutes. This helps them hold their shape better when you dip them in chocolate.
- Choose Quality Chocolate: Use high-quality chocolate chips for melting to ensure a smooth and delicious coating.
- Customize Your Antlers: Get creative with your antlers! You can use different types of pretzels or even chocolate-covered pretzels for a fun twist.
- Let the Chocolate Set: Allow the chocolate to set at room temperature for the best texture. If you’re in a hurry, you can place them in the fridge for a quick firming process.
Variations
Flavor Variations
You can change the flavor of these treats easily. Try using vanilla cookies for a lighter taste. You can also swap peanut butter for almond butter. This gives a nutty twist that pairs well with chocolate. For a minty version, add mint extract to the melted chocolate. Just a few drops will do!
Dietary Substitutes
If you have allergies, there are great swaps. Use sunflower seed butter instead of peanut butter for nut-free treats. For a gluten-free option, choose gluten-free cookies. You can find many brands that taste just as good. If you want a vegan treat, use dairy-free chocolate chips and nut butter.
Creative Decoration Ideas
Make your reindeer treats even more fun with decorations. Use mini marshmallows instead of candy eyes for a fluffy look. You can also add colorful sprinkles for a festive touch. Try using different colored M&M’s for a unique nose. Let your kids help with the decorating. It’s a fun way to celebrate the season!
Storage Info
Best Storage Practices
To keep your No-Bake Christmas Reindeer Treats fresh, store them in an airtight container. This will help them stay moist and tasty. I like to use a container that is not too big. It helps prevent the treats from moving around and getting damaged.
Shelf Life
When stored properly, these treats last about five days at room temperature. If you keep them in the fridge, they can last up to two weeks. Just make sure to check for any changes in texture or smell before eating.
Freezing Instructions
You can freeze these treats for longer storage. Simply place them in a single layer on a baking sheet and freeze for about an hour. Once firm, transfer them to an airtight container or freezer bag. They will keep well for up to three months. To enjoy, thaw them in the fridge overnight before serving.
FAQs
Can I make these treats in advance?
Yes, you can make these treats in advance. They stay fresh in the fridge for up to a week. Just store them in an airtight container. If you want to freeze them, wrap each treat in plastic wrap. Then, place them in a freezer bag. They can last for up to three months in the freezer. Just let them thaw in the fridge before serving.
How can I adjust the recipe for different servings?
To adjust the recipe for different servings, you can easily scale the ingredients. For example, if you want to make 8 treats instead of 16, just halve each ingredient. If you need 32 treats, double the amounts. Keep the ratios the same for the best results. Remember, each treat should still be about 1 inch in size.
What can I use instead of peanut butter?
If you need a peanut butter alternative, try using almond butter or sun butter. Both options provide a similar texture and flavor. Nut-free options are great for people with allergies. You can also use chocolate hazelnut spread, but that will change the taste a bit. Just make sure any substitute is smooth for easy mixing.
This blog post covered everything you need to know about making delicious treats. We looked at key ingredients, step-by-step instructions, and helpful tips. I shared ways to add your own spin with flavor and decoration options. Plus, we discussed storage to keep your treats fresh.
Remember, cooking is fun! Experiment and enjoy the process. Whether you follow the recipe exactly or make it your own, have fun in the kitche
No-Bake Christmas Reindeer Treats
Ingredients
- 2 cups chocolate sandwich cookies, finely crushed
- 1 cup creamy peanut butter
- ½ cup powdered sugar
- 1 cup chocolate chips (for melting)
- 16 pieces pretzel twists (for antlers)
- 16 pieces candy eyes
- 16 pieces red M&M’s (for noses)
- 1 tablespoon vegetable oil (for melting chocolate)
Instructions
- In a large mixing bowl, combine the finely crushed chocolate sandwich cookies, creamy peanut butter, and powdered sugar. Use a spatula or your hands to mix well until the ingredients come together and form a dough-like consistency.
- Scoop a tablespoon of the mixture and roll it into a ball, approximately 1-inch in diameter. Continue this process until all the mixture is shaped into about 16 balls.
- Arrange the cookie balls on a baking sheet lined with parchment paper. Place them in the refrigerator for about 30 minutes to firm up nicely.
- While the cookie balls are chilling, prepare to melt the chocolate. In a microwave-safe bowl, combine the chocolate chips and vegetable oil. Microwave in 30-second intervals, stirring in between, until the mixture is completely smooth and glossy.
- Once the cookie balls are firm, remove them from the refrigerator. Dip each ball into the melted chocolate, ensuring that they are thoroughly coated. Place the chocolate-covered balls back onto the parchment paper.
- While the chocolate coating is still wet, gently press two pretzel twists into the top of each chocolate-coated ball to resemble antlers.
- Carefully place two candy eyes on each reindeer treat and top with a red M&M as the nose, slightly pressing them into the chocolate.
- Allow the chocolate to set completely at room temperature or refrigerate briefly for a quicker firming process.
![To make a tasty Blueberry Peach Crostata, you’ll need a few simple ingredients. Here’s what to gather: - 1 cup fresh blueberries - 2 ripe peaches, diced (about 2 cups) - 1/4 cup granulated sugar - 1 tablespoon freshly squeezed lemon juice - 1 tablespoon cornstarch - 1 teaspoon pure vanilla extract - 1 pre-made pie crust (or homemade for an artisanal touch) - 1 egg, beaten (for gloss and color) - 1 tablespoon unsalted butter, cut into small pieces - A pinch of fine sea salt - Optional: powdered sugar for a final dusting Each ingredient plays a key role in the taste and texture of the crostata. The fresh blueberries and peaches bring sweetness and juiciness. The sugar enhances their natural flavors, while lemon juice adds a bright zing. Cornstarch helps thicken the filling, keeping it from getting too runny. Using vanilla extract adds depth to the fruit, and a pinch of sea salt balances the sweetness. For the crust, you can choose a pre-made option for ease or whip up your own for that homemade touch. The beaten egg gives the edges a lovely golden color, while unsalted butter adds richness. Don’t forget the powdered sugar for a sweet finish on top! Ready to gather these ingredients? You can find the full details in the [Full Recipe]. 1. Preheat the Oven: Start by heating your oven to 375°F (190°C). This step ensures the crostata cooks evenly. 2. Prepare the Baking Sheet: Line a baking sheet with parchment paper. This helps with easy cleanup later. 3. Prepare the Fruit Filling: In a bowl, mix fresh blueberries and diced peaches. Add granulated sugar, lemon juice, cornstarch, vanilla extract, and a pinch of sea salt. Toss gently. Let this mixture rest for about 10 minutes. This helps the flavors blend. 4. Roll Out the Pie Crust: Roll out your pie crust on a floured surface. Aim for a circle about 12 inches wide. If you use a store-bought crust, make sure it is cold for easy handling. 1. Shape the Crostata: Place the rolled crust on your baking sheet. Spoon the fruit mixture into the center, leaving a 2-inch border. 2. Fold the Edges: Carefully fold the crust edges over the filling. Create pleats to give it a rustic look. Make sure some fruit shows at the center. 3. Apply the Egg Wash: Use a pastry brush to coat the crust edges with the beaten egg. This gives it a nice golden color when baked. 4. Dot with Butter: Scatter small pieces of butter over the fruit filling. This adds extra richness during baking. 1. Bake: Place your crostata in the preheated oven. Bake for 30-35 minutes. Look for a golden-brown crust and bubbling filling. 2. Cool Before Serving: Once baked, let the crostata cool on the sheet for 10 minutes. This makes it easier to slice. Dust with powdered sugar if you like, then serve warm or at room temperature. You can find the Full Recipe for more detailed steps and tips. Enjoy your delicious Blueberry Peach Crostata! To create the best crust, start with cold ingredients. This helps the crust stay flaky. Use your fingers to mix the butter into the flour until it looks like coarse crumbs. Do not overwork the dough; handle it gently. Balancing sweetness and acidity is key. Blueberries are sweet, while peaches add a nice tang. Use lemon juice to brighten the flavors. Taste your filling before baking. If it seems too sweet, add a tiny bit of salt. This will balance the flavors better. For a beautiful display, serve slices on a rustic wooden board. Garnish with fresh mint leaves for color. You can also dust the top with powdered sugar for a nice finish. Pair your crostata with a scoop of vanilla ice cream or a dollop of whipped cream. The cold creaminess goes perfectly with the warm fruit filling. You can also try it with a drizzle of honey for an extra touch. If your crust is too soggy, it may need more time in the oven. Check the bottom of the crust to see if it is golden brown. You can also try baking it a few minutes longer. To avoid over-baking, keep an eye on the crostata as it cooks. The crust should be golden and the filling should bubble. If you notice it browning too quickly, cover it lightly with foil. This will help protect it while it finishes baking. For the full recipe, visit the link. {{image_4}} You can switch up the fruits in your crostata. For a fun twist, try using apricots or cherries. Both fruits bring a unique taste. They also pair well with blueberries and peaches. If you need a gluten-free option, use almond flour or a gluten-free pie crust. This keeps your dessert delicious and safe for gluten-sensitive friends. Want to add some extra flavor? Sprinkle in some cinnamon or nutmeg. These spices add warmth and depth to the filling. You can also try fresh herbs like basil or mint. They give a fresh twist that brightens the fruit flavors. When it comes to serving, think outside the box. A drizzle of homemade caramel sauce or a scoop of creamy vanilla ice cream works wonders. For special occasions, serve slices on a beautiful platter. Add fresh mint leaves for color and aroma. Your guests will love the visual and tasty touch! For the complete recipe, check out the Full Recipe section. To keep your blueberry peach crostata fresh, store it in the fridge. First, let it cool completely. Then, cover it with plastic wrap or place it in an airtight container. This helps keep the crust crispy and the filling juicy. You can enjoy it for up to three days. If you want to save it for longer, freezing is a great option. Wrap the crostata tightly in plastic wrap, then in aluminum foil. This method helps prevent freezer burn. You can freeze it for up to three months. When you're ready to eat it, just thaw it in the fridge overnight. To reheat the crostata, the oven is your best friend. Preheat it to 350°F (175°C). Place the crostata on a baking sheet and warm it for about 10-15 minutes. This method keeps the crust nice and flaky. If you want to refresh the flavors, brush a little melted butter on top before reheating. This adds richness and helps the fruit flavors shine. Enjoy your crostata warm for the best taste! Can I make the crostata ahead of time? Yes, you can make the crostata ahead. Prepare the filling and crust separately. Store them in the fridge for a day. When ready, assemble and bake. This keeps the crust fresh. How do I know when the crostata is done baking? Look for a golden brown crust and bubbling filling. A toothpick should slide easily through the crust. If it’s too soft, bake a few more minutes. What’s the difference between a crostata and a galette? A crostata is a rustic pie, often filled with fruit. A galette is similar but usually has a more free-form shape. Both have a flaky crust. They are delicious and easy to make. Can I use frozen fruit in the recipe? Yes, frozen fruit works well. Just thaw and drain excess liquid. This keeps the filling from being too watery. How do I keep the crust from getting soggy? To prevent a soggy crust, sprinkle cornstarch on the bottom before adding fruit. This absorbs extra juices. Bake until the crust is golden for best results. Making the crostata vegan To make a vegan crostata, replace the egg wash with a plant-based milk. Use a vegan pie crust. The filling stays the same, ensuring a tasty dessert. Tips for reducing sugar in the recipe You can cut the sugar by half. Use ripe fruits for natural sweetness. Add a touch of honey or maple syrup if needed. This keeps the flavor balanced and fresh. For the Full Recipe, check the main section. In this post, we covered how to make a delicious fruit crostata with fresh ingredients. You learned about the necessary ingredients, step-by-step instructions, and useful tips for perfecting your dessert. We also explored variations and storage options to extend its life. Now, you’re equipped to create your own stunning crostata. Experiment with flavors and enjoy the praise from family and friends! Your new dessert will impress at any gathering.](https://fastmealmate.com/wp-content/uploads/2025/06/584381ba-fe5e-4dcd-ab97-e37815fc2576-768x768.webp)
. To make your shortcake soft and fluffy, avoid overmixing the dough. Overmixing can lead to tough shortcakes. Mix just until the dough comes together. This keeps your shortcakes light. The temperature of your ingredients matters. Use cold butter and chilled cream. Cold butter creates steam when baked. This steam helps the shortcakes rise. Chilled cream keeps the dough from getting warm. Use a good pastry cutter or your hands to mix the butter. A sturdy mixing bowl helps, too. For cutting, a round biscuit cutter works best. It gives neat edges for your shortcakes. For baking, use a parchment-lined baking sheet. This prevents sticking and makes cleanup easier. A wire rack helps cool the shortcakes evenly after baking. Whipped cream is a classic topping for your shortcake. It adds creaminess and balances the sweetness of the strawberries. You can also use ice cream for a richer dessert. For a beautiful presentation, garnish with fresh strawberries on top. A sprinkle of mint leaves adds color and freshness. Serve your shortcake with a dollop of whipped cream on the side for extra delight. For the full recipe, check the Classic Strawberry Shortcake Delight. {{image_4}} You can swap strawberries for other fruits. Berries, peaches, and rhubarb work great. For berries, use blueberries, raspberries, or blackberries. Just follow the same steps for macerating. With peaches, slice them thin and sprinkle with sugar. Let them sit for about 20 minutes to get juicy. Rhubarb needs a little cooking. Chop it and simmer with sugar until tender. Then use it just like strawberries. Whipped cream can be fun! Try adding different flavors to it. Mix in vanilla, almond, or even a bit of lemon zest. You can create a unique taste. For a twist, drizzle chocolate or caramel over the top. Melt chocolate chips for a rich sauce, or warm up caramel. Both add a nice touch to your dessert. Want a vegan version? Swap dairy for plant-based options. Use coconut cream instead of heavy cream. For the shortcake, replace butter with coconut oil. You can choose almond milk or soy milk for the liquid. If you're looking for sugar-free options, use a sugar substitute. Stevia or monk fruit can work well. Just adjust the amount to your taste. Feeling adventurous? Check the Full Recipe to see all the details! To keep your baked shortcakes fresh, store them in an airtight container. Place parchment paper between layers to avoid sticking. Store at room temperature for up to two days. If you need to keep them longer, refrigerate for up to a week. However, cold can change the texture. For best taste, eat them fresh. After macerating your strawberries, cover them tightly with plastic wrap. This keeps them juicy and tasty. Store them in the fridge for up to three days. Avoid washing them until just before use. Moisture can cause strawberries to spoil quickly. If you have leftover shortcakes, you can warm them up. Preheat your oven to 350°F (175°C). Wrap each shortcake in foil to keep them soft. Heat for about 10 minutes. You can also microwave them for about 15-20 seconds. Just be careful not to overheat. Enjoy the warmth and flavor! Strawberry shortcake has roots in England. The dessert started as a simple biscuit, served with cream and fruit. In the 19th century, it made its way to America. Here, chefs added sweetened strawberries and whipped cream. This combination made it a summer favorite. Today, it remains a beloved treat, especially during strawberry season. Yes, you can prepare some parts ahead. Make the shortcakes and store them in an airtight container. You can also prepare the strawberries and chilling cream earlier. Just keep the strawberries in the fridge. When you're ready to serve, assemble the shortcake. This way, you keep the shortcakes fresh and fluffy. Look for a golden-brown color on top. The edges should feel firm, and the center should spring back when touched. You can also insert a toothpick into the center. If it comes out clean, your shortcakes are done. Be careful not to overbake, as this can dry them out. Yes, you can freeze leftover shortcake. Wrap each piece tightly in plastic wrap, then place them in a freezer bag. They can last up to three months in the freezer. When you want to enjoy them, thaw them in the fridge overnight. Reheat in the oven for a few minutes to restore warmth and texture. In this blog post, we explored how to make great strawberry shortcake. We covered fresh ingredients, the right techniques, and tips for perfect results. Remember, the quality of your ingredients matters most. You can swap in different fruits and toppings for variety. Storing and reheating your shortcake can keep it fresh. I hope these steps inspire you to whip up this classic dessert. Enjoy the sweet rewards of your hard work!](https://fastmealmate.com/wp-content/uploads/2025/06/e92a88f0-b46a-45f1-a24e-50dd1609a02e-768x768.webp)