Thai Drunken Noodles Quick and Tasty Recipe Guide
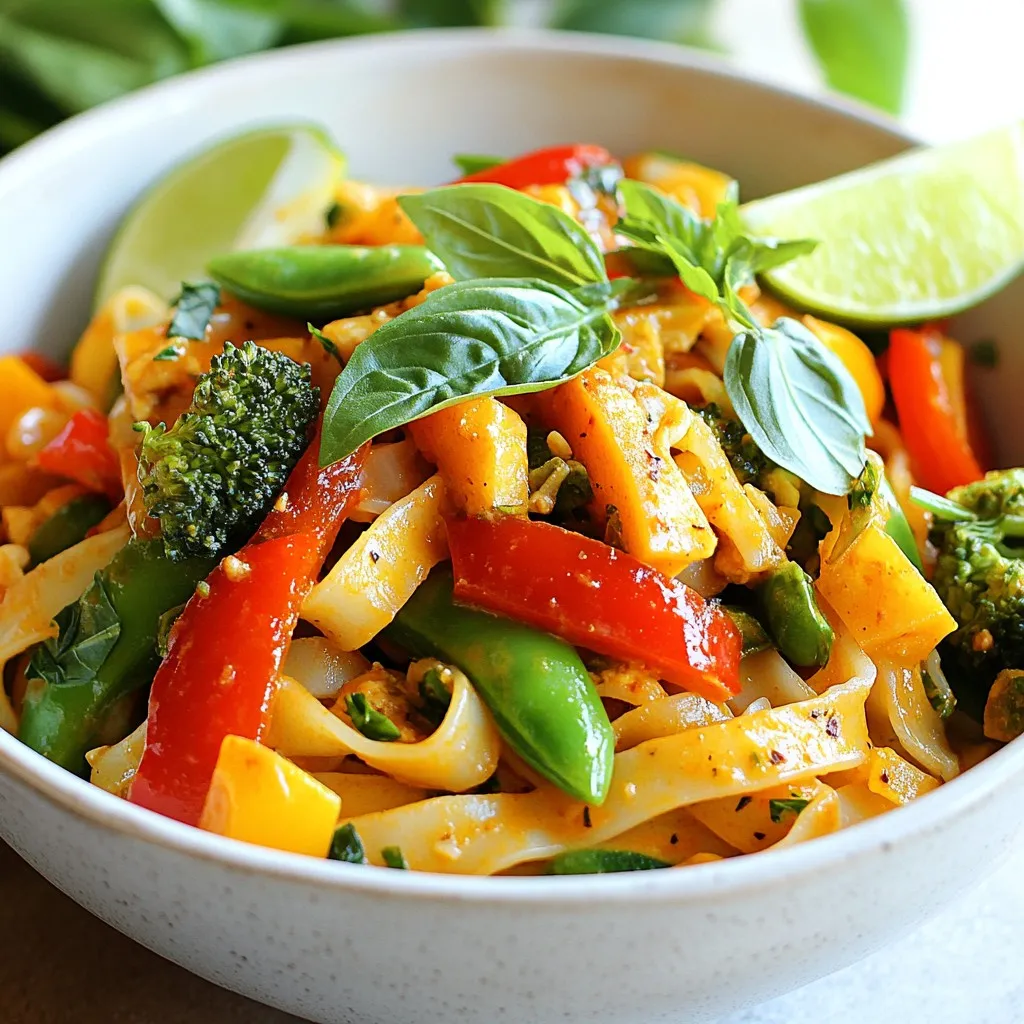

Are you ready to whip up a bold and tasty dish? Thai Drunken Noodles grab your taste buds with rich flavors and quick prep! In this guide, I’ll share easy steps and tips to make this iconic meal at home. Whether you crave spicy, savory, or veggie-packed options, I’ve got you covered. Let’s dive into the world of Thai cooking and create a dish that’ll wow your friends and family!
Why I Love This Recipe
- Bold Flavors: This dish is packed with a vibrant mix of ingredients that create a deliciously bold flavor profile, making every bite exciting.
- Quick and Easy: With just 30 minutes from start to finish, this recipe is perfect for a weeknight dinner when you’re short on time.
- Customizable: This recipe allows for plenty of customization, whether you want to add more veggies, protein, or adjust the spice level to your liking.
- Fresh Ingredients: Using fresh herbs and vegetables not only enhances the flavor but also boosts the nutritional value of this delightful meal.
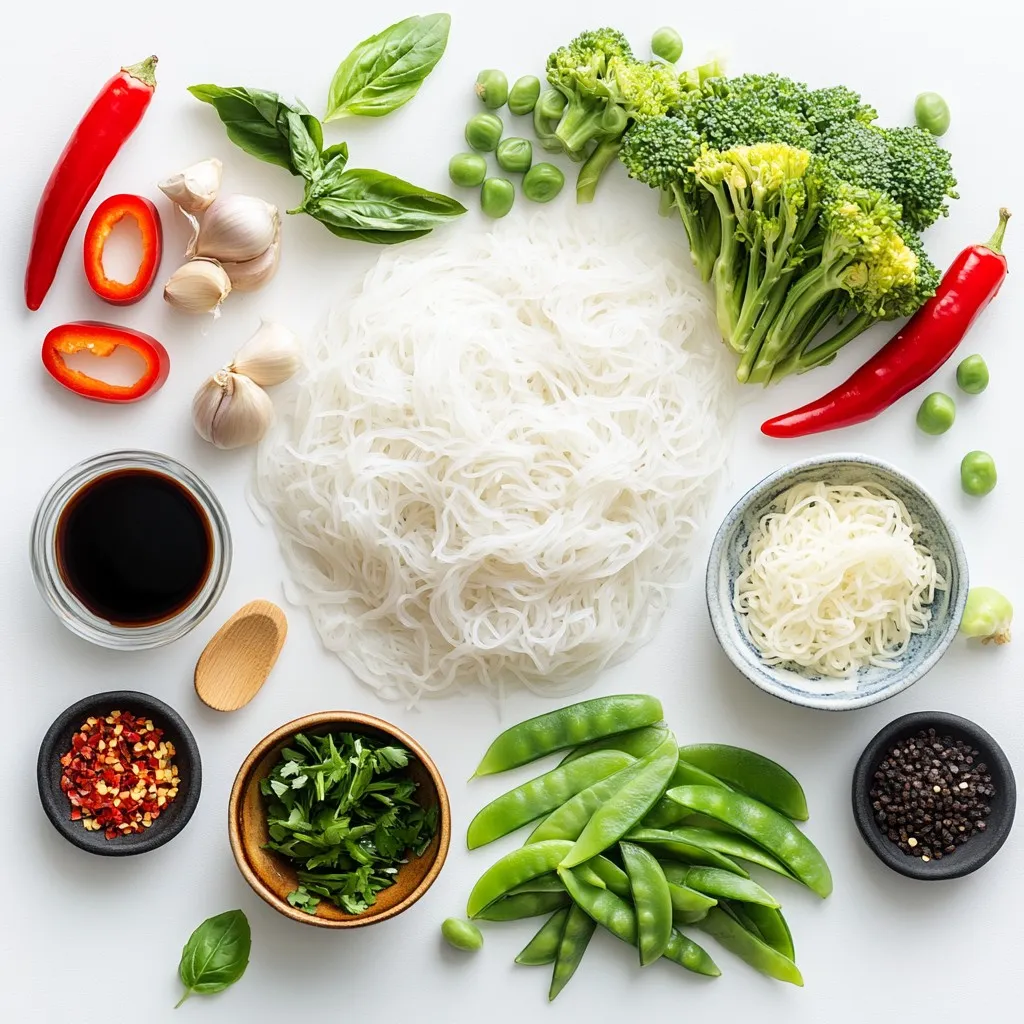
Ingredients
List of main ingredients
For Thai Drunken Noodles, you need these key items:
– 8 oz wide rice noodles
– 2 tablespoons vegetable oil
– 3 cloves garlic, finely minced
– 1-inch piece of ginger, freshly grated
– 1 red bell pepper, sliced into thin strips
– 1 cup broccoli florets, bite-sized
– 1 cup snap peas, trimmed
– 2 green onions, chopped into 1-inch pieces
– 1 small red chili, thinly sliced
– 4 tablespoons soy sauce
– 2 tablespoons oyster sauce
– 1 tablespoon brown sugar
– 1 tablespoon fresh lime juice
– Fresh basil leaves, for garnish
Key ingredients for authentic flavor
To make this dish taste just right, focus on these ingredients:
– Wide rice noodles: They hold sauce well.
– Oyster sauce: It gives a rich, savory flavor.
– Fresh ginger and garlic: These add depth and warmth.
– Basil leaves: They bring freshness and aroma.
Suggested ingredient substitutions
If you can’t find some ingredients, here are swaps you can use:
– Oyster sauce: Use mushroom sauce for a vegetarian option.
– Red chili: Adjust based on your spice level preference.
– Broccoli: You can swap it for green beans or bell peppers.
– Soy sauce: For gluten-free, try tamari or coconut aminos.
Step-by-Step Instructions
Cooking the rice noodles
First, cook the rice noodles. Follow the package instructions carefully. Usually, you will boil them in water for about 5 to 7 minutes. You want them to be al dente, so don’t overcook them. Once they are done, drain the noodles in a colander. Rinse them under cold water to stop the cooking process. Place them in a large bowl and set aside. This keeps them from sticking together.
Sautéing aromatics
Next, grab a large skillet or wok. Heat 2 tablespoons of vegetable oil over medium-high heat. When the oil shimmers, it’s time to add the aromatics. Carefully add 3 minced garlic cloves and 1 inch of freshly grated ginger. Sauté them for about 30 seconds. You want them to smell amazing, but be careful not to burn them. This step builds the base of flavor for your dish.
Stir-frying the vegetables and noodles
Now, it’s time for the fun part. Add the sliced red bell pepper, 1 cup of broccoli florets, and 1 cup of snap peas to the skillet. Stir-fry the veggies for about 3 to 4 minutes. You want them to be tender but still crisp and colorful. Once they look good, add in your cooked rice noodles. Toss in 2 chopped green onions and 1 small sliced red chili too. Stir-fry everything together for another 2 minutes.
Now, prepare the sauce. In a small bowl, mix 4 tablespoons of soy sauce, 2 tablespoons of oyster sauce, 1 tablespoon of brown sugar, and 1 tablespoon of fresh lime juice. Pour this sauce over the noodles and veggies. Toss everything to coat well. Let it cook for one more minute to heat through. Finally, fold in some fresh basil leaves and give it a gentle toss. Your Thai Drunken Noodles are ready to impress!
Tips & Tricks
Achieving authentic flavor profiles
To get the real taste of Thai Drunken Noodles, focus on fresh ingredients. Use garlic and ginger for strong flavor. Fresh basil adds a nice touch. The right sauces are key. Soy sauce gives saltiness, while oyster sauce adds depth. If you want a vegetarian dish, swap oyster sauce for mushroom sauce. Each of these choices brings you closer to that authentic taste.
Cooking tips for perfect texture
Texture is important in this dish. Start with al dente rice noodles. This means they should be firm when you bite them. Drain them well to avoid stickiness. When stir-frying, don’t overcrowd the pan. This helps keep your veggies crisp. Stir-fry on high heat for a short time. This way, you get a nice char without overcooking.
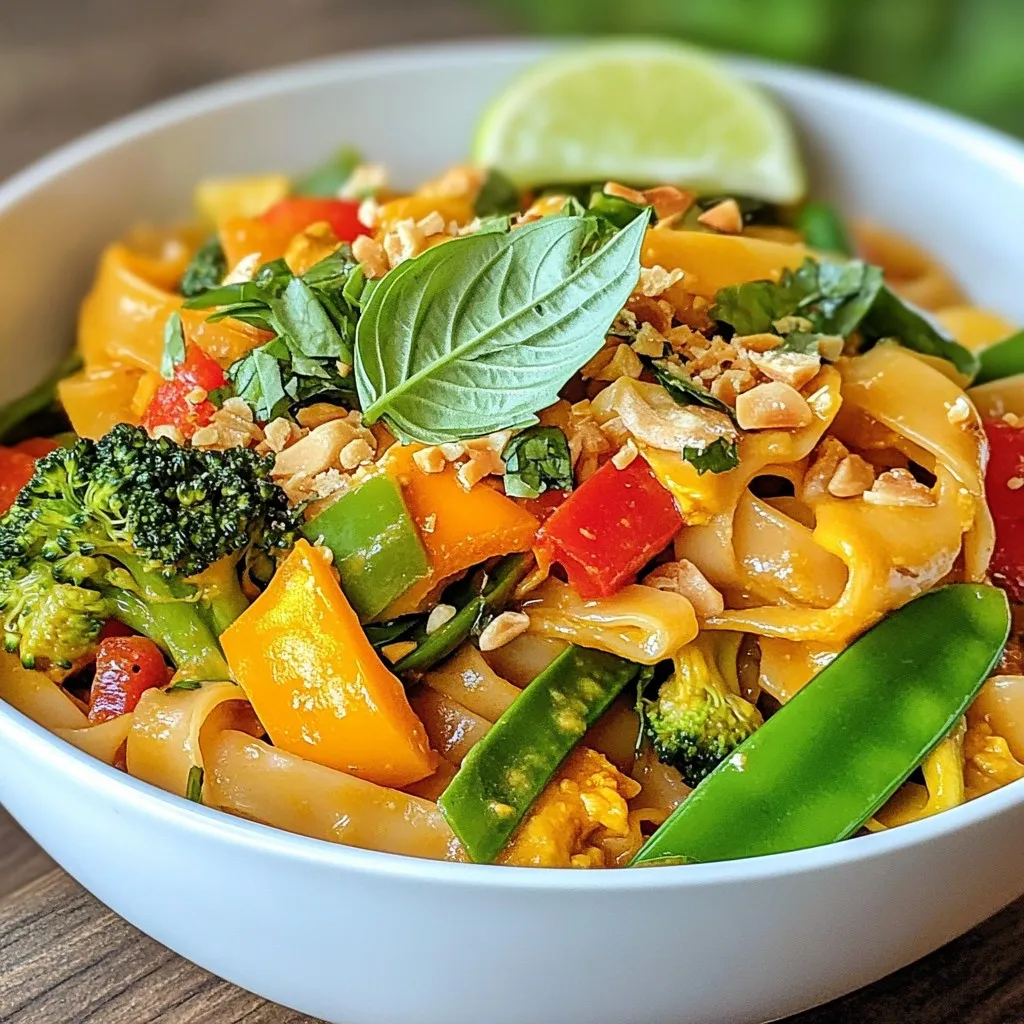
Presentation and serving suggestions
A beautiful plate makes the meal even better. Serve the noodles in a shallow bowl or a wide plate. Top with fresh basil leaves for color. You can add lime wedges on the side for extra zing. For crunch, sprinkle some sesame seeds just before serving. This makes your dish not just tasty, but also pretty!
Pro Tips
- Use Fresh Ingredients: Always opt for fresh vegetables and herbs to enhance the flavor and nutrition of your Drunken Noodles.
- Adjust Spice Levels: Feel free to modify the amount of red chili based on your spice tolerance to ensure the dish is perfect for your palate.
- Don’t Overcook the Noodles: Cook the rice noodles just until al dente, as they will continue to cook slightly when stir-fried with the vegetables.
- Garnish for Flavor: Adding fresh basil and lime wedges not only enhances the presentation but also adds a burst of flavor when served.
Variations
Protein options (chicken, beef, tofu)
You can swap proteins in Thai Drunken Noodles for variety. Chicken and beef are popular. For chicken, use thin strips, and stir-fry until cooked. If you prefer beef, flank steak works well. Slice it thinly for quick cooking. If you want a meatless option, tofu is perfect. Firm tofu holds its shape and adds a nice texture. Just cube it and fry until golden.
Vegetarian and vegan adaptations
To make a vegetarian version, replace the oyster sauce with mushroom sauce. This keeps the umami flavor without meat. For a vegan option, ensure the sauces are vegan-friendly. You can add extra vegetables like bell peppers or eggplant for more nutrition. Always check labels for hidden animal products in sauces.
Spiciness adjustments and flavor enhancements
Adjust the spice level to your taste. Use less chili for a milder dish or extra for heat. You can also add a splash of chili sauce for more flavor. Fresh herbs like cilantro or mint can enhance the dish too. They add freshness and contrast the noodles’ richness. Experiment with lime juice or a bit of vinegar for a tangy twist.
Storage Info
Proper storage techniques
To store your Thai Drunken Noodles, let them cool down first. Place the noodles in an airtight container. This helps keep them fresh. You can also use plastic wrap to cover the dish. If you have extra sauce, store it in a separate container. This way, your noodles won’t get soggy.
Reheating instructions
When it’s time to eat leftovers, reheat the noodles in a skillet. Heat over medium heat and add a splash of water or broth. This adds moisture and helps them heat evenly. Stir gently until warmed through. You can also use the microwave. Just cover the dish and heat in short bursts. Stir between each burst to avoid hot spots.
Shelf life of prepared dish
Thai Drunken Noodles can last in the fridge for about 3 days. If you freeze them, they can last up to 2 months. When frozen, the texture might change a bit. To enjoy the best flavor, eat them within a week for best results. Always check for signs of spoilage before eating.
FAQs
What are the origins of Thai Drunken Noodles?
Thai Drunken Noodles, or Pad Kee Mao, come from Thailand. The dish has a rich history. It is a popular street food that combines bold flavors. The name “Drunken Noodles” may come from how well it pairs with beer. Some say it was made for late-night eaters. Others think it helps cure hangovers. The dish is known for its spicy kick and fresh herbs.
Can I use other vegetables in this recipe?
Yes, you can use other vegetables in Thai Drunken Noodles. This dish is very flexible. You can add bell peppers, carrots, or zucchini. Try mushrooms or baby corn for different textures. Just make sure to cut them small for even cooking. This way, they will blend well with the noodles. The key is to keep the veggies crisp and colorful. Feel free to experiment with what you have at home!
How can I make this dish gluten-free?
Making Thai Drunken Noodles gluten-free is easy. First, switch out regular soy sauce for gluten-free soy sauce. You can also use tamari as a substitute. Check the oyster sauce for gluten, too. You can use a mushroom sauce if needed. Always read labels to ensure all ingredients are gluten-free. With these swaps, you can enjoy this tasty dish without worry!
In this blog post, we explored how to make Thai Drunken Noodles. We covered the key ingredients that bring authentic flavor and suggested easy substitutions. You learned step-by-step cooking techniques and tips to achieve the best texture. We also discussed variations, storage info, and answered common questions.
Now you can create this tasty dish at home. Enjoy experimenting with flavors and sharing your delicious result

Thai Drunken Noodles
Ingredients
- 8 oz wide rice noodles
- 2 tablespoons vegetable oil
- 3 cloves garlic, finely minced
- 1 inch piece of ginger, freshly grated
- 1 unit red bell pepper, sliced into thin strips
- 1 cup broccoli florets, bite-sized
- 1 cup snap peas, trimmed
- 2 unit green onions, chopped into 1-inch pieces
- 1 small red chili, thinly sliced
- 4 tablespoons soy sauce
- 2 tablespoons oyster sauce
- 1 tablespoon brown sugar
- 1 tablespoon fresh lime juice
- to taste unit fresh basil leaves, for garnish
Instructions
- Begin by cooking the rice noodles according to the package instructions until they are al dente. Once cooked, drain the noodles and set them aside in a large bowl, ensuring they don't stick together.
- In a large skillet or wok, heat the vegetable oil over medium-high heat until shimmering.
- Carefully add the minced garlic and grated ginger to the hot oil, sautéing for about 30 seconds or until they become fragrant, being cautious not to burn them.
- Add the sliced red bell pepper, broccoli florets, and snap peas to the skillet. Stir-fry the vegetables for about 3-4 minutes until they are tender yet still crisp, maintaining their vibrant color.
- Introduce the cooked rice noodles to the skillet along with the chopped green onions and sliced red chili. Stir-fry everything together for an additional 2 minutes, ensuring all ingredients are well combined.
- In a small mixing bowl, whisk together the soy sauce, oyster sauce, brown sugar, and fresh lime juice until well blended. Pour this sauce over your noodle and vegetable mixture, tossing everything to coat evenly. Allow it to cook for an additional minute to ensure everything is heated through and flavors meld together.
- Once everything is well combined and heated, remove the skillet from the heat, fold in the fresh basil leaves, and gently toss one last time to distribute the basil throughout the dish.
. To keep your loaded baked potato salad fresh, store it in an airtight container. Make sure to cover the salad tightly to prevent air from entering. This keeps the flavors intact and stops the salad from drying out. In the refrigerator, your salad stays fresh for up to three days. After three days, the taste and texture start to decline. Reheating loaded baked potato salad can be tricky. The best way to do it is slowly. You can warm it in the microwave on low power. Stir it gently to help the heat spread evenly. Avoid using high heat, as it can make the potatoes mushy. You can also serve it cold for a refreshing twist. Can it be frozen? Yes, but it may change the texture. If you freeze it, store it in a freezer-safe container. When you thaw it, the salad might be a bit watery. To fix this, just stir it well and add a bit of sour cream or mayonnaise to bring back creaminess. Enjoy your loaded baked potato salad, no matter how you choose to serve it! You can prepare this salad up to a day in advance. Just follow all the steps and chill it in the fridge. This makes it perfect for parties or picnics. The flavors will mix together nicely, making it taste even better. Absolutely! You can use any cheese you like. Try mozzarella for a milder taste or pepper jack for some spice. Just make sure your cheese melts well if you bake the potatoes. If you want to cut calories, try Greek yogurt or a mix of sour cream and yogurt. Both options keep the creamy texture but add extra protein. They also help the salad taste fresh and zesty. This potato salad will stay fresh for about 3 to 5 days in the fridge. Just make sure to store it in an airtight container. Check for any changes in smell or texture before serving. Yes! This salad is very flexible. You can add diced tomatoes, jalapeños, or olives. Try mixing in some corn or bell peppers for extra crunch. Get creative and add whatever you enjoy! You can find the full recipe for Loaded Baked Potato Salad in this article. It has all the details you need to create this delicious dish at home. In this blog post, we explored how to make a creamy Loaded Baked Potato Salad. We covered important ingredients, step-by-step prep, and helpful tips. Remember, choosing the right potatoes and mixing well makes a big difference. Feel free to customize with your favorite toppings and seasonings. This dish works great for gatherings or as a side for grilled meats. With these guidelines, you can serve a delicious and satisfying salad any time. Trust me, it’s worth the effort! Enjoy your cooking adventure!](https://fastmealmate.com/wp-content/uploads/2025/06/841684b0-3d76-4995-bccc-748e700eeb02-768x768.webp)
![- 2 boneless, skinless chicken breasts - 4 cups frozen sweet corn - 1 medium onion, finely diced - 2 cloves garlic, minced - 2 medium-sized potatoes, peeled and diced - 3 cups chicken broth (low-sodium if preferred) - 1 teaspoon dried thyme - 1 teaspoon smoked paprika - 1 teaspoon salt (adjust to taste) - 1/2 teaspoon black pepper - 1 cup heavy cream - 1 tablespoon fresh parsley, finely chopped (for garnish) - Chicken Breasts: These give the chowder its protein and heartiness. Boneless and skinless cuts work best for easy shredding. - Frozen Sweet Corn: This adds natural sweetness and a nice texture. Frozen corn saves time and adds flavor. - Onion and Garlic: These aromatics enhance the overall taste. They create a flavorful base for your chowder. - Potatoes: Diced potatoes add creaminess and body. They also soak up all the lovely flavors. - Chicken Broth: This liquid forms the chowder's base. Low-sodium broth lets you control the salt. - Heavy Cream: This ingredient adds richness and smoothness. It makes the chowder feel indulgent. - Dried Thyme and Smoked Paprika: These spices give depth and warmth. They create a lovely, savory taste. - Chicken: You can use turkey or tofu for a different protein. - Corn: Fresh corn works instead of frozen if you have it. - Cream: Swap heavy cream for coconut milk for a dairy-free option. - Potatoes: Cauliflower can replace potatoes for a lower-carb choice. - Broth: Use vegetable broth for a vegetarian version. - Herbs and Spices: Feel free to mix in your favorite seasonings or herbs. This recipe is flexible, allowing you to create a chowder that fits your taste and needs. Check out the Full Recipe for cooking instructions and enjoy making this hearty meal! To start, gather all your ingredients. You’ll need chicken, corn, onion, garlic, potatoes, and broth. Place the chicken breasts at the bottom of the crockpot. Next, add the corn, onion, garlic, and potatoes on top of the chicken. This order helps the chicken cook well. Pour the broth over everything, covering the ingredients completely. Sprinkle in the thyme, paprika, salt, and pepper. Use a spoon to mix them gently. Set your crockpot to cook on low for 6-8 hours or high for 4 hours. The low setting gives the best taste and texture. The chicken will be very tender when done. You can check for doneness by cutting into the chicken; it should be white and juicy. About 30 minutes before serving, take the chicken out of the pot. Use two forks to shred it into small pieces. This will help it absorb more flavors. After shredding, return the chicken to the chowder. Mix it well. This step adds heartiness to your meal. Enjoy the rich, creamy goodness of this chowder! For the complete recipe, refer to the [Full Recipe]. To boost the flavor of your chowder, try using fresh herbs. Fresh thyme or basil can add a bright touch. You can also add a squeeze of lemon juice before serving. This gives a fresh and zesty kick. For a smoky flavor, increase the smoked paprika. If you like heat, add a pinch of cayenne pepper. This will make your chowder more exciting without overpowering it. One common mistake is not seasoning enough. Always taste your chowder before serving. Adjust the salt and pepper to your liking. Another mistake is overcooking the chicken. If you leave it in too long, it can become dry. Remember to shred the chicken about 30 minutes before serving. This keeps it juicy and flavorful. Lastly, don’t skip the cream. It adds richness and a nice texture to your chowder. Garnishing can make your chowder look appealing. I love using fresh parsley for color and freshness. Chopped green onions also add a nice crunch. A dollop of sour cream can enhance creaminess and flavor. For a fun twist, sprinkle some crispy bacon bits on top. This adds a salty crunch that contrasts well with the smooth chowder. Serve with warm bread for a complete meal. {{image_4}} You can boost the health of your chowder by adding more veggies. Carrots, bell peppers, or zucchini work great. Chop them into small pieces so they cook well. You can add them when you put in the corn and potatoes. This way, they cook together and soak up all the yummy flavors. If you need a gluten-free dish, this chowder is already a great choice. Just make sure the chicken broth you use is gluten-free. Most store-bought broths are, but it's always good to check the label. This chowder is warm and filling without any gluten. Want to add some heat? You can make your chowder spicy! Add diced jalapeños or a pinch of cayenne pepper. Start with a little and taste it. You can always add more if you like it hot. This twist will give your chowder a fun kick and make it even more exciting. For more ideas and a complete guide, check out the Full Recipe. After you finish your meal, let the chowder cool. Store it in an airtight container. It will stay fresh in the fridge for about 3 to 4 days. If you want to keep it longer, consider freezing. To freeze your chowder, first cool it completely. Then, pour it into freezer-safe bags or containers. Make sure to leave some space for expansion. You can freeze it for up to 3 months. When ready to eat, just thaw it overnight in the fridge. When it’s time to enjoy your chowder again, reheat it gently. You can use the stove or microwave. If using the stove, heat it on low and stir often. If it seems too thick, add a splash of chicken broth or water. This will help bring back the creamy texture. Enjoy your warm and hearty meal! You can store leftover chowder in the fridge for up to four days. Keep it in an airtight container. If you want to keep it longer, freeze it. It can last up to three months in the freezer. Just make sure to thaw it overnight in the fridge before reheating. Yes, you can use fresh corn! Just cut the kernels off the cob. You will need about four ears of corn to replace the frozen version. Fresh corn adds a lovely crunch and sweetness. Just add it to the crockpot at the same time as the other ingredients. Crockpot Chicken Corn Chowder goes well with many sides. Here are some great options: - Crispy bread - Buttered rolls - Green salad - Garlic bread - Cornbread These sides add texture and complement the chowder's flavors. To make this chowder vegetarian, replace chicken with firm tofu or chickpeas. Use vegetable broth instead of chicken broth. You can also add more veggies, like bell peppers or zucchini. This way, you keep the chowder hearty and tasty without meat. This chowder is rich and filling. A serving has about: - 350 calories - 15 grams of fat - 30 grams of carbs - 20 grams of protein These values can change based on the ingredients you use. Check the labels for exact numbers if you substitute items. For the full recipe, refer to the earlier section. This blog post covered all you need to make tasty Crockpot Chicken Corn Chowder. We explored key ingredients, helpful cooking steps, and tips to enhance flavor. I shared variations to fit your diet and storage info to keep leftovers fresh. Remember, making chowder can be fun and easy. Experiment with flavors and enjoy your meal. Happy cooking!](https://fastmealmate.com/wp-content/uploads/2025/07/7342804b-764e-40da-bca1-0102f439c2b1-768x768.webp)