
Quick Chicken Enchiladas Tasty and Simple Recipe


Looking for a quick and tasty dinner? You’ve landed in the right place! My Quick Chicken Enchiladas recipe brings bold flavors to your table in under 30 minutes. With easy-to-follow steps and simple ingredients, this dish is perfect for busy nights. Whether you’re a newbie or a kitchen pro, you’ll love how simple it is to whip up these delicious enchiladas. Ready to dive into the recipe? Let’s get started!
Why I Love This Recipe
- Quick Preparation: This recipe takes only 15 minutes to prep, making it perfect for busy weeknights.
- Flavorful Ingredients: The combination of chicken, black beans, and spices creates a deliciously satisfying meal.
- Customizable: You can easily adjust the heat level by adding more jalapeños or using a spicier enchilada sauce.
- Family-Friendly: This dish is a hit with both kids and adults, making it a great choice for family dinners.
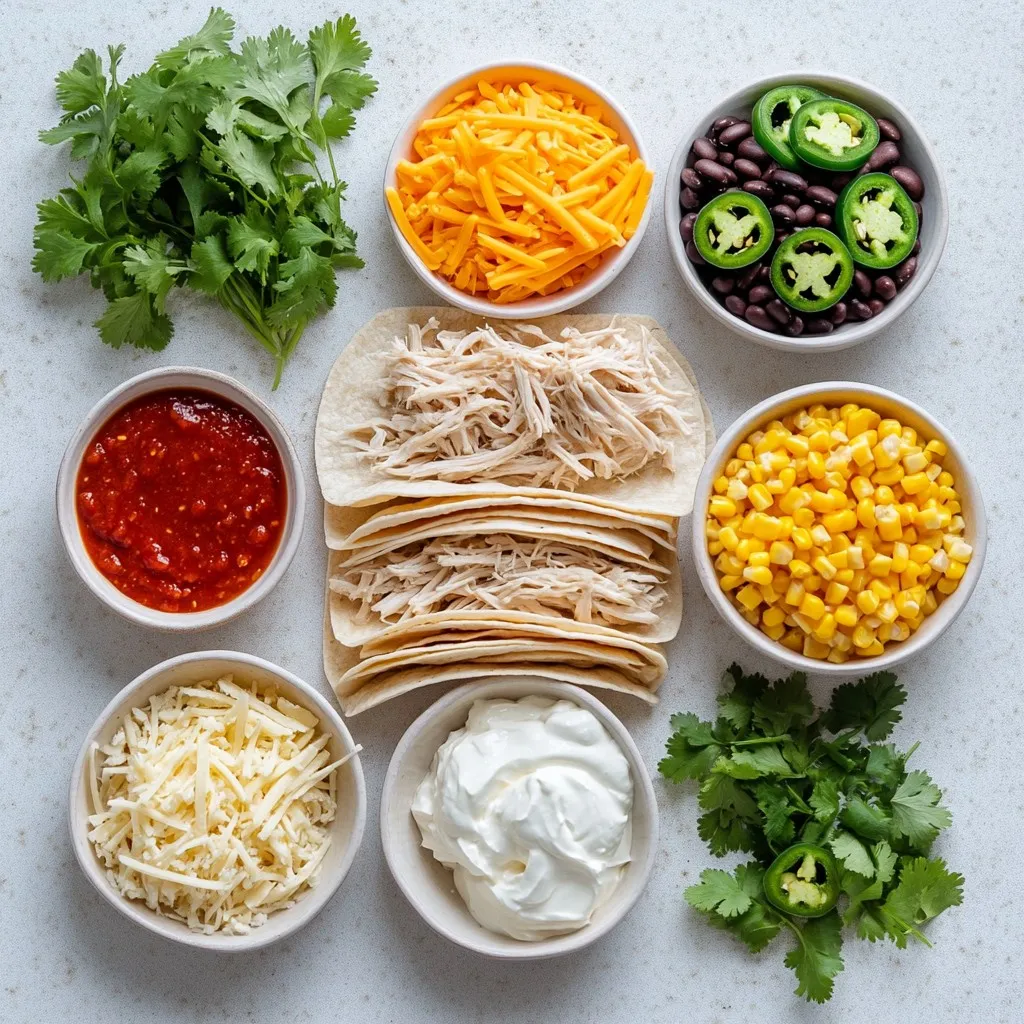
Ingredients
List of Ingredients
– 2 cups shredded cooked chicken
– 1 cup black beans, rinsed and drained
– 1 cup corn kernels (fresh or frozen)
– 1 cup diced tomatoes (canned or fresh)
– 1 teaspoon ground cumin
– 1 teaspoon chili powder
– 8 small flour or corn tortillas
– 2 cups shredded cheese (cheddar or a blend)
– 1 cup enchilada sauce (store-bought or homemade)
– Fresh cilantro, chopped, for garnish
– Sliced jalapeños (optional for added heat)
– Sour cream (optional for serving)
Suggested Brands for Enchilada Sauce
For enchilada sauce, I recommend a few brands. Look for Las Palmas, Old El Paso, or Herdez. They all offer tasty options. If you have time, homemade sauce is also great.
Substitutions for Common Ingredients
You can easily swap some ingredients. Here are some ideas:
– Use shredded rotisserie chicken instead of cooking your own.
– Swap black beans for pinto beans or kidney beans.
– Try diced bell peppers instead of corn for a different flavor.
– Use a dairy-free cheese if you want a vegan option.
– Replace flour tortillas with corn tortillas for a gluten-free meal.
These changes keep the recipe tasty and fun!
Step-by-Step Instructions
Prepping the Ingredients
To start, gather all your ingredients. You need:
– 2 cups shredded cooked chicken
– 1 cup black beans, rinsed and drained
– 1 cup corn kernels (fresh or frozen)
– 1 cup diced tomatoes (canned or fresh)
– 1 teaspoon ground cumin
– 1 teaspoon chili powder
– 8 small flour or corn tortillas
– 2 cups shredded cheese (cheddar or a blend)
– 1 cup enchilada sauce (store-bought or homemade)
– Fresh cilantro, chopped, for garnish
– Sliced jalapeños (optional for added heat)
– Sour cream (optional for serving)
Next, preheat your oven to 375°F (190°C). This step is key for perfect baking. In a large bowl, mix the chicken, black beans, corn, tomatoes, cumin, and chili powder. Stir until everything blends well. This mixture packs a lot of flavor.
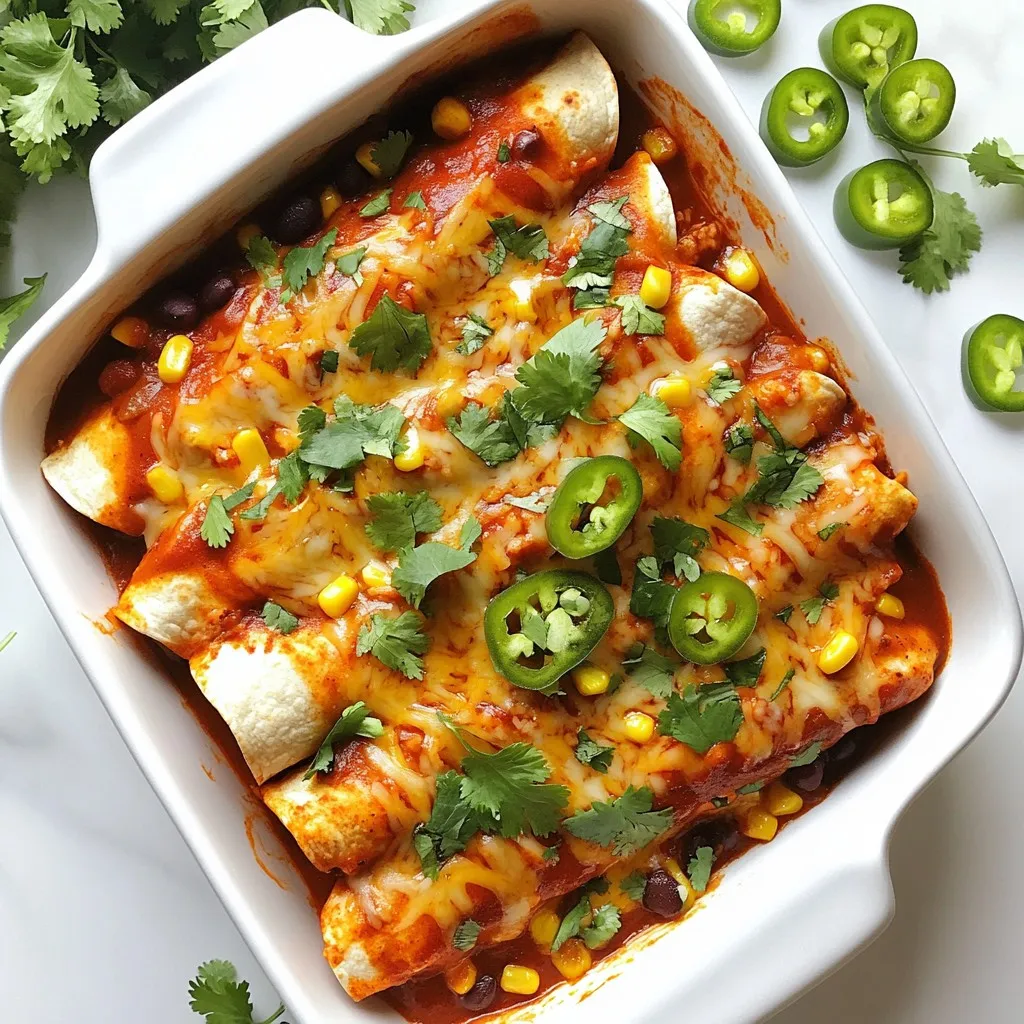
Assembling the Enchiladas
Now it’s time to build those enchiladas! Spread half the enchilada sauce evenly in a 9×13 inch baking dish. Grab a tortilla, and put about 1/3 cup of the chicken mixture in the middle. Sprinkle some cheese on top. Roll the tortilla tightly around the filling. Place it seam-side down in the baking dish. Repeat this for all tortillas.
After placing all the rolled tortillas, drizzle the rest of the enchilada sauce over them. Make sure they are well-coated. Then, sprinkle the remaining cheese on top. This will create a cheesy layer that melts perfectly.
Baking Instructions
Cover the dish with aluminum foil, sealing it well. Bake in your preheated oven for about 15 minutes. This keeps the enchiladas moist. After 15 minutes, carefully remove the foil. Bake for another 10-15 minutes until the cheese is melted, bubbly, and golden brown.
Once they are done, let the enchiladas cool for a few minutes. Garnish with chopped cilantro and jalapeños if you like heat. Serve hot with a dollop of sour cream on the side. Enjoy every cheesy bite!
Tips & Tricks
Time-Saving Tips for Quick Preparation
To save time, use shredded rotisserie chicken. It’s cooked and ready to go! You can also prep your ingredients in advance. Chop tomatoes and rinse beans the night before. This way, you cut down on cooking time. Lay out all your ingredients before you start. It makes the assembly quick and easy.
How to Achieve the Perfect Cheese Melt
Use a mix of cheeses for the best melt. Cheddar and Monterey Jack work well together. Spread cheese evenly on top of the enchiladas. Cover with foil while baking to trap heat. Remove the foil in the last few minutes to get that golden crust. Watch closely to avoid burning.
Flavor Boosters for Your Enchiladas
Add spices to your chicken mixture for extra flavor. A pinch of smoked paprika gives a nice depth. Fresh lime juice brightens the dish. You can also toss in some chopped cilantro for freshness. If you love heat, mix in diced jalapeños. They add a tasty kick to every bite.
Pro Tips
- Use Rotisserie Chicken: For a quicker option, use store-bought rotisserie chicken to save time on prep without sacrificing flavor.
- Customize Your Heat: Adjust the amount of chili powder and add jalapeños based on your heat preference for a personalized kick.
- Layer It Up: For extra flavor, consider layering some of the filling, cheese, and sauce inside the enchiladas as you roll them.
- Garnish Creatively: Enhance presentation by garnishing with avocado slices or a sprinkle of lime zest for a fresh touch.
Variations
Vegetarian Option: Black Bean and Cheese Enchiladas
You can make a tasty vegetarian version of enchiladas. Simply swap the chicken for black beans. Use 2 cups of black beans instead of 2 cups of shredded chicken. This keeps the flavor high and the protein intact. Add 1 cup of cheese to the bean mix for extra creaminess. The spices will still shine through, making it a satisfying meal.
Spicy Twist: Add Jalapeños or Chipotle
If you love heat, add sliced jalapeños or chipotle peppers. You can mix in 1/2 cup of sliced jalapeños into the filling. This adds a nice spicy kick. If you prefer chipotle, use 1-2 tablespoons of chipotle in adobo sauce. This smoky flavor enhances the dish. Adjust the amount based on your heat level preference.
Alternative Sauces and Cheeses
Feel free to get creative with sauces and cheeses. You can try green enchilada sauce for a different taste. It gives a fresh twist to the classic red sauce. For cheese, experiment with Monterey Jack or pepper jack. These varieties melt well and add a unique flavor. Combining cheeses can also create a delightful cheesy topping.
Storage Info
Storing Leftover Enchiladas
If you have some enchiladas left, store them in an airtight container. This will keep them fresh. Place a piece of plastic wrap over the top before sealing. They can last in the fridge for up to three days. If you want to keep them longer, freezing is a great option.
Reheating for Best Results
To reheat, preheat your oven to 350°F (175°C). Place the enchiladas in a baking dish. Add a splash of enchilada sauce on top to keep them moist. Cover the dish with foil to avoid drying out. Heat for about 20 minutes or until hot throughout. This method keeps the cheese nice and melted.
Freezing Enchiladas for Future Meals
Freezing enchiladas is simple and smart. After cooking, let them cool completely. Wrap each enchilada in plastic wrap. Then place them in a freezer bag. They can stay in the freezer for up to three months. When you’re ready to eat, thaw them in the fridge overnight. Then, reheat as described above. Enjoy delicious homemade enchiladas anytime!
FAQs
How can I make enchiladas ahead of time?
You can make enchiladas a day before. Just follow the recipe up to baking. Once you assemble them, cover the dish with plastic wrap. Store it in the fridge. When you’re ready to bake, remove the wrap and add extra sauce. Bake as usual. This saves time on busy days.
What can I serve with chicken enchiladas?
Chicken enchiladas pair well with many sides. Here are some ideas:
– Rice: Spanish rice or cilantro lime rice adds color and flavor.
– Beans: Refried beans or black beans complement the enchiladas nicely.
– Salad: A fresh green salad brightens the plate.
– Chips and salsa: Crunchy chips with salsa make a fun snack.
– Guacamole: Creamy guacamole enhances the meal.
Can I use rotisserie chicken for the filling?
Yes, rotisserie chicken works great! It saves time and adds flavor. Just shred the chicken and mix it with the other filling ingredients. This shortcut makes your cooking even quicker and still tastes delicious.
You now have a complete guide to making delicious enchiladas. We covered ingredients, brands, and good substitutes. The step-by-step instructions lead you from prep to baking.
With tips to save time and boost flavor, your enchiladas will stand out. We also explored tasty variations, like vegetarian and spicy options. Plus, there are easy ways to store and reheat your leftovers.
Use this guide to create your perfect enchiladas every time. Enjoy your cookin

Quick and Flavorful Chicken Enchiladas
Ingredients
- 2 cups shredded cooked chicken
- 1 cup black beans, rinsed and drained
- 1 cup corn kernels (fresh or frozen)
- 1 cup diced tomatoes (canned or fresh)
- 1 teaspoon ground cumin
- 1 teaspoon chili powder
- 8 small flour or corn tortillas
- 2 cups shredded cheese (cheddar or a blend)
- 1 cup enchilada sauce (store-bought or homemade)
- to taste Fresh cilantro, chopped, for garnish
- to taste Sliced jalapeños (optional for added heat)
- to taste Sour cream (optional for serving)
Instructions
- Preheat your oven to 375°F (190°C) to ensure it’s ready when it’s time to bake.
- In a spacious mixing bowl, combine the shredded chicken, black beans, corn, diced tomatoes, ground cumin, and chili powder. Stir thoroughly until all ingredients are well incorporated.
- To prevent the enchiladas from sticking, spread half of the enchilada sauce evenly across the bottom of a 9x13 inch baking dish.
- Take one tortilla and place about 1/3 cup of the chicken mixture in the center. Sprinkle a small amount of cheese on top, then roll the tortilla tightly around the filling. Place it seam-side down in the prepared baking dish. Repeat this process with the remaining tortillas and filling until everything is used up.
- Drizzle the remaining enchilada sauce over the top of the arranged tortillas, ensuring they are well coated. Sprinkle the remaining cheese evenly over the sauce, allowing for a delightful cheesy topping.
- Cover the baking dish with aluminum foil, ensuring it’s sealed well to retain moisture, and bake in the preheated oven for approximately 15 minutes.
- After 15 minutes, carefully remove the foil. Continue baking for an additional 10-15 minutes, or until the cheese is melted, bubbly, and beautifully golden brown.
- Once done, allow the enchiladas to cool for a few minutes before garnishing them with freshly chopped cilantro and slices of jalapeños, if desired.
- Serve the enchiladas hot, with a dollop of sour cream on the side for a creamy complement.


![- ripe tomatoes - onion - garlic - extra virgin olive oil - salt and pepper - vegetable broth - granulated sugar - fresh basil leaves - balsamic vinegar - heavy cream (optional) When I make roasted tomato basil soup, I gather the freshest ingredients. Ripe tomatoes are the star. They give the soup its rich flavor. I love using juicy, in-season tomatoes for the best taste. Next, I chop a large onion. It adds sweetness and depth. I also use garlic, which gives the soup a warm, inviting aroma. Extra virgin olive oil is a must. It helps to roast the veggies and adds healthy fats. Salt and pepper season the soup perfectly. I then choose low-sodium vegetable broth. It keeps the soup light but flavorful. A teaspoon of granulated sugar balances the acidity of the tomatoes. Fresh basil leaves add a fragrant touch. I use them generously for that classic flavor. A splash of balsamic vinegar brightens the taste. Finally, I consider adding heavy cream. It makes the soup creamy and rich, but it's optional. This combination of ingredients creates a delightful soup that warms the soul. For the complete recipe, check out the [Full Recipe]. Tomatoes are full of vitamins. They have vitamin C, potassium, and antioxidants. Eating tomatoes can support heart health and skin. Basil is more than just a herb. It has anti-inflammatory properties and is rich in vitamins A and K. It can help boost your immune system too. Olive oil is known for its health benefits. It contains healthy fats that can lower bad cholesterol. It also has antioxidants that help fight disease. These ingredients not only taste great but are good for you too! First, preheat your oven to 425°F (220°C). This helps the tomatoes roast perfectly. While the oven heats, prepare your fresh ingredients. Take 2 pounds of ripe tomatoes and cut them into quarters. Next, chop 1 large onion into bite-sized pieces. Finally, peel 4 cloves of garlic and leave them whole. Now, it's time to roast. On a large baking sheet, arrange the quartered tomatoes, chopped onion, and whole garlic cloves. Drizzle ¼ cup of extra virgin olive oil over the veggies. Season with salt and freshly ground black pepper to taste. Toss everything together to coat evenly. Roast the vegetables in the oven for about 25-30 minutes. You're looking for caramelized edges and soft onions. The aroma should be sweet and inviting. Once roasted, take the baking sheet out and let the veggies cool for a few minutes. In a large pot, combine the roasted vegetables with 2 cups of vegetable broth. Add 1 teaspoon of granulated sugar and 1 cup of fresh basil leaves. Heat the mixture over medium until it simmers. This helps all the flavors blend nicely. Next, you’ll blend the soup. Use an immersion blender for a smooth consistency. If you don’t have one, carefully pour the soup into a blender in batches. Return the blended soup to the pot. Add 1 teaspoon of balsamic vinegar for a hint of tang. For a creamy texture, stir in ½ cup of heavy cream if you like. Taste your soup and adjust the seasoning with salt and pepper as needed. Serve hot in bowls, garnishing with fresh basil leaves or a swirl of olive oil for a nice touch. For the full recipe, check out the detailed instructions. Seasoning is key to great soup. Use salt and pepper to enhance the taste. Adding a sprinkle of sugar balances the acidity of tomatoes. Always taste as you go. This lets you adjust flavors to your liking. Roasting is also vital. Roast your veggies for 25 to 30 minutes. This helps develop a deep, sweet flavor. The edges should caramelize nicely. You want that lovely aroma wafting from your oven. To make a rich soup, you can add heavy cream. This gives a smooth, creamy texture. If you want a lighter option, use blended beans or pureed potatoes. Both will add body without extra fat. When blending, make sure to mix well. This helps create a uniform texture. If you prefer a chunkier soup, blend only half. This way, you get a mix of smooth and textured soup. A beautiful presentation makes your dish shine. Garnish with fresh basil leaves for color. A swirl of olive oil adds a nice touch, too. Serve your soup in deep bowls. Pair it with crusty artisan bread or grilled cheese. This gives a nice crunch and complements the soup. You can also add some croutons on top for extra texture. Enjoying the soup is about the experience, so make it look good! {{image_4}} You can change this soup by adding more vegetables. Carrots add sweetness. Bell peppers bring a nice crunch. Chopping them into small pieces helps them cook well. You might also try adding zucchini for a fresh twist. Using fresh herbs like thyme or oregano can boost the flavor. These herbs add a new layer of taste to your dish. If you want a vegan soup, you can skip the heavy cream. Use coconut milk instead for a creamy texture. Almond milk is another good choice. For broth, make sure to use vegetable broth. This keeps the soup vegan. Adjust the seasoning to fit your taste. You can change the soup's taste with spices. Adding cumin or smoked paprika gives a warm depth. A pinch of chili flakes can add heat. You can also explore cultural variations. For example, Italian versions may include a dash of pesto. Some Mexican versions use lime juice and cilantro. These spices and ingredients make your soup unique and exciting. For the full recipe, check out the [Full Recipe]. After you enjoy your roasted tomato basil soup, you may have some left. Here’s how to keep it fresh: - Refrigeration tips: Store the soup in an airtight container. It lasts for about 4 to 5 days in the fridge. Let it cool before sealing to prevent moisture buildup. - Freezing the soup: If you want to save it longer, freezing works well. Use freezer-safe bags or containers. Leave some space at the top as the soup expands when frozen. It can last up to 3 months in the freezer. When you're ready to enjoy your soup again, here’s how to reheat it without losing flavor: - Methods to reheat without losing flavor: The best way is to use the stovetop. Pour the soup into a pot and heat it over medium heat. Stir often until it's warm. You can also use a microwave. Heat in short bursts, about 1 to 2 minutes, stirring in between. - Tips for maintaining texture: If the soup seems too thick, add a splash of broth or water. This helps restore its creamy texture. Always taste before serving to adjust the seasoning if needed. Roasted Tomato Basil Soup lasts about 5 days in the fridge. Store it in an airtight container. Make sure it cools down before sealing. If you see any mold, toss it right away. For best taste, heat and enjoy it within those days. Yes, you can use canned tomatoes. They are convenient and often more consistent in flavor. Canned tomatoes save time, but fresh tomatoes add a brighter taste. When using canned, choose whole or crushed tomatoes without added sugars. Drain excess liquid to avoid a watery soup. You can pair the soup with a variety of dishes. Some great options include: - Grilled cheese sandwiches - Crusty artisan bread - Fresh basil pesto pasta - A simple mixed green salad These dishes complement the soup's rich flavors and add texture to your meal. For a complete experience, consider adding a dollop of sour cream or a sprinkle of Parmesan cheese on top. Want to explore more? Check the Full Recipe for more serving ideas! This article explored how to make a tasty Roasted Tomato Basil Soup. We covered the ingredients you need, their benefits, and the steps to create this dish. You learned about helpful tips and how to customize the recipe to suit your taste. Storing and reheating the soup was also discussed for your convenience. Now, you have all the tools to make this simple and delicious soup. Enjoy cooking and sharing it with friends and family. Your kitchen can be a place of joy and flavor!](https://fastmealmate.com/wp-content/uploads/2025/07/2e40192c-dd82-4486-9582-e1e9c28fcf57-768x768.webp)