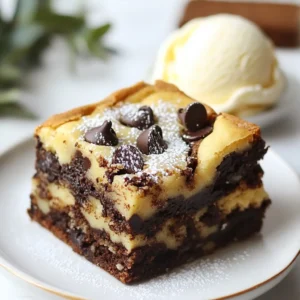
Fudgy Chewy Brookies Irresistible Homemade Treat


Get ready for a sweet treat that combines the best of two worlds! These fudgy chewy brookies blend rich brownies and soft cookies into one irresistible bite. In this post, I’ll share easy steps, tips, and variations to help you make these homemade delights. Whether you’re a baking newbie or a seasoned pro, this recipe will satisfy your cravings. Let’s get baking!
Why I Love This Recipe
- Delicious Fusion: The combination of fudgy brownies and chewy cookies creates a uniquely satisfying texture that is hard to resist.
- Easy to Make: This recipe is straightforward, making it perfect for both novice bakers and seasoned pros looking for a quick treat.
- Perfect for Sharing: With 16 servings, these brookies are ideal for parties, gatherings, or just to indulge in with friends and family.
- Customizable: Feel free to mix in your favorite candies or nuts to personalize the recipe and make it your own!
Ingredients
Brownie Layer Ingredients
– ½ cup unsalted butter, melted
– 1 cup granulated sugar
– 2 large eggs
– 1 teaspoon vanilla extract
– ⅓ cup unsweetened cocoa powder
– ½ cup all-purpose flour
– ¼ teaspoon salt
– ½ teaspoon baking powder
Cookie Layer Ingredients
– ½ cup unsalted butter, softened
– ½ cup brown sugar, packed
– ¼ cup granulated sugar
– 1 large egg
– 1 teaspoon vanilla extract
– 1 ½ cups all-purpose flour
– ½ teaspoon baking soda
– ¼ teaspoon salt
– 1 cup chocolate chips (mix of dark and semi-sweet)
Important Ingredient Notes
For the best brookies, use high-quality cocoa powder. It adds rich flavor. Choose a mix of dark and semi-sweet chocolate chips. This mix creates a great taste balance.
Make sure your butter is at the right temperature. Melted butter for brownies must be warm. Softened butter for cookies should be creamy but not melted.
Measure your flour correctly. Too much flour can lead to dry brookies. Spoon flour into the measuring cup and level it off.
These ingredients work together to create fudgy brownies and chewy cookies. The textures blend well, making each bite a delight.

Step-by-Step Instructions
Preheating the Oven
Start by preheating your oven to 350°F (175°C). This heat is perfect for baking. Next, grab a 9×9 inch baking pan. Grease it lightly or line it with parchment paper. This step helps with easy removal later.
Preparing the Brownie Layer
In a medium bowl, mix ½ cup melted butter with 1 cup granulated sugar. Stir until smooth. Next, add 2 large eggs one at a time. Mix in 1 teaspoon vanilla extract. Gradually add ⅓ cup cocoa powder, ½ cup flour, ¼ teaspoon salt, and ½ teaspoon baking powder. Stir until just combined. Pour this brownie batter into the pan, spreading it evenly.
Making the Cookie Dough
In another bowl, use an electric mixer to beat ½ cup softened butter, ½ cup brown sugar, and ¼ cup granulated sugar. Mix until creamy. Then, add 1 large egg and 1 teaspoon vanilla extract. Mix well. Next, slowly add 1 ½ cups flour, ½ teaspoon baking soda, and ¼ teaspoon salt. Stir until combined. Finally, fold in 1 cup chocolate chips.
Combining the Layers
Spoon dollops of cookie dough over the brownie layer. Use a knife or skewer to swirl the cookie dough into the brownie mixture. Be gentle! You want to create a marbled effect without overmixing. This keeps the layers distinct and fun.
Baking Instructions
Place the pan in the oven and bake for 25-30 minutes. The edges should be set, while the middle stays slightly gooey. Use a toothpick to check; it should come out with a few moist crumbs attached.
Cooling and Serving
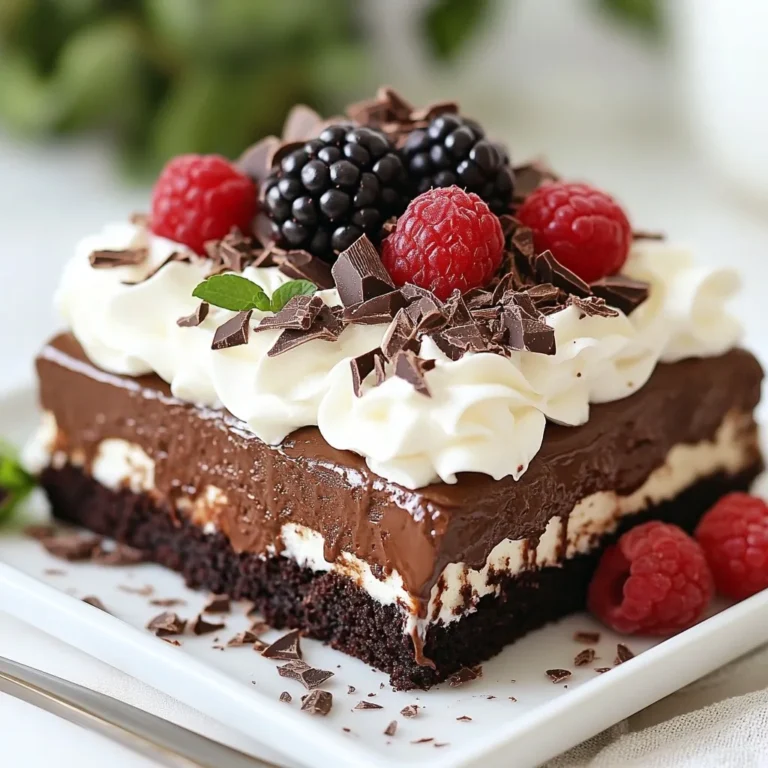
After baking, take the pan out of the oven. Let it cool for at least 15 minutes. This cooling time helps the brookies set and makes cutting easier. Serve warm for the best experience. Dust with powdered sugar or add a scoop of vanilla ice cream for a treat. Enjoy every fudgy and chewy bite!
Tips & Tricks
Achieving the Perfect Fudgy Texture
To get that perfect fudgy texture in your brookies, focus on the brownie layer. Use melted butter instead of softened butter. This helps create a denser, richer base. Mix the batter only until combined. Overmixing can add too much air and make them cakey. Bake at 350°F (175°C) for just the right time. Aim for the edges to be set but the center to remain soft. A toothpick should pull out moist crumbs, not clean.
How to Store Leftovers
If you have leftovers, store them in an airtight container. This keeps them fresh and chewy. They can last up to four days at room temperature. You can also refrigerate them for longer storage. Just make sure they are in a sealed container to avoid drying out. To enjoy them warm, pop them in the microwave for a few seconds.
Presentation Ideas for Serving
Presentation can make your brookies even more tempting! Serve them warm for the best taste. Dust the top with powdered sugar for a nice touch. Pair each square with a scoop of vanilla ice cream. This adds a creamy contrast to the fudgy texture. You can also drizzle some chocolate or caramel sauce on top for extra flair. Enjoy the blend of flavors and textures!
Pro Tips
- Use Room Temperature Ingredients: Make sure your butter and eggs are at room temperature for the best texture in both layers.
- Don’t Overmix: When combining the brownie and cookie layers, mix just enough to create a marble effect without overmixing, to preserve the distinct textures.
- Check for Doneness: Begin checking your brookies a few minutes before the end of the baking time; they should be set around the edges but still slightly gooey in the center.
- Cool Before Cutting: Allow the brookies to cool in the pan for at least 15 minutes before cutting to ensure clean squares and better flavor melding.

Variations
Adding Nuts or Other Mix-ins
You can add nuts for extra crunch. Chopped walnuts or pecans work well. Just fold in about ½ cup of your chosen nuts into the cookie dough. This gives your brookies a nice texture. You can also add other mix-ins, like dried fruit or even toffee bits. This will enhance the flavor and make them unique.
Gluten-Free Option
For a gluten-free version, swap the all-purpose flour with a gluten-free blend. Make sure it works for baking. Check the packaging for the right amount. This way, everyone can enjoy these treats, even those with gluten issues.
Flavor Variations (e.g., Mint, Espresso)
You can change the flavor of your brookies easily. For a mint twist, add 1 teaspoon of peppermint extract to the cookie dough. If you love coffee, mix in 1 tablespoon of instant espresso powder. Both options add a fun twist while keeping the fudgy and chewy texture you love. Feel free to get creative and try other flavors, like orange zest or almond extract!
Storage Info
Storing Short-term (Room Temperature)
You can store your brookies at room temperature. Place them in an airtight container. They stay fresh for up to three days. Keep them in a cool, dry spot. If you want, use parchment paper between layers to prevent sticking.
Long-term Storage (Freezing Methods)
For longer storage, freezing is best. Cut the brookies into squares first. Wrap each square in plastic wrap. Then, place them in a freezer-safe bag or container. They can last for up to three months in the freezer. Be sure to label the bag with the date.
Thawing and Reheating Instructions
To enjoy your frozen brookies, remove them from the freezer. Thaw them in the fridge overnight. If you want them warm, heat them in the microwave. Use low power for about 10-15 seconds. You can also warm them in the oven at 350°F (175°C) for about 5-7 minutes. Serve them warm for the best taste!
FAQs
What is the difference between a brookie and a brownie?
A brookie is a mix of a brownie and a cookie. It has two layers: a rich, fudgy brownie on the bottom and a chewy cookie on top. A brownie is denser and made with more chocolate, while a brookie gives you the best of both worlds. You get the deep flavor of brownies and the soft, sweet texture of cookies. It’s a fun twist that satisfies both cravings!
Can I use a different type of chocolate?
Yes, you can use different types of chocolate! You might try milk chocolate or even white chocolate chips. For a richer flavor, dark chocolate is a great choice. Just remember to keep the total amount of chocolate chips the same. Mixing chocolates can add a unique twist to your brookies and make them even more special.
Why are my brookies not chewy?
Brookies can lose their chewiness for a few reasons. If you overmix the dough, it can become tough. Also, baking them too long can dry them out. Make sure to check them a few minutes before the time is up. They should be set at the edges but slightly gooey in the center. Letting them cool in the pan helps them stay chewy too!
How do I make these brookies dairy-free?
To make brookies dairy-free, you can use dairy-free butter or a plant-based alternative. There are also dairy-free chocolate chips available. Check labels to ensure they fit your needs. With these swaps, you can enjoy the same great taste without any dairy!
In this post, we explored how to make delicious brookies. You learned about the tasty brownie and cookie layers. We discussed important tips for the best texture and long-term storage. Remember to get creative with mix-ins and flavors for fun twists. Brookies are tasty treats for every occasion. With these steps, you’ll impress friends and family. Enjoy your baking adventur
Fudgy Chewy Brookies
Ingredients
- 0.5 cup unsalted butter, melted
- 1 cup granulated sugar
- 2 large eggs
- 1 teaspoon vanilla extract
- 0.33 cup unsweetened cocoa powder
- 0.5 cup all-purpose flour
- 0.25 teaspoon salt
- 0.5 teaspoon baking powder
- 0.5 cup unsalted butter, softened
- 0.5 cup brown sugar, packed
- 0.25 cup granulated sugar
- 1 large egg
- 1 teaspoon vanilla extract
- 1.5 cups all-purpose flour
- 0.5 teaspoon baking soda
- 0.25 teaspoon salt
- 1 cup chocolate chips (mix of dark and semi-sweet)
Instructions
- Preheat your oven to 350°F (175°C) and prepare a 9x9 inch square baking pan by greasing it lightly or lining it with parchment paper.
- In a medium mixing bowl, combine the melted butter and granulated sugar, stirring until smooth. Add the eggs one at a time, whisking in the vanilla extract. Gradually incorporate the cocoa powder, flour, salt, and baking powder until just combined. Pour the brownie batter into the prepared pan.
- In a separate bowl, beat together the softened butter, brown sugar, and granulated sugar until creamy. Add the egg and vanilla extract, mixing thoroughly. Slowly add the flour, baking soda, and salt until just combined. Fold in the chocolate chips.
- Spoon dollops of the cookie dough over the brownie layer and swirl gently with a knife to create a marbled effect.
- Bake for 25-30 minutes until the edges are set and the middle is slightly gooey. A toothpick should come out with a few moist crumbs.
- Allow to cool in the pan for at least 15 minutes before cutting into squares.
. - Set temperature to 325°F (160°C) - Prepare a 9-inch springform pan Start by preheating your oven to 325°F (160°C). This will ensure that your carrot cake cheesecake bakes evenly. Next, grab a 9-inch springform pan. Grease it well and line the bottom with parchment paper. This will help the cheesecake come out easily after baking. - Mix dry ingredients and combine with wet ingredients - Fold in grated carrots, walnuts, and crushed pineapple In a medium bowl, mix the dry ingredients. You need flour, baking powder, baking soda, cinnamon, nutmeg, and salt. In a large bowl, whisk together the sugars, vegetable oil, eggs, and vanilla extract. Once it is smooth, slowly add the dry mix to the wet mix. Stir gently until just combined. Now, fold in the grated carrots, walnuts, and crushed pineapple. This gives your cake great texture and flavor. - Pour batter into the springform pan - Bake for 25-30 minutes until a toothpick comes out clean Pour the carrot cake batter into the prepared springform pan. Bake for 25-30 minutes. To check if it's done, insert a toothpick into the center. If it comes out clean, it's ready. Let the carrot layer cool in the pan on a wire rack. - Beat the cream cheese until smooth - Gradually add sugar and eggs while mixing In a large bowl, beat the softened cream cheese with an electric mixer on medium speed. Keep mixing until it's smooth. Gradually add in the sugar. Then, add the eggs one at a time, mixing on low speed after each one. Finally, mix in the vanilla extract, lemon juice, and sour cream. Your cheesecake batter should be creamy and well blended. - Pour cheesecake batter over the cooled carrot layer - Smooth the surface with a spatula Once the carrot layer is cool, pour the cheesecake batter over it. Use a spatula to spread it out evenly. This will create a nice, smooth top for your cake. - Bake for 45-50 minutes or until center slightly jiggles - Cool gradually in the oven Put the cake back in the oven. Bake for 45-50 minutes. The center should jiggle slightly when done. After baking, turn off the oven and crack the door open. This helps the cheesecake cool slowly, reducing the chance of cracks. - Chill in the refrigerator for at least 4 hours - Top with walnuts and shredded coconut before serving After an hour, take the cheesecake out and place it in the fridge. Chill for at least 4 hours, or overnight for the best taste. Before serving, sprinkle the top with walnuts and shredded coconut for extra flavor and crunch. Enjoy your delicious creation! For the full recipe, check the details above. - Use room temperature ingredients for better mixing. This helps all the flavors blend well. - Avoid overmixing the cheesecake batter to prevent cracks. Mix until just smooth for a perfect texture. - Serve with whipped cream or a scoop of vanilla ice cream. This adds a creamy touch to each bite. - Garnish with fresh carrots or edible flowers for decoration. This makes the dish look extra special and fun. - A springform pan is great for easy removal. It helps keep your cheesecake intact when serving. - An electric mixer ensures a smooth cheesecake batter. This saves time and effort, making mixing a breeze. {{image_4}} You can change the flavor of your carrot cake cheesecake. Try adding raisins or shredded coconut to the carrot layer. Both add sweetness and texture. You can also mix in spices like cardamom for a warm, spicy kick. This makes each bite more exciting. If you want a lighter version, use whole wheat flour instead of all-purpose flour. This swap adds fiber and nutrients. You can also replace sour cream with Greek yogurt. It gives creaminess with less fat. For a gluten-free option, use a gluten-free flour blend. This way, everyone can enjoy your cheesecake. If you need a vegan version, use dairy-free cream cheese. It works just as well in the cheesecake layer. These variations allow you to make this dessert fit your taste and dietary needs. Feel free to explore and enjoy the process! For the complete recipe, check the Full Recipe section. Store your carrot cake cheesecake in the refrigerator for up to 5 days. To keep it fresh, cover it tightly with plastic wrap or foil. This will help prevent it from drying out and absorbing other fridge odors. You can freeze carrot cake cheesecake for up to 2 months. Be sure to wrap it well in plastic wrap and then place it in an airtight container. When you're ready to enjoy it, thaw it in the refrigerator overnight before serving. This cheesecake is best enjoyed chilled. However, if you like it warm, you can briefly heat it in the oven. Just a few minutes at a low temperature will do. This method can enhance its creamy texture, making it even more delightful. The center should slightly jiggle and not look wet when finished. This means it has set properly. You can also check with a toothpick. Insert it into the center; it should come out mostly clean. Yes, it can be prepared a day in advance for optimal flavor. Making it ahead allows the flavors to blend better. Just remember to chill it in the fridge until you’re ready to serve. Slice with a sharp knife and serve chilled, topped as desired. You can add whipped cream or extra nuts for fun. A nice touch is a sprinkle of cinnamon on top. Absolutely! Pecans or almonds can be great substitutes for walnuts. They will add different flavors and textures. You can also skip the nuts if you prefer a nut-free version. This post covered everything you need to make a delicious Carrot Cake Cheesecake. We discussed the ingredients for both layers, how to bake, and tips for the best results. Remember, use room-temperature items and avoid overmixing the cheesecake. Feel free to try variations to fit your taste and dietary needs. This cake is perfect for any occasion and is easy to store. Now, grab your ingredients and impress your family or friends with this treat!](https://fastmealmate.com/wp-content/uploads/2025/06/33af2c91-c02f-4d6c-a85e-840ab017cd6c-768x768.webp)
. It details each step to make this delicious caramel brownie cheesecake! This article breaks down how to make a delicious caramel brownie cheesecake. We covered the key ingredients, from the fudgy brownie base to the creamy cheesecake layer and rich caramel sauce. I shared step-by-step instructions, tips for perfection, and variations to try. Make the most of this treat by storing it properly and experimenting with flavors. Dive into this dessert, and enjoy every bite with family and friends. You won’t regret it!](https://fastmealmate.com/wp-content/uploads/2025/06/2aae48c9-c1a8-4836-a5ef-44def97c7ba8-768x768.webp)