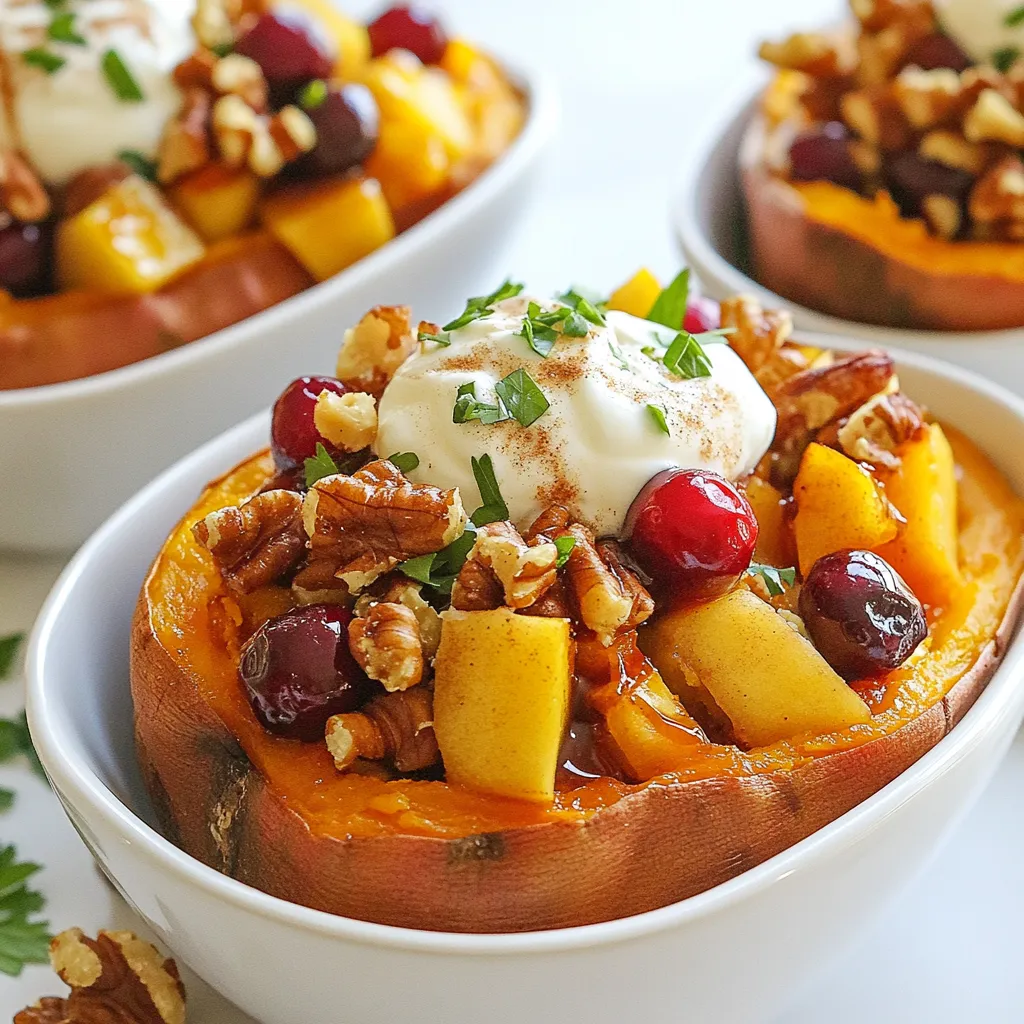
Cranberry Apple Twice Baked Sweet Potatoes Delight


Get ready to delight your taste buds with my Cranberry Apple Twice Baked Sweet Potatoes! This dish combines sweet potatoes, tart cranberries, and crisp apples for a flavor explosion. Perfect for cozy dinners or holiday gatherings, these twice-baked gems are a hit. I’ll walk you through simple steps, share tips, and offer tasty variations. Let’s make a dish that everyone will love!
Why I Love This Recipe
- Flavorful Combination: The tartness of cranberries paired with the sweetness of apples creates a delightful flavor explosion in every bite.
- Nutritious Twist: This dish is packed with nutrients from sweet potatoes, cranberries, and apples, making it a wholesome choice for any meal.
- Versatile Side Dish: These twice-baked sweet potatoes can complement a variety of main dishes, from roasted meats to vegetarian options.
- Beautiful Presentation: The vibrant colors of the filling make this dish not only tasty but also stunning when served, perfect for any festive occasion.
Ingredients
Sweet Potatoes
– 4 medium sweet potatoes
Sweet potatoes are the star of this dish. They bring a natural sweetness and creamy texture. Choose medium-sized ones for even cooking.
Filling Ingredients
– 1 cup fresh cranberries, coarsely chopped
– 1 medium apple, peeled and diced into small cubes
– 1/4 cup pure maple syrup
– 1/2 teaspoon ground cinnamon
– 1/4 teaspoon ground nutmeg
– 1/4 cup Greek yogurt (or a dairy-free option)
– Salt and freshly ground black pepper to taste
The filling blends tart cranberries with sweet apples. Maple syrup adds depth, while spices like cinnamon and nutmeg enhance the flavor. Greek yogurt makes the filling creamy and rich.
Optional Garnishes
– 1/8 cup walnuts, coarsely chopped
– Fresh parsley, chopped
Walnuts add a nice crunch, while parsley brings freshness and color. Use these garnishes to elevate the dish’s look and taste.

Step-by-Step Instructions
Preparing the Sweet Potatoes
First, I preheat the oven to 400°F (200°C). Rinse the sweet potatoes well under cold water. Next, I pierce each potato several times using a fork. This helps steam escape while they bake. I place the sweet potatoes on a baking sheet lined with parchment paper. This makes for easy cleanup later.
I bake the sweet potatoes for 45 to 60 minutes. They are done when they feel tender and a knife easily goes through them. Once baked, I let them cool for about 5 minutes.
Making the Cranberry Apple Filling
While the sweet potatoes bake, I focus on the filling. In a medium saucepan, I combine 1 cup of chopped cranberries, 1 diced apple, and 1/4 cup of pure maple syrup. I also add 1/2 teaspoon of ground cinnamon and 1/4 teaspoon of ground nutmeg for flavor. I cook this mixture over medium heat for about 8 to 10 minutes. I stir occasionally until the cranberries burst and the apple cubes soften. Once ready, I take the saucepan off the heat and let the filling cool for a moment.
Assembling and Baking the Twice Baked Sweet Potatoes
When the sweet potatoes cool enough to handle, I slice each one in half lengthwise. I scoop out the flesh carefully and place it in a mixing bowl. I leave about a 1/4-inch border of flesh to keep the skins sturdy.
To the bowl, I add the warm cranberry and apple mixture along with 1/4 cup of Greek yogurt. I mix everything until it is creamy and well combined. I season it with salt and black pepper to taste. If I want a sweeter filling, I can add more maple syrup.
Next, I spoon the filling back into the sweet potato skins. I mound the mixture slightly over the tops for a nice look. I return the stuffed sweet potatoes to the oven for an additional 15 to 20 minutes. They are ready when heated through. If I choose to use walnuts, I sprinkle them over the tops during the last 5 minutes of baking.
After they are done, I take the sweet potatoes out of the oven. I let them cool for a moment before serving them. If desired, I garnish with freshly chopped parsley for color and freshness.
Tips & Tricks
Choosing the Right Sweet Potatoes
When picking sweet potatoes, look for firm ones. They should feel heavy for their size. Choose those with smooth skin and no dark spots. You want medium sweet potatoes for this recipe. They cook evenly and hold the filling well.
Enhancing Flavors with Spices
Spices bring your dish to life! Ground cinnamon and nutmeg are key here. They add warmth and depth. You can also try adding ginger for a little zing. A pinch of salt brings out all the flavors. Don’t forget to taste as you go. Adjust to your liking for the best result.
Making it Vegetarian or Vegan-Friendly
This recipe is easy to make vegetarian or vegan. Just swap Greek yogurt for a dairy-free option. Coconut yogurt works well and adds creaminess. You can also use almond or soy yogurt. For a vegan sweetener, maple syrup is perfect. This way, everyone can enjoy the dish!
Pro Tips
- Choose the Right Sweet Potatoes: Look for sweet potatoes that are firm and have smooth skin. Avoid those with soft spots or blemishes.
- Enhance Flavor with Spices: Don’t hesitate to experiment with additional spices like ginger or cloves to elevate the flavor profile of the filling.
- Make Ahead: You can prepare the sweet potato filling in advance and store it in the refrigerator. Just stuff the skins and bake when ready to serve.
- Garnish for Presentation: A sprinkle of pomegranate seeds or a drizzle of balsamic glaze can add a festive touch and enhance the visual appeal of your dish.
Variations
Different Fruit Options
You can switch up the fruit in this dish. Try pears for a unique twist. Their soft texture and sweet flavor blend well with the sweet potatoes. You can also use dried fruits like apricots or raisins. These add chewiness and a new taste dimension. Just chop them up small to mix well.
Alternative Sweeteners
Maple syrup gives a nice flavor, but other sweeteners work too. Honey or agave syrup can replace it. Each option brings its own sweetness and taste. For a low-calorie choice, consider stevia or monk fruit. These sweeteners can help you enjoy this dish without much sugar.
Adding Protein for a Heartier Dish
To make your dish more filling, add protein. You can mix in cooked chicken or turkey for a savory twist. For a plant-based option, try black beans or lentils. These provide protein and add a hearty texture. Greek yogurt is already in the recipe, but you can add more for extra creaminess.
Storage Info
Refrigeration Guidelines
Store your Cranberry Apple Twice Baked Sweet Potatoes in the fridge. Place them in an airtight container. They will stay fresh for about 3-5 days. Before storing, let them cool completely. This helps prevent extra moisture.
Freezing Twice Baked Sweet Potatoes
You can freeze these sweet potatoes for later use. Wrap each one tightly in plastic wrap. Then, place them in a freezer bag or container. They can last in the freezer for up to 3 months. When you’re ready to eat, thaw them in the fridge overnight.
Reheating Instructions
To reheat, preheat your oven to 350°F (175°C). Remove the sweet potatoes from the fridge or freezer. If frozen, thaw them first. Place them in a baking dish and cover with foil. Bake for about 20-25 minutes until heated through. You can also microwave them for 2-3 minutes. Just make sure they are warm all the way through. Enjoy them hot for the best taste!
FAQs
Can I use canned cranberries instead?
Yes, you can use canned cranberries. However, fresh cranberries have a bright flavor. Canned cranberries may be sweeter. If you use them, reduce the maple syrup to balance the sweetness.
How do I know when the sweet potatoes are done?
Sweet potatoes are done when they feel soft. You can check by poking them with a fork. If the fork goes in easily, they are ready. They should also have a nice, sweet aroma.
What dishes pair well with Cranberry Apple Twice Baked Sweet Potatoes?
These sweet potatoes pair well with roasted turkey or chicken. They also go great with green salads and steamed veggies. For a hearty meal, serve them with quinoa or wild rice.
You learned how to create tasty Cranberry Apple Twice Baked Sweet Potatoes. We covered the key ingredients, prepping the sweet potatoes, and making the filling. Tips like choosing the right sweet potatoes and flavoring with spices help you. Variations let you try different fruits and sweeteners. Remember to store leftovers properly for future meals. Enjoy your cooking journey, and don’t hesitate to experiment with flavors! This dish offers a fresh twist on a classic favorit

Cranberry Apple Twice Baked Sweet Potatoes
Ingredients
- 4 medium sweet potatoes
- 1 cup fresh cranberries, coarsely chopped
- 1 medium apple, peeled and diced into small cubes
- 1 4 cup pure maple syrup
- 1 2 teaspoon ground cinnamon
- 1 4 teaspoon ground nutmeg
- 1 4 cup Greek yogurt
- 1 8 cup walnuts, coarsely chopped (optional for garnish)
- to taste Salt and freshly ground black pepper
- to taste Fresh parsley, chopped, for garnish (optional)
Instructions
- Begin by preheating your oven to 400°F (200°C).
- Rinse the sweet potatoes under cold water and pierce them several times with a fork to allow steam to escape during baking. Place the sweet potatoes on a baking sheet lined with parchment paper for easy cleanup. Bake them for 45-60 minutes, or until they are tender and easily pierced with a knife.
- While the sweet potatoes are baking, prepare the flavorful filling. In a medium saucepan over medium heat, combine the chopped cranberries, diced apple, maple syrup, ground cinnamon, and ground nutmeg. Cook this mixture for about 8-10 minutes, stirring occasionally, until the cranberries have burst and the apple cubes have softened. Remove the saucepan from the heat and allow the filling to cool slightly.
- Once the sweet potatoes are done baking, remove them from the oven and let them cool for about 5 minutes. When they are cool enough to handle, slice each sweet potato in half lengthwise. Using a spoon, carefully scoop out the flesh, placing it into a mixing bowl while leaving about a 1/4-inch border of sweet potato flesh inside the skins to maintain their structural integrity.
- To the bowl with the sweet potato flesh, add the warm cranberry and apple mixture along with the Greek yogurt. Stir everything together until it is well combined and creamy, seasoning with salt and freshly ground black pepper to taste. If you prefer a sweeter filling, feel free to add more maple syrup at this stage.
- Spoon the luscious filling back into each of the sweet potato skins, making sure to mound the mixture slightly over the tops for an appealing presentation.
- Return the stuffed sweet potatoes to the oven and bake for an additional 15-20 minutes, or until they are thoroughly heated. If you’re using walnuts, sprinkle them over the tops of the sweet potatoes during the last 5 minutes of baking to add a delightful crunch.
- Once they are finished baking, remove the sweet potatoes from the oven and allow them to cool for a moment before serving. Garnish with a sprinkle of freshly chopped parsley for a pop of color and freshness.

![To make Easy Roasted Tomato Soup, gather these key ingredients: - 2 pounds of ripe, juicy tomatoes, halved - 1 medium onion, cut into quarters - 4 cloves of garlic, left unpeeled - 2 tablespoons of extra virgin olive oil - Sea salt and freshly cracked black pepper, to taste - 1 teaspoon of dried basil - 1 teaspoon of sugar (optional, to counterbalance acidity) - 4 cups of rich vegetable broth - 1/2 cup of heavy cream (optional, for a luscious finish) - Fresh basil leaves, for a lovely garnish These ingredients create a base that bursts with flavor. The tomatoes give the soup its rich taste. The onion adds sweetness, while garlic brings depth. You can add optional ingredients to boost the flavor: - A splash of balsamic vinegar for acidity - A pinch of red pepper flakes for heat - A teaspoon of smoked paprika for a smoky taste These extras can transform the soup into something special. Feel free to experiment and find your favorite combination. To prepare this soup, you’ll need a few handy tools: - A large baking sheet for roasting - A pot for cooking the soup - An immersion blender or a standard countertop blender - A cutting board and sharp knife for prep Having the right tools makes cooking easier. With these, you’ll create a smooth, tasty soup that warms the soul. For the complete recipe, check out the [Full Recipe]. To start, gather all your ingredients. You need: - 2 pounds of ripe, juicy tomatoes, halved - 1 medium onion, cut into quarters - 4 cloves of garlic, left unpeeled - 2 tablespoons of extra virgin olive oil - Sea salt and freshly cracked black pepper, to taste - 1 teaspoon of dried basil - 1 teaspoon of sugar (optional) - 4 cups of rich vegetable broth - 1/2 cup of heavy cream (optional) - Fresh basil leaves for garnish First, wash the tomatoes well. Cut them in half and place them on a baking sheet. Next, quarter the onion and add it to the sheet. Toss in the unpeeled garlic cloves. Now, drizzle the olive oil over the veggies. Sprinkle sea salt, black pepper, and dried basil on top. If you want to balance the soup's acidity, add sugar now. Preheat your oven to 400°F (200°C). Once the oven is ready, slide in your baking sheet. Roast the vegetables for 25-30 minutes. The tomatoes should soften and caramelize. After roasting, take the sheet out and let the veggies cool. Once cool enough to handle, peel off the garlic skins. In a large pot, combine the roasted tomatoes, onion, and garlic. Add the vegetable broth and place the pot over medium heat. Bring the mixture to a gentle simmer. Use an immersion blender to puree the soup until smooth. If you don’t have one, carefully transfer the soup to a blender. Make sure to leave space for steam to escape. If you want a rich finish, stir in the heavy cream now. Taste the soup and adjust the seasoning. Heat until hot throughout. Finally, serve the soup in bowls. Garnish with fresh basil leaves for color and flavor. Enjoy your delicious, comforting bowl of roasted tomato soup! To get a smooth soup, use an immersion blender. It makes blending easy. If you prefer, you can blend in batches with a regular blender. Just leave space for steam. For a thicker texture, add less broth. If you like it thinner, add more broth. You can also stir in heavy cream for extra richness. It adds a nice velvety feel. One mistake is not roasting the tomatoes long enough. They need time to caramelize and develop flavor. Don’t skip the sugar if your tomatoes are very acidic. It balances the taste. Also, remember to peel the garlic after roasting. Skins can affect the smoothness of your soup. Finally, taste your soup before serving. Adjust salt and pepper to match your flavor. Serve your soup hot, garnished with fresh basil leaves. They add color and flavor. Pair it with a grilled cheese sandwich for a classic combo. You can also serve it with crusty bread for dipping. For a twist, add a drizzle of balsamic glaze on top. This adds a sweet tang that enhances the soup. For the full recipe, check the details above. {{image_4}} You can easily make this soup vegan. Just skip the heavy cream. Use more vegetable broth instead. This keeps the soup rich and tasty. The roasted tomatoes give it a great flavor. You won’t miss the cream at all. Add a splash of coconut milk for creaminess if you like. It adds a nice twist! Want to spice things up? Add a pinch of red pepper flakes for heat. A dash of smoked paprika gives a warm flavor. Fresh herbs like thyme or oregano enhance the soup, too. You can also stir in a tablespoon of balsamic vinegar. It adds depth and a little sweetness. Don't forget to taste as you go! This soup is naturally gluten-free. You don’t need any flour or wheat. Just use certified gluten-free vegetable broth. This way, everyone can enjoy it. If you want to thicken the soup, use blended potatoes or a cornstarch slurry. It keeps the soup smooth without gluten. Enjoy this comforting bowl without worries! To store leftover soup, let it cool first. Pour it into an airtight container. Make sure to seal it well. Place it in the fridge. It will stay fresh for about three days. If you want to keep it longer, freezing is better. Freezing is a great way to prepare meals ahead. Use freezer-safe containers or bags. Fill them with soup, leaving some space at the top. This allows for expansion. Label the containers with the date. It can last up to three months in the freezer. When you’re ready to use it, just thaw it in the fridge overnight. To reheat your soup, use a pot on the stove. Heat it gently over medium-low. Stir often to avoid burning. If the soup is too thick, add a splash of broth or water. You can also use a microwave. Heat it in short bursts, stirring in between. Always taste before serving to check the flavor. Adjust seasoning if needed for that perfect bowl of comfort. The best tomatoes for this soup are ripe, juicy varieties. I love using Roma or vine-ripened tomatoes. They have great flavor and are less watery. You can also mix in some heirloom tomatoes for extra depth. Their sweetness adds a lovely touch to the soup. Yes, you can make this soup ahead of time. It keeps well in the fridge for up to four days. Just make sure to cool it completely before storage. You can also freeze it for up to three months. For the best taste, reheat the soup gently on the stove. To make roasted tomato soup without cream, simply skip the heavy cream. Instead, you can add a splash of vegetable broth for richness. For added creaminess, blend in some cooked white beans or cashews. They blend smoothly and give a nice texture without dairy. You’ll still enjoy a flavorful bowl of comfort. For the full recipe, check out the detailed instructions above. In this post, we explored how to make easy roasted tomato soup. We discussed key ingredients, optional flavors, and tools you need. Following the step-by-step instructions ensures success every time. I shared tips for the perfect consistency and common mistakes to avoid. You can even try vegan and gluten-free options. Lastly, I covered storage and reheating for later enjoyment. Enjoy making this warm soup and share it with others.](https://fastmealmate.com/wp-content/uploads/2025/07/8c50acbe-b26b-4fce-9348-24a1062b636d-768x768.webp)
![For a great crispy tofu panini, you need: - 1 block firm tofu, well-pressed and sliced into 1/2 inch slabs - 1 tablespoon soy sauce - 1 tablespoon sesame oil - 1 tablespoon cornstarch - 1 large round ciabatta or focaccia bread, sliced in half horizontally - 1/2 cup fresh spinach leaves, washed and dried - 1/2 red bell pepper, roasted, peeled, and sliced thin - 1 small ripe avocado, sliced - 2 tablespoons hummus or vegan mayonnaise - Salt and freshly ground black pepper to taste - Olive oil, for grilling These ingredients work together to create a crispy, tasty panini that is both filling and healthy. You can add some extra flavor with these ingredients: - Sliced tomatoes for freshness - Red onion for a bit of bite - Fresh herbs like basil or cilantro - A dash of hot sauce for heat If you want to mix things up, these optional ingredients can make your panini even better. To make your meal complete, consider these sides: - A light salad with lemon vinaigrette - Sweet potato fries for crunch - A bowl of soup, like tomato or lentil These sides balance the flavors and add variety to your meal. Plus, they are easy to prepare! For the full recipe, check out the detailed steps to bring your crispy tofu panini to life. To start, we need to prepare the tofu. First, press the block of firm tofu. Use a clean kitchen towel or tofu press. This step removes excess moisture. Removing moisture is key for achieving crispiness later. Once pressed, slice the tofu into even slabs, each about 1/2 inch thick. This ensures even cooking and crispiness. Next, we will marinate the tofu. In a mixing bowl, whisk together soy sauce, sesame oil, and a pinch of salt and pepper. Then, add your tofu slices to this mixture. Make sure each piece gets coated well. Let the tofu soak in the marinade for about 15 minutes. This allows the tofu to absorb all those tasty flavors. Now, it’s time to cook the tofu. After marinating, take the slices out and sprinkle cornstarch on both sides. This coating is crucial for that nice, crispy texture. Heat a non-stick skillet over medium heat. Add a drizzle of olive oil to the pan. When the oil shimmers, carefully lay the coated tofu slices in the skillet. Cook each slice for about 4-5 minutes on each side. Look for a golden brown color and a crispy texture. Once done, transfer the tofu to a plate and set it aside. Let’s move on to assembling the panini. Take your ciabatta or focaccia bread and cut it in half horizontally. Spread hummus or vegan mayo on the inside of both halves. This adds moisture and flavor to the sandwich. On the bottom half, layer fresh spinach leaves first. Then add the crispy tofu slices, followed by roasted red bell pepper slices. Finally, place avocado slices on top. Now, close the sandwich with the top half of the bread. Press it down gently to hold everything in place. Next, we grill the panini. Preheat your panini press or another skillet over medium heat. Brush the outside of the sandwich with olive oil. This helps to create a crunchy crust while grilling. If using a skillet, place a heavy pan on top of the sandwich. This presses it down as it cooks. Grill for about 3-4 minutes on each side. Look for a beautiful golden brown color and a crispy texture. Once grilled to perfection, remove the panini from the heat. Slice it in half with a sharp knife and serve warm for the best taste. Enjoy your crispy tofu panini, a flavorful and satisfying delight! For the full recipe, check out the earlier sections. To make your tofu crispy, follow these tips: - Press the tofu well: Remove as much water as possible. This helps the tofu absorb flavors better. - Use cornstarch: Coat both sides of the tofu slices with cornstarch. This creates a crunchy crust. - Heat your skillet properly: Use medium heat and wait for the oil to shimmer before adding the tofu. - Do not overcrowd the pan: Cook in batches if needed. This allows each piece to get crisp. Here are some mistakes to watch out for: - Skipping the marination: Marinating adds flavor. Don’t rush this step. - Using too little oil: A light drizzle helps achieve that golden color and crisp texture. - Not slicing evenly: Make sure your tofu slabs are even. This ensures consistent cooking. - Opening the panini too soon: Let it grill fully to get the best texture. Having the right tools makes a big difference. Here are my top picks: - Panini press: This tool cooks evenly and gives perfect grill marks. - Non-stick skillet: If you don’t have a press, a good skillet works too. - Heavy pan: Use it to press down the sandwich while it cooks in a skillet. - Sharp knife: A sharp knife helps slice your panini without squishing it. Using these tips and tools, you can create a delicious crispy tofu panini. For the full recipe, check out the earlier sections. {{image_4}} When making a crispy tofu panini, you can switch up the ingredients to match your taste. This adds fun and keeps things interesting. You can use different sauces or spreads. Try using pesto or spicy mustard instead of hummus. Swap spinach for kale or arugula for a bolder flavor. For added crunch, add sliced cucumbers or pickles. You can also replace the red bell pepper with grilled zucchini or eggplant. Each swap brings a new twist to your panini. To keep this dish vegan, stick with plant-based ingredients. Use gluten-free bread to make it gluten-free. Many brands offer delicious options that taste great. Check labels to ensure they have no animal products. This allows everyone to enjoy the crispy tofu panini without worry. Fresh produce can change with the seasons. In spring, try adding fresh asparagus or sprouts. In summer, include ripe tomatoes or zucchini. In fall, swap in roasted butternut squash for a sweet flavor. Winter might call for roasted root vegetables like carrots or sweet potatoes. These seasonal swaps help you enjoy fresh tastes all year long. This recipe offers endless possibilities for creativity. Use the [Full Recipe] as your base, and let your imagination run wild with variations! To keep your crispy tofu panini fresh, wrap it tightly. Use plastic wrap or foil for best results. Store it in the fridge for up to three days. Avoid leaving it out at room temperature. This helps prevent sogginess and keeps the flavors intact. To reheat, use a skillet over medium heat. Place the panini in the skillet and cover it. Heat for about 4-5 minutes on each side. This method helps restore the crispiness. You can also use a toaster oven for a similar effect. Avoid the microwave, as it can make the bread soft. If you want to freeze your panini, wrap it well in plastic wrap and foil. It can last for up to a month in the freezer. When you’re ready to eat, thaw it in the fridge overnight. Reheat it in a skillet for the best texture. This way, you can enjoy a quick meal without losing flavor. To make tofu extra crispy, start with firm tofu. Press it well to remove water. Slice it into even slabs. Marinate the slices in soy sauce and sesame oil. Let them soak for at least 15 minutes. After marinating, coat each slice with cornstarch. This coating helps create that crunchy texture you want. Cook the tofu in a hot skillet with olive oil. Flip it until golden brown on both sides. Yes, you can use many types of bread. Ciabatta and focaccia work great, but others can too. Try sourdough or whole grain for a different taste. Each bread type adds its own flavor and texture. Choose one that you love, and enjoy your panini in a new way. Dipping sauces can enhance your panini experience. Hummus is a classic choice. It adds creaminess and flavor. Vegan mayo also works well for a smooth dip. You can try spicy salsa for a kick. Another option is a tangy vinaigrette. Each sauce complements the crispy tofu and adds fun flavors. For more ideas, check out the Full Recipe for inspiration. In summary, we explored how to make a crispy tofu panini. We covered the main and optional ingredients, step-by-step cooking tips, and even some fun variations. Remember to store leftovers well and reheat them correctly for the best taste. Experiment with flavors and enjoy this dish as part of your meals. With a few simple steps, you can have a delicious, crispy tofu panini that satisfies your cravings. Enjoy your cooking journey!](https://fastmealmate.com/wp-content/uploads/2025/06/c0074219-6fc3-4ba3-a1d2-dcd469194d4e-768x768.webp)