
Minute Maple Cranberry Sauce Tasty and Simple Recipe

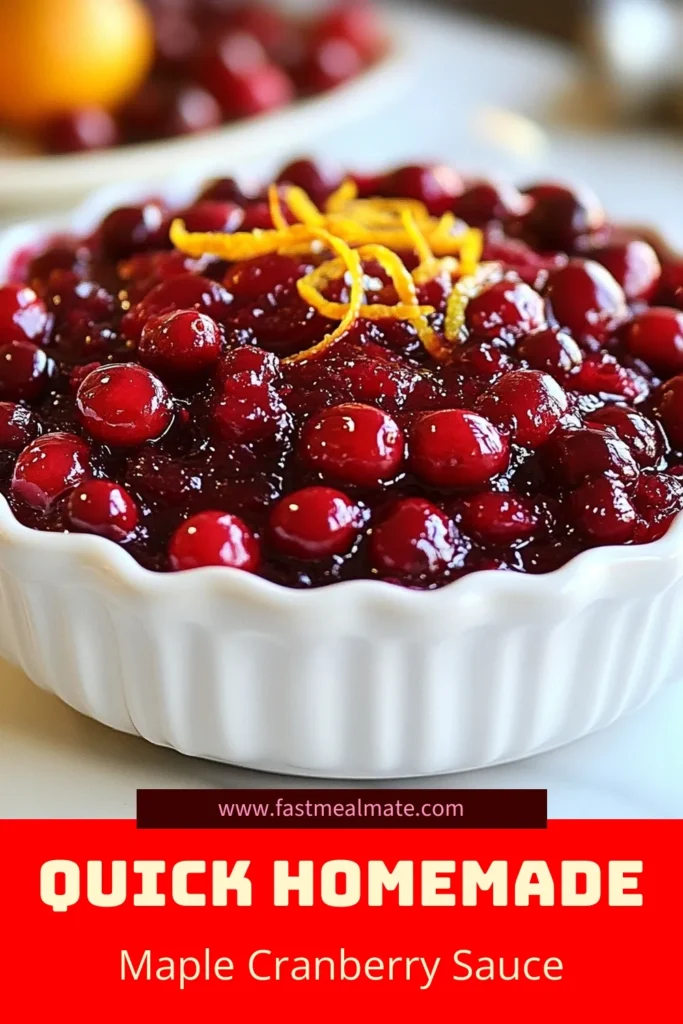
Are you ready to wow your guests with a quick and tasty side dish? My Minute Maple Cranberry Sauce is both simple and packed with flavor. In just a few steps, you can create a sauce that balances tart and sweet perfectly. Whether you need it for a holiday feast or a casual dinner, this recipe is a game changer. Let’s dive into the details so you can impress everyone with your cooking skills!
Why I Love This Recipe
- Quick and Easy: This recipe takes only 15 minutes from start to finish, making it a perfect last-minute addition to your holiday table.
- Natural Sweetness: The use of pure maple syrup adds a rich, natural sweetness that complements the tartness of the cranberries beautifully.
- Fresh Flavor: With freshly squeezed orange juice and zest, this sauce bursts with fresh, vibrant flavors that elevate your dining experience.
- Versatile Serving Options: Whether served warm or chilled, this cranberry sauce pairs perfectly with turkey, ham, or as a festive spread on sandwiches.
Ingredients
List of Required Ingredients
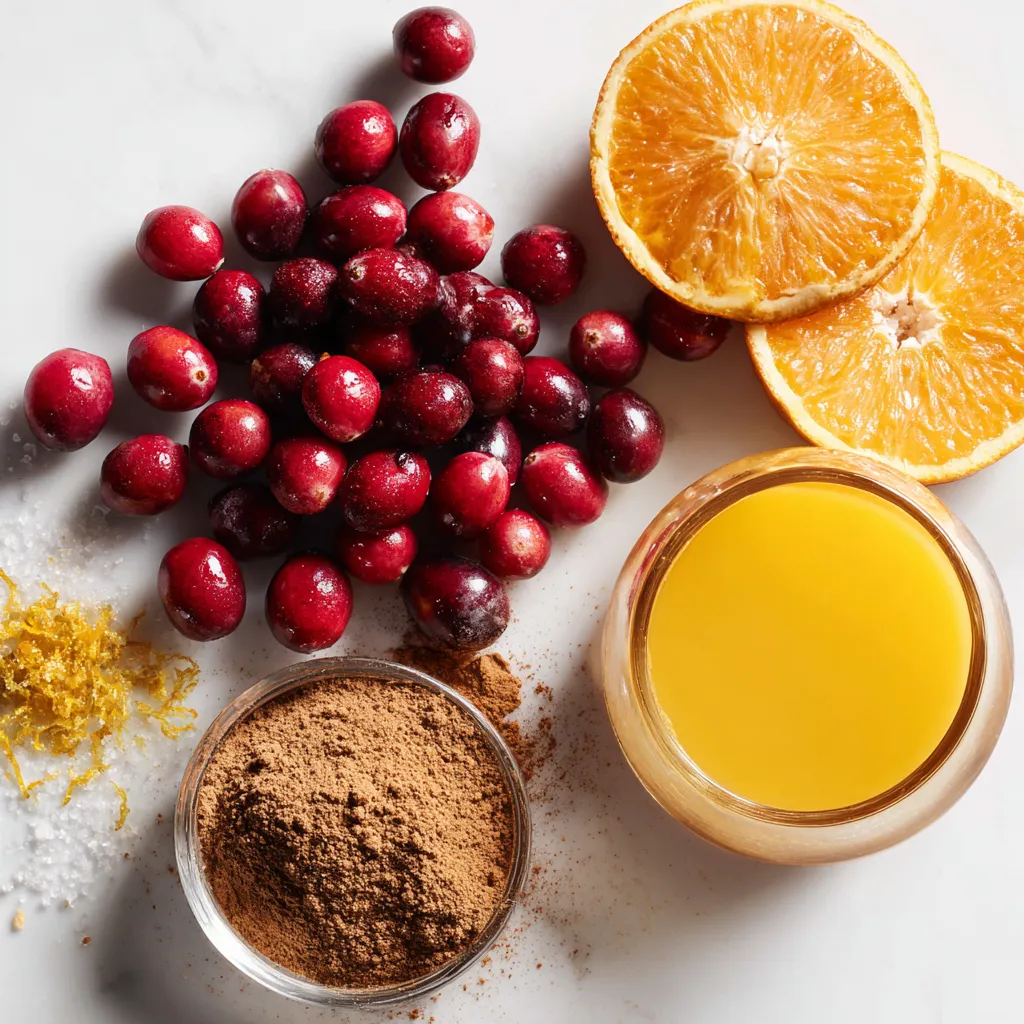
To make Minute Maple Cranberry Sauce, you need these key ingredients:
– 12 oz fresh cranberries
– 1 cup pure maple syrup
– 1/2 cup freshly squeezed orange juice
– Zest of 1 medium orange
– 1/2 teaspoon ground cinnamon
– 1/4 teaspoon ground nutmeg
– Pinch of sea salt
Measurements and Substitutions
The measurements are important for flavor. If you want to change things up, here are some ideas:
– Use honey instead of maple syrup for a different sweetness.
– Swap lemon juice for orange juice for a tart twist.
– You can reduce the cinnamon and nutmeg if you prefer lighter spice notes.
Tips for Selecting Fresh Cranberries
Choosing fresh cranberries is key for great sauce. Here are my tips:
– Look for deep red berries, which show ripeness.
– Avoid berries that are soft or wrinkled, as they may be spoiled.
– Check for any brown spots, which can indicate age.
– Fresh cranberries should feel firm and bounce slightly when you press them.
Following these tips will help you create a tasty and vibrant sauce for your meals!
Step-by-Step Instructions
Preparation of Fresh Cranberries
First, rinse the fresh cranberries under cold water. This removes dirt and ensures they are clean. As you rinse, look for any soft or damaged berries. Discard these bad ones. You want only the best cranberries for your sauce.
Cooking the Sauce: Mixing and Simmering
In a medium saucepan, add the rinsed cranberries, maple syrup, and freshly squeezed orange juice. Mix these ingredients well. Place your saucepan over medium heat. Stir occasionally to mix flavors and prevent sticking. When the mixture starts to boil, reduce the heat to a simmer. Add in the orange zest, ground cinnamon, ground nutmeg, and a pinch of sea salt. These spices add warmth and depth to your sauce. Cook for about 5-10 minutes. The cranberries will pop open, and the sauce will thicken.
Achieving the Desired Texture
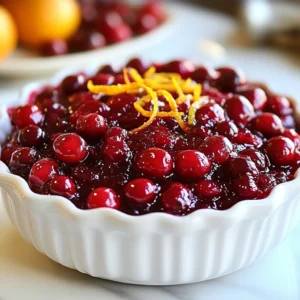
Keep an eye on the sauce as it cooks. You’ll know it’s ready when the cranberries burst and the sauce thickens. If you want a smooth sauce, use an immersion blender to blend it. This step is optional, so feel free to leave it chunky if you prefer. Once done, remove the saucepan from the heat and let the sauce cool. It will thicken more as it cools. Transfer it to a serving dish and let it chill completely. You can serve it warm or cold, depending on your taste!
Tips & Tricks
How to Thicken or Thin the Sauce
To thicken your sauce, let it simmer longer. The more you cook it, the thicker it gets. If your sauce is too thick, add a splash of water or more orange juice. Stir well to mix in the added liquid. This simple method works fast and keeps the flavor.
Best Practices for Storage and Serving
Cool the sauce at room temperature before storing. Once cool, transfer it to an airtight container. It keeps well in the fridge for up to one week. For serving, use a clear glass bowl. This shows off the bright red color. You can add fresh orange slices or herbs like rosemary on top for a nice look.
Enhancements for Flavor and Aroma
For added flavor, try mixing in chopped nuts or a splash of brandy. You can also add a bit of ginger for spice. Fresh herbs can lift the aroma, too. Thyme or mint works well. Just a hint can make a big difference in taste and scent.
Pro Tips
- Freshness Matters: Always use fresh cranberries for the best flavor and texture. Avoid any that are mushy or shriveled for optimal results.
- Adjusting Sweetness: If you prefer a less sweet sauce, reduce the amount of maple syrup or add more orange juice to balance the flavors.
- Experiment with Spices: Feel free to add additional spices like ginger or allspice to give your cranberry sauce a unique twist.
- Storage Tips: Store any leftover sauce in an airtight container in the refrigerator for up to a week. It also freezes well for later use!

Variations
Alternative Sweeteners
You can change the sweetener in this sauce. If you want a different taste, try honey or agave syrup. Both can give a unique flavor. Use the same amount as maple syrup. Just keep in mind that each sweetener has its own sweetness level.
Adding Spices for Custom Flavor
Add spices to make the sauce your own. Besides cinnamon and nutmeg, try ginger for some heat. You can also use allspice for a warm taste. Start with a pinch, then adjust to your liking. Mix in these spices while the sauce simmers for the best flavor.
Using Different Citrus Fruits
Orange juice is great, but you can use other citrus fruits too. Lemon juice adds a nice tartness. Lime juice can give a fresh twist. If you use these, adjust the sweetness to balance the flavors. You can also add zest from these fruits for extra zing.
Storage Info
Best Ways to Store Maple Cranberry Sauce
To keep your maple cranberry sauce fresh, store it in an airtight container. Glass jars work well and help you see the color. Place the container in the fridge. This sauce stays good for about a week when stored this way. If you plan to use it later, freezing is a great option.
Freezing and Thawing Instructions
If you want to freeze your sauce, let it cool completely first. Pour it into freezer-safe bags or containers. Label them with the date for easy tracking. When you are ready to use it, move the sauce to the fridge overnight. This slow thaw keeps the texture nice. You can also thaw it in a saucepan over low heat. Stir it often until it warms up.
Shelf Life and Usage Reminders
The shelf life of your maple cranberry sauce is about one week in the fridge. If frozen, it can last for up to three months. Always check for any signs of spoilage before using. If it smells off or has strange colors, it’s best to toss it. Use this sauce as a side for meats or as a topping for desserts. Its sweet and tangy flavor pairs well with many dishes!
FAQs
Can I make maple cranberry sauce ahead of time?
Yes, you can make maple cranberry sauce ahead of time. In fact, it tastes even better after a day in the fridge. Make it up to a week ahead. Just store it in an airtight container. This allows the flavors to blend nicely.
How do I adjust the sweetness level?
To adjust sweetness, you can add more or less maple syrup. Start with the recipe’s amount. Taste as you go. If you want it sweeter, add one tablespoon of syrup at a time. If it’s too sweet, add a bit more orange juice. This can balance the flavors well.
What to serve with cranberry sauce?
Cranberry sauce pairs well with many dishes. It is great with turkey or chicken. You can also serve it with ham. Try it on sandwiches or as a topping for pancakes. For a festive touch, use it with cheese platters. The tartness adds a nice contrast to savory foods.
You learned how to make a tasty maple cranberry sauce. We explored ingredients, cooking steps, and tips. I shared ways to enhance flavor and store leftovers. Remember, fresh cranberries make the best sauce. You can adjust sweetness and try new flavors easily. This sauce can be a delightful addition to many meals. Now, go ahead and create your own maple cranberry sauce masterpiec
Minute Maple Cranberry Sauce
Ingredients
- 12 oz fresh cranberries
- 1 cup pure maple syrup
- 0.5 cup freshly squeezed orange juice
- 1 medium zest of orange
- 0.5 teaspoon ground cinnamon
- 0.25 teaspoon ground nutmeg
- 1 pinch sea salt
Instructions
- Begin by rinsing the fresh cranberries thoroughly under cold running water. As you rinse, carefully sort through them and remove any damaged or soft berries.
- In a medium-sized saucepan, combine the rinsed cranberries, maple syrup, and freshly squeezed orange juice. Place the saucepan over medium heat and begin to mix the ingredients.
- Allow the mixture to come to a gentle boil, stirring occasionally to prevent sticking and ensure even heating.
- Once the mixture reaches a boil, lower the heat to a simmer. Stir in the orange zest, ground cinnamon, ground nutmeg, and a pinch of sea salt for added flavor.
- Continue to cook the sauce for about 5-10 minutes until the cranberries begin to burst open and the sauce thickens to your desired texture.
- Once thickened, remove the saucepan from heat and let it cool slightly at room temperature.
- For those who prefer a smoother sauce texture, carefully use an immersion blender to blend the sauce until you achieve your desired smoothness.
- Finally, transfer the cranberry sauce to a decorative serving dish, allowing it to cool completely before serving.
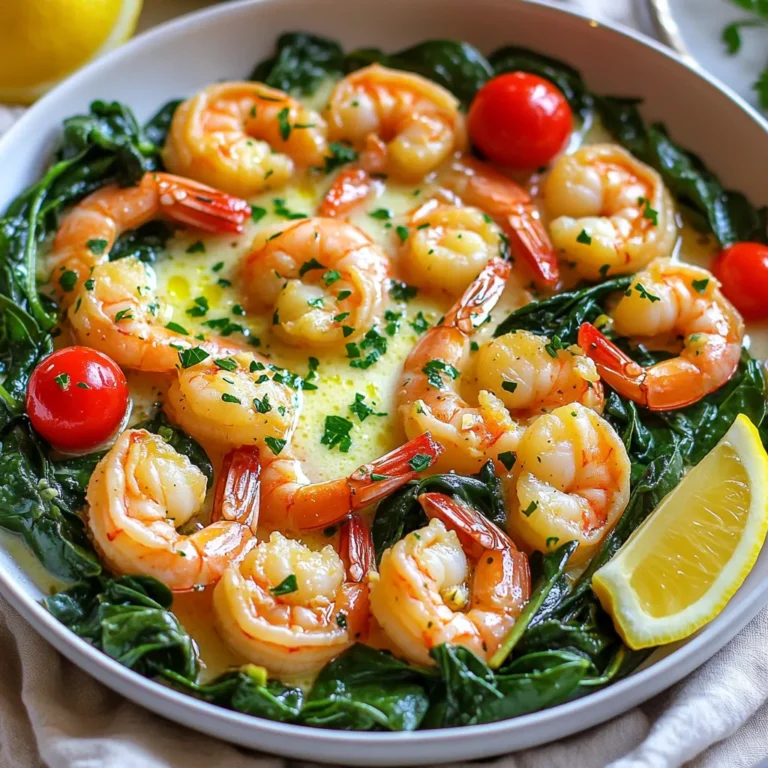
![To make garlic butter shrimp, gather these simple ingredients: - 1 lb large shrimp, deveined and peeled - 6 tablespoons unsalted butter - 5 cloves garlic, finely minced - 1 teaspoon red pepper flakes - 1 lemon, zested and juiced - 2 tablespoons fresh parsley, finely chopped - Salt and freshly ground black pepper, to taste - Optional: 1 tablespoon extra virgin olive oil These ingredients create a dish full of flavor. The shrimp give a sweet and briny taste. The garlic brings a warm, earthy aroma. Butter adds richness and a smooth texture. Lemon juice brightens the dish and balances the flavors. Fresh parsley gives a pop of color and freshness. Feel free to adjust the red pepper flakes. If you like heat, add more! If you prefer a milder flavor, use less. The optional olive oil helps prevent butter from burning. It adds depth to the dish. Once you gather these ingredients, you're ready to dive into the world of garlic butter shrimp. For a full recipe, check out the section above. To start, heat a large skillet over medium heat. Add 3 tablespoons of unsalted butter and, if you like, 1 tablespoon of extra virgin olive oil. This oil helps keep the butter from burning and adds flavor. Once the butter melts, add 5 cloves of minced garlic along with 1 teaspoon of red pepper flakes. Sauté for about 1-2 minutes. Stir often until the garlic smells great and turns light golden brown. Watch closely, so the garlic doesn’t burn. Now, it’s time for the shrimp. Carefully add 1 pound of peeled and deveined shrimp to the skillet. Spread them out in a single layer. Season with salt and freshly ground black pepper. Let the shrimp cook for about 2-3 minutes without stirring. You will see them change color to pink and opaque. When they look good, gently flip the shrimp over. Add the zest and juice from 1 lemon along with the remaining 3 tablespoons of butter. Cook for another 2-3 minutes until the shrimp are fully cooked and coated in the buttery sauce. When the shrimp are done, take the skillet off the heat. Stir in 2 tablespoons of finely chopped parsley. Taste the dish and adjust seasoning by adding more salt or pepper if needed. Serve the garlic butter shrimp hot to enjoy the best flavor. For more details, check the Full Recipe. To make your garlic butter shrimp shine, focus on two key areas: garlic and seasoning. - Avoid burning garlic: Garlic burns fast. Keep your heat at medium. Stir it often. You want it golden, not dark. Burnt garlic tastes bad. - Adjust seasoning to preference: Taste is personal. Start with salt and pepper. Add more to match your liking. You can also play with red pepper flakes for heat. Now, let’s talk about how to serve your dish. Presentation matters, and there are tasty ways to enjoy it. - Pairing with rice or bread: Serve your shrimp over fluffy rice. Jasmine or basmati works great. If you prefer, slice some warm bread. It soaks up the sauce well. - Garnishing ideas: Fresh parsley adds color. A few lemon wedges brighten your plate. A sprinkle of extra red pepper flakes adds a kick. Need more help? Here are some useful tools. - Suggested video tutorial or high-quality images: Look for a video that shows the steps in action. It helps to see the cooking process. - Nutritional information: Check out the calories and nutrients in this dish. It’s good to know what you're eating. For the full recipe, click [Full Recipe]. Enjoy cooking! {{image_4}} You can play with the flavors in garlic butter shrimp. For a kick, try Spicy Garlic Butter Shrimp. Just add more red pepper flakes. Adjust the heat to your taste. This gives the dish a nice kick that many love. Another great option is Lemon Herb Garlic Shrimp. Add fresh herbs like thyme or basil for a fresh twist. You can also squeeze extra lemon juice for more brightness. This variation makes the dish feel light and refreshing. You can swap some ingredients for different flavors. Instead of butter, try using olive oil. This gives a different taste and is a healthier choice. You can also use ghee for a rich flavor. Adding vegetables can change the dish too. Toss in asparagus or cherry tomatoes. These add color and nutrients. They cook quickly and soak up the garlic butter sauce. If you need gluten-free options, this recipe is easy. Just make sure your red pepper flakes and any other spices are gluten-free. For a dairy-free option, use olive oil instead of butter. You can also try vegan butter. This keeps the flavor while making it suitable for those avoiding dairy. By making these small adjustments, you can enjoy garlic butter shrimp in many ways. For the full recipe, check out the details above. To store leftovers, place the garlic butter shrimp in an airtight container. Ensure the shrimp cool down first. This keeps them fresh and tasty. You should eat the leftovers within 2 days. The flavors stay best within this time. For reheating, I suggest using a skillet. Heat it on low and add a little butter. This method keeps the shrimp moist. Stir gently to avoid overcooked shrimp. If you use the microwave, heat in short bursts. Check every 30 seconds until warm. You can freeze cooked shrimp for later use. Place them in a freezer-safe bag and remove as much air as possible. They can last up to 3 months in the freezer. To defrost, place the shrimp in the fridge overnight. For a faster method, submerge the bag in cold water. This way, you can enjoy your garlic butter shrimp whenever you want. For the full recipe, check out the [Full Recipe]. Cook shrimp for about 2-3 minutes on each side. They turn pink and opaque. This short time keeps them tender and juicy. Overcooking makes them tough. Always check their texture before serving. Yes, you can use frozen shrimp. Thaw them first in cold water. It takes about 15-20 minutes. Pat them dry before cooking. This helps them sear nicely in the pan. Cooking frozen shrimp directly may not give the best results. You can pair garlic butter shrimp with many sides. Rice is a great choice, like jasmine or basmati. You can also serve it with crusty bread. A fresh salad or steamed veggies work well too. They balance the rich flavors of the shrimp. This recipe is very flexible. You can adjust the spice level by adding more or less red pepper flakes. Want a different flavor? Try adding fresh herbs like basil or cilantro. You can even add veggies like asparagus or bell peppers. The choice is yours! For the full recipe, check the earlier section. This blog post covered a simple garlic butter shrimp recipe with step-by-step instructions. You learned about key ingredients, cooking tips, and variations for flavor. Storing and reheating shrimp was also discussed. This dish is not only easy to make, but it’s also delicious too. Experiment with the ingredients or try new sides to make it your own. Enjoy your cooking, and have fun exploring different flavors and options!](https://fastmealmate.com/wp-content/uploads/2025/05/4326bcb2-842f-4d6f-96a8-35ed43fbf561-768x768.webp)