
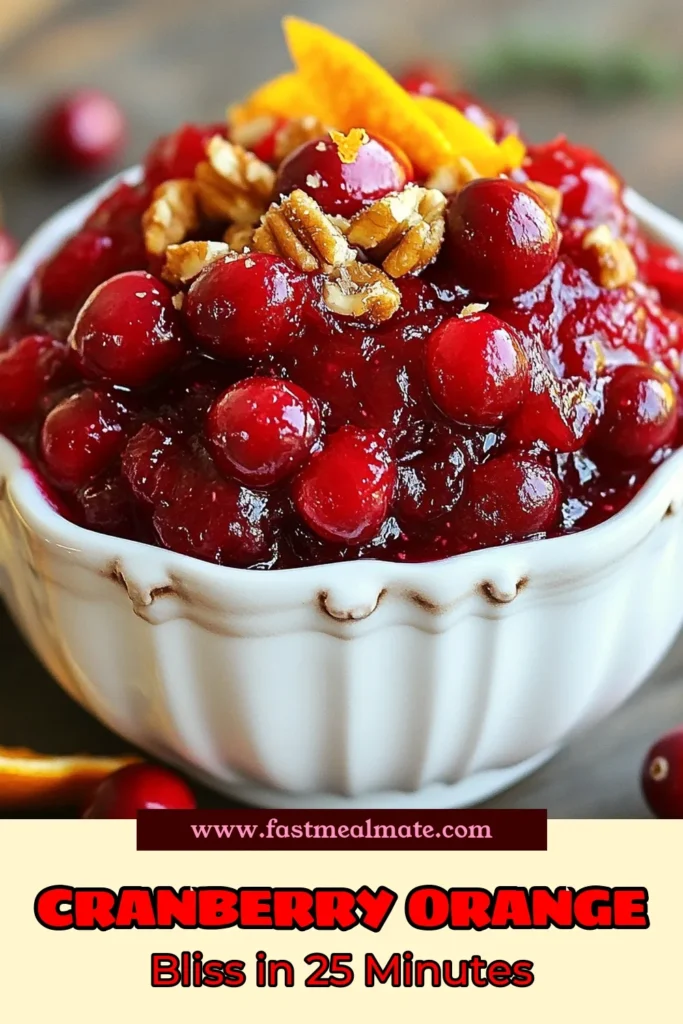
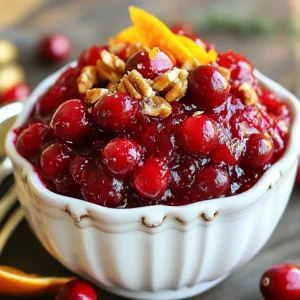
Homemade Cranberry Sauce with Orange Zest Delight
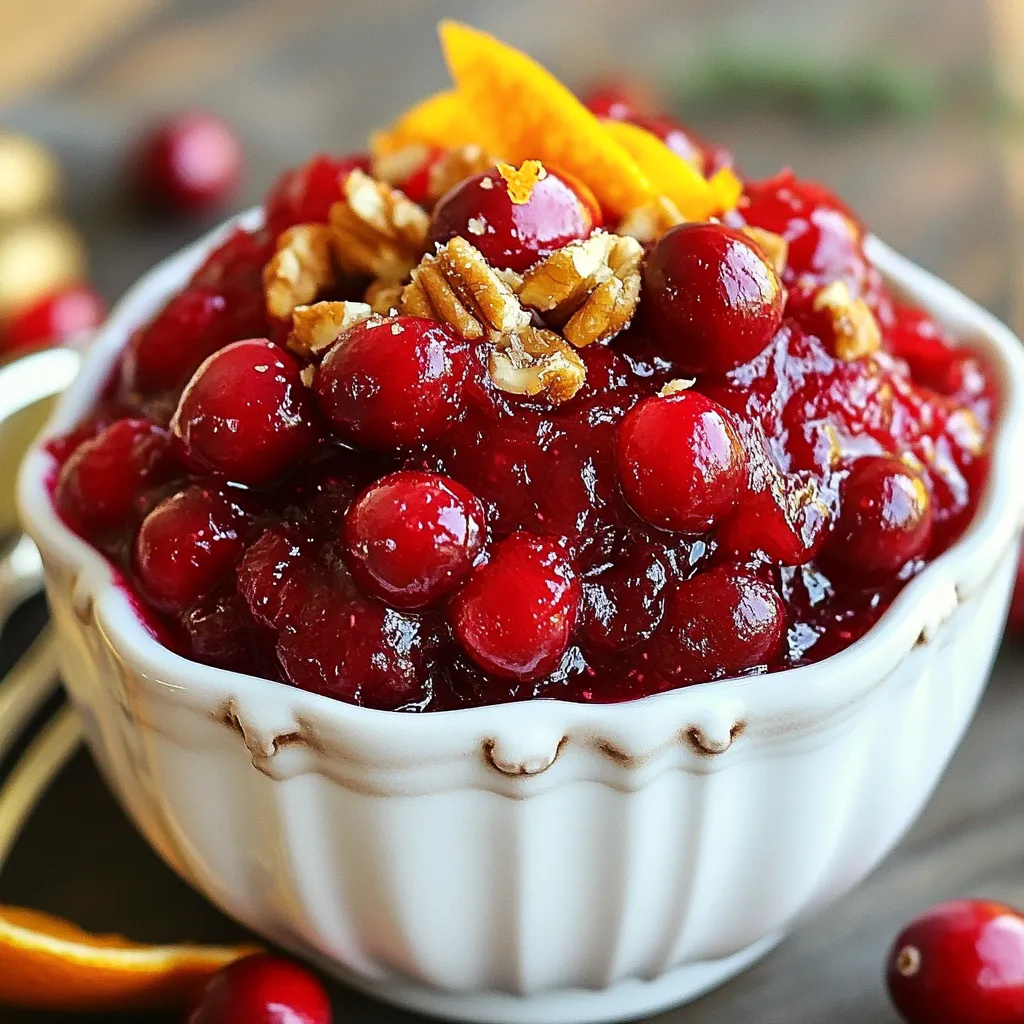
Get ready to make a delicious homemade cranberry sauce with orange zest! This unique twist will brighten up your holiday table. I’ll guide you through simple steps, tasty tips, and creative variations. You’ll find that fresh ingredients and a touch of orange can elevate this classic dish. By the end, you’ll have a vibrant sauce perfect for any meal. Let’s get cooking!
Why I Love This Recipe
- Fresh and Fruity Flavor: The combination of tart cranberries and bright orange zest creates a refreshing and vibrant taste that’s perfect for the season.
- Easy to Make: This recipe comes together quickly with minimal ingredients, making it accessible for anyone to whip up a delightful treat.
- Versatile Use: Enjoy it as a sauce for holiday dishes, spread on toast, or as a topping for desserts; it adds a festive touch to any meal.
- Beautiful Presentation: With its vibrant color and optional garnishes, this cranberry bliss sauce not only tastes great but looks stunning on the table.
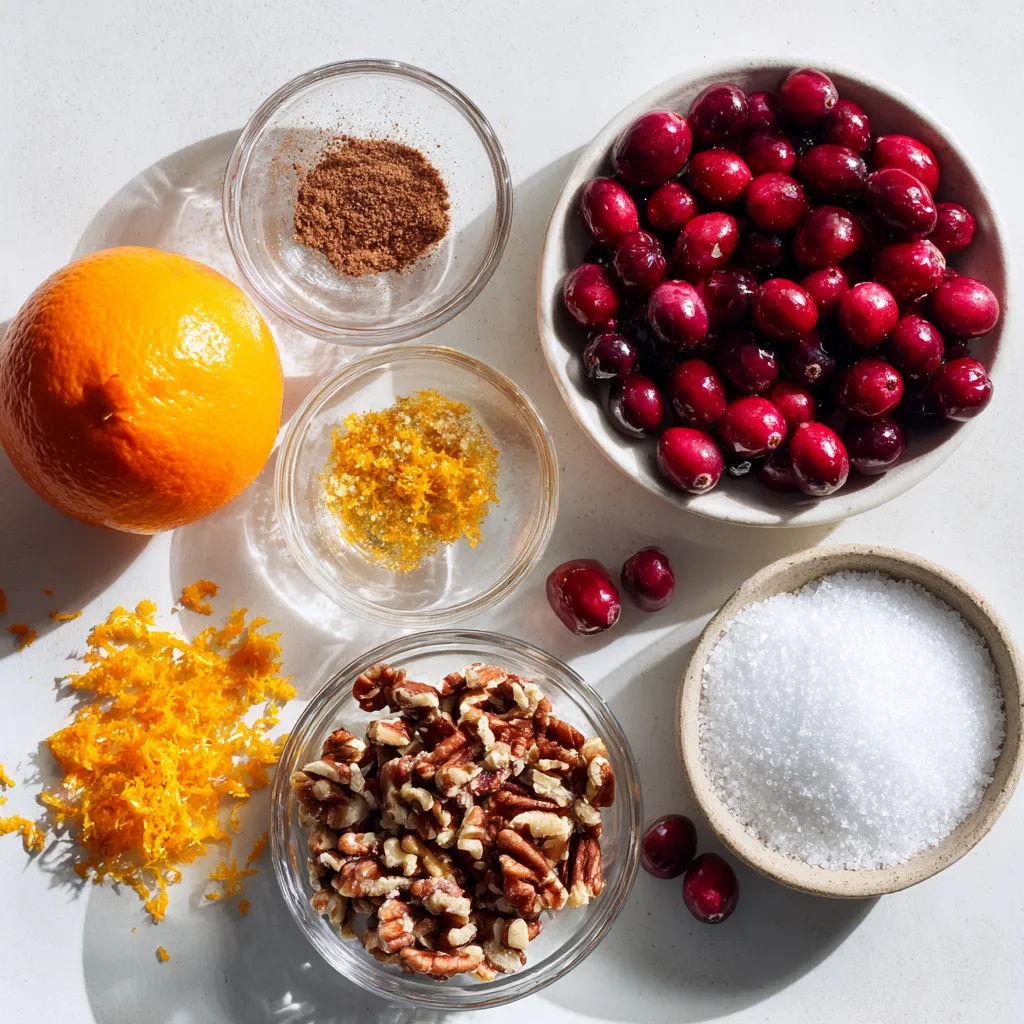
Ingredients
Fresh Ingredients
– 12 oz fresh cranberries
– Zest of 1 large orange (about 1 tablespoon)
Fresh cranberries are the star here. Choose bright, firm berries. Rinse them well to remove dirt. Check for any bad berries and toss those out. The zest from an orange adds a bright flavor. It gives a nice citrus touch to the sauce.
Sugars and Sweeteners
– 1 cup granulated sugar
– 1 cup filtered water
Granulated sugar sweetens the tart cranberries. It helps balance the flavors and makes the sauce taste great. We mix the sugar with filtered water to create a simple syrup. This syrup dissolves easily over heat.
Flavor Enhancers
– 1 teaspoon ground cinnamon
– 1/2 teaspoon pure vanilla extract
– 1/4 teaspoon salt
– Optional: 1/2 cup chopped walnuts or pecans for added crunch
Cinnamon adds warmth and spice to the sauce. Vanilla gives a rich, sweet note. A touch of salt balances the sweetness. If you like crunch, add walnuts or pecans for texture. These ingredients take the sauce to the next level!
Step-by-Step Instructions
Preparing the Cranberries
Start by rinsing the fresh cranberries under cold water. This step washes away dirt and impurities. Look closely at the cranberries. Remove any that are spoiled or damaged. You want only the best berries for your sauce.
Cooking the Sauce
In a medium saucepan, mix 1 cup of filtered water and 1 cup of granulated sugar. Place the pan over medium heat. Stir the mixture until the sugar dissolves completely. Once it boils, add the rinsed cranberries. Bring it back to a boil, then lower the heat to simmer. Cook for 10 to 15 minutes. Stir occasionally. You will see the cranberries pop as they cook. This is when your sauce starts to thicken.
Adding Flavors and Thickening
Once the cranberries burst, add the orange zest, ground cinnamon, vanilla extract, and salt. Stir these ingredients together well. This is where the magic happens. If you want a crunch, fold in the chopped walnuts or pecans. Remove the pan from the heat and let the sauce cool at room temperature. The sauce will thicken more as it cools. Once cooled, transfer it to a pretty dish or an airtight container. Chill it in the fridge until you are ready to serve. The flavors will blend nicely while it cools.
Tips & Tricks
Achieving the Perfect Consistency
To get the right thickness for your sauce, cook it longer. After the cranberries pop, let it simmer for an extra minute or two. This helps the sauce thicken nicely. If it seems too thin, a quick trick is to mash a few cranberries with a fork. This will help create a thicker texture. Remember, the sauce will also thicken as it cools, so don’t worry if it seems a bit runny at first.
Flavor Balancing Tips
Balancing flavors is key for great cranberry sauce. The tartness of cranberries needs some sweetness. That’s why we use one cup of sugar. If you want it less sweet, reduce sugar by a bit. Adding a pinch of salt enhances all the flavors. The orange zest adds a bright note. You can also experiment with spices like cinnamon or nutmeg for warmth. Taste your sauce as you go. Adjust the flavors to your liking.
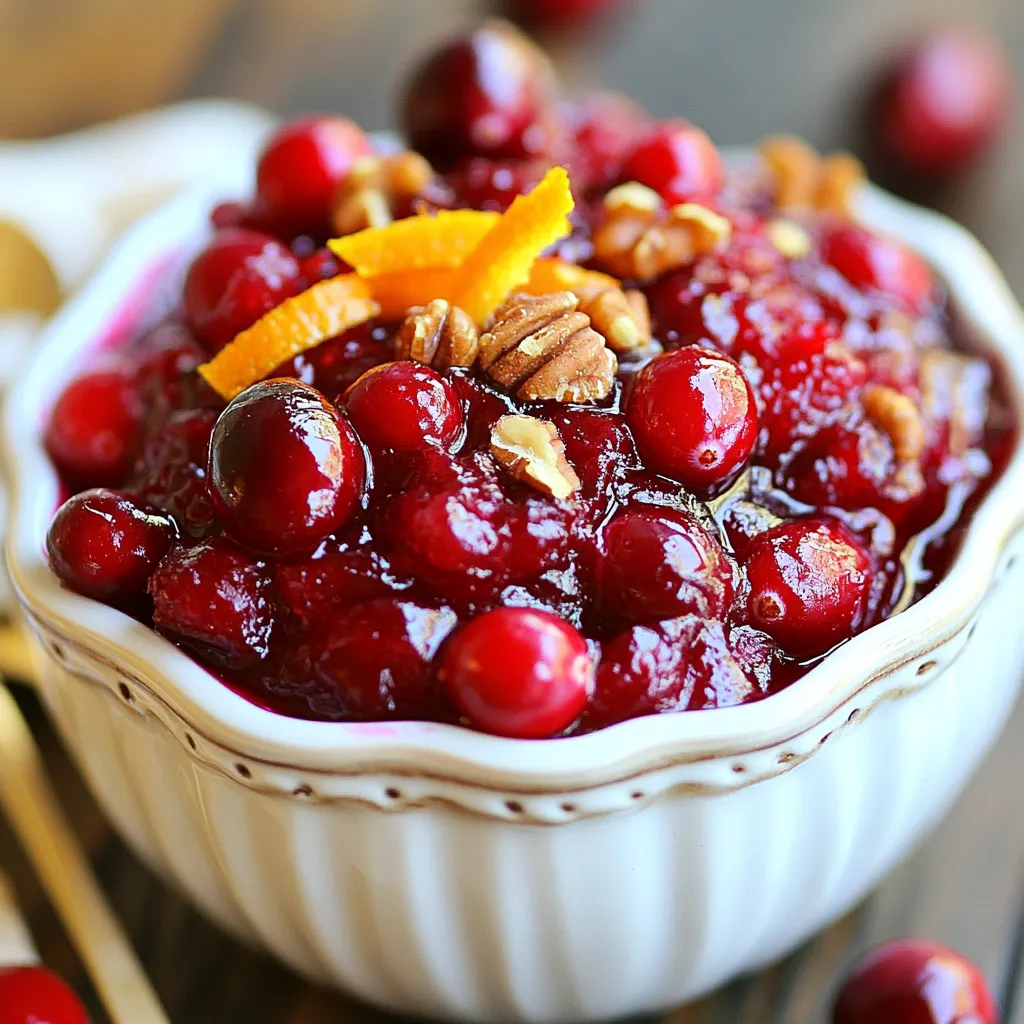
Presentation Suggestions
Serving your cranberry sauce nicely makes a big difference. Use a pretty bowl to show off the color. A light sprinkle of orange zest on top adds a pop. You can also place a few whole cranberries for extra flair. If you added nuts, sprinkle some on top as well. Make it festive! Remember, we eat with our eyes first. A great presentation makes your dish shine at any gathering.
Pro Tips
- Fresh Cranberries: Ensure you select plump, firm cranberries with a bright color for the best flavor and texture.
- Thicker Sauce: For a thicker cranberry sauce, let it simmer a bit longer until it reaches your desired consistency.
- Flavor Enhancements: Experiment with adding a pinch of nutmeg or cloves for a different flavor profile.
- Storage Tips: Store the sauce in an airtight container in the refrigerator for up to one week; it also freezes well for longer storage.
Variations
Nutty Additions
You can make your cranberry sauce even better by adding nuts. Chopped walnuts or pecans work well. Just add half a cup of nuts when you mix in the orange zest. The nuts give a great crunch and flavor. They also add healthy fats, which are good for you. Be sure to mix them in gently so they do not break apart. This nutty twist makes your sauce unique and tasty.
Citrus Infusions
Want to boost the citrus flavor? You can add more zest or even juice from other fruits. Lime or lemon juice brings a fresh taste. Adding about a tablespoon of lemon juice can brighten the sauce. You can also mix in zest from lemons or limes. This gives the sauce a zesty kick. Each citrus fruit brings its own fun taste to the dish. So, feel free to experiment and find what you like best!
Spiced Alternatives
If you love spices, try adding some to your sauce. Ground ginger or cardamom can add a warm flavor. Just a pinch of ground ginger gives a nice, spicy kick. You can also try using cloves for a sweet and warm taste. Mix in these spices when you add the orange zest. This creates a cozy feel, perfect for cold days. Spice it up and enjoy a whole new flavor in your cranberry sauce!
Storage Info
Refrigeration Guidelines
After making your cranberry sauce, let it cool to room temperature. Then, transfer it to an airtight container. Store in the fridge for up to two weeks. This will keep the flavors fresh and vibrant. The sauce may thicken as it chills. If it becomes too thick, just stir in a bit of water before serving.
Freezing Instructions
You can freeze cranberry sauce for longer storage. Place it in a freezer-safe container, leaving some space for expansion. Seal tightly and freeze for up to three months. To use, thaw it in the fridge overnight. You can also warm it gently on the stove if you prefer it warm.
Shelf Life Tips
Homemade cranberry sauce lasts well in the fridge and freezer. Check for any off smells or changes in color before using. If stored properly, it maintains great quality. Enjoy your sauce with turkey, ham, or even on toast!
FAQs
Can I use frozen cranberries?
Yes, you can use frozen cranberries. They work well in this sauce. Just toss them in the pot straight from the freezer. You may need to cook them a bit longer. The sauce will still taste great!
What can I serve with cranberry sauce?
Cranberry sauce pairs well with many dishes. I love serving it with turkey or chicken. It also goes nicely with grilled cheese or spread on bread. Try it on pancakes for a fun twist!
How do I make it less sweet?
To make the sauce less sweet, reduce the sugar. Start with 3/4 cup instead of 1 cup. You can also add a bit of lemon juice for a tart flavor. Another option is to mix in extra cranberries, which will balance the sweetness.
You learned about the key ingredients for cranberry sauce, including fresh fruits, sugars, and flavor enhancers. You saw how to prepare, cook, and add flavors for the best results. I shared tips on perfecting the sauce’s texture and balance, plus great ways to present it. We explored fun variations like nutty and spiced options. Lastly, I highlighted storage tips to keep your sauce fresh.
By following these steps, you can make a delicious cranberry sauce that will impress everyone. Enjoy your cookin
Cranberry Bliss with Orange Zest
Ingredients
- 12 oz fresh cranberries
- 1 cup granulated sugar
- 1 cup filtered water
- 1 tablespoon zest of 1 large orange
- 1 teaspoon ground cinnamon
- 1/2 teaspoon pure vanilla extract
- 1/4 teaspoon salt
- 1/2 cup chopped walnuts or pecans (optional)
Instructions
- Begin by rinsing the fresh cranberries under cold running water. Inspect them carefully, removing any stems or berries that appear damaged or spoiled.
- In a medium-sized saucepan, combine 1 cup of filtered water and 1 cup of granulated sugar. Place over medium heat and bring the mixture to a gentle boil, stirring continuously until the sugar is fully dissolved into the water.
- Once boiling, incorporate the rinsed cranberries into the saucepan. Allow the mixture to return to a boil, then reduce the heat to a low simmer. Cook for 10-15 minutes, stirring occasionally, until the cranberries pop open and the sauce begins to thicken.
- After the cranberries have burst, add the orange zest, ground cinnamon, pure vanilla extract, and salt to the saucepan. Stir well to integrate these flavors. If using, fold in the chopped walnuts or pecans for an extra layer of texture and flavor.
- Remove the saucepan from the heat and let the cranberry sauce cool down at room temperature. It will thicken further as it cools, enhancing its consistency.
- Once cooled, carefully transfer the cranberry sauce to a decorative serving dish or an airtight container. Refrigerate until ready to serve; the flavors will meld beautifully as it chills.
![For a delicious S'mores Brownie Skillet Dip, gather the following ingredients: - 1 cup all-purpose flour - 1 cup granulated sugar - 1/2 cup unsweetened cocoa powder - 1/2 teaspoon baking powder - 1/4 teaspoon salt - 1/2 cup unsalted butter, melted - 2 large eggs - 1 teaspoon vanilla extract - 1 cup semi-sweet or dark chocolate chips - 1 cup mini marshmallows - 1/2 cup graham cracker crumbs - Extra graham crackers for serving These ingredients blend together to create a rich, chocolatey dip. The all-purpose flour and cocoa give it a brownie base. The sugar adds sweetness, while the baking powder helps it rise slightly. The melted butter keeps it rich and moist. The eggs and vanilla extract add flavor and structure. Chocolate chips provide bursts of chocolatey goodness. Mini marshmallows, when baked, become soft and gooey, adding that classic S'mores taste. Finally, the graham cracker crumbs create a crunchy topping, perfect for dipping. Use this list to prepare your dip. Following these steps ensures you get the best flavor and texture. For full details, check out the Full Recipe. - Preheat oven to 350°F (175°C). This helps the dip cook evenly. - In a large bowl, mix the dry ingredients: flour, sugar, cocoa powder, baking powder, and salt. Stir well to combine. - In another bowl, combine the wet ingredients: melted butter, eggs, and vanilla extract. Mix gently until they blend together. - Pour the wet mix into the dry mix. Stir until just combined. Do not overmix; a few lumps are okay. - Now, fold in the chocolate chips. This adds rich flavor and texture to the dip. - Grease a 10-inch cast-iron skillet or oven-safe dish. Pour the brownie batter into the skillet. Spread it evenly. - Top the batter with mini marshmallows and graham cracker crumbs. This gives the dip that classic s'mores taste. - Place the skillet in the preheated oven. Bake for 20-25 minutes. The edges should be set, and the center should be soft. The marshmallows will puff up and turn golden. - Once baked, take the skillet out of the oven. Let it cool for a few minutes. This makes it safe to eat. Enjoy this warm dip with extra graham crackers for a fun treat! To avoid overmixing the batter, mix just until the wet and dry ingredients blend. You want some lumps for that fudgy texture. Too much mixing makes the brownies tough. For the perfect marshmallow topping, add them during the last few minutes of baking. This lets them brown nicely without burning. Keep an eye on them. You want golden, not charred! The best snacks for dipping are graham crackers, of course! You can also use fruit like strawberries or bananas. They add a nice, fresh taste to the rich dip. For a great presentation, drizzle melted chocolate on top before serving. Add some colorful fruit on the side. It makes the dish look fun and inviting. {{image_4}} You can make this dessert fit your needs with some easy swaps. If you want a gluten-free option, use gluten-free flour. It works well and keeps the taste great. You can also switch the chocolate. Dark chocolate gives a rich taste, while milk chocolate is sweeter. Choose what you like best! Add more fun to your dip with flavor extras. Chopped nuts add crunch and taste. Walnuts or pecans work best. If you love sweetness, drizzle some caramel over the top. It makes the dip even more special. You can also try different extracts. Almond extract gives a nice twist. Coconut extract can add a tropical touch. Just use a little bit to taste and enjoy! To keep your S'mores Brownie Skillet Dip fresh, store it in the fridge. First, let it cool completely. Then, cover the skillet tightly with plastic wrap or transfer it to an airtight container. When stored this way, it can last for about 3 days. If you have more than you can eat, freezing is an option. Scoop the dip into a freezer-safe container. Leave a little space at the top, as it may expand. It can last up to 2 months in the freezer. Just remember to label the container with the date for easy tracking. When it's time to enjoy your leftovers, reheating is simple. You can warm it up in the oven. Preheat the oven to 350°F (175°C). Place the skillet in the oven for about 10-15 minutes. This helps keep the dip gooey and warm. You can also reheat in the microwave if you're short on time. Use a microwave-safe bowl and heat in short bursts. Stir between each burst to ensure even warming. This way, the marshmallows remain soft and fluffy, just like when it was first made. Can I make this dish ahead of time? Yes, you can prepare the batter ahead. Just store it in the fridge. Bake it right before serving for best results. What can I use if I don’t have a cast-iron skillet? You can use any oven-safe dish. A glass or ceramic baking dish works well too. Just make sure to grease it well. How can I make it less sweet? To cut back on sweetness, use less sugar or dark chocolate. You can also add a pinch of salt to balance the flavors. What is the best way to serve this dip? Serve it warm with extra graham crackers. You can also add fresh fruit like strawberries or bananas for dipping. - Check out the [Full Recipe] for detailed instructions. This blog post covers a fun and tasty s'mores brownie skillet dip. You learned how to mix the right ingredients and bake this treat perfectly. I shared tips to make it even better and suggestions for serving. With storage info, you can save leftovers too. Enjoy making this sweet dip for your next gathering! It’s easy, fun, and sure to impress. Remember that you can personalize it with your favorite flavors. Happy baking!](https://fastmealmate.com/wp-content/uploads/2025/07/00705dfa-6977-4536-b8b9-b3715ee69892-768x768.webp)
![- 2 cups all-purpose flour - 1 teaspoon baking powder - 1/2 teaspoon baking soda - 1/2 teaspoon salt - 1 teaspoon ground cinnamon - 3/4 cup granulated sugar - 1/2 cup packed brown sugar - 1/2 cup unsalted butter, melted - 2 large eggs, at room temperature - 1 teaspoon pure vanilla extract - 1 cup plain yogurt (or sour cream) - 2 cups apples, peeled and diced (approximately 2 medium apples) - 1/2 cup old-fashioned rolled oats When you measure your ingredients, use proper tools. For dry ingredients, a dry measuring cup is best. Press flour down slightly to avoid gaps. For liquids, use a liquid measuring cup and check at eye level. This ensures you get the right amounts for recipes. Accurate measurements lead to better results. You can switch some ingredients if needed. Use whole wheat flour for a healthier option. If you want a dairy-free muffin, try almond or coconut yogurt instead. Apples are key, but you can use pears or peaches too. For a nutty touch, add chopped walnuts or pecans. Always feel free to adjust! Make sure to check the [Full Recipe] for detailed instructions and baking times! Preheating the Oven Start by preheating your oven to 350°F (175°C). This step is key for even baking. Preparing the Muffin Tin Line a standard muffin tin with paper liners. You can also spray each cup with non-stick cooking spray. This helps the muffins release easily after baking. Dry Mixture Preparation In a large bowl, whisk together 2 cups of all-purpose flour, 1 teaspoon of baking powder, 1/2 teaspoon of baking soda, 1/2 teaspoon of salt, and 1 teaspoon of ground cinnamon. Mix well and set it aside. Sugar and Butter Mixture In another bowl, combine 3/4 cup of granulated sugar, 1/2 cup of packed brown sugar, and 1/2 cup of melted butter. Stir until this mixture is smooth and creamy. Wet and Dry Ingredient Integration Gently pour the sugar-butter mixture into the bowl with the dry ingredients. Use a spatula to mix just until combined. Be careful not to overmix, as this keeps the muffins light and fluffy. Folding in Apples Next, fold in 2 cups of peeled and diced apples. Use a spatula to distribute them evenly without overmixing the batter. Preparing the Crumb Topping In a small bowl, mix 1/2 cup of old-fashioned rolled oats with 1/4 cup of flour, 1/4 cup of brown sugar, and 1/4 cup of melted butter. Blend until it becomes crumbly. This topping adds a nice crunch. Filling Muffin Liners Spoon the muffin batter into the lined muffin cups. Fill each about two-thirds full. This allows room for the muffins to rise while baking. Baking Instructions Place the muffin tin in your preheated oven. Bake for 20 to 25 minutes. To check if they are done, insert a toothpick into the center of a muffin. It should come out clean. These steps will guide you to make delicious apple crumb muffins. For more details, check the Full Recipe. Preventing Overmixing To keep your muffins light, mix gently. After adding the wet ingredients to the dry, stir just until combined. If you see some flour lumps, that’s okay. Overmixing can make your muffins dense, not fluffy. Ensuring Proper Baking Time Baking time is key. Set your timer for 20 minutes. Check doneness by inserting a toothpick in the center. If it comes out clean, they’re ready. If not, check every minute. Be careful not to open the oven too often, as it can affect the rise. Adding a pinch of nutmeg can boost flavor. You might also try mixing in some chopped walnuts or pecans. They add a nice crunch and depth. If you love spice, a dash of ginger pairs well with apple too. Presentation makes your muffins shine. Arrange them on a rustic wooden platter. A light dusting of powdered sugar adds charm. For an extra touch, place slices of fresh apples around the muffins. This creates a warm and inviting look. {{image_4}} Choosing the right apple makes a big difference. Sweet apples like Fuji or Honeycrisp work well. They add a nice balance of flavor. Tart apples like Granny Smith give a refreshing zing. You can mix different apples for a unique taste. This adds layers of flavor to your muffins. Adding nuts or dried fruits can enhance your muffins. Chopped walnuts or pecans add a nice crunch. Dried cranberries or raisins bring a burst of sweetness. Just fold them in with the apples to keep it simple. Consider adding spices for extra flavor. A pinch of nutmeg gives warmth. You can also try cardamom for a unique twist. Just remember to balance the spices so they don’t overpower the apples. You can make these muffins gluten-free. Substitute all-purpose flour with a gluten-free blend. This works well and keeps the texture light. Just ensure your baking powder is gluten-free too. If you want to cut back on sugar, try using applesauce. It keeps the muffins moist and sweet. You can also use less butter or switch to a lighter oil. This way, you enjoy a tasty treat without the guilt. For the complete recipe, check out the Full Recipe section. Store your leftover muffins in an airtight container. This keeps them fresh for up to four days. If you want to keep them longer, consider freezing them. To freeze muffins, let them cool completely. Wrap each muffin in plastic wrap and place them in a freezer bag. They can last up to three months in the freezer. When you're ready to enjoy, just take them out and let them thaw at room temperature. Reheat muffins in the oven for the best taste. Preheat your oven to 350°F (175°C). Place the muffins on a baking sheet and warm them for about 10 minutes. You can also use the microwave. Heat each muffin for about 20-30 seconds. Enjoy them warm for the best flavor! For more details on making these muffins, check out the Full Recipe. You can use sour cream instead of yogurt. It gives a similar texture and flavor. Another option is to use buttermilk, which makes the muffins moist. Yes, you can make mini muffins. Just adjust the baking time to 12-15 minutes. Keep an eye on them, so they don’t overbake. Check for doneness by inserting a toothpick into the center of a muffin. If it comes out clean, they are ready. You can also lightly press the top; it should spring back. These muffins stay fresh for about 3 days at room temperature. Store them in an airtight container to keep them soft. Yes, you can prepare the batter the night before. Cover it and store it in the fridge. When you're ready, bake them fresh in the morning. For the full recipe, check the earlier section. You’ll find all the steps and ingredients needed to make these tasty Apple Crumb Muffins. You now have all the key steps to make delicious Apple Crumb Muffins. We covered ingredients, preparation, and baking instructions to ensure your muffins turn out great. Remember to follow the tips for flavor and presentation. With these easy instructions, you can enjoy warm muffins at home. Whether you share them or keep them all, they are sure to impress. Happy baking!](https://fastmealmate.com/wp-content/uploads/2025/07/c8d25f82-9d23-458d-8a15-e1a22d6eabb0-768x768.webp)
![For the dry mix, gather these items: - 1 ½ cups all-purpose flour - 1 teaspoon baking powder - 1 teaspoon baking soda - ½ teaspoon salt - 1 teaspoon ground cinnamon - ½ teaspoon ground nutmeg - ¼ teaspoon ground ginger These ingredients help create the loaf's structure and flavor. The spices add warmth and depth. Next, collect these wet items: - 1 cup granulated sugar - ½ cup packed brown sugar - 1 cup vegetable oil - 3 large eggs - 1 teaspoon vanilla extract These components bring moisture and sweetness. The combination of sugars gives a rich taste. Now, let's spice it up with these add-ins: - 2 cups finely shredded carrots (approximately 4 medium carrots) - ½ cup crushed pineapple, well-drained - ½ cup chopped walnuts (optional) These add-ins bring texture and flavor. The carrots keep the loaf moist, while the pineapple adds a touch of sweetness. If you like crunch, toss in the walnuts. For the full recipe, you can explore the step-by-step instructions in [Full Recipe]. - Preheat the oven to 350°F (175°C). - Prepare your 9x5-inch loaf pan. Use non-stick spray or line it with parchment paper. This helps the loaf come out easily after baking. - In a medium bowl, combine the dry ingredients. Whisk together the flour, baking powder, baking soda, salt, and spices. Set this mixture aside for later. - In a large bowl, mix the sugars and oil. Beat them together until smooth. - Add the eggs one at a time to the sugar mixture. Mix well after each addition. Stir in the vanilla extract. - Gradually blend the dry ingredients with the wet ingredients. Stir gently until just combined. Avoid overmixing to keep your loaf tender. - Carefully fold in the finely shredded carrots, well-drained crushed pineapple, and chopped walnuts if you’re using them. Make sure they are evenly spread throughout the batter. - Pour the batter into your prepared loaf pan. Use a spatula to smooth the top. - Place the loaf pan in the oven. Bake for 50-60 minutes. Check for doneness by inserting a toothpick in the center. It should come out clean. If the top browns too fast, cover it loosely with aluminum foil. Use freshly grated carrots for the best flavor and moisture. Fresh carrots add a sweet crunch. You can also adjust the sugar based on your taste. If you prefer a sweeter cake, add a bit more sugar. If you want it less sweet, cut back. Mixing just until combined keeps the cake tender and moist. If you overmix, the loaf can turn out dense. When you add dry ingredients to the wet mix, stir gently. The batter should look slightly lumpy; that’s okay! To get a smooth cream cheese frosting, start with room temperature cheese and butter. Cold ingredients can lead to lumps. Beat the cream cheese and butter until creamy. Gradually add powdered sugar to avoid a cloud of sugar. Remember to mix until smooth, and then add a pinch of salt for flavor. For the full recipe, check out the [Full Recipe]. {{image_4}} You can easily change the flavor of your carrot cake loaf with different add-ins. If you want to swap nuts, try using raisins or shredded coconut instead. Both options add a sweet, chewy texture that pairs well with the spices. You can also adjust spices for a unique flavor. Add a little more cinnamon for warmth or some cardamom for a fragrant twist. This way, you can create a taste that fits your mood. If you need gluten-free options, consider almond or oat flour. Both flours work well and keep the loaf moist. For vegan substitutions, use flax eggs instead of regular eggs. Just mix one tablespoon of ground flaxseed with three tablespoons of water for each egg. You can also replace the cream cheese with a vegan cream cheese spread. These small changes keep the cake delicious while meeting your dietary needs. Pair your carrot cake loaf with a warm cup of coffee or tea. The rich flavors balance perfectly with a hot drink. To make your loaf look fancy, arrange slices on a beautiful platter. You can sprinkle chopped walnuts on top and add edible flowers for color. This makes your dessert not just tasty but also a feast for the eyes. For a fun touch, serve it with a scoop of vanilla ice cream for a delightful contrast. Make sure to check out the Full Recipe for more details on creating this delicious treat! To keep your carrot cake loaf fresh, store it in the fridge. Place it in an airtight container. This helps keep moisture in and prevents it from drying out. The cream cheese frosting also needs special care. To keep the frosting fresh, cover it with plastic wrap. This stops air from making it hard or crusty. You can freeze the carrot cake loaf both ways. First, freeze it before frosting. Wrap it in plastic wrap and then foil. This helps keep the cake moist. If you already frosted it, freeze the loaf on a plate. Once frozen, wrap it tightly. To thaw the loaf, place it in the fridge overnight. This helps keep the texture nice and soft. The carrot cake loaf can last about three days at room temperature. Keep it in a cool, dry place. If you see any mold or smell a sour scent, it’s best to throw it away. Always trust your senses when checking if food is safe to eat. Enjoy your delicious treat while it's fresh! For the full recipe, check the complete guide. Baking a carrot cake loaf takes about 50-60 minutes at 350°F (175°C). To test for doneness, insert a toothpick into the center. If it comes out clean, your loaf is ready. If the top browns too quickly, cover it with foil. This tip helps keep the top soft and moist. Yes, you can prepare this loaf ahead of time. You can mix the dry ingredients and store them in an airtight container. The wet ingredients can also be combined a day before. Just keep them in the fridge. Bake the loaf when you are ready. It keeps well and tastes fresh. If you need a dairy-free option, use vegan cream cheese. Another choice is to blend silken tofu with a bit of vanilla and powdered sugar. This gives you a smooth frosting that still tastes great. You can also try coconut cream for a tropical twist. Yes, this carrot cake loaf is great for kids. It contains nutritious carrots and pineapple, which add vitamins. The loaf is moist and flavorful, making it appealing to young eaters. Just be sure to watch for any nut allergies if you use walnuts. To check if the loaf is done, look for a golden brown top. You can also gently press the top; it should spring back. Use a toothpick to test the center. If it comes out clean, your carrot cake loaf is perfect. These cues help ensure a delicious result. This blog post covered all the essential steps to make a delicious carrot cake loaf. We explored the key ingredients, from dry and wet components to tasty add-ins. I shared tips to keep your cake moist and flavorful, along with ways to customize your loaf. Lastly, we discussed storage and FAQs to help you perfect your baking. Embrace your baking journey and enjoy each slice of your creation!](https://fastmealmate.com/wp-content/uploads/2025/06/8b09a955-a057-4b29-b3fd-380f10cea1b9-768x768.webp)