Creamy Garlic Butter Chicken Orzo Skillet Delight

Welcome to the world of creamy comfort with my Creamy Garlic Butter Chicken Orzo Skillet Delight! This dish combines juicy chicken, tender orzo, and rich garlic butter for a meal that satisfies everyone. Whether you’re a busy parent or a cooking newbie, this recipe is simple yet packed with flavor. Get ready to impress your family with a mouthwatering dinner that’s quick to prepare and oh-so-delicious!
Ingredients
Main Ingredients
– 1 lb chicken breast, cut into bite-sized pieces
– 1 cup orzo pasta
– 4 cloves garlic, minced
– 1 medium onion, finely chopped
Chicken breast is the star of this dish. I love using it because it cooks fast and stays juicy. Orzo pasta adds a fun twist. It’s small and cooks quickly. Garlic and onion bring great flavor. They add depth to every bite.
Dairy and Fats
– 4 tablespoons unsalted butter (divided)
– 1 cup heavy cream
– 1/2 cup grated Parmesan cheese
Unsalted butter makes this dish rich. I use it to sauté the chicken and aromatics. Heavy cream adds that creamy texture we crave. Parmesan cheese gives it a salty kick. All these fats work together for a dreamy taste.
Seasonings and Add-ins
– 2 cups chicken broth (low-sodium recommended)
– 1 cup fresh spinach, roughly chopped
– 1 teaspoon dried thyme
– 1 teaspoon smoked paprika
Chicken broth keeps the dish moist. I prefer low-sodium to control the salt. Fresh spinach adds color and nutrition. Thyme and smoked paprika enhance the flavor. Together, they create a delightful mix that makes each bite memorable.
Step-by-Step Instructions
Cooking the Chicken
– Start by melting 2 tablespoons of unsalted butter in a large skillet over medium heat.
– Once melted, add 1 pound of chicken breast cut into bite-sized pieces.
– Season the chicken with salt, black pepper, 1 teaspoon of dried thyme, and 1 teaspoon of smoked paprika.
– Sauté the chicken for about 5-7 minutes, until it turns golden brown and is cooked through.
– Transfer the chicken to a plate and set it aside for later.
Sautéing Aromatics
– In the same skillet, add the remaining 2 tablespoons of butter.
– Once the butter melts, add 1 medium onion that has been finely chopped.
– Next, add 4 cloves of minced garlic.
– Sauté these for 2-3 minutes, stirring often, until the onion is soft and the garlic smells great.
Incorporating Orzo and Combining Ingredients
– Stir in 1 cup of orzo pasta, mixing it well with the garlic and onion.
– Cook the orzo for another 1-2 minutes to let it toast and soak in the flavors.
– Carefully pour in 2 cups of low-sodium chicken broth.
– Bring the mixture to a simmer and cover the skillet with a lid.
– Let the orzo cook for about 10 minutes, stirring occasionally, until it is al dente.
Making it Creamy
– When the orzo is ready, lower the heat.
– Stir in 1 cup of heavy cream, simmering gently for about 2-3 minutes.
– This will thicken the sauce and make it creamy.
Finishing Touches
– Add the cooked chicken back to the skillet.
– Toss in 1 cup of roughly chopped fresh spinach and 1/2 cup of grated Parmesan cheese.
– Mix everything thoroughly and cook for another 2-3 minutes, until the spinach wilts and the cheese melts.
– Finally, taste the dish and adjust seasoning with more salt and black pepper as needed.
Tips & Tricks
Perfecting Creaminess
To get the perfect creamy sauce, I suggest adjusting the cream to your taste. If you want it richer, use heavy cream. For a lighter version, you can use half-and-half or whole milk. If the sauce is too thick, add a splash of chicken broth to loosen it up. If it’s too thin, let it simmer longer to thicken naturally.
Seasoning Suggestions
To make the flavors pop, taste your dish often. You can adjust the salt and pepper based on your preference. If you love heat, try adding a pinch of red pepper flakes. Fresh herbs like basil or thyme can also enhance the flavor profile. Just chop them finely and stir them in at the end for a fresh taste.
Cooking Method Variations
You can try different methods to cook the orzo. Instead of cooking it in the skillet, boil it separately in salted water. Drain it and then mix it back in with the creamy sauce. Another option is to bake it in the oven. Combine all ingredients in an oven-safe dish and bake until bubbly. Both methods bring unique flavors to the dish.

Variations
Protein Substitutes
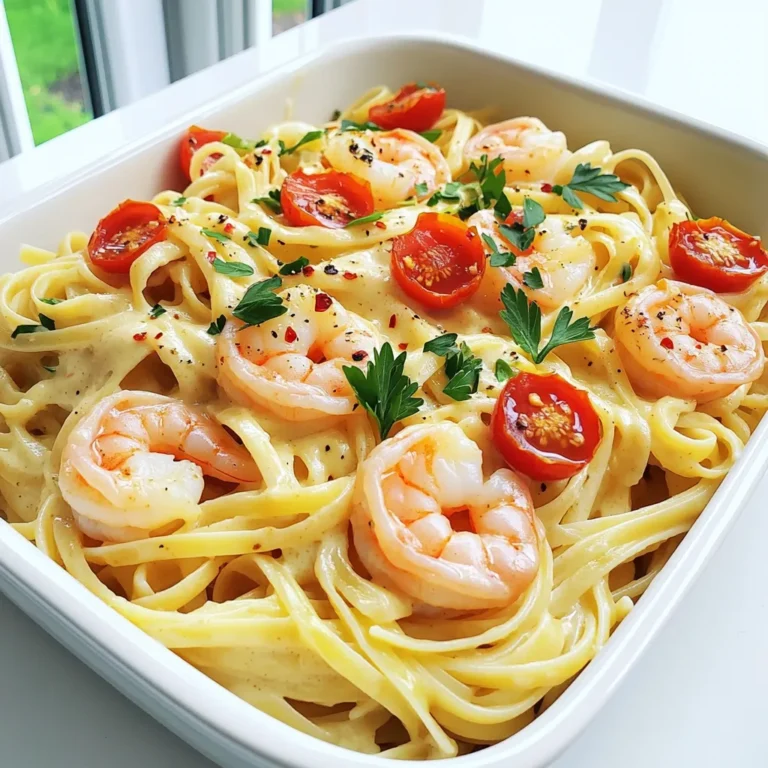
You can switch out the chicken for shrimp or tofu. Shrimp cooks fast and adds a nice flavor. Use medium or large shrimp for best results. Tofu is a great choice for a vegetarian meal. Make sure to press the tofu to get rid of extra water. Other cuts of chicken work well too. Thighs are juicier and add a richer taste.
Vegetable Additions
Adding seasonal veggies boosts nutrition and color. Try using broccoli, zucchini, or bell peppers. These veggies add crunch and flavor. You can mix them in with the onions and garlic. Cook them until tender for the best taste. This keeps your meal fresh and exciting.
Flavor Enhancements
Boost the taste by adding different herbs or spices. Fresh herbs like basil or thyme can brighten the dish. You can also try adding a pinch of red pepper flakes for heat. Experiment with lemon zest for a zesty kick. These changes can make your meal unique every time.
Storage Info
Refrigeration Guidelines
To store leftovers, let the dish cool first. Place it in an airtight container. This keeps the orzo and chicken fresh. You can refrigerate it for up to three days. Make sure to label the container with the date. This way, you’ll remember how long it’s been stored.
Reheating Instructions
For reheating, I recommend using the stove. Place the leftover orzo in a skillet over low heat. Add a splash of chicken broth or cream to help it warm up. Stir gently until heated through. You can also use the microwave. Heat in short bursts, stirring in between. This helps prevent uneven heating.
Freezing Tips
To freeze, let the dish cool completely. Then, transfer it to a freezer-safe container. Leave some space at the top for expansion. You can freeze it for up to three months. To thaw, move it to the fridge overnight. Reheat as mentioned above for the best results.
FAQs
Can I use whole wheat orzo?
Yes, you can use whole wheat orzo in this dish. It adds a nice nutty flavor. Whole wheat orzo is a great option for a healthier meal. Just remember, it may take a bit longer to cook than regular orzo. Keep an eye on it and adjust the cooking time as needed.
How can I make this dish gluten-free?
To make this meal gluten-free, swap the orzo for gluten-free pasta. Many brands offer gluten-free orzo made from rice or corn. You can also use quinoa or cauliflower rice for a lighter option. Just make sure to check that your chicken broth is gluten-free, too.
How long does this meal last in the fridge?
This meal will stay fresh in the fridge for about three days. Store it in an airtight container to keep it tasty. Reheat it gently on the stove to keep the creaminess intact. If it seems dry, add a splash of chicken broth or cream when reheating.
What can I serve with Creamy Garlic Butter Chicken Orzo Skillet?
You can serve this dish with a simple green salad or roasted vegetables. Garlic bread pairs well too. For a heartier meal, add some steamed broccoli or asparagus on the side. The fresh veggies balance the creamy flavors perfectly.
Is it possible to make this recipe ahead of time?
Yes, you can make this recipe ahead of time! Prepare the chicken and orzo, then store them separately. Reheat them together when you’re ready to serve. This way, you maintain the creamy texture and flavors. Just note that the orzo may absorb some sauce, so keep extra cream on hand.
This blog post explored how to make a delicious Creamy Garlic Butter Chicken Orzo Skillet. We discussed key ingredients, step-by-step cooking instructions, and helpful tips for the perfect dish. You learned how to adjust creaminess and seasoning to suit your taste. Don’t forget about the variations and storage tips to make this meal last. Cooking can be fun and easy. Enjoy this dish with loved ones for a satisfying meal!


![- 2 ripe mangoes - 1 large cucumber - 1 red bell pepper - 1/4 red onion - 1/4 cup fresh cilantro - 1 jalapeño - Honey or agave syrup - Fresh lime juice - Salt and pepper to taste When I make this salad, I start by gathering all the main ingredients. Ripe mangoes add sweetness and color. The cucumber gives a nice crunch. A red bell pepper brings brightness. I chop the red onion finely for a hint of sharpness. Fresh cilantro adds a burst of flavor. If you like heat, you can add a jalapeño. Just remember to remove the seeds. For sweetness, honey or agave syrup works well too. For the dressing, I use fresh lime juice. It brightens the salad and adds tang. I season it with salt and pepper. This combination makes the salad taste fresh and lively. The full recipe is easy to follow and takes just 15 minutes to prep. Enjoy making this delightful dish! First, you'll need to prep your fruits and veggies. Start with these steps: - Dice 2 ripe mangoes into bite-sized pieces. Make sure they are sweet and juicy. - Chop 1 large cucumber into small cubes. This adds a nice crunch. - Cut 1 red bell pepper into small pieces for color and taste. - Finely chop 1/4 red onion for a hint of sharpness. - If you like some heat, mince 1 jalapeño and set it aside. - Finally, chop 1/4 cup fresh cilantro for a burst of freshness. Now, it's time to combine everything. Follow these steps: - In a large mixing bowl, add the diced mangoes, cucumber, red bell pepper, and red onion. Give them a gentle stir to mix. - Next, fold in the chopped cilantro and minced jalapeño. Adjust the jalapeño based on how spicy you want your salad. - In a separate bowl, whisk together 2 tablespoons fresh lime juice and 1 tablespoon honey (or agave syrup) until smooth. - Drizzle the dressing over the salad mix in the large bowl. - Using a spatula or wooden spoon, toss everything together gently. You want all the ingredients to be coated in the dressing. To finish your salad, season it just right: - Sprinkle salt and pepper to taste over the salad. - Toss it again very gently to distribute the seasoning. - Let the salad rest for about 10 minutes before serving. This helps the flavors blend nicely. By following these steps, you create a Mango Cucumber Summer Salad that is not only refreshing but also full of vibrant flavors. For the complete details, refer to the Full Recipe. To make the best Mango Cucumber Summer Salad, choose ripe mangoes and fresh cucumbers. Look for mangoes that feel slightly soft when you gently press them. Their skin should have a rich color. A ripe cucumber should be firm and dark green, with no soft spots. For cilantro, pick bunches with bright green leaves. Avoid any that look wilted or yellowed. Fresh cilantro adds a burst of flavor to your salad. To boost the taste, let your salad marinate. Mix the diced fruits and veggies and let them sit for about 10 minutes. This helps the flavors blend well. Before serving, chill the salad in the fridge for about an hour. This makes it extra refreshing on warm days. How you serve your salad matters. Use a large, colorful bowl to show off those vibrant ingredients. For a fun touch, garnish with lime wedges and more cilantro on top. This adds color and makes your dish even more inviting. Enjoy your beautiful salad! For the complete recipe, check out the [Full Recipe]. {{image_4}} To make your Mango Cucumber Summer Salad even more fun, try these variations. You can add grilled chicken or shrimp for a protein boost. These options taste great with the fresh flavors. If you want a vegetarian choice, substitute tofu. Tofu soaks up the dressing well and adds a nice texture. Adding grains can change the salad's texture. Consider mixing in quinoa or couscous. Both grains work well and make the salad heartier. You can also explore using brown rice as a base. It adds a nutty flavor that pairs nicely with mango. Mix in other seasonal fruits or vegetables for variety. Try diced avocado or cherry tomatoes for added color. Experimenting with different herbs can also bring new flavors. Fresh mint or basil can add a refreshing twist. Nuts like almonds or walnuts add a nice crunch too. For a complete experience, check out the [Full Recipe]. To keep your Mango Cucumber Summer Salad fresh, store leftovers in airtight containers. This will lock in flavor and keep the salad crisp. Use the salad within three days for the best taste. If you wait too long, the ingredients may become soggy. You can prepare the ingredients ahead of time. Chop the mangoes, cucumber, red bell pepper, and red onion. Keep each ingredient separate in the fridge. When it's time to eat, simply mix them together. Assemble the salad just before serving for the freshest taste. This salad does not freeze well. Freezing can change the texture of the mango and cucumber. If you want to preserve the ingredients, consider freezing them separately. Use them in smoothies or soups instead. Always make sure to pack produce in freezer-safe bags or containers. You can use several fruits instead of mango. Pineapple adds a sweet, tangy flavor. Peaches bring a juicy touch. Papaya offers a mild sweetness. When you pick a fruit, think about how it will blend with cucumber and lime. You want a balance of sweetness and freshness. Typically, this salad lasts about two days. After that, the vegetables may get soggy. Look for signs of spoilage like a change in color or smell. If it smells off, it’s best to toss it out. Yes! To make it vegan, swap honey for agave syrup. You can also add more veggies like avocado or even black beans for extra nutrition. This way, you keep the flavor while making it plant-based. This mango salad blends fresh ingredients with simple steps. You start by preparing ripe fruits and vegetables. Mixing them with fresh lime juice brings out their flavor. Optional proteins and grains add variety. Store leftovers properly to enjoy later. Try different herbs or spices for unique tastes. This recipe is versatile and easy to adapt. Enjoy your colorful, healthy dish!](https://fastmealmate.com/wp-content/uploads/2025/07/d214d25a-b677-4b49-bd4c-02fe8092c0e1-768x768.webp)