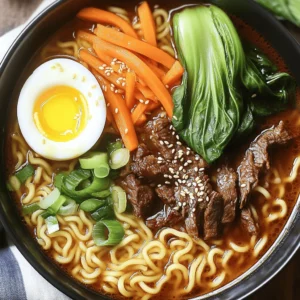
Spicy Korean Beef Ramen Flavorful and Satisfying Meal

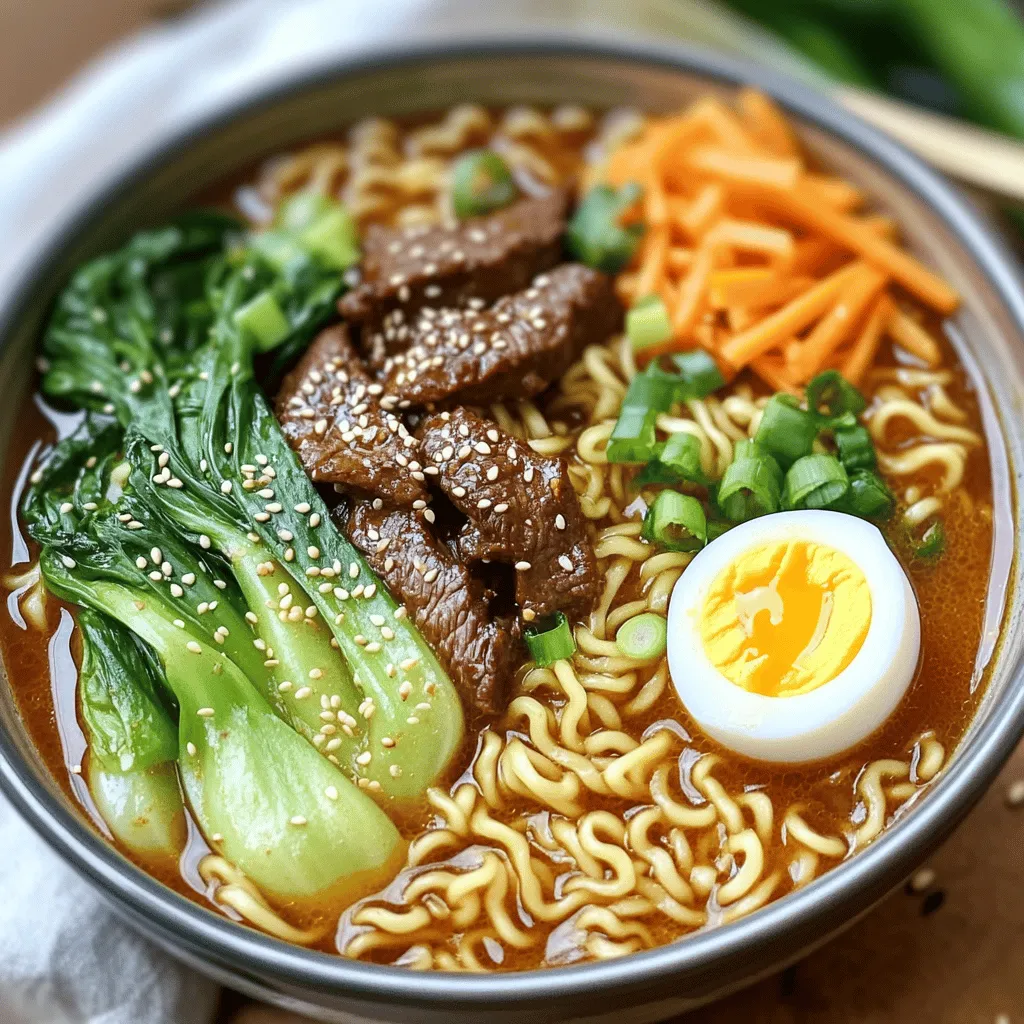
Are you ready to spice up your dinner routine? My Spicy Korean Beef Ramen is a flavorful and satisfying meal that brings bold taste to your table. With tender beef, slurp-worthy noodles, and a kick from gochujang, this dish hits all the right notes. Join me as I guide you through the simple steps to create this mouthwatering ramen in your own kitchen!
Ingredients
Main Ingredients for Spicy Korean Beef Ramen
– 200g ramen noodles
– 200g beef sirloin, thinly sliced against the grain
The ramen noodles are the heart of this dish. They soak up the rich broth and add a chewy texture. I prefer using fresh ramen noodles when possible. They cook quickly and bring a lively taste to your meal. The beef sirloin adds a savory flavor. Thin slices work best, as they cook fast and remain tender.
Flavor Enhancers
– 2 tablespoons gochujang (Korean chili paste)
– 1 tablespoon soy sauce
– 1 tablespoon sesame oil
Gochujang is the star here. It brings a spicy kick and depth of flavor. Add soy sauce for saltiness and umami. Sesame oil gives a nutty aroma that pulls the dish together. These flavor enhancers are what make this ramen unforgettable.
Vegetables and Toppings
– 1 cup bok choy or fresh spinach, roughly chopped
– 1 medium carrot, julienned
– 2 green onions, chopped (whites and greens kept separate)
Fresh greens add color and crunch. Bok choy or spinach brings vitamins and a slight earthiness. Carrots add natural sweetness, balancing the spice. Green onions add a fresh bite. They also make for a beautiful topping. Each vegetable contributes to the overall taste and texture, making every bite a delight.
Step-by-Step Instructions
Preparing the Beef Marinade
To start, marinate the beef sirloin. In a bowl, mix the thinly sliced beef with gochujang, soy sauce, minced garlic, and grated ginger. Make sure you coat the beef evenly. Cover the bowl and let it sit for at least 15 minutes at room temperature. This step adds great flavor.
Making the Beef Broth
Next, we make the beef broth. In a large pot over medium heat, combine the beef broth, sesame oil, and brown sugar. Add the white parts of the chopped green onions. Bring this to a gentle simmer. Let the flavors meld together for about five minutes. This will create a rich base for your ramen.
Cooking the Beef and Noodles
While the broth simmers, cook the beef. Heat a small drizzle of oil in a skillet over high heat. Once hot, add the marinated beef. Stir-fry it quickly until browned, about three to four minutes. Then transfer the cooked beef to a plate and set it aside. Now, return to the pot with the simmering broth and add the ramen noodles. Cook them according to the package instructions, usually four to five minutes, until they’re tender.
Final Assembly of Ramen
In the last minute of cooking the noodles, add the chopped bok choy or spinach and the julienned carrots to the pot. Stir gently to wilt them while keeping some texture. Now, it’s time to assemble! Divide the cooked ramen and vibrant veggies into large serving bowls. Carefully ladle the hot broth over the noodles and vegetables. Top each bowl with the stir-fried beef. For a creamy touch, add a soft-boiled egg cut in half if you’d like. Finally, sprinkle the chopped green onion tops and toasted sesame seeds over the ramen. Enjoy your meal!
Tips & Tricks
Perfecting the Broth Flavor
To make the broth taste amazing, balance is key. You can add a bit of brown sugar to cut through the saltiness of soy sauce. This mix gives the broth a rounder flavor. It is like a dance of sweet and salty that makes every sip delightful. Taste it while cooking. Adjust it until you find what feels right for you.
Cooking Noodles to Perfection
To avoid overcooking ramen, watch the clock closely. Fresh ramen noodles usually need just 4-5 minutes in boiling broth. Stir them gently as they cook. This helps them cook evenly and not stick together. If you are unsure, taste a noodle. It should be tender, but still have a little bite.
Vegetable Cooking Tips
To keep veggies fresh and crunchy, add them in the last minute of cooking. Bok choy or spinach should wilt just enough to be soft but still bright. Carrots should stay crisp, adding a nice crunch. This way, your ramen looks colorful and tasty!
Variations
Alternative Proteins
You can swap beef for chicken or tofu in this recipe. Chicken adds a lighter touch. It cooks fast and soaks up flavors well. Tofu is great for a plant-based meal. Use firm tofu for the best texture. Just remember to press it to remove excess water. This helps it absorb the marinade better.
Adjusting Spice Levels
Want a milder dish? Reduce the gochujang to one tablespoon. You can also add a bit of sugar for balance. To make it spicier, add more gochujang or even a splash of chili oil. Taste as you go, so you find your perfect heat level.
Adding Extra Vegetables
Feel free to add more veggies to your ramen. Zucchini, bell peppers, or snap peas work great. You can also use seasonal greens like kale or Swiss chard. Just chop them into bite-sized pieces for easy eating. Add them in the last minute of cooking for the best texture.
Storage Info
How to Store Leftovers
To store your leftovers, let them cool first. Place the ramen, broth, and beef in separate airtight containers. This keeps everything fresh. Seal tightly and refrigerate. Enjoy your meal within three days for the best flavor.
Reheating Tips
Reheat ramen slowly to keep its texture. Use a pot on low heat for the broth. For the noodles, heat them in a little boiling water for one to two minutes. This method helps them stay firm and not mushy. Avoid using the microwave, as it can overcook the noodles.
Freezing Ramen for Later
If you want to freeze ramen, separate the components first. Freeze the broth in a freezer-safe bag or container. Place the noodles in a different bag. You can also freeze the beef separately. This way, everything stays fresh and tasty. When ready, thaw overnight in the fridge and reheat as mentioned above.
FAQs
What is Gochujang and how is it used?
Gochujang is a spicy Korean chili paste. It adds heat and depth to dishes. Made from red chili powder, fermented soybeans, and salt, it has a sweet and savory flavor. In this recipe, gochujang is the star. It gives the beef a bold kick. You mix it with soy sauce, garlic, and ginger. This marinade helps tenderize the meat and infuses it with flavor.
Can I make this dish vegetarian?
Yes, you can make a vegetarian version. For the beef, use tofu or mushrooms. Marinate them just like the beef. Replace beef broth with vegetable broth for a lighter taste. You can also add more veggies. Consider using bell peppers, zucchini, or snap peas. These will add color and crunch. This way, you keep the delicious flavor without meat.
What can I serve with Spicy Korean Beef Ramen?
You can serve this ramen with many sides. A simple cucumber salad pairs well. The coolness of the salad balances the heat of the ramen. You could also serve steamed rice. It soaks up the savory broth nicely. For a fun touch, offer kimchi on the side. Kimchi adds a tangy crunch, enhancing the meal. Enjoy the ramen with your favorite drink, like iced tea or lemonade.
In this post, we explored making spicy Korean beef ramen. We looked at key ingredients like beef, noodles, and gochujang. You learned how to prepare the beef and broth, cook the noodles, and assemble your dish. We shared tips on perfecting flavors, cooking noodles, and variations for proteins and spices. Finally, we discussed storing leftovers and reheating for the best taste. Enjoy your cooking journey, and trust that you can customize this dish to your liking!
![- 1 ½ cups graham cracker crumbs - ½ cup unsalted butter, melted - 2 tablespoons granulated sugar - 8 oz cream cheese, softened - ½ cup powdered sugar - ½ cup heavy whipping cream - Zest and juice of 1 lemon - 1 teaspoon pure vanilla extract - Assorted fresh berries (for topping) - Fresh mint leaves (for garnish) Gathering the right ingredients is key. The graham cracker crumbs form a sweet and crunchy crust. Unsalted butter adds richness, while granulated sugar gives a touch of sweetness. Cream cheese provides that classic cheesecake texture. Powdered sugar balances the filling's flavor. Next, I add heavy whipping cream for lightness. The zest and juice from the lemon bring bright flavor. Pure vanilla extract adds depth. For garnishing, I use fresh berries on top for color and mint leaves for a fresh touch. These ingredients come together to create a treat that is light, creamy, and bursting with flavor. You can find the detailed steps in the Full Recipe. - Combine 1 ½ cups of graham cracker crumbs, ½ cup melted unsalted butter, and 2 tablespoons granulated sugar in a bowl. - Press this mixture firmly into mini tart molds. Ensure it is even and tight. - Chill the crusts in the refrigerator for 10-15 minutes to help them set. - In a large bowl, beat 8 oz of softened cream cheese until it is smooth. - Mix in ½ cup powdered sugar, zest and juice of 1 lemon, and 1 teaspoon vanilla extract. Blend until there are no lumps. - In a separate bowl, whip ½ cup heavy cream with an electric mixer until stiff peaks form. - Gently fold the whipped cream into the cream cheese mixture using a spatula. Be careful not to deflate the whipped cream. - Take the chilled crusts out of the refrigerator. - Fill each crust with the lemon cheesecake filling, smoothing the tops evenly. - Place the filled tarts back in the refrigerator. Chill for at least 2 hours to let the filling set. - Gently remove the tarts from their pans. - Top each tart with fresh berries and a mint leaf for a lovely touch. For the full recipe, please refer to the earlier section. Enjoy making these delightful mini no-bake lemon cheesecake tarts! To make the crust strong, pack the mixture tightly. This helps keep the shape. You can also try different cookies. For example, use chocolate cookies or gingersnaps. Each cookie gives a unique flavor. For a smooth filling, use cream cheese at room temperature. Cold cream cheese can make lumps. You can adjust the lemon juice to find your perfect tartness. If you love tart, add more lemon. For a milder taste, use less juice. To fill the tarts neatly, use a piping bag. This gives a professional look. You can also sprinkle extra lemon zest on the plate. It adds color and makes your dessert pop. For a fun touch, place fresh mint leaves around the tarts. It looks great and adds freshness! You can find the Full Recipe for these delightful tarts to explore more tips. {{image_4}} You can change up the taste of these mini tarts easily. Swap lemon for lime for a zesty twist. The tartness from lime adds a fresh kick. If you want something rich, use chocolate or fruit purees for a unique filling. Chocolate brings sweet indulgence, while fruit purees add a fruity burst. Not everyone can eat the same way. You can make a gluten-free crust with gluten-free crumbs. This way, everyone can enjoy these tarts. For those avoiding dairy, substitute with vegan cream cheese and coconut cream. These options keep the creamy texture while being dairy-free. Garnishing can elevate your dessert. Top your tarts with seasonal fruits like strawberries or raspberries. The colors and flavors will pop! You can also use edible flowers for an elegant presentation. They add a touch of beauty and whimsy to your tarts. For the full recipe, check out the [Full Recipe]. You can store the mini no-bake lemon cheesecake tarts in the refrigerator. They will last for up to three days if covered. To keep them fresh, make sure to cover them well. It’s best to keep the tarts separate from any garnishes until you are ready to serve them. This way, they stay fresh and look great. If you want to save some for later, you can freeze the unfilled crusts. This is a great option if you plan to make them ahead of time. The filled tarts can also be frozen for up to a month. Just remember to thaw them before serving. This will help keep their creamy texture. To prevent the tarts from drying out, use airtight containers. This keeps them fresh and tasty. It’s also smart to label your containers with dates. This way, you can easily track how long they have been stored. Yes, you can prepare these tarts a day in advance and chill them. This makes them great for parties or busy days. Just keep them in the fridge until you are ready to serve. Lightly grease the tart pans before filling them. You can also use silicone molds. Both methods help the tarts pop out without breaking. You can use bottled lemon juice in a pinch. However, fresh lemons give the best flavor. The zest adds a bright taste that makes these tarts stand out. Yes, Greek yogurt or vegan cream cheese works well as substitutes. These options can change the flavor slightly, but they still taste great. This recipe yields 12 mini tarts. Perfect for sharing or enjoying over a few days! Pair your mini tarts with coffee or tea. This makes for a delightful dessert experience that everyone will love. For the full recipe, check out the details above! This blog post covers how to make delicious mini lemon cheesecake tarts. We discussed each ingredient, from the crust to the creamy filling, and shared tips for a perfect dessert. You can customize flavors and garnishes to suit your taste. Remember, storage is key for keeping them fresh. Enjoy making these tarts for any occasion. Your friends and family will love them!](https://fastmealmate.com/wp-content/uploads/2025/06/a8bd9651-0c39-4151-9790-24600a8eb0ea-768x768.webp)