Ultimate Greek Moussaka Flavorful Comfort Food Dish

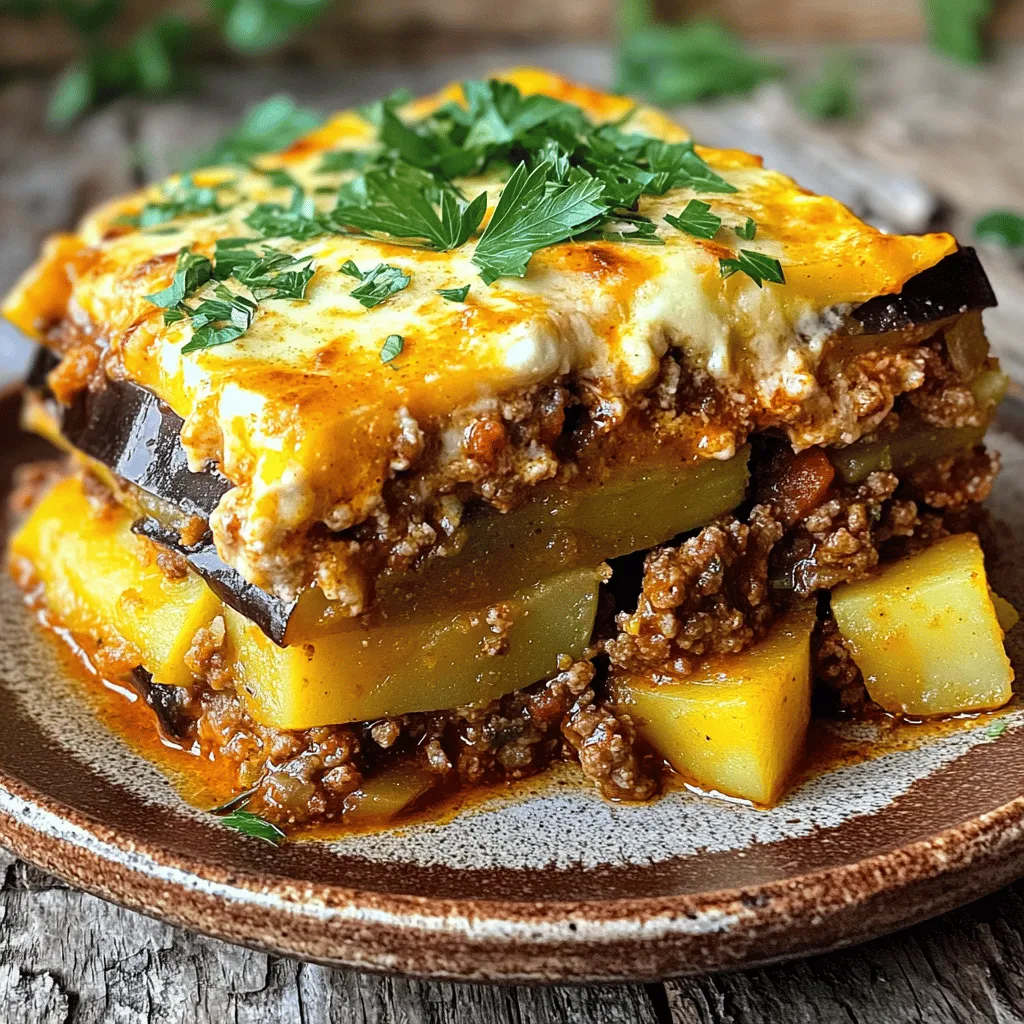
Are you ready to create the ultimate comfort food? Greek moussaka is a classic dish that combines flavors and textures in every bite. With layers of eggplant, ground meat, and creamy béchamel, this dish is sure to impress. In this post, I’ll share step-by-step instructions, tips for perfection, and variations to suit your tastes. Get your apron on and let’s dive into making moussaka that will delight your family and friends!
Ingredients
Main Ingredients
– 3 large eggplants, sliced into 1/4 inch rounds
– 1 lb ground beef or lamb
– 3 medium potatoes, peeled and sliced into rounds
Moussaka starts with the base of sliced eggplants. I prefer large eggplants for their rich flavor. Ground meat, either beef or lamb, adds a hearty touch. Potatoes serve as a sturdy layer, too.
Seasonings and Sauce
– 1 large onion, finely diced
– 3 cloves garlic, minced
– 1 can crushed tomatoes
– 2 tablespoons tomato paste
– 1 teaspoon ground cinnamon
– 1 teaspoon dried oregano
– 1 teaspoon sea salt
– 1/2 teaspoon black pepper
– 1/4 cup extra virgin olive oil
– 1 1/2 cups béchamel sauce
– 1/2 cup fresh grated Parmesan cheese
– 1/2 cup shredded mozzarella cheese
The seasonings make the dish sing. The mix of cinnamon and oregano gives it a warm flavor. The béchamel sauce adds creaminess, while the cheeses bring richness and a nice crust.
Optional Ingredients
– Fresh parsley for garnish
– Variations for different dietary preferences
Feel free to add fresh parsley on top for color. If you want to switch things up, consider using lentils or mushrooms instead of meat. This way, you can cater to different diets while keeping the dish tasty.
Step-by-Step Instructions
Preparing the Eggplants
First, preheat your oven to 375°F (190°C). Slice the eggplants into 1/4 inch rounds. Lay them on a baking sheet and sprinkle salt over each slice. Let them sit for about 30 minutes. This step draws out moisture, making the eggplants less soggy. After 30 minutes, rinse the slices under cold water. Pat them dry with paper towels. This removes excess salt and moisture.
Cooking the Potatoes
Next, fill a pot with water and add a pinch of salt. Bring the water to a boil. Once boiling, add the potato slices. Cook them for about 5-7 minutes. You want them slightly tender but still firm. After cooking, drain the potatoes and set them aside to cool.
Sautéing the Meat and Making the Sauce
In a large skillet, heat 2 tablespoons of olive oil over medium heat. Add the diced onion and minced garlic. Sauté them for about 3-4 minutes, until they are soft and fragrant. Next, add 1 pound of ground beef or lamb. Break it apart with a spoon and cook until browned, about 5-7 minutes.
After browning the meat, add 1 can of crushed tomatoes, 2 tablespoons of tomato paste, 1 teaspoon of ground cinnamon, 1 teaspoon of dried oregano, 1 teaspoon of sea salt, and 1/2 teaspoon of black pepper. Stir well and let the mixture simmer for 10-15 minutes. This helps the flavors blend nicely.
For the béchamel sauce, if you choose to make it from scratch, melt 1/4 cup of butter in a saucepan over medium heat. Whisk in 1/4 cup of flour until you have a smooth paste. Gradually add 2 cups of milk while whisking. Stir until the sauce thickens. Add a pinch of salt and nutmeg for taste.
Tips & Tricks
Tips for Perfect Eggplants
How to prevent sogginess:
Sogginess can ruin your moussaka. To avoid this, salt the eggplant slices. Let them sit for about 30 minutes. This draws out excess moisture. Rinse the slices well and pat them dry. This step makes a big difference.
Cooking methods for eggplants:
You can cook eggplants in different ways. Sautéing gives a nice flavor. Frying adds richness, but be mindful of oil. Baking is a great option, too. It keeps them tender without extra fat. Choose the method that works best for your taste.
Layering Techniques
Best practices for assembly:
When layering your moussaka, start with potatoes. This creates a solid base. Next, add half of the meat mixture. Follow with half of the eggplant. Repeat these layers. The last layer should be eggplant. This keeps everything neat and organized.
Ensuring even cooking:
To ensure even cooking, spread each layer evenly. Use a spatula to smooth out the filling. This helps the heat circulate. It also ensures that every bite has the same great taste.
Serving Suggestions
Ideal pairing with salads:
Moussaka pairs well with fresh salads. A Greek salad is a perfect choice. The crisp veggies add a nice contrast. The tangy dressing balances the rich flavors of the moussaka.
Alternative side dishes:
You can serve moussaka with other sides, too. Roasted vegetables or a simple rice dish work well. These options add variety to your meal. Choose sides that you enjoy and that complement the moussaka.
Variations
Vegetarian Options
You can easily make moussaka vegetarian. Just swap the meat for lentils or mushrooms. Lentils add protein and a nice texture. Use cooked green or brown lentils for a hearty bite. If you prefer mushrooms, use a mix of button and portobello mushrooms for depth. Sauté them with onions and garlic until soft. This gives your dish a rich flavor without meat.
Gluten-Free Modifications
If you need a gluten-free option, try a gluten-free béchamel sauce. Use gluten-free flour or cornstarch to thicken your sauce. You can also use almond or coconut milk for a dairy-free version. Just like the classic sauce, cook it until smooth and thick. This way, you still get that creamy topping without gluten.
Regional Variations
Moussaka is not the same everywhere in Greece. Each region has its twist. In some areas, they add zucchini or bell peppers. Others use different spices or herbs. For example, in Crete, they may add a layer of béchamel with egg. These changes create unique flavors and textures. Explore different styles to find your favorite!
Storage Info
Storing Leftovers
To keep your moussaka fresh, let it cool first. After it cools, cover it tightly with plastic wrap or aluminum foil. You can also use an airtight container. Store it in the fridge for up to three days. Keeping it sealed prevents it from drying out. When you’re ready to eat, just take it out and enjoy!
Freezing Guidelines
If you want to save moussaka for later, freezing is a great option. Cut it into individual slices for easy serving. Wrap each slice in plastic wrap, then place them in a freezer-safe bag. Make sure to press out any extra air. You can freeze moussaka for up to three months. Label the bag with the date so you know when to use it.
Reheating Tips
To reheat moussaka, avoid the microwave if you can. The oven is best for keeping the texture nice. Preheat your oven to 350°F (175°C). Place the moussaka in an oven-safe dish and cover it with foil. Heat for about 20-30 minutes, or until it’s warm all the way through. If you want a crispy top, remove the foil for the last 5-10 minutes. Enjoy your delicious moussaka just like when it was fresh!
FAQs
What is moussaka traditionally made of?
Moussaka is a rich dish made with layers of flavor. The main ingredients include:
– Eggplants
– Ground beef or lamb
– Potatoes
– Onions
– Garlic
– Crushed tomatoes
– Tomato paste
– Spices like cinnamon and oregano
– Béchamel sauce
– Parmesan and mozzarella cheese
These simple ingredients combine to create a wonderful comfort food.
Can I make moussaka ahead of time?
Yes, you can prepare moussaka in advance. Here’s how:
– Cook and cool: You can cook the meat and prepare the eggplants a day before. Let them cool, then layer them in a baking dish.
– Cover tightly: Wrap the dish with plastic wrap or foil. This keeps the flavors fresh.
– Bake later: When ready to eat, simply bake it. You might need to add a few extra minutes to the cooking time.
How do I ensure my moussaka is not watery?
To keep your moussaka from becoming soggy, follow these tips:
– Salt the eggplants: Salting helps draw out moisture. After 30 minutes, rinse and dry them well.
– Cook the meat properly: Make sure to brown the meat well. This adds flavor and reduces moisture.
– Layer wisely: Don’t overload with sauce. Keep each layer balanced for even cooking.
In this article, I covered moussaka’s main ingredients, step-by-step instructions, and helpful tips. Key components like eggplants, ground meat, and béchamel sauce create a rich flavor. I also shared dietary variations, storage tips, and answers to common questions. Moussaka is versatile and can fit many tastes. With practice, you can make it just right for friends or family. Enjoy the process of cooking and experimenting with flavors. Your journey in moussaka-making can be both fun and tasty!


![To make this delicious bread, gather these items: - 1 cup fresh strawberries, hulled and diced - 1 cup rhubarb, diced - 1/2 cup unsalted butter, softened to room temperature - 1 cup granulated sugar, divided - 2 large eggs, at room temperature - 1 teaspoon pure vanilla extract - 1/2 cup Greek yogurt, plain - 2 cups all-purpose flour - 1 teaspoon baking powder - 1/2 teaspoon baking soda - 1/4 teaspoon sea salt - 1/2 teaspoon ground cinnamon (optional) - 1/4 cup chopped walnuts or pecans (optional) Using fresh ingredients is key to good flavor. Fresh strawberries and rhubarb give the bread a tart and sweet taste. They also add moisture, making the bread soft. When you choose fresh fruits, look for vibrant colors and firm textures. This will enhance your final dish. If you can, visit a local farmer’s market for the best produce. It really makes a difference in taste. You can make the bread even better with some optional ingredients. Adding ground cinnamon brings warmth and depth to the flavor. If you like crunch, chopped walnuts or pecans add a nice texture. These nuts also pair well with the fruit. You can mix and match these extras based on your taste. Feel free to experiment and find what you love! For the full recipe, check out the earlier sections. Start by preheating your oven to 350°F (175°C). This warms the oven for even baking. Grease and flour a 9x5-inch loaf pan. This step helps the bread slide out easily after baking. Next, prepare the fruit. In a medium bowl, mix the diced strawberries and rhubarb. Sprinkle 1 tablespoon of sugar over the fruit and toss gently. Let it sit for a few minutes. This draws out moisture and brings out the fruit's flavor. In a large mixing bowl, cream the softened butter with the remaining sugar. Use an electric mixer for about 3-4 minutes. The mixture should look light and fluffy. Add the eggs one at a time, mixing well after each addition. Then, mix in the vanilla extract and Greek yogurt until smooth. In another bowl, whisk together the flour, baking powder, baking soda, sea salt, and ground cinnamon. Gradually add this dry mix to the wet ingredients. Stir gently until just combined to avoid a dense bread. Finally, fold in the prepared strawberries and rhubarb. If you like, add chopped nuts for crunch. Pour the batter into your greased loaf pan. Smooth the top with a spatula for an even surface. Bake in the preheated oven for 55-65 minutes. Check if it’s done by inserting a toothpick in the center. It should come out clean or with a few moist crumbs. Once baked, let the bread cool in the pan for about 10 minutes. Then, transfer it to a wire rack to cool completely. This step is important for the best texture. Now, you can slice and enjoy your strawberry rhubarb delight bread! For the full recipe, refer to the earlier section. To get that soft and fluffy bread, you must mix the batter just right. When you mix the wet and dry ingredients, do it slowly. Stir until just combined. This helps keep air in the batter. Over-mixing makes your bread dense. Remember, a few lumps are okay! One common mistake is using cold ingredients. Always start with eggs and yogurt at room temperature. This helps the batter mix better and rise nicely. Another mistake is not measuring the flour properly. Too much flour can lead to a dry texture. Use a spoon to scoop flour into your measuring cup, then level it off for accuracy. Want to add more flavor? Try adding a bit of lemon zest. It brightens the bread and pairs well with strawberries and rhubarb. You can also mix in spices like nutmeg or ginger for warmth. If you like nuts, fold in walnuts or pecans for crunch. You can find the full recipe for this delicious bread above. {{image_4}} You can easily adapt this recipe for different diets. If you want a dairy-free option, swap the butter for coconut oil or a plant-based butter. Use almond or oat yogurt in place of Greek yogurt. For a gluten-free bread, replace all-purpose flour with a gluten-free blend. Always check the labels to ensure your substitutes fit your needs. This recipe is versatile, allowing you to play with flavors. Instead of strawberries, try blueberries or diced apples. You can mix in lemon zest for a fresh twist. If you love spices, add nutmeg or cardamom for warmth. These changes keep the bread exciting and fun! Get creative with add-ins to enhance your bread. Try adding chocolate chips for a sweet treat. For crunch, include a handful of sunflower seeds or pumpkin seeds. You can also mix in a scoop of shredded coconut for a tropical touch. These add-ins make each slice unique and flavorful. For the complete recipe, check out the [Full Recipe]. To keep your strawberry rhubarb bread fresh, store it at room temperature. Wrap it tightly in plastic wrap or foil. This helps to prevent it from drying out. If you have leftover bread, try to keep it in an airtight container. This way, it stays soft and delicious for a few days. Avoid storing it in the fridge, as that can make it stale faster. If you want to save your bread for later, freezing is a great option. First, let the bread cool completely after baking. Then, slice it into pieces. Wrap each slice in plastic wrap, and then place them in a freezer bag. Make sure to squeeze out any air before sealing. You can freeze it for up to three months. When you're ready to enjoy it, you can thaw it overnight in the fridge or leave it at room temperature for a few hours. To enjoy your strawberry rhubarb bread warm, preheat your oven to 350°F (175°C). Place the slices on a baking sheet and cover with foil. Heat for about 10-15 minutes. This keeps the bread moist and enhances its flavors. You can also use a microwave. Just heat each slice for about 15-20 seconds. However, the oven method gives the best taste and texture. Enjoy your warm slices with a little butter or jam for extra flavor! To keep your bread moist, use fresh fruit. Fresh strawberries and rhubarb add natural moisture. You can also add Greek yogurt. It adds creaminess and keeps the bread soft. Be careful not to over-mix your batter. Over-mixing can cause dense bread. Bake until just done to keep it fluffy. Yes, you can use frozen strawberries and rhubarb. Thaw them and drain excess liquid first. This prevents your bread from getting soggy. The flavor will still be good, but fresh fruit tastes better. Try to use fresh when possible, especially in peak season. This bread is great on its own. For a special treat, serve it with whipped cream. You can also pair it with butter or cream cheese. A sprinkle of powdered sugar adds a nice touch. Serve it warm for the best taste. Enjoy it with your favorite tea or coffee! Strawberry rhubarb bread is simple and fun to make. We covered key ingredients, step-by-step instructions, and helpful tips. Fresh ingredients are vital for great flavor. Remember to avoid common mistakes for the best texture. You can add your own flavors too, which makes it even better. Don’t forget how to store it well, so you can enjoy every bite later. I hope these tips inspire you to bake and savor this delicious bread. Enjoy your time in the kitchen!](https://fastmealmate.com/wp-content/uploads/2025/06/5214b0a0-4654-456a-8121-021057b3e65e-768x768.webp)


![- Arugula (4 cups) - Cherry tomatoes (1 cup) - Cucumber (1 medium) - Red onion (1/2 medium) - Kalamata olives (1/2 cup) - Feta cheese (1/4 cup) - Sunflower seeds (1/4 cup, optional) - Extra virgin olive oil (1/4 cup) - Fresh lemon juice (2 tablespoons) - Dried oregano (1 teaspoon) - Salt and black pepper to taste Gathering fresh ingredients is key for this salad. Arugula gives it a peppery taste. Cherry tomatoes add sweetness and color. Cucumber brings crunch, while red onion gives a nice bite. Now, let’s talk about the add-ins. Kalamata olives add a briny flavor. Feta cheese gives creaminess and tang. If you want a crunch, add sunflower seeds. They work well with the other flavors. Next, we need the dressing. Extra virgin olive oil is rich and smooth. Fresh lemon juice brightens the salad. Dried oregano adds an earthy touch. Don’t forget salt and black pepper to finish. You can find the complete recipe in the [Full Recipe]. First, wash the arugula well. Rinse it under cold water to remove dirt. After washing, dry it gently with a salad spinner or a clean kitchen towel. This step helps the leaves stay crisp. Next, prepare the vegetables. Slice the cherry tomatoes in half. Dice the cucumber into half-inch cubes. For the red onion, cut it into thin rings. These steps add color and crunch to your salad. Now, it's time to mix the salad. In a large mixing bowl, add the fresh arugula, halved cherry tomatoes, diced cucumber, sliced red onion, and Kalamata olives. Use your hands to toss the salad gently. This method keeps the leaves from bruising. After mixing, sprinkle the crumbled feta cheese on top. This cheese adds a creamy texture and salty flavor. If you want extra crunch, you can also add sunflower seeds at this point. For the dressing, take a small bowl. Whisk together the extra virgin olive oil, fresh lemon juice, and dried oregano. Add a pinch of salt and pepper for taste. Whisk until everything combines well. Drizzle the dressing over the salad mixture. Use a large spoon or salad tongs to toss gently. This ensures every bite is flavorful without crushing the arugula. For a complete meal, check out the Full Recipe for all the details. To keep arugula fresh, handle it gently. Avoid squishing or bruising the leaves. When washing arugula, fill a bowl with cold water. Submerge the leaves and swish them around. This helps remove dirt without damaging them. Lift the arugula out and place it on a clean towel. Pat it dry carefully to keep the leaves crisp. To boost the flavor of your Mediterranean Arugula Salad, add fresh herbs like basil or parsley. These herbs bring bright notes to the dish. You can also sprinkle in a pinch of crushed red pepper for heat. When garnishing, use a few extra olives or a lemon wedge. This adds a pop of color and makes the salad look inviting. Serve your salad right after mixing for the best taste. The freshness of the arugula is key. If you need to prep ahead, wash and dry the arugula first. Store it in a container lined with paper towels. This keeps the leaves dry and crisp. You can chop the other veggies and store them separately. Just combine everything before serving. Enjoy the full flavors of your Mediterranean Arugula Salad! For the full recipe, refer to the earlier section. {{image_4}} You can make your Mediterranean arugula salad even more filling. Adding grilled chicken is a great choice. It brings a nice smoky flavor. If you prefer a plant-based option, try chickpeas. They add protein and a hearty texture. For a seafood twist, consider incorporating shrimp. Lightly sautéed or grilled shrimp works well. It adds a delightful taste that pairs nicely with the fresh ingredients. Feel free to adjust your salad based on the season. In summer, add ripe peaches or strawberries for sweetness. In fall, consider roasted butternut squash for warmth. You can also change up the dressing. Swap traditional vinegar for balsamic or apple cider vinegar. Each type will give the salad a unique flavor profile. If you want to make your Mediterranean arugula salad vegan, simply omit the cheese. The salad will still be fresh and tasty. For those needing gluten-free options, this salad is perfect. All ingredients are gluten-free, making it a safe choice for everyone. Enjoy your meal without worries! To store leftover Mediterranean Arugula Salad, place it in an airtight container. This helps keep the salad fresh and prevents it from drying out. Use glass or plastic containers with tight lids. If you have a lot of salad, consider dividing it into smaller portions. This makes it easy to grab just what you need. The salad stays fresh for about three days in the fridge. After this, the arugula may wilt, and the tomatoes might get mushy. Watch for signs like a slimy texture or off smells. If you see these, it's best to toss the salad. Fresh ingredients are key to a great taste. To refresh the salad, add a splash of lemon juice or olive oil. This can bring back some flavor and zest. You can also mix in fresh arugula or other greens. If you want to repurpose leftover salad, try using it as a filling for wraps or sandwiches. You can also stir it into cooked pasta for a quick meal. Arugula is low in calories but packed with nutrients. It has vitamins A, C, and K. Arugula also contains calcium and iron. These nutrients support bone health and boost immunity. Eating arugula can improve heart health due to its antioxidants. It's a great choice for a Mediterranean diet. This diet focuses on whole foods, healthy fats, and fresh produce. Arugula fits perfectly into this style of eating, enhancing flavors and health. Yes, you can prepare parts of the salad ahead of time. Wash and dry the arugula and veggies first. Store them separately to keep them fresh. Chop the tomatoes, cucumber, and onion in advance. Keep them in airtight containers in the fridge. You can make the dressing ahead too. Just whisk together olive oil, lemon juice, and seasonings. Store the dressing in a jar. When ready to serve, mix everything together for a fresh salad. You can try several dressings with this salad. A classic vinaigrette works well. Use olive oil, vinegar, salt, and pepper. A lemon-tahini dressing adds a creamy touch. You could also use balsamic vinaigrette for sweetness. Another tasty option is yogurt-based dressing for a tangy kick. Each dressing can enhance the salad’s flavors, so experiment to find your favorite. For the full recipe, check out the details above. In this blog post, we explored the Mediterranean Arugula Salad. We discussed fresh produce, flavorful add-ins, and the best dressing to bring it all together. You learned how to prepare, mix, and serve the salad with tips for freshness and flavor enhancement. Remember, this salad is versatile—you can change the protein or vegetables based on the season. Enjoy making your own tasty versions and store leftovers properly. With the right care, your salad can stay fresh and delicious for days.](https://fastmealmate.com/wp-content/uploads/2025/06/6fae422d-07df-4724-84de-c8edab5789ea-768x768.webp)