No-Bake Peanut Butter Bars Tasty and Easy Treat
Craving a sweet treat that takes no time to make? You’re in the right place! My No-Bake Peanut Butter Bars are tasty, easy, and ready in just a short while. With simple ingredients and quick steps, you’ll enjoy a delicious reward without the fuss of baking. So, grab your mixing bowl and let’s get started on a delight that everyone will love!
Ingredients
List of Required Ingredients
To make the no-bake peanut butter bars, gather these key items:
– 1 cup natural creamy peanut butter
– 1/2 cup honey or maple syrup
– 2 cups rolled oats
– 1 cup coconut flour
– 1/2 cup dark chocolate chips
– 1/4 teaspoon sea salt
– 1 teaspoon vanilla extract
These ingredients work together to create a sweet and nutty treat. The peanut butter gives a rich flavor, while the oats add texture. Honey or maple syrup brings sweetness, and dark chocolate chips provide a nice contrast.
Optional Add-Ins
You can boost the flavor or nutrition with some fun add-ins:
– 1/2 cup chopped nuts (like almonds or walnuts)
– 1/4 cup shredded coconut
– 1/4 cup dried fruits (like cranberries or raisins)
– 1 tablespoon chia seeds or flaxseeds
These add-ins can change the bars. They give extra crunch and flavor. Feel free to mix and match to suit your taste!
Ingredient Substitutions
Not every ingredient may be on hand, and that’s okay! Here are some swaps you can try:
– If you want a nut-free option, use sun butter instead of peanut butter.
– You can replace honey with agave syrup for a vegan choice.
– Instead of coconut flour, use almond flour or regular flour, but adjust the amount.
– If you prefer milk chocolate, use milk chocolate chips instead of dark.
These substitutions make the recipe flexible. You can still enjoy delicious bars no matter your pantry’s contents.
Step-by-Step Instructions
Detailed Preparation Process
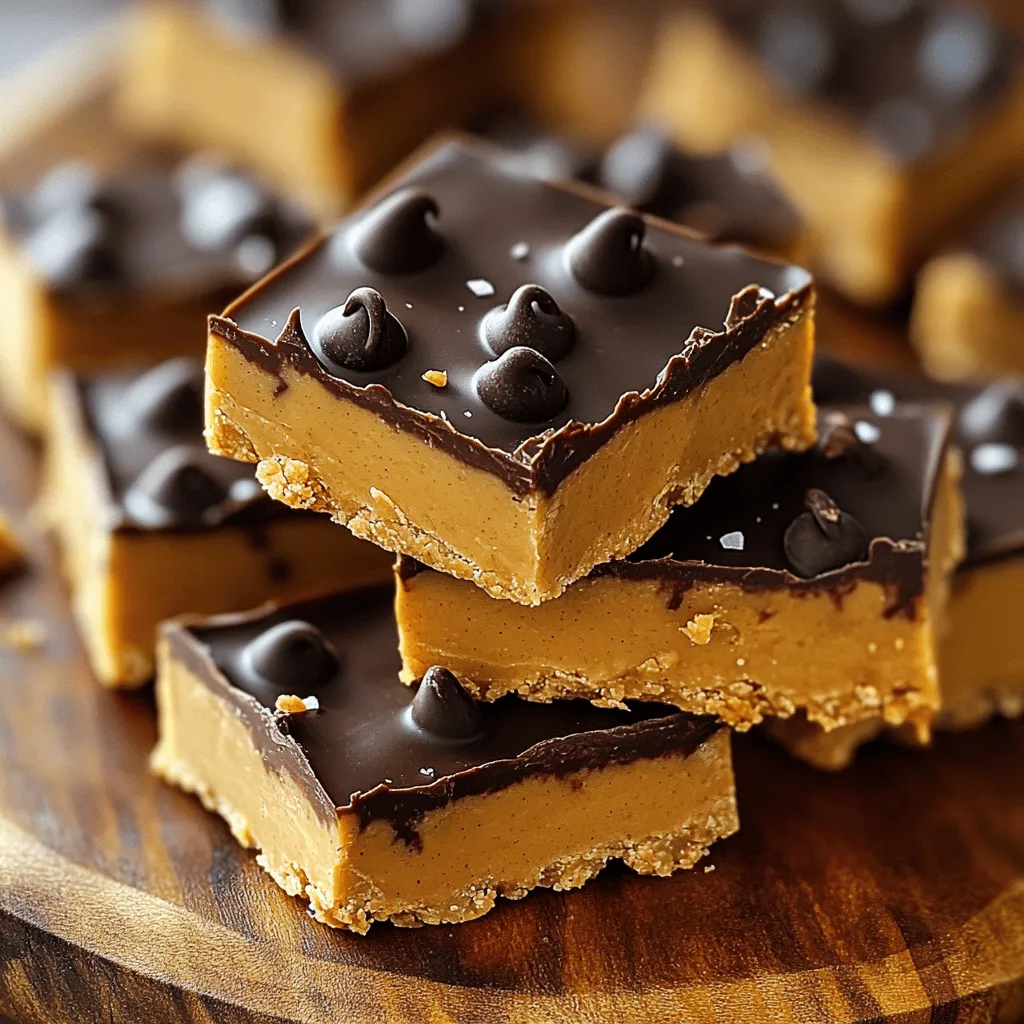
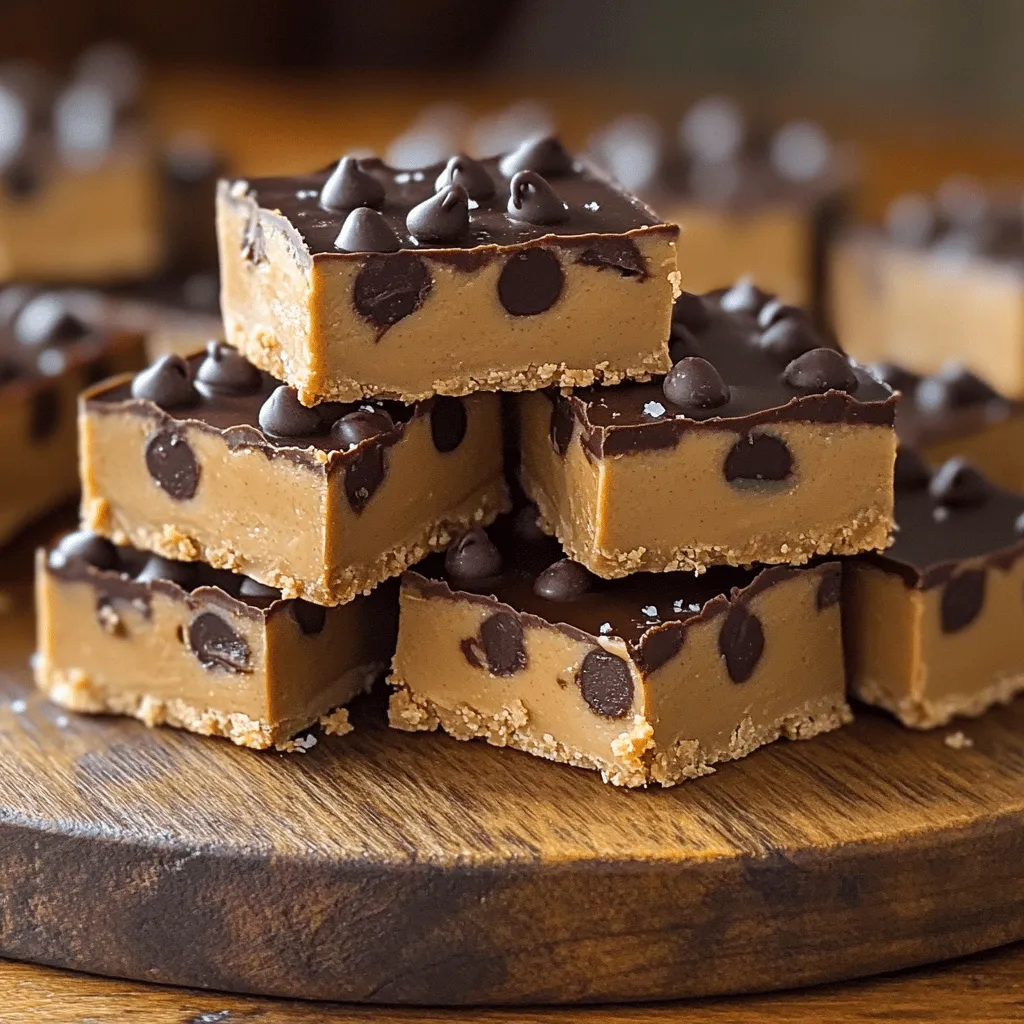
To make these no-bake peanut butter bars, start with the peanut butter. In a medium bowl, add 1 cup of creamy peanut butter and 1/2 cup of honey or maple syrup. Stir this mix until it is smooth. You want it free of lumps. Next, add 2 cups of rolled oats, 1 cup of coconut flour, 1/4 teaspoon of sea salt, and 1 teaspoon of vanilla extract. Mix everything until all dry ingredients blend well. This should give you a thick and even consistency.
Now it’s time for the chocolate! Fold in 1/2 cup of dark chocolate chips. Make sure they spread evenly so every bite has that rich chocolate flavor. Prepare an 8×8 inch baking pan by lining it with parchment paper. Leave some paper hanging over the sides. This will help you lift the bars out later.
Transfer the peanut butter mix into the pan. Press it down firmly and evenly. This creates a solid structure for your bars. Cover the pan with plastic wrap or foil. Place it in the fridge and chill for at least 2 hours. This step is key for firm bars that hold their shape when cut.
Key Techniques for Success
The key to perfect bars lies in the mixing process. Make sure you blend the peanut butter and sweetener well. This ensures a smooth start. When adding dry ingredients, mix until everything is fully integrated. Do not rush this step. Packing the mixture tightly in the pan is also important. This helps the bars stay together.
Tips for Even Mixing
Use a spatula or wooden spoon for mixing. These tools work well to combine everything. To avoid lumps, mix in a circular motion. Start from the edges and move toward the center. This helps distribute ingredients evenly. If you find it hard to mix, consider using your hands. Just make sure they are clean! After mixing, always check for dry spots. Each bite should have a bit of everything for the best taste.
Enjoy making these tasty no-bake peanut butter bars! For the complete recipe, refer to the section above.
Tips & Tricks
Perfecting Texture and Flavor
To get the best texture, use natural creamy peanut butter. This type blends well and gives a smooth finish. Make sure your honey or maple syrup is fresh. This keeps the bars sweet and sticky. You can also adjust the oats for a chewier bite. More oats make the bars denser. If you want a richer taste, add a pinch more sea salt. This simple tweak can elevate the flavor.
Time-Saving Suggestions
If you’re short on time, prepare the bars in stages. Mix the peanut butter and honey first. Set that aside while you gather the dry ingredients. This way, you can save time and keep your workspace neat. You can also make the bars ahead of time. They store well in the fridge. This makes them a quick snack for busy days.
Common Mistakes to Avoid
One common mistake is not pressing the mixture tightly. If you don’t pack it well, the bars may fall apart. Another pitfall is skipping the cooling time. If you cut the bars too soon, they will be too soft. Make sure to chill them for a full two hours. Lastly, don’t forget to line your pan with parchment paper. This makes it easier to lift out the bars later.
Variations
Flavor Pairings
You can mix flavors to make your no-bake peanut butter bars even better. Try adding a dash of cinnamon to bring warmth. If you love chocolate, swap dark chocolate chips for white chocolate or even butterscotch chips. Want a fruity twist? Add dried cranberries or raisins for a sweet surprise. You can also fold in chopped nuts like almonds or pecans for a crunchy texture. Each pairing gives your bars a unique taste that keeps them exciting.
Dietary Adjustments
You can make these bars fit various diets. If you need gluten-free bars, use certified gluten-free oats. For vegan bars, swap honey with maple syrup. You can also choose a plant-based chocolate option. If you are watching sugar, use a sugar-free sweetener instead of honey or maple syrup. These adjustments let everyone enjoy this tasty treat without worry.
Creative Serving Suggestions
Serving your bars can be a fun way to impress friends. Slice the bars into fun shapes using cookie cutters. This makes them great for parties or kids. You can also serve them with a side of fresh fruit or yogurt for a complete snack. Drizzle melted chocolate on top for a fancy look. For a special touch, sprinkle some chopped nuts or sea salt over the bars before serving. These ideas help make your no-bake peanut butter bars a hit at any gathering.
Storage Info
How to Store Bars
To keep your no-bake peanut butter bars fresh, place them in an airtight container. You can store them in the fridge for best results. Make sure they are cool and firm before you put them in the container. This will help maintain their texture.
Freezing Instructions
You can freeze these bars for later use. First, cut them into squares. Then, wrap each square in plastic wrap. After that, place the wrapped bars in a freezer-safe bag or container. They will last up to three months in the freezer. When you want to enjoy them, just thaw them in the fridge.
Shelf Life Tips
These bars stay good in the fridge for about one week. After that, they may lose their taste or texture. If you notice any changes in smell or appearance, it’s best to throw them out. Always check your bars before eating. Keeping them stored well will help you enjoy this tasty treat longer!
FAQs
Can I use crunchy peanut butter instead?
Yes, you can use crunchy peanut butter. It adds nice texture. The bars will still taste great. Just make sure to mix it well with honey or maple syrup. That way, it blends nicely with the oats and flour.
How do I make these bars vegan?
To make these bars vegan, switch honey for maple syrup. Use vegan chocolate chips instead of dark chocolate chips. The other ingredients are already plant-based. This keeps the bars tasty and friendly for vegans.
What can I use instead of coconut flour?
If you don’t have coconut flour, use almond flour or a mix of oat flour. Both options work well in this recipe. Just remember that coconut flour absorbs more liquid. So, you may need to adjust the amount slightly.
How long do no-bake bars last in the fridge?
No-bake bars last about one week in the fridge. Store them in an airtight container. This keeps them fresh and tasty. You can also freeze them for up to three months for longer storage.
Can I add protein powder to the recipe?
Yes, you can add protein powder. Just add about 1/4 cup to the mix. This boosts the protein content without changing the taste much. Make sure to mix it well with the dry ingredients for even flavor.
In this post, we covered essential ingredients and how to prepare your bars. We explored tips to enhance texture and avoid common mistakes. You learned about variations, storage, and FAQs for real-life concerns.
Remember, making your own bars can be fun and easy. Follow these steps to enjoy delicious snacks that suit your taste. Happy cooking!

![- 1 cup pumpkin puree - 1 cup water - 1 cup brown sugar - 1 tablespoon pure vanilla extract - 1 teaspoon ground cinnamon - 1 teaspoon ground nutmeg - 1/2 teaspoon ground ginger - 1/4 teaspoon ground cloves Substitutes for pumpkin puree If you cannot find pumpkin puree, you can use butternut squash puree. This option works well and gives a similar flavor. You can roast and blend the squash until smooth for best results. The importance of using pure vanilla extract Using pure vanilla extract is key for the best flavor. I avoid imitation vanilla as it lacks the depth you need for this syrup. The pure extract enhances the sweetness and adds warmth to the spice mix. How to adjust serving sizes You can easily scale the recipe up or down. If you want more syrup, just double the ingredients. For a smaller batch, cut everything in half. Alternative ways to use pumpkin spice syrup This syrup is not just for coffee. Drizzle it on pancakes and waffles or mix it into yogurt. You can even stir it into oatmeal or smoothies for a fall twist. - Blending pumpkin puree and water Start by adding 1 cup of pumpkin puree and 1 cup of water to a medium saucepan. Use a whisk to blend these together. Make sure there are no lumps. A smooth mixture is essential for a nice syrup. - Heating the mixture Place the saucepan on medium heat. Keep a close eye on it as you heat. You want the mixture to reach a gentle simmer, not a boil. This helps develop the flavors without burning. - Adding brown sugar Once your mixture is simmering, gradually add 1 cup of brown sugar. Stir continuously until all the sugar dissolves. This will make the mixture glossy and sweet. - Stirring in spices After the sugar dissolves, add in 1 tablespoon of pure vanilla extract, 1 teaspoon of ground cinnamon, 1 teaspoon of ground nutmeg, 1/2 teaspoon of ground ginger, and 1/4 teaspoon of ground cloves. Stir well to mix the spices evenly into the syrup. - Simmering for flavor development Let the mixture simmer gently for 10-15 minutes. Stir it occasionally. You will notice the syrup starting to thicken. This thickening shows that the flavors are blending together nicely. - The thickening process Keep an eye on the syrup as it cooks. It should thicken slightly, which is a good sign that it is ready. The longer it simmers, the richer the flavor will be. - Straining the syrup Once cooked, remove the saucepan from heat. Let the syrup cool down to room temperature. After cooling, strain it through a fine-mesh sieve into a clean container. This step removes any solids, giving you a smooth syrup. - Storing the syrup properly Pour your finished syrup into an airtight bottle or jar. Store it in the refrigerator. It will stay fresh for up to two weeks. Now, you can use it in your favorite drinks and desserts! For the full recipe, check out the complete details. - Overheating the mixture: Heating too high can burn the sugar. Keep it to medium heat and watch closely. - Not stirring enough while cooking: Stirring helps mix flavors and prevents sticking. Always keep the spoon moving. - Ensuring the right thickness: To check thickness, dip a spoon and see if syrup coats it. It should feel sticky but not too thick. - Enhancing flavors with additional spices: You can add a pinch of allspice or cardamom for extra depth. Experiment to find your favorite mix. - Creative serving ideas: Drizzle syrup over pancakes, waffles, or even ice cream. It adds a nice touch to your treats. - Pairing suggestions with recipes: Use your syrup in lattes or hot chocolate. It’s also great in oatmeal or yogurt for a fall twist. For the full recipe, check out the details! {{image_4}} You can boost the taste of pumpkin spice syrup in fun ways. Try adding a vanilla bean for a rich flavor. Slice the bean open and scrape out the seeds. Mix these seeds into the syrup for a creamy touch. Another option is caramel. Drizzle in some caramel sauce for a sweet twist. This adds depth and a unique flavor to your syrup. You can even create a spiced pumpkin version. Mix in extra spices like allspice or cardamom for a new taste. These small changes can make a big difference. As the seasons change, so can your syrup. For the holidays, add flavors like peppermint or gingerbread. This gives your syrup a festive flair. You can also use different types of pumpkin. Try butternut squash or sweet potato for a unique twist. Each type brings its own flavor and sweetness, making your syrup special. Experiment with these variations to find your favorite. Pumpkin spice syrup is not just for drinks. You can use it in many recipes. Add it to pancakes or waffles for a sweet breakfast. It also works great in desserts like cakes and pies. Drizzle it on ice cream for a fall-inspired treat. You can even stir it into your coffee or tea for a warm drink. The options are endless! Check out the [Full Recipe] for more ideas. Pumpkin spice syrup lasts about two weeks in the refrigerator. Store it in an airtight container. For best taste, use it fresh. You can freeze the syrup to extend its life. It keeps well in ice cube trays. Just thaw before use. Use glass jars or plastic bottles for storage. Ensure they are airtight to keep the syrup fresh. Label your containers with the date you made the syrup. This helps you keep track of its freshness. Look for changes in color or smell. If it smells off or looks cloudy, it’s time to toss it. If you see mold, do not use it. Always taste a small amount before using. If it tastes strange, throw it away. Pumpkin spice syrup includes simple, tasty ingredients. Here are the main ones: - 1 cup pumpkin puree - 1 cup water - 1 cup brown sugar - 1 tablespoon pure vanilla extract - 1 teaspoon ground cinnamon - 1 teaspoon ground nutmeg - 1/2 teaspoon ground ginger - 1/4 teaspoon ground cloves You can change or add some ingredients too. For example, you can use maple syrup instead of brown sugar. This gives a unique flavor twist. You can use this syrup in many ways. Here are some fun ideas: - Drizzle it over pancakes or waffles. - Stir it into coffee or lattes. - Add it to smoothies for a fall flavor. - Mix it with oatmeal or yogurt. - Use it in baking for cookies or cakes. These ideas help you enjoy that yummy pumpkin spice taste in all your meals. Yes, you can make pumpkin spice syrup vegan easily. Just swap out a few things: - Use agave syrup or maple syrup instead of brown sugar. - Ensure your vanilla extract is alcohol-free. These changes keep the flavor while making it plant-based. You can find pumpkin spice syrup in many stores. Look in these places: - Local grocery stores often have it. - Check specialty coffee shops or cafes. - Online shops like Amazon or specialty food sites. When buying, read the label. Some brands add extra flavors or sugars. Homemade pumpkin spice syrup lasts about two weeks in the fridge. To store it well: - Keep it in an airtight jar or bottle. - Always use a clean spoon to scoop out syrup. If you have more, you can freeze it. Just pour it into ice cube trays. This way, you can use it later in drinks or desserts. Pumpkin spice syrup is simple to make and adds great flavor to many dishes. We covered key ingredients, steps for cooking, and tips for serving. You can easily switch ingredients and try different flavors. Remember to store your syrup well to keep it fresh. With this guide, you can create or enjoy homemade pumpkin spice syrup all season long. Explore all the ways to use it today!](https://fastmealmate.com/wp-content/uploads/2025/07/e167359e-7abc-4f0d-8f6c-a8401fb81292-768x768.webp)


![To make Minute Cajun Shrimp and Corn Chowder, you need some key ingredients: - 1 lb large shrimp, peeled and deveined - 2 cups corn kernels (fresh or frozen) - 1 medium onion, diced - 2 cloves garlic, minced - 1 red bell pepper, diced - 2 medium potatoes, peeled and diced These ingredients form the base of your chowder. The shrimp give it a nice protein punch. The corn adds sweetness, while the onion and garlic bring out savory flavors. Next, we need our liquids to make this chowder rich and tasty: - 4 cups chicken or vegetable broth - 1 cup coconut milk The broth adds depth, while coconut milk gives creaminess. You can use chicken broth for a richer taste, or vegetable broth if you want a lighter option. Now, let's spice things up! - 2 tablespoons Cajun seasoning - 1 teaspoon smoked paprika - Salt and fresh cracked pepper to taste - 2 tablespoons olive oil - Fresh parsley, chopped (for garnish) Cajun seasoning brings the heat and flavor. Smoked paprika adds a nice touch, giving a warm, smoky flavor. Salt and pepper are essential for balance. Olive oil helps to sauté the veggies, and parsley makes it pretty. For the full recipe, check out [Full Recipe]. 1. Heat 2 tablespoons of olive oil in a large pot over medium heat. 2. Once the oil shimmers, add 1 diced onion, 2 minced garlic cloves, and 1 diced red bell pepper. 3. Sauté these ingredients for about 4-5 minutes until the onions are soft and fragrant. 4. Next, add 2 diced potatoes to the pot. Cook for another 5 minutes, stirring often. 1. Sprinkle in 2 tablespoons of Cajun seasoning and 1 teaspoon of smoked paprika. 2. Stir well to coat the vegetables with the spices. 3. Pour in 4 cups of chicken or vegetable broth and bring the mixture to a gentle simmer. 4. Cook for 10-15 minutes until the potatoes are fork-tender. 1. Add 2 cups of corn and 1 pound of peeled shrimp to the pot. 2. Gradually stir in 1 cup of coconut milk until blended. 3. Cook for an additional 5 minutes until the shrimp turn pink and opaque. 4. Taste the chowder and adjust the seasoning with salt and fresh cracked pepper as needed. 5. Let it rest for a few minutes to thicken before serving. This process ensures you create a delicious and comforting chowder that captures the essence of Cajun cooking. For the full recipe, check the earlier section. For this chowder, I recommend sautéing the vegetables rather than boiling them. Sautéing brings out the sweet flavors in the onion and red bell pepper. Use medium heat and keep an eye on them. Avoid letting them brown too much, as this can change the taste. To avoid overcooking the shrimp, add them near the end of cooking. They only need about five minutes to cook through. When they turn pink and opaque, they are done. Remove them from the heat right away to keep them tender. To boost the taste, consider adding a pinch of cayenne pepper or paprika. Both will add depth without overwhelming the dish. Fresh herbs like thyme or cilantro can also brighten the chowder. If you want a different creamy texture, you can swap coconut milk for heavy cream or even Greek yogurt. Each option adds richness while changing the flavor slightly. Serve the chowder in deep bowls for a cozy feel. A sprinkle of fresh parsley on top adds color and freshness. You could also add a dash of extra Cajun seasoning for a nice touch. Pair your chowder with crusty bread or cornbread. Both make great sides for dipping. They also complement the rich flavors of the chowder. For a refreshing twist, serve with a light salad on the side. {{image_4}} You can easily make this chowder fit your diet. - Gluten-free options: Use gluten-free broth and check labels on your seasonings. They should not have gluten. - Dairy alternatives: Swap coconut milk with almond milk or oat milk. This keeps it creamy without dairy. Feeling creative? Here are some fun swaps. - Other seafood options: You can use crab or lobster instead of shrimp. Both add a rich flavor. - Additional vegetables to include: Try adding diced carrots or celery. They add crunch and more flavor. Adjusting the flavors can make this dish your own. - Changing the spice level: If you like it mild, use less Cajun seasoning. For a spicy kick, add more! - Using different types of broth for variations: Chicken broth gives a warm taste, but vegetable broth offers a lighter flavor. Try both to see which you prefer. For the full recipe, refer to the original instructions to get started! To store leftovers, let the chowder cool first. Pour it into an airtight container. This keeps it fresh longer. I recommend using glass or BPA-free plastic containers. They seal well and do not absorb odors. If you want to freeze the chowder, follow these steps: 1. Cool the chowder completely. 2. Divide it into portions in freezer-safe bags or containers. 3. Remove as much air as possible before sealing. For reheating frozen chowder, thaw it in the fridge overnight. Heat it gently on the stove over low heat. Stir often to prevent sticking. In the fridge, you can keep the chowder for about 3 to 4 days. If you freeze it, it lasts for up to 3 months. Always check for freshness before eating. Making Minute Cajun shrimp and corn chowder takes just 30 minutes. You spend about 10 minutes prepping the ingredients. Then, you cook everything for 20 minutes. It's a quick meal for busy days. Yes, you can use frozen shrimp. Just make sure to thaw them first. Frozen shrimp are often easier to find and save time. They cook just as well in the chowder. If you don't have Cajun seasoning, you can use a mix of spices. Try paprika, cayenne pepper, garlic powder, and onion powder. You can also make a simple blend at home. This helps you customize the flavors to your taste. For a milder chowder, reduce the cayenne pepper. This blog post shared a simple recipe for Cajun shrimp and corn chowder. You learned about the main ingredients, broths, and seasonings that bring flavor. I also outlined step-by-step instructions for perfect results. Helpful tips and dietary variations enhance your chowder experience. In the end, this chowder is flexible and easy to make. Enjoy experimenting with flavors and ingredients your way. Make it your own, and savor every bite.](https://fastmealmate.com/wp-content/uploads/2025/07/c6449679-e116-43ab-bcba-93cf12d2671e-768x768.webp)