
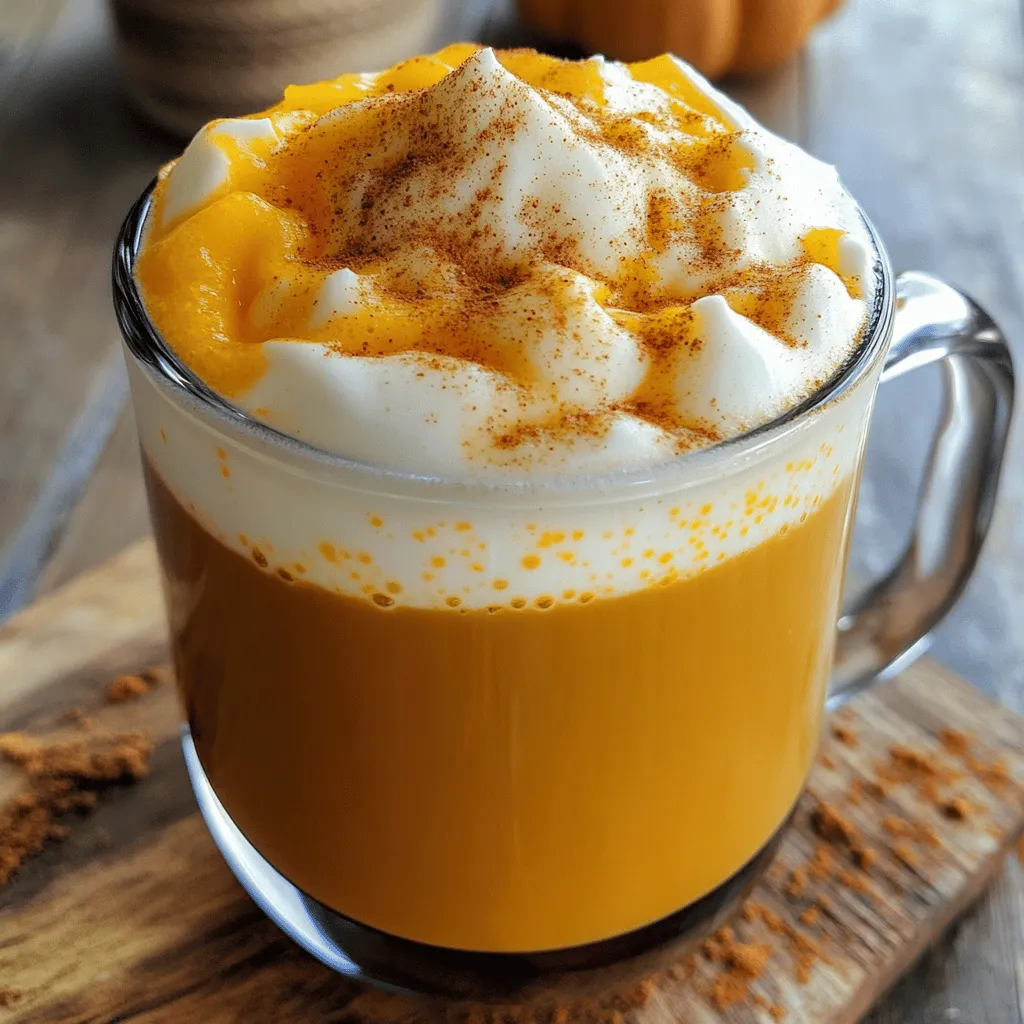
Easy Pumpkin Cold Foam Creamy Delight in Minutes
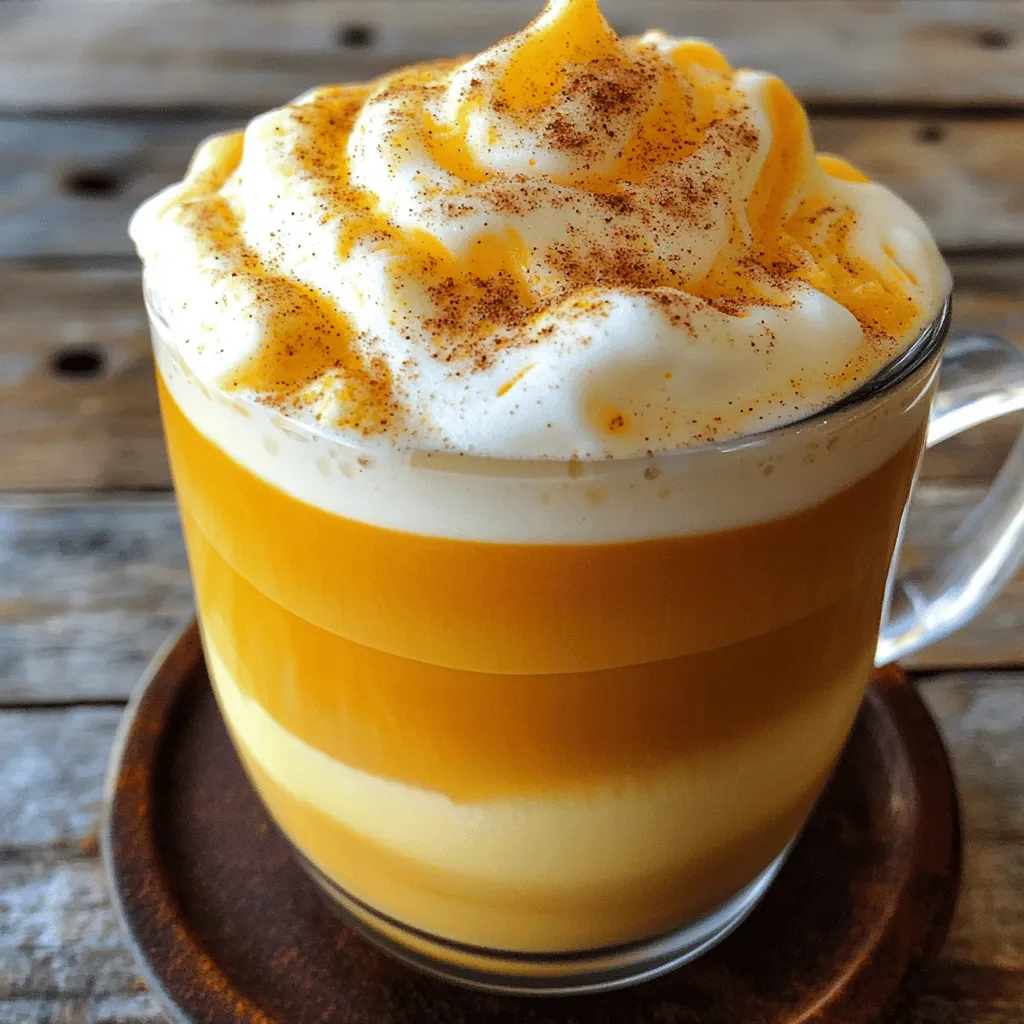
Craving a sweet autumn treat that’s super easy to make? You’re in the right place! In just a few minutes, you can whip up a creamy pumpkin cold foam that transforms any drink into a cozy delight. I’ll guide you through simple steps and tips, ensuring your foam is rich and delicious. Let’s dive in and make this fall favorite together!
Ingredients
List of Ingredients for Easy Pumpkin Cold Foam
To make Easy Pumpkin Cold Foam, gather these ingredients:
– 1 cup heavy cream
– 1/2 cup milk (choose between whole or almond for a nutty touch)
– 1/4 cup pumpkin puree (canned or homemade)
– 2 tablespoons pure maple syrup (for natural sweetness)
– 1 teaspoon vanilla extract (adds depth)
– 1 teaspoon pumpkin pie spice (plus extra for a finishing touch)
– Pinch of salt (to enhance flavors)
Ingredient Substitutions
You can swap some ingredients if needed. For the milk, use oat or soy milk for a dairy-free option. If you want a lighter foam, try half-and-half instead of heavy cream. You can also use brown sugar instead of maple syrup for a richer taste. If you don’t have pumpkin pie spice, mix cinnamon and nutmeg for a similar flavor.
Tips for Choosing Quality Ingredients
Quality ingredients make a big difference. Look for heavy cream that has no additives. Fresh pumpkin puree gives a richer flavor than canned. When choosing maple syrup, pick pure syrup over imitation for the best taste. Always smell the spices before buying. Fresh spices bring more flavor to your foam.
Step-by-Step Instructions
Preparation Process
Start by gathering your ingredients. You need:
– 1 cup heavy cream
– 1/2 cup milk
– 1/4 cup pumpkin puree
– 2 tablespoons pure maple syrup
– 1 teaspoon vanilla extract
– 1 teaspoon pumpkin pie spice
– Pinch of salt
Take a medium mixing bowl. Add the heavy cream, milk, pumpkin puree, maple syrup, vanilla, pumpkin pie spice, and salt. Make sure all the ingredients are at room temperature. This helps them mix well.
Mixing Techniques
Use a hand mixer or a whisk. Beat the mixture with some energy. You want to mix until it thickens. This should take about 3-5 minutes if you use an electric mixer. If you use a whisk, it may take a bit longer.
How to Achieve Soft Peaks
When you see soft peaks forming, stop mixing right away. This step is very important. Over-mixing can ruin your foam. You want it to stay light and airy. Now, carefully spoon the foam over your favorite coffee or iced drink. It should float nicely on top. For a finishing touch, sprinkle extra pumpkin pie spice over the foam. Enjoy your creamy pumpkin cold foam delight!
Tips & Tricks
How to Perfect Your Pumpkin Cold Foam
To make your pumpkin cold foam great, start with room temperature ingredients. This helps them mix well. Use a hand mixer for speed, but you can whisk by hand if you prefer. Mix until you see soft peaks. This should take about 3-5 minutes with a mixer. Stop mixing right away. Over-mixing will make the foam too dense.
Common Mistakes to Avoid
One big mistake is using cold ingredients. They won’t blend as nicely. Another error is mixing too long. It can turn your foam into butter. Don’t forget to taste before serving. You might need a bit more spice or sweetness.
Serving Suggestions for Best Flavor
Serve your foam on top of hot coffee or iced drinks. It adds a nice creamy layer. For a fun twist, try it on chai lattes too. A sprinkle of pumpkin pie spice on top makes it look great. Enjoy your pumpkin cold foam right away for the best flavor!
Variations
Dairy-Free Pumpkin Cold Foam Options
You can make your pumpkin cold foam dairy-free. Use coconut cream instead of heavy cream. This gives a nice tropical taste. For milk, choose almond or oat milk. Both add a lovely flavor. This way, you still get that creamy delight without dairy.
Sweetener Alternatives
If you want less sugar, try using honey or agave syrup. These natural sweeteners taste great. You can also use stevia or monk fruit for a sugar-free option. Just adjust the amount to fit your taste. Experimenting with sweeteners can add a fun twist to your foam.
Flavor Enhancements
Want to jazz up your cold foam? Add a splash of caramel or chocolate syrup. This will give your drink a rich flavor. You can also mix in a bit of espresso powder for a coffee kick. A pinch of nutmeg can add warmth, making it perfect for fall. These small changes can make your pumpkin cold foam even more exciting.
Storage Info
How to Store Leftover Pumpkin Cold Foam
To store leftover pumpkin cold foam, place it in a clean, airtight container. Make sure to cover it tightly. This keeps the foam fresh and prevents it from absorbing other flavors. You can store it in the fridge for up to three days. If you see any separation, just give it a quick whisk before using.
Best Practices for Reheating or Serving Later
If you want to serve the foam later, avoid heating it. Heating can ruin its fluffy texture. Instead, take it out of the fridge and let it sit at room temperature for about 10 minutes. Then, give it a good whisk to bring back its creamy delight. This way, it stays light and airy!
Shelf Life of Ingredients
The shelf life of your ingredients varies. Here are some key points:
– Heavy cream: Lasts about one week after opening.
– Milk: Usually stays fresh for about five to seven days after opening.
– Pumpkin puree: If opened, it’s best used within three days. Unopened, it can last for months.
– Maple syrup: Can last for a year or longer if stored correctly.
– Pumpkin pie spice: Should be used within two to three years for the best flavor.
Keeping track of these dates helps ensure you enjoy every drop of your creamy pumpkin cold foam!
FAQs
Can I use a different type of milk?
Yes, you can. Almond milk adds a nutty taste. You can also try oat milk for a creamier texture. Just make sure it’s unsweetened if you want to control the sweetness.
What can I substitute for pumpkin puree?
If you don’t have pumpkin puree, use sweet potato puree. You can also mash cooked butternut squash. Both options give a nice flavor and keep the dish creamy.
How do I make this recipe vegan?
To make the recipe vegan, swap heavy cream with coconut cream. Use almond or oat milk instead of dairy milk. Replace maple syrup with agave nectar for sweetness.
Is it possible to make the foam ahead of time?
You can make the foam ahead but it’s best fresh. If you store it, keep it in an airtight container. It can last in the fridge for up to two days. Just re-whip before serving.
How to adjust sweetness levels in the recipe?
To change the sweetness, add more or less maple syrup. Taste the mixture first, then adjust. You can also use a sugar substitute if you prefer. Just remember to mix well after adding.
You learned how to make easy pumpkin cold foam. We covered the best ingredients, creative swaps, and selection tips. I shared clear steps to prepare your foam and mix it to soft peaks. You also got tips to perfect your drink and avoid common mistakes. Variations, like dairy-free options, ensure everyone can enjoy it.
Remember, storing your foam correctly keeps it fresh. With this guide, you can create a tasty treat that impresses. Enjoy your fall drink, and don’t hesitate to experiment!

![- 1 cup unsalted butter, softened to room temperature - 1/2 cup powdered sugar, plus additional for dusting - 1 teaspoon pure vanilla extract - 1/2 teaspoon almond extract - 2 cups all-purpose flour - 1/2 cup finely chopped almonds - 1/4 teaspoon salt - 1/2 cup raspberry preserves When making Raspberry Almond Snowball Cookies, each ingredient plays a key role. The butter makes the cookies rich and tender. Powdered sugar adds a sweet touch and helps with that snowy look. Vanilla and almond extracts give the cookies a warm, nutty flavor. The flour gives structure to the cookies. Chopped almonds add a nice crunch. Salt balances the sweetness. Finally, raspberry preserves are the surprise inside. They burst with flavor when you take a bite. - For a different sweet taste, try using honey or maple syrup instead of powdered sugar. - If you want a dairy-free option, use vegan butter. It works well in this recipe. - For a gluten-free treat, swap all-purpose flour with almond flour or a gluten-free mix. These substitutions can change the flavor and texture, but they keep the spirit of the cookies alive. Experimenting with these ingredients can lead to fun and tasty variations! For the full recipe, check out the detailed steps to create this delightful treat. First, preheat your oven to 350°F (175°C). This step helps your cookies bake evenly. While the oven heats, line a baking sheet with parchment paper. This keeps the cookies from sticking, making cleanup easy. Next, in a large bowl, mix 1 cup of softened butter with 1/2 cup of powdered sugar. Then, add 1 teaspoon of pure vanilla extract and 1/2 teaspoon of almond extract. Beat this mixture with an electric mixer until light and fluffy. This takes about 2-3 minutes. Now, gradually add 2 cups of all-purpose flour and 1/4 teaspoon of salt to the butter mixture. Mix on low speed until just combined. Be careful not to overmix; we want a nice texture. Gently fold in 1/2 cup of finely chopped almonds. For the fun part, scoop about 1 tablespoon of dough. Flatten it slightly in your hand. Add 1/2 teaspoon of raspberry preserves in the center. Carefully fold the dough edges around the preserves, sealing it tightly into a ball. Place the cookie balls on your prepared baking sheet. Make sure they are about 2 inches apart. This spacing allows them to spread while baking. Bake the cookies for 12-15 minutes. Keep an eye on them; you want the bottoms to turn lightly golden. After baking, let the cookies cool on the baking sheet for about 5 minutes. This helps them firm up a bit. Then, gently transfer them to a wire rack to cool completely. Once cool, take some extra powdered sugar and dust it generously over the cookies. This adds a lovely snowy look. Enjoy these delightful treats with your friends or family! For the full recipe, check out the details provided. To make the best cookies, start with room temperature butter. Soft butter mixes well, creating a light and fluffy dough. Cold butter makes it hard to blend. Another tip is to prevent cookies from spreading too much. Chill your cookie dough for at least 30 minutes before baking. This helps them keep their shape while baking. When you arrange your cookies, think about a nice display. Use a decorative plate to showcase them beautifully. You can also garnish with fresh raspberries or a sprinkle of almond slices. This adds color and makes them look even more inviting. A light-colored dish contrasts nicely with the snowy dusting of sugar. Want to boost the flavor? Try adding a pinch of cinnamon or a dash of lemon zest. This can give your cookies a unique twist. You can also adjust the sweetness by using different types of raspberry preserves. For a tart flavor, opt for low-sugar preserves. For a sweeter taste, choose regular preserves. You can find the full recipe [here]. {{image_4}} You can play with flavors in your Raspberry Almond Snowball Cookies. Try different fruit preserves like strawberry or apricot. Each fruit adds a unique twist. You might also add chocolate chips or cocoa powder. This makes the cookies richer and more indulgent. Mixing in these flavors can make each batch fun and exciting. For those with dietary needs, there are great options. You can make gluten-free cookies by using almond flour or a gluten-free flour blend. These swaps keep the cookies light and tasty. If you want a vegan version, substitute the butter with coconut oil or vegan butter. Use a plant-based milk in place of any dairy. These changes keep the spirit of the cookies while catering to different diets. You can make themed cookies for special occasions. For holidays, add colorful sprinkles or food coloring to the dough. This gives the cookies a festive touch. For parties, consider making mini cookie versions. Smaller cookies are great for sharing and look lovely on a platter. Each theme allows you to share the joy of baking with your loved ones. If you want the full recipe, check out the details above! To keep your Raspberry Almond Snowball Cookies fresh, store them in an airtight container. This helps to lock in moisture and flavor. You can use glass jars or plastic containers with tight lids. Place parchment paper between layers of cookies to prevent sticking. Keep the cookies at room temperature for up to a week. If you want to keep them longer, then freezing is a great option. You can freeze both unbaked and baked cookies. For unbaked cookies, scoop them onto a baking sheet lined with parchment paper. Freeze until solid, then transfer them to a freezer bag. This way, you can bake fresh cookies anytime. For baked cookies, let them cool completely first. Place them in a freezer-safe container or bag, separating layers with parchment paper. When you are ready to enjoy them, thaw baked cookies at room temperature. If you want a warm treat, pop them in the oven at 350°F for a few minutes. Reheating brings back their delightful texture. For unbaked cookies, just bake them straight from the freezer. Add a couple of extra minutes to the bake time to ensure they cook through. How long do Raspberry Almond Snowball Cookies last? These cookies stay fresh for about one week. Store them in an airtight container. If you want them to last longer, you can freeze them. Can I make the dough ahead of time? Yes, you can make the dough and chill it in the fridge. Wrap it tightly in plastic. This way, you can bake them later. What can I do if my cookies turn out too crumbly? If your cookies are too crumbly, you might need more butter. Add a little melted butter to the dough. Mix gently until it holds together. Can I substitute almond extract with something else? Yes, you can use vanilla extract or even a bit of coconut extract. Each will give a different flavor but will still taste great. What is the best way to measure flour for this recipe? Use the spoon and level method. Scoop flour into a measuring cup, then level it off with a knife. Don’t pack it down for the best results. What to serve with these cookies? These cookies pair well with fresh fruit, like raspberries or strawberries. You can also serve them with vanilla ice cream for a tasty treat. Ideal beverages to pair with Raspberry Almond Snowball Cookies Enjoy these cookies with a warm cup of tea or coffee. A glass of milk also complements their sweet and nutty flavor nicely. In this blog post, I covered how to make Raspberry Almond Snowball Cookies. We explored the key ingredients and tips for perfecting texture and flavor. You can use alternatives like vegan butter and gluten-free flour too. I shared storage methods for keeping cookies fresh and ways to freeze them. Try different fruit preserves or chocolate chips for fun variations. Remember, cookies taste best when shared and enjoyed fresh. Give this recipe a try, and I bet you will love it!](https://fastmealmate.com/wp-content/uploads/2025/07/7fd5f108-97a5-4fb0-86b3-b9219b799aa8-768x768.webp)


![This Chocolate Tres Leches Cake uses simple ingredients. Each one works together to create a rich flavor. - 1 cup all-purpose flour - 1/2 cup unsweetened cocoa powder - 1 1/2 teaspoons baking powder - 1/2 teaspoon baking soda - 1/4 teaspoon salt - 1/2 cup unsalted butter, softened - 1 cup granulated sugar - 3 large eggs, at room temperature - 1 teaspoon vanilla extract - 1/2 cup buttermilk, at room temperature - 1 cup sweetened condensed milk - 1 cup evaporated milk - 1 cup whole milk - 1 cup heavy cream, chilled - 2 tablespoons powdered sugar (for whipped cream) - Chocolate shavings or cocoa powder for garnish (optional) These ingredients create a soft cake soaked in a sweet milk mixture. The heavy cream topping adds a light and airy touch. Using room temperature ingredients helps everything mix well. I recommend using fresh milk for the best taste. For a unique twist, sprinkle chocolate shavings on top before serving. Enjoy making this delicious treat! For the complete recipe, check the [Full Recipe]. Start by preheating your oven to 350°F (175°C). Grab a 9x13 inch baking pan. Grease it with butter to make sure your cake won’t stick. Dust the pan lightly with flour. This quick step helps the cake come out clean and perfect. In a medium bowl, sift together the all-purpose flour, cocoa powder, baking powder, baking soda, and salt. This helps mix everything well. In a large bowl, use an electric mixer to beat the softened butter and sugar until it is light and fluffy. This takes about 3-5 minutes. Then, add the eggs one at a time. Mix well after each egg. Finally, stir in the vanilla extract. Slowly fold the dry ingredients into the wet mixture. Alternate with the buttermilk. Start and finish with the dry mix. Be gentle; mix until you see no flour streaks. Pour the batter into your prepared pan. Smooth the top with a spatula. Bake for 30-35 minutes. Check if it’s done by inserting a toothpick into the center; it should come out clean. Let it cool for 10 minutes, then turn it out onto a wire rack. In a separate bowl, mix the sweetened condensed milk, evaporated milk, and whole milk. Whisk this mixture until blended. This will soak into your cake, making it rich and moist. Once the cake is cool, poke holes in the top with a fork. Pour the tres leches mixture evenly over the cake. This helps the cake absorb the milk. Cover it with plastic wrap and let it soak for at least one hour. This step is key for flavor. In a large bowl, beat the chilled heavy cream with powdered sugar until stiff peaks form. Spread this whipped cream over the soaked cake. For a nice touch, sprinkle chocolate shavings or cocoa powder on top. Refrigerate the cake for at least 2 hours before serving. This waiting time mixes the flavors and makes each bite delicious. For the full recipe, check the details in the earlier sections. To get a moist cake, follow a few simple steps. Start by using room temperature ingredients. This helps the batter mix well. Next, do not overmix the batter. Mix until just combined. Overmixing adds air, which can dry the cake out. Finally, bake the cake just until a toothpick comes out clean. If you bake too long, the cake will dry out. Soaking the cake properly is key. First, let the cake cool completely before soaking it. This helps the cake absorb the milk mixture better. Use a fork to poke holes all over the top of the cake. This allows the milk to seep in. Then, pour the tres leches mixture evenly over the cake. Let it sit for at least one hour. For best results, cover it with plastic wrap and refrigerate. This ensures the cake soaks up all the flavor. Whipped cream adds a light touch to the cake. Start by chilling your mixing bowl and beaters. This keeps the cream cold and helps it whip better. Beat the heavy cream until it forms stiff peaks. This means it should hold its shape when you lift the whisk. Add the powdered sugar gradually for sweetness. Spread the whipped cream gently over the soaked cake. For a fun twist, add chocolate shavings or a sprinkle of cocoa powder on top. For the complete recipe, check the Full Recipe section. {{image_4}} You can make a gluten-free version of this cake easily. Just swap the all-purpose flour for a gluten-free flour blend. Look for a blend that works well for baking. This change keeps the cake moist and delicious. You may also add a pinch of xanthan gum to help the texture. To create a vegan chocolate tres leches cake, replace the eggs with flax eggs. Mix 1 tablespoon of ground flaxseed with 2.5 tablespoons of water for each egg. For the milk mixture, use coconut milk, almond milk, or any plant-based milk. Use coconut cream instead of heavy cream for topping. This way, you keep the rich flavor while going dairy-free. You can also play with flavors to make this cake unique. For a minty twist, add mint extract to the batter and whipping cream. Just a teaspoon will do. If you love coffee, add espresso powder to the batter for a rich, coffee flavor. You can also fold in chocolate chips for more texture and taste. Each variation brings a new fun experience to this classic dessert. For the full recipe, check the source to get all the details you need. To keep your Chocolate Tres Leches Cake fresh, always store it in the fridge. Use an airtight container to prevent it from drying out. If you have not yet topped it with whipped cream, store the cream separately. This keeps the cake moist and the cream fluffy. When stored properly, the cake lasts about 3 to 5 days in the fridge. The flavors will continue to blend, making each bite even better. Always check for any signs of spoilage, like a strange smell or changes in texture. You can freeze the cake if you want to keep it longer. Wrap it tightly in plastic wrap, then place it in a freezer-safe bag. This way, it can last up to 3 months in the freezer. When you're ready to enjoy it, let it thaw in the fridge overnight. Add the whipped cream topping just before serving for the freshest taste. For the complete recipe, you can refer to the Full Recipe section. Yes, you can! This cake is great for planning ahead. You can bake the cake, soak it, and then chill it in the fridge. It tastes even better after a day. Just cover it well so it stays fresh. Tres leches cake is soaked in three types of milk. Regular cake usually has no soaking. Tres leches is moist and rich. Regular cake is often lighter. The extra milk makes tres leches creamy and sweet. To keep the cake from being too soggy, let it cool completely first. After soaking, cover the cake and chill it. Serve it within a few days. This way, it stays moist without getting overly wet. Yes, you can use cake mix. Just follow the package instructions for baking. Make sure to adjust the milk mixture. This way, you get the rich flavor of tres leches without starting from scratch. You can use sweetened condensed milk, evaporated milk, and whole milk. If you want, you can try alternatives like almond milk or oat milk. Each choice will give a different taste, but they will still work well. For the full recipe, check out the Heavenly Chocolate Tres Leches Cake recipe above! In this post, we covered the essential steps to make a Chocolate Tres Leches Cake. You learned about the key ingredients and how to mix them. We detailed how to bake the cake and prepare the soaking mix. You got tips on keeping your cake moist and explored tasty variations. Finally, we discussed storing leftovers to enjoy later. Baking is fun and rewarding. Try this recipe to impress friends and family. Enjoy every delicious bite!](https://fastmealmate.com/wp-content/uploads/2025/06/83784e58-e7f6-4d4b-aebc-0bf8177d26de-768x768.webp)

