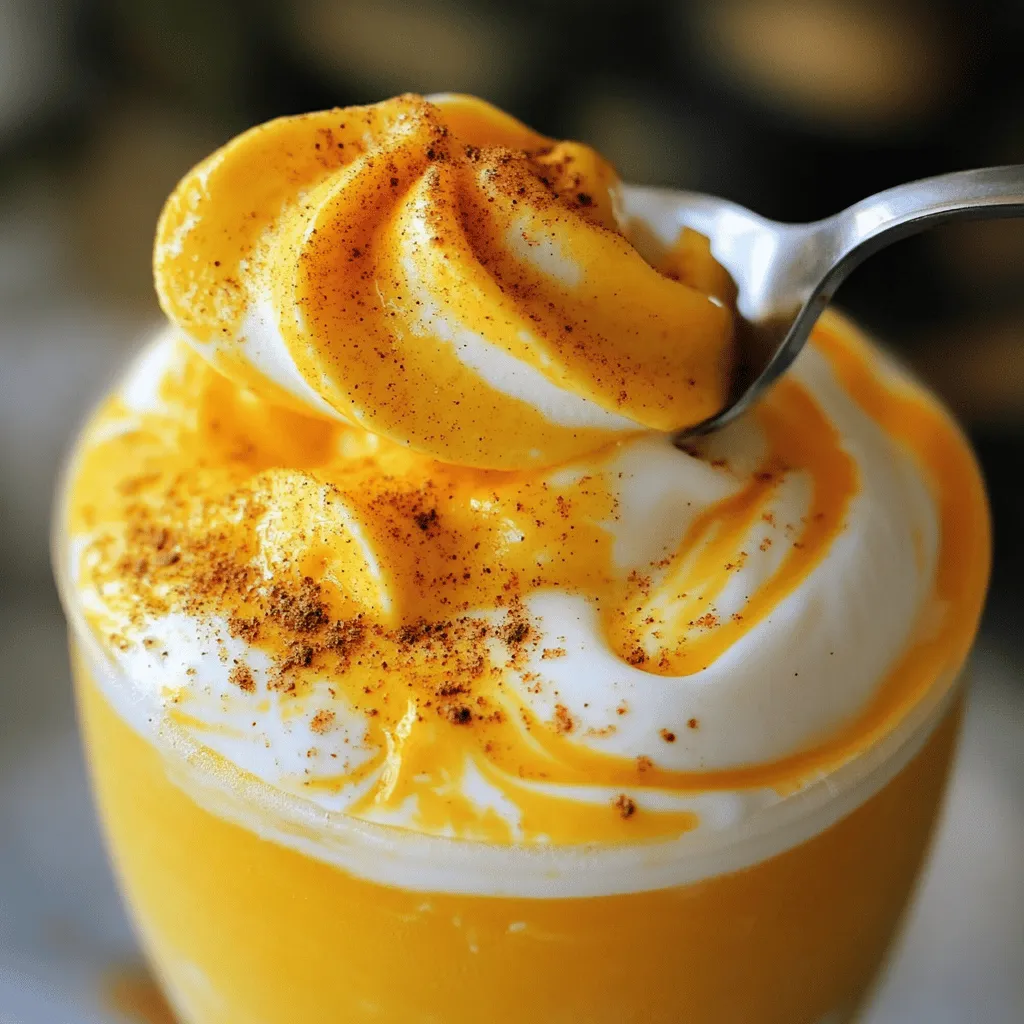
Whipped Pumpkin Cold Foam Rich and Creamy Delight
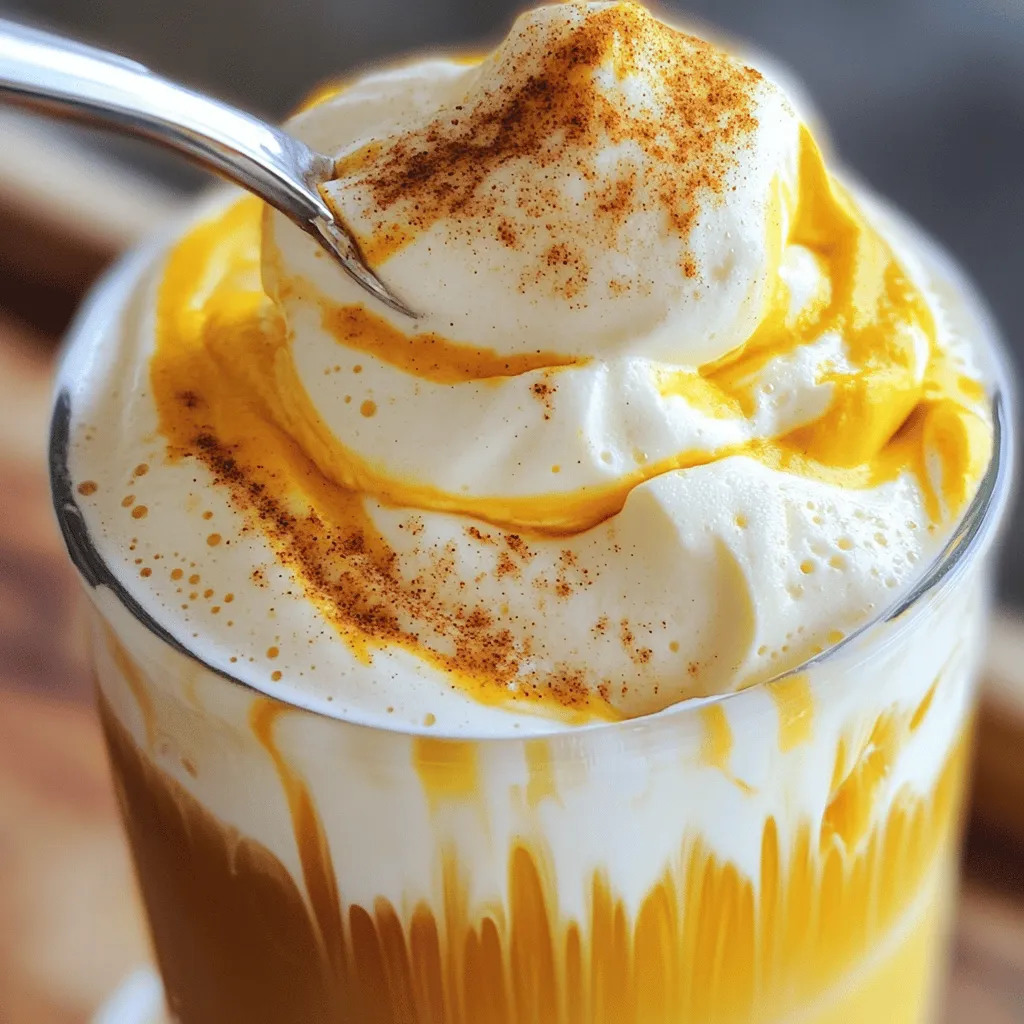
If you’re looking to elevate your fall drinks, you’ve come to the right place. Whipped Pumpkin Cold Foam is a rich and creamy delight that adds a cozy twist to lattes and iced coffees. With just a few simple ingredients, you can create fluffy perfection at home. In this post, I’ll guide you through easy steps, helpful tips, and tasty variations. Get ready to impress with your own whipped pumpkin creation!
Ingredients
Essential Ingredients for Whipped Pumpkin Cold Foam
To make whipped pumpkin cold foam, you need these key ingredients:
– 1 cup heavy cream
– 1/2 cup canned pumpkin puree
– 1/4 cup powdered sugar
– 1 teaspoon vanilla extract
– 1 teaspoon pumpkin pie spice
– Pinch of salt
– 2 tablespoons milk (optional, for desired consistency)
Each ingredient plays an important role in building flavor and texture. Heavy cream brings richness and a smooth feel. Canned pumpkin puree provides that warm, fall flavor we all love. Powdered sugar adds sweetness without grit. Vanilla extract enhances the overall taste, while pumpkin pie spice gives it that cozy aroma. A pinch of salt balances all the flavors perfectly.
If you want a lighter foam, adding milk can help adjust the thickness. You can use any milk you prefer, like almond or oat milk, if you want a dairy-free option. This simple list of ingredients ensures a delightful, creamy concoction that will elevate your drinks.
Step-by-Step Instructions
Preparation Steps
First, gather your ingredients. You will need:
– 1 cup heavy cream
– 1/2 cup canned pumpkin puree
– 1/4 cup powdered sugar
– 1 teaspoon vanilla extract
– 1 teaspoon pumpkin pie spice
– Pinch of salt
– 2 tablespoons milk (optional, for desired consistency)
In a spacious mixing bowl, combine the heavy cream, pumpkin puree, powdered sugar, vanilla extract, pumpkin pie spice, and salt. Mix these well. The pumpkin and cream should blend smoothly.
Next, use an electric mixer or a whisk. Beat the mixture on medium-high speed. You will see soft peaks form. Keep an eye on the foam. If you whip too long, it may turn into butter, which is not what we want!
If your foam seems too thick, add milk. Do this gradually, one tablespoon at a time. Mix until you reach a smooth, creamy texture. This foam should be rich yet light.
After mixing, taste the foam. If you want it sweeter or spicier, add more powdered sugar or pumpkin pie spice. Adjust to fit your taste buds.
Serving Suggestions
Now, you can use this foam in many drinks. It works great on lattes and iced coffees. Just spoon or pipe it over your favorite drinks. This adds a fun touch!
For a special look, sprinkle extra pumpkin pie spice on top. This not only makes the foam pretty but also adds more flavor. Enjoy your whipped pumpkin cold foam!
Tips & Tricks
Creating the Perfect Texture
To make whipped pumpkin cold foam, aim for a light and airy texture. Overwhipping can ruin your foam, so stop as soon as soft peaks form. If the mixture looks too thick, it may become grainy and dry.
– How to avoid overwhipping: Watch the mixture closely. Use a mixer or whisk at a medium speed. Stop as soon as you see soft peaks forming. This will give you a smooth foam that holds its shape.
– Balancing thickness and creaminess: If your foam is too thick, add milk. Start with one tablespoon and mix well. You can always add more if needed. This will help keep your foam creamy and easy to spoon over your drinks.
Flavor Enhancements
Adding spices and sweeteners can take your foam to the next level. You can make it more exciting with just a few tweaks.
– Additional spices and sweeteners: Try adding a pinch of nutmeg or cinnamon for extra warmth. If you like it sweeter, stir in more powdered sugar until it meets your taste.
– Experimenting with different milk options: You can use almond milk, oat milk, or even coconut milk. Each choice alters the flavor and texture. Play around until you find what you love best.Enjoy crafting your perfect whipped pumpkin cold foam!
Variations
Customizing Your Whipped Pumpkin Cold Foam
You can make this whipped pumpkin cold foam your own. Start with dairy-free options. Use coconut cream or almond milk instead of heavy cream. This keeps the foam rich and creamy without dairy.
Next, think about flavor. You can add caramel or chocolate for a sweet twist. Just stir in a tablespoon of your chosen syrup. This adds a fun layer to your foam. You can also try different spices, like nutmeg or cinnamon, to enhance the pumpkin flavor.
Seasonal Twists
Fall is the perfect time to mix in other seasonal flavors. Consider adding a touch of maple syrup for extra sweetness. This brings a warm, cozy feel to your drink.
You can also switch up your sweeteners. Try honey or agave syrup instead of powdered sugar. Each option gives a different taste and texture.
Storage Info
Short-Term Storage
After making whipped pumpkin cold foam, you might have some left over. Store it in the fridge. Use an airtight container to keep it fresh. This foam stays good for about three days. If you see any changes in color or texture, it’s best to toss it.
Long-Term Storage
You can freeze whipped pumpkin cold foam too! Scoop it into ice cube trays for easy use later. Once frozen, transfer the cubes to a freezer bag. They can last for about three months. When you want to use them, just thaw the cubes in the fridge. Once thawed, stir well before using. You can add them to drinks or desserts for a fall twist. Enjoy the rich and creamy delight anytime!
FAQs
Common Questions About Whipped Pumpkin Cold Foam
Can I use fresh pumpkin instead of canned?
Yes, you can use fresh pumpkin. Just cook and puree it first. Canned pumpkin is smoother and easier. It also saves time.
How long does the foam last in the fridge?
The foam stays fresh for up to three days in the fridge. Store it in an airtight container. This helps to keep it fluffy.
Where can I buy ready-made whipped pumpkin cold foam?
Some coffee shops offer this foam. You can also find it at specialty food stores. Check online retailers for convenience.
Additional Queries
Can I make whipped pumpkin cold foam in advance?
Yes, you can make it ahead of time. Just keep it in the fridge. Make sure to stir it gently before serving.
Is this recipe suitable for vegan diets?
This recipe uses heavy cream, so it is not vegan. For a vegan version, use coconut cream or a plant-based whipped cream. Adjust the ingredients to fit your taste.
In this post, I covered how to make whipped pumpkin cold foam. We explored essential ingredients like heavy cream and pumpkin puree. You learned the step-by-step instructions to create the perfect texture and flavor. I shared tips for personalizing your foam and explained storage options.
As you try this recipe, feel free to experiment. Enjoy the cozy flavors in your drinks, making each sip special. Happy whipping!

![For a delicious S'mores Brownie Skillet Dip, gather the following ingredients: - 1 cup all-purpose flour - 1 cup granulated sugar - 1/2 cup unsweetened cocoa powder - 1/2 teaspoon baking powder - 1/4 teaspoon salt - 1/2 cup unsalted butter, melted - 2 large eggs - 1 teaspoon vanilla extract - 1 cup semi-sweet or dark chocolate chips - 1 cup mini marshmallows - 1/2 cup graham cracker crumbs - Extra graham crackers for serving These ingredients blend together to create a rich, chocolatey dip. The all-purpose flour and cocoa give it a brownie base. The sugar adds sweetness, while the baking powder helps it rise slightly. The melted butter keeps it rich and moist. The eggs and vanilla extract add flavor and structure. Chocolate chips provide bursts of chocolatey goodness. Mini marshmallows, when baked, become soft and gooey, adding that classic S'mores taste. Finally, the graham cracker crumbs create a crunchy topping, perfect for dipping. Use this list to prepare your dip. Following these steps ensures you get the best flavor and texture. For full details, check out the Full Recipe. - Preheat oven to 350°F (175°C). This helps the dip cook evenly. - In a large bowl, mix the dry ingredients: flour, sugar, cocoa powder, baking powder, and salt. Stir well to combine. - In another bowl, combine the wet ingredients: melted butter, eggs, and vanilla extract. Mix gently until they blend together. - Pour the wet mix into the dry mix. Stir until just combined. Do not overmix; a few lumps are okay. - Now, fold in the chocolate chips. This adds rich flavor and texture to the dip. - Grease a 10-inch cast-iron skillet or oven-safe dish. Pour the brownie batter into the skillet. Spread it evenly. - Top the batter with mini marshmallows and graham cracker crumbs. This gives the dip that classic s'mores taste. - Place the skillet in the preheated oven. Bake for 20-25 minutes. The edges should be set, and the center should be soft. The marshmallows will puff up and turn golden. - Once baked, take the skillet out of the oven. Let it cool for a few minutes. This makes it safe to eat. Enjoy this warm dip with extra graham crackers for a fun treat! To avoid overmixing the batter, mix just until the wet and dry ingredients blend. You want some lumps for that fudgy texture. Too much mixing makes the brownies tough. For the perfect marshmallow topping, add them during the last few minutes of baking. This lets them brown nicely without burning. Keep an eye on them. You want golden, not charred! The best snacks for dipping are graham crackers, of course! You can also use fruit like strawberries or bananas. They add a nice, fresh taste to the rich dip. For a great presentation, drizzle melted chocolate on top before serving. Add some colorful fruit on the side. It makes the dish look fun and inviting. {{image_4}} You can make this dessert fit your needs with some easy swaps. If you want a gluten-free option, use gluten-free flour. It works well and keeps the taste great. You can also switch the chocolate. Dark chocolate gives a rich taste, while milk chocolate is sweeter. Choose what you like best! Add more fun to your dip with flavor extras. Chopped nuts add crunch and taste. Walnuts or pecans work best. If you love sweetness, drizzle some caramel over the top. It makes the dip even more special. You can also try different extracts. Almond extract gives a nice twist. Coconut extract can add a tropical touch. Just use a little bit to taste and enjoy! To keep your S'mores Brownie Skillet Dip fresh, store it in the fridge. First, let it cool completely. Then, cover the skillet tightly with plastic wrap or transfer it to an airtight container. When stored this way, it can last for about 3 days. If you have more than you can eat, freezing is an option. Scoop the dip into a freezer-safe container. Leave a little space at the top, as it may expand. It can last up to 2 months in the freezer. Just remember to label the container with the date for easy tracking. When it's time to enjoy your leftovers, reheating is simple. You can warm it up in the oven. Preheat the oven to 350°F (175°C). Place the skillet in the oven for about 10-15 minutes. This helps keep the dip gooey and warm. You can also reheat in the microwave if you're short on time. Use a microwave-safe bowl and heat in short bursts. Stir between each burst to ensure even warming. This way, the marshmallows remain soft and fluffy, just like when it was first made. Can I make this dish ahead of time? Yes, you can prepare the batter ahead. Just store it in the fridge. Bake it right before serving for best results. What can I use if I don’t have a cast-iron skillet? You can use any oven-safe dish. A glass or ceramic baking dish works well too. Just make sure to grease it well. How can I make it less sweet? To cut back on sweetness, use less sugar or dark chocolate. You can also add a pinch of salt to balance the flavors. What is the best way to serve this dip? Serve it warm with extra graham crackers. You can also add fresh fruit like strawberries or bananas for dipping. - Check out the [Full Recipe] for detailed instructions. This blog post covers a fun and tasty s'mores brownie skillet dip. You learned how to mix the right ingredients and bake this treat perfectly. I shared tips to make it even better and suggestions for serving. With storage info, you can save leftovers too. Enjoy making this sweet dip for your next gathering! It’s easy, fun, and sure to impress. Remember that you can personalize it with your favorite flavors. Happy baking!](https://fastmealmate.com/wp-content/uploads/2025/07/00705dfa-6977-4536-b8b9-b3715ee69892-768x768.webp)