
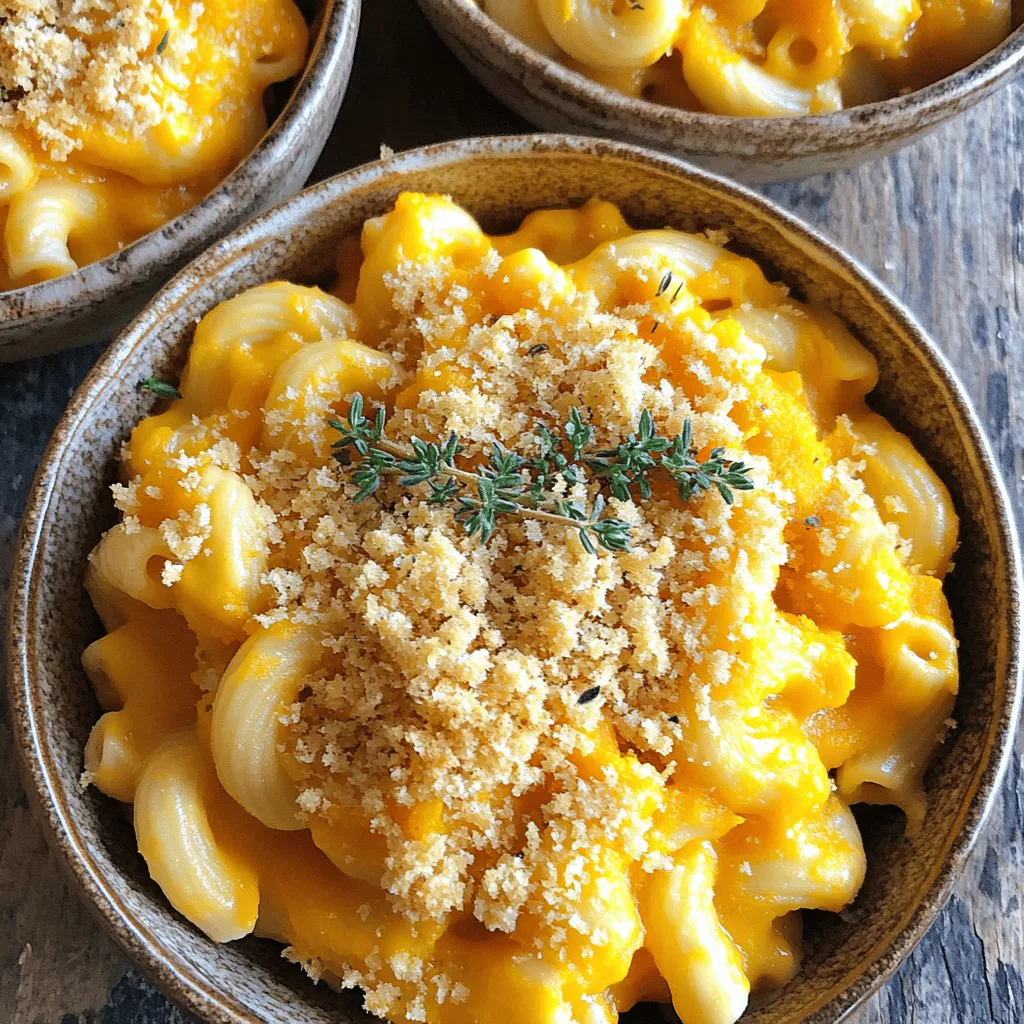
Slow Cooker Butternut Squash Mac and Cheese Delight
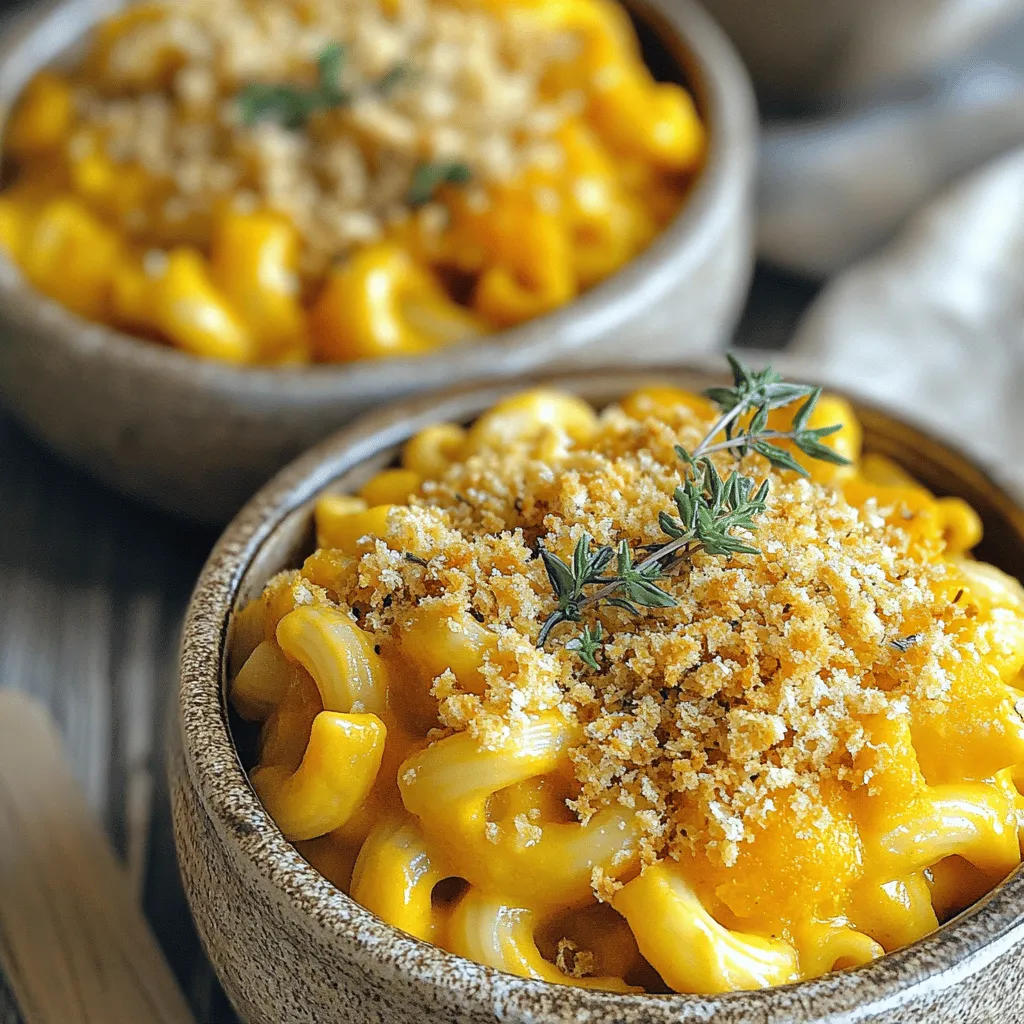
Looking for a creamy, tasty dish that’s easy to make? Try my Slow Cooker Butternut Squash Mac and Cheese Delight! It’s a fun take on comfort food that combines the sweetness of butternut squash with gooey cheese. You can make this meal with simple ingredients and minimal effort. Let’s explore how to create a rich, smooth, and satisfying mac and cheese that will please everyone at the table. Ready? Let’s dive in!
Ingredients
Main Ingredients
– 2 cups butternut squash, peeled and diced into small cubes
– 2 cups elbow macaroni
– 3 cups sharp cheddar cheese, freshly shredded
– 1 cup creamy mozzarella cheese, freshly shredded
Additional Ingredients
– 2 cups vegetable broth
– 1 cup whole milk
– 1 teaspoon garlic powder
– 1 teaspoon onion powder
– 1 teaspoon dried thyme
Optional Ingredients
– ½ cup panko breadcrumbs (for a crispy topping)
– 2 tablespoons olive oil (for panko topping)
For this delightful dish, you need fresh, simple ingredients. The butternut squash gives a sweet and creamy base. The elbow macaroni adds that classic pasta feel. Sharp cheddar and creamy mozzarella provide a rich, cheesy flavor. To elevate the taste, use vegetable broth and whole milk. Garlic powder, onion powder, and dried thyme give it depth.
If you want a crunchy topping, consider using panko breadcrumbs mixed with olive oil. This adds a fun texture and a golden finish. Use these ingredients to create a comforting meal that warms the soul.
Step-by-Step Instructions
Preparing the Butternut Squash
1. Cooking squash in the slow cooker: Start by placing the diced butternut squash in your slow cooker. Pour in the vegetable broth, making sure the squash is well-covered. Set your slow cooker to high and let it cook for about 2 hours. You want the squash to be tender enough to pierce easily with a fork.
2. Pureeing the squash for smoothness: Once the squash is soft, grab an immersion blender. Blend the squash in the slow cooker until it becomes smooth and creamy. If you don’t have an immersion blender, carefully transfer the squash to a regular blender, puree it, and return it to the slow cooker.
Cooking the Mac and Cheese
1. Adding macaroni and other ingredients: To the smooth butternut squash puree, add the elbow macaroni, whole milk, garlic powder, onion powder, dried thyme, and a good pinch of salt and pepper. Stir everything together well. Make sure the macaroni is coated in the creamy mixture.
2. Cooking time and stirring tips: Cover the slow cooker with the lid and keep cooking on high for another 30 minutes. This will soften the macaroni. Stir occasionally to prevent sticking and help it cook evenly.
Adding the Cheeses and Topping
1. Mixing in cheese varieties: When the macaroni is soft, it’s time to add the cheeses! Stir in the shredded sharp cheddar and mozzarella cheese. Mix until the cheese is melted and creates a rich, creamy texture.
2. Preparing and applying the panko topping: If you want a crunchy topping, mix the panko breadcrumbs with olive oil. Coat them well. Sprinkle the panko mixture over the mac and cheese. Cover the slow cooker and cook for another 10 minutes on high. This lets the breadcrumbs toast and turn golden.
Tips & Tricks
Ensuring Creaminess
To make your mac and cheese creamy, choose high-quality cheese. Freshly shredded cheese melts better than pre-shredded. I love using sharp cheddar and mozzarella for their rich flavors. For a smooth texture, blend the butternut squash well. Use an immersion blender to puree it right in the slow cooker.
Flavor Enhancements
Spices can really boost the taste. I recommend adding garlic powder, onion powder, and dried thyme. They add warmth and depth. You could also stir in some cooked chicken or turkey for extra protein. This makes the dish more filling and satisfying.
Cooking Considerations
Adjust the slow cooker settings based on your timing. If you want it faster, use the high setting. Stir the mixture every so often to avoid sticking. If your mac and cheese seems too thick, add a splash of milk. This keeps it creamy. If it’s too watery, let it cook a bit longer with the lid off.
Variations
Classic Variations
You can change up the cheese in this dish. Mixing different cheeses makes it fun. Try using gouda or fontina for a rich taste. You can also use a mix of sharp cheddar and creamy mozzarella.
Switching the pasta shape can also create new textures. While elbow macaroni is classic, feel free to use shells or rotini. These shapes hold the cheese sauce well and add a twist to your dish.
Healthy Alternatives
If you want a lighter version, swap whole milk for plant-based milk. Almond milk or oat milk works great and keeps it creamy. You can also cut calories by using less cheese. Just balance it with a bit more butternut squash for flavor.
Adding extra veggies is another way to make it healthier. Spinach, kale, or bell peppers boost nutrition and add color.
Seasonal Additions
Incorporating seasonal veggies adds flair to your mac and cheese. Try adding roasted Brussels sprouts or sautéed mushrooms during fall. They provide a hearty touch that pairs well with butternut squash.
Spicing it up with seasonal herbs can elevate flavors. In the fall, use nutmeg or sage for warmth. In spring, fresh basil or chives can brighten the dish.
Remember, the goal is to enjoy your meal while making it your own.
Storage Info
Refrigeration Guidelines
To keep your butternut squash mac and cheese fresh, store leftovers in the fridge. Use airtight containers to prevent moisture loss. Glass or BPA-free plastic containers work best. Make sure the mac and cheese cools down before sealing the container. This helps avoid condensation and soggy textures.
Freezing Instructions
If you want to freeze this dish, let it cool completely first. Portion it into freezer-safe containers. Label each container with the date. When ready to eat, thaw the mac and cheese overnight in the fridge. Reheat it gently in the microwave or on the stove. Add a splash of milk to restore creaminess.
Shelf Life Tips
In the fridge, your mac and cheese lasts about 3 to 5 days. Always check for signs of spoilage. If it smells off or has a strange color, it’s time to toss it. If you freeze it, it can last up to 3 months. Enjoy your cozy meal without worry by following these tips.
FAQs
Can I use frozen butternut squash?
Yes, you can use frozen butternut squash. Just remember to adjust your cooking time. Frozen squash may take longer to cook. I recommend checking for tenderness after about 2.5 hours. If you find it’s not soft yet, continue cooking until it is.
How do I make this dish ahead of time?
To prep this dish early, cook the squash and puree it. Store the puree in the fridge for up to two days. When you’re ready to cook, add the other ingredients and cook in the slow cooker. You can also fully prepare the dish and refrigerate it overnight. Just heat it in the slow cooker the next day.
Can I make a vegan version of this mac and cheese?
Absolutely! For a vegan option, swap out the cheeses. Use nutritional yeast for a cheesy flavor. You can also try plant-based shredded cheese. For milk, use almond or oat milk, and make sure your vegetable broth is vegan-friendly.
What should I serve with butternut squash mac and cheese?
This dish pairs well with many sides. Try a fresh green salad for a light touch. Roasted vegetables also make a great match. You might even enjoy it with garlic bread. These sides add color and balance to your meal.
This blog post explored how to make a delicious butternut squash mac and cheese. We covered the main and optional ingredients, along with step-by-step instructions for perfecting the dish. I shared tips for creaminess and flavor enhancement, plus storage tips to keep leftovers fresh. Try variations like different cheeses or seasonal veggies for a unique twist. With these insights, you can create a tasty meal that’s easy to make and fun to enjoy. Enjoy your cooking adventure!


![- 4 medium cucumbers, sliced into rounds - 1 teaspoon sea salt - 1 teaspoon freshly ground black pepper - 1 teaspoon smoky chili powder - 1 tablespoon freshly squeezed lime juice - 1/4 cup crumbled queso fresco (or feta) - 1/4 cup fresh cilantro, finely chopped - 1 jalapeño, finely chopped (optional) - 1 tablespoon extra virgin olive oil When I make Mexican-style cucumbers, I focus on fresh, vibrant ingredients. Each item plays a key role in flavor and texture. The cucumbers are crisp and refreshing. They are the star of this dish. The sea salt enhances their natural taste. Black pepper adds a nice kick, while smoky chili powder gives it depth. Fresh lime juice brings brightness. It balances the flavors perfectly. Queso fresco adds a creamy touch, and cilantro gives a fresh burst. If you like heat, jalapeño adds a nice spicy twist. The extra virgin olive oil ties everything together, making it rich and smooth. - Mixing bowl - Cutting board and knife - Measuring spoons - Serving bowl Using the right tools makes cooking easier. A good knife helps slice cucumbers evenly. A mixing bowl is perfect for combining all the ingredients. Measuring spoons ensure you get the flavors just right. Finally, a nice serving bowl makes your dish look great at the table. You can find the full recipe for Mexican-style cucumbers to guide you through this process. - Rinse cucumbers under cold water. - Trim ends and slice into 1/4 inch rounds. Start by washing your cucumbers. Cold water helps remove dirt and any residue. After rinsing, trim off the ends. Now, slice each cucumber into rounds about 1/4 inch thick. This size gives a nice bite and ensures even seasoning. - Combine cucumber slices with salt, pepper, and chili powder. - Toss gently to coat evenly. In a big bowl, mix the cucumber slices with sea salt, black pepper, and smoky chili powder. The salt enhances the cucumber's natural flavor. The chili powder adds a great kick. Toss the cucumbers gently. You want every slice to be coated well without breaking them. - Drizzle lime juice and olive oil over the cucumbers. - Fold in queso fresco and cilantro. - Optionally add jalapeño for extra spice. - Let marinate for 10 minutes before serving. Next, drizzle fresh lime juice and olive oil over the cucumbers. This adds brightness and richness. Fold in crumbled queso fresco and chopped cilantro. If you like spice, add jalapeño. Mix everything gently so the flavors blend well. Let it sit for at least 10 minutes. This waiting time helps the cucumbers soak up all those delicious flavors. Enjoy your vibrant and tasty dish! For the full recipe, refer back here. To make your Mexican style cucumbers shine, use fresh lime juice. The juice brightens the taste and adds a zesty kick. You can also experiment with different types of peppers. If you like heat, try serrano or habanero peppers. Each pepper brings a unique taste and spice level, making your dish fun and exciting. For a stunning look, serve your cucumbers in a stylish bowl. Top them with lime wedges and fresh cilantro. This not only adds color but also enhances the flavor. You might sprinkle extra chili powder for even more appeal. This small touch can make your dish look gourmet and inviting. Use a mandoline to slice your cucumbers evenly. This tool helps create uniform rounds, making them look professional. You can also prepare your ingredients in advance. Chop everything and store them separately. This way, you can quickly assemble your dish when you're ready. These shortcuts save time and make cooking more enjoyable. For the full recipe, check out the [Full Recipe]. {{image_4}} To add heat to your dish, try these tips: - Increase the jalapeño or add serrano peppers for more spice. - Include chopped red onions for extra crunch and flavor. These changes create a perfect balance of spice and freshness. You can adjust the heat level to match your taste. The spicy version pairs well with grilled meats or tacos. For a rich, creamy twist, consider these ideas: - Add Greek yogurt or sour cream for a smooth texture. - Mix in avocado for added creaminess and nutrition. This creamy variation is great for those who enjoy a thicker dressing. It also makes the dish more filling and satisfying. Serve it with pita chips or as a dip for veggies. Want to try something sweet? Here’s how: - Incorporate diced mango or pineapple for a fruity twist. - Drizzle with honey to create a unique flavor combo. This sweet and tangy version is refreshing and fun. It's perfect for summer gatherings or as a light snack. Each bite bursts with flavor, making it a hit with kids and adults alike. For the full recipe, check out the details above. To store leftover Mexican style cucumbers, place them in an airtight container. This keeps them fresh and safe. You should eat them within 2-3 days for the best taste and crunch. Freezing cucumbers is not a good idea. The texture changes when frozen, making them watery and mushy. Instead, enjoy them fresh! To keep your cucumbers fresh, wait to add dressing until you serve. This prevents them from getting soggy. You can also store them with paper towels. The towels soak up extra moisture, keeping your dish crisp and tasty. Mexican-style cucumbers stand out due to their unique seasoning blends. I use fresh, vibrant ingredients like lime juice, smoky chili powder, and cilantro. These flavors combine to create a refreshing taste that dances on your palate. The mix of spices gives a fun twist to simple cucumbers, making them a delightful dish. Yes, you can easily make this recipe vegan. Just replace queso fresco with a plant-based cheese alternative. This change keeps the dish creamy and delicious while fitting a vegan diet. You can still enjoy all the flavors without dairy. These cucumbers shine as a side dish with grilled meats. They also work well as a standalone salad. Pair them with tacos, chicken, or fish for a complete meal. Their crispness complements rich dishes perfectly. Letting cucumbers marinate for at least 10 minutes is best. This time allows the flavors to meld together. However, if you let them sit longer, the taste gets even better. Just be sure to keep them at room temperature, and they will be ready to serve. Mexican-style cucumbers are low in calories and rich in vitamins. They provide hydration, making them perfect for hot days. This dish is also great for weight loss, as it fills you up without adding many calories. Enjoy the freshness guilt-free! This blog post covered the core ingredients and step-by-step instructions to make delicious Mexican-style cucumbers. We discussed how to enhance flavors and provided tips for presentation. You can easily vary the recipe to suit your taste or dietary needs. Remember to store leftovers properly for the best taste. Enjoy refreshing, healthy cucumbers as a side or salad! Making them at home is simple, fun, and sure to impress anyone you serve. Your kitchen can be a hub of fresh taste!](https://fastmealmate.com/wp-content/uploads/2025/06/eb69b124-1af5-44a9-95ae-72c395866c25-768x768.webp)
![- 2 ripe mangoes, peeled and diced - 1 cup freshly squeezed lemon juice (approximately 4-5 lemons) - 4 cups cold water - 1/2 cup honey or agave syrup (adjust for sweetness) - 1/4 teaspoon sea salt - Ice cubes - Fresh mint leaves and lemon slices for garnish In this recipe, ripe mangoes are key. They give the drink a rich, sweet flavor. Fresh lemon juice adds a tangy twist that balances the sweetness. I recommend using cold water for a refreshing drink. Honey or agave syrup allows you to control the sweetness level. Adding a pinch of sea salt enhances the taste and brings out the flavors. Don't forget the ice cubes! They keep your drink cool and refreshing. Lastly, fresh mint leaves and lemon slices make a beautiful garnish. They add a nice touch to your glass and make it look appetizing. For the complete recipe, check out the [Full Recipe]. To start, you need ripe mangoes. Peel and dice two mangoes. Place the diced mangoes in a blender. Add 1 cup of cold water. Blend on high until smooth and creamy. This mango puree gives your drink a rich flavor. Next, grab a large pitcher. Pour in 1 cup of freshly squeezed lemon juice. Use about 4-5 lemons for this. Add 3 cups of cold water. Mix in 1/2 cup of honey or agave syrup. Stir until everything is well combined. This mixture will be your refreshing lemonade base. Now, it’s time to combine. Gently pour the mango puree into the pitcher with the lemonade. Stir carefully until everything is mixed. You want the mango and lemonade to blend perfectly for a smooth taste. Take a moment to taste your mixture. If it’s too sweet, add more lemon juice. If you want it sweeter, mix in more honey or agave. Don't forget the salt! Stir in 1/4 teaspoon of sea salt to balance the flavors. Adjust until it tastes just right for you. It’s almost time to serve! Fill your glasses with ice cubes. Carefully pour the mango lemonade over the ice. Each glass should be full of that bright, fruity goodness. For a nice touch, garnish with fresh mint leaves and a lemon slice on the rim. This makes your drink look inviting and fresh. For the full recipe, check out the detailed steps above! To make your mango lemonade sweet, you can adjust the honey or agave syrup. Start with the half cup stated in the recipe. After mixing, taste it. If it’s not sweet enough, add more sweetener a little at a time. This way, you control the flavor. Remember, mangoes also add some natural sweetness. So, your lemonade may not need much more. Want to add some extra flavor? Fresh herbs like mint or basil work great. Just chop them up finely and mix them into the lemonade. You can also try adding a pinch of ginger or a dash of cinnamon. These spices bring a new twist to your drink. They can brighten the mango's flavor and make it even more refreshing. Mango lemonade pairs well with light snacks. Think about serving it with fresh fruit or a light salad. It also goes perfectly with grilled chicken or fish. For a fun twist, try it with spicy tacos. The sweet and tangy lemonade cools down the heat. Serve it over ice for a refreshing treat. Enjoy the colorful look with mint and lemon slices on top, making your table even more inviting. {{image_4}} You can make mango lemonade even better by adding other fruits. Try mixing in fresh berries like strawberries or blueberries. Pineapple also works great. These fruits add extra color and fun flavors. To do this, simply blend the fruits with the mango before mixing with the lemonade. Each fruit brings its own unique taste, making your drink more exciting. Want to spice things up? You can turn mango lemonade into a fun adult drink. Add rum or vodka for a spiked version. Use about 1 to 2 ounces of your favorite spirit per glass. This addition gives the drink a kick, perfect for parties or summer gatherings. Just remember to drink responsibly! Get creative by using flavored teas or herbal infusions in your mango lemonade. You can brew a light green tea or a refreshing mint tea. Once it cools, mix it into your lemonade base. This adds a whole new layer of flavor. You can even try herbal infusions like chamomile for a soothing twist. Explore these options to find your favorite mix. The full recipe will guide you through making this delightful drink. To keep your mango lemonade fresh, store it in an airtight container. A glass jar or a pitcher works well. Make sure to seal it tightly to prevent any odors from the fridge from mixing in. Always place it in the coldest part of the fridge, usually towards the back. This helps keep it cool and refreshing. Your mango lemonade will stay fresh for about 3 to 5 days. After that, the flavors may start to fade. If it starts to taste less vibrant, you might want to add a little more lemon juice or honey to revive it. Always check for any changes in smell or color before drinking. If you want to save some for later, freezing is a great option. Pour the mango lemonade into ice cube trays or freezer-safe bags. Leave a little space at the top, as liquids expand when frozen. When you want to enjoy it again, just thaw it in the fridge overnight. You can also blend the frozen cubes into smoothies for an instant fruity treat. For the full recipe, check out the [Full Recipe]. Mango lemonade is packed with vitamins. Mangoes are rich in vitamin C, which helps boost your immune system. They also contain vitamin A, good for your eyes and skin. The lemon juice adds more vitamin C and antioxidants. Together, they help you stay hydrated and healthy. Drinking mango lemonade can also support digestion due to its natural enzymes. Yes, you can use frozen mangoes! They make a great substitute. When you use frozen mango, it still blends well into a smooth puree. You do not need to thaw them first. Just add them to the blender with some water and blend until smooth. This makes it easy for you to enjoy mango lemonade anytime, even when fresh mangoes aren't available. To make your mango lemonade less tart, add more sweetness. You can increase the honey or agave syrup. Start with a little, then taste and add more if needed. If it’s still too sour, you can add more mango puree. A pinch of salt can also help balance the flavors. This way, you will enjoy a sweeter, more balanced drink. This mango lemonade recipe is sure to refresh you. We covered the ingredients, step-by-step instructions, and variations to try. Don't forget to adjust sweetness and explore fun combos. You can enjoy this drink fresh or store it for later. Whether you sip it by itself or with snacks, it's a bright treat. I hope you’re excited to make this delicious drink and share it with others!](https://fastmealmate.com/wp-content/uploads/2025/07/c517a603-1516-4e83-8a0a-b9bae852f1a0-768x768.webp)
