
Cherry Lime Soda Slushies Refreshing Summer Treat
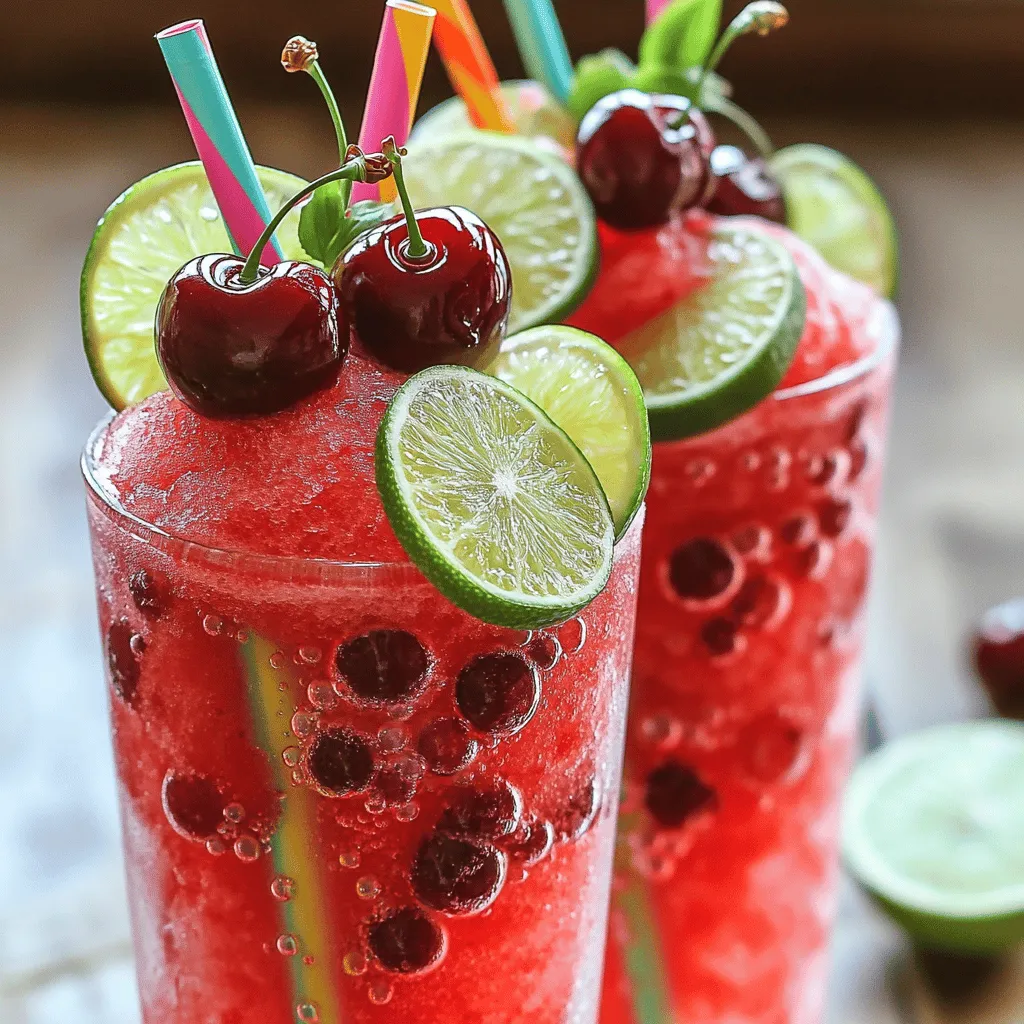
Chill out with a delicious Cherry Lime Soda Slushie this summer! This refreshing treat mixes bright cherry flavors with zesty lime for the perfect sip on a hot day. In this post, I’ll walk you through easy steps to create this icy delight, share tips for that perfect slushy texture, and explore fun variations. Get ready to impress your friends and family with this summer favorite!
Ingredients
Main Ingredients for Cherry Lime Soda Slushies
To make the perfect cherry lime soda slushies, you need just a few main ingredients. Here’s what you will need:
– 2 cups fresh or frozen cherries, pitted
– 1/2 cup freshly squeezed lime juice
– 1/2 cup granulated sugar
– 1 1/2 cups sparkling water
– 2 cups ice cubes
These ingredients combine to create a sweet and tangy treat. The cherries give it a vibrant color and rich flavor. The lime juice adds a zesty kick that balances the sweetness.
Optional Garnishes
Garnishes can make your slushies look even more fun. Here are some ideas:
– Lime slices
– Fresh cherries
Adding these garnishes makes your slushies pop. They also add a nice touch for presentation.
Recommended Tools and Equipment
You only need a few simple tools to make these slushies:
– Blender
– Mixing bowl
– Spatula
– Tall glasses
Using these tools will help you blend and serve your slushies with ease.
Step-by-Step Instructions
Preparation Process
Start with your ingredients. You need fresh or frozen cherries, lime juice, sugar, sparkling water, and ice cubes. Gather two cups of cherries. The cherries should be pitted for easy blending. Next, measure half a cup of fresh lime juice. This juice adds a zesty flavor that wakes up the drink. Then, grab half a cup of granulated sugar. This will sweeten your slushie perfectly.
Blending the Ingredients
Place the pitted cherries, lime juice, and sugar in a blender. Blend this mixture on high until it is smooth. You want a uniform texture with no lumps. Next, add the ice cubes. Blend again, but this time pulse it gently. You want your slushie to have a slushy feel, with small ice chunks. This gives it a nice texture.
Serving the Slushies
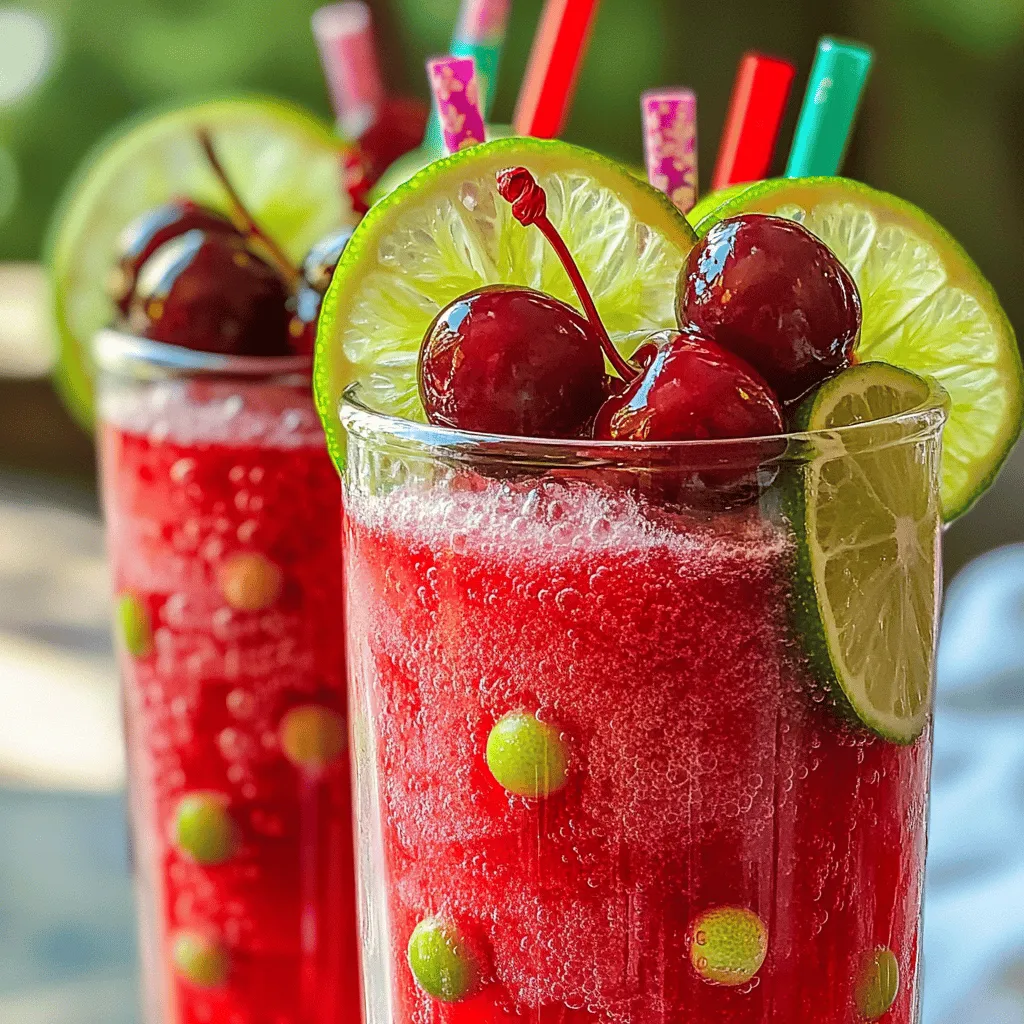
When your slushie is ready, transfer it to a large bowl. Now, carefully fold in the sparkling water. Use a spatula and be gentle. This keeps the bubbles in your drink. Taste it! If you want it sweeter, add more sugar or cherries. Blend briefly to mix it in, then it’s time to serve. Use a spoon to fill tall glasses. Let it mound at the top for a fun look. Finally, garnish each glass with a lime slice and a few fresh cherries. Serve it right away with a straw. Enjoy your cherry lime soda slushies!
This refreshing summer treat is sure to please everyone.
Tips & Tricks
Achieving the Perfect Slushy Consistency
To make your cherry lime soda slushies just right, focus on blending. Start with the cherries, lime juice, and sugar. Blend until smooth. Then, add ice and pulse. You want small ice chunks for a fun texture. If it’s too smooth, it won’t have that slushy bite.
Adjusting Sweetness and Flavor
Taste your slushie mix before serving. If it’s not sweet enough, add more sugar or cherries. Blend briefly to mix. The lime juice gives a nice tang, but you can balance it with sweetness. Find what works for you!
Best Practices for Serving
Serve your slushies right after making them. This keeps them cold and fresh. Use tall glasses for a great look. Mound the slushie at the top for fun. Garnish with lime slices and cherries. This adds color and makes it even more inviting.
Variations
Adding Fruit Flavors
You can easily add more fruit to your Cherry Lime Soda Slushies. Try mixing in strawberries, blueberries, or raspberries. Just toss them into the blender with the cherries. You will get a tasty twist on the classic flavor. Each fruit brings its own unique taste and color. This makes your slushies even more fun and delicious. If you choose to add fruit, keep the same amounts. The blend will still taste amazing!
Alcoholic Versions for Adults
For a fun adult drink, consider adding a splash of alcohol. Vodka or rum works well in this slushie. Just add about one ounce per glass. Blend it in with the other ingredients for a smooth mix. This adds a nice kick for summer parties. Always drink responsibly and know your limits. This twist makes Cherry Lime Soda Slushies a great choice for a warm night.
Alternative Sweeteners
If you want to cut sugar, try different sweeteners. Honey, agave syrup, or stevia can replace granulated sugar. Start with a smaller amount and taste as you go. This helps you find the right sweetness for you. Each sweetener will add its own flavor, so experiment! This way, you can enjoy a slushie that fits your diet without losing fun.
Storage Info
How to Store Leftover Slushies
If you have leftover slushies, store them in an airtight container. This helps keep the flavor and texture fresh. Place the container in the fridge. Use the slushies within one day for the best taste. If they sit longer, they may lose their icy vibe.
Freezing Tips for Future Use
You can freeze slushies for later. Pour the slushie into ice cube trays. Once frozen, pop the cubes into a bag. This way, you can enjoy a quick treat anytime. Just remember to use the frozen slushies within three months for the best flavor.
Reconstituting the Slushie for Serving
To serve frozen slushies, blend them again with a splash of sparkling water. This helps bring back the slushy texture. You can also add more lime juice or sugar to adjust the taste. Blend until you reach your desired consistency. Enjoy your refreshing drink just like when you first made it!
FAQs
Can I use canned cherries instead of fresh or frozen?
Yes, you can use canned cherries. However, canned cherries often have extra syrup. This can make your slushie too sweet. Drain the cherries well and rinse them to reduce the extra sugar. This way, your slushie stays bright and tasty.
How can I make this slushie non-alcoholic?
This slushie is already non-alcoholic. You simply blend the cherries, lime juice, sugar, and sparkling water. You can serve it to kids and adults alike. If you want a twist, add some flavored soda instead of sparkling water.
What are some serving suggestions for parties?
For parties, serve the slushies in tall glasses with colorful straws. You can also add fun garnishes like lime slices and fresh cherries. Set up a slushie bar where guests can add their own toppings. This makes it interactive and exciting!
Can I make this ahead of time?
You can prepare the slushie mixture ahead of time. Just store it in the fridge until you are ready to serve. When it’s time, blend it again with ice to refresh it. This keeps it cold and slushy.
How can I adjust the sweetness of the slushie?
You can easily adjust the sweetness. After blending, taste the mixture. If it needs more sweetness, add extra sugar or cherries. Blend again briefly to mix it in. Always start with a little, then add more if needed.
What other fruits can I use in this slushie?
You can mix other fruits into your slushie. Try strawberries, raspberries, or even mango. Each fruit gives a unique flavor. Just keep the cherry base for a refreshing twist.
Is this slushie healthy?
This slushie can be a healthy treat. It uses fresh fruit and natural sugar. You can also use less sugar if you like. This makes it a fun, cool drink without too many calories.
You learned how to make tasty cherry lime soda slushies from scratch. We covered the main ingredients, tools, and step-by-step instructions. Tips helped you get the best slushy texture and flavor. You also saw fun variations and storage advice for your leftovers.
Now, you can enjoy refreshing slushies anytime. Remember to try different fruits or sweeteners for a twist. Happy slushying!

![- 1 cup Biscoff cookie spread - 2 cups whole milk - 1 cup heavy cream - 1/2 cup granulated sugar - 1/4 cup cornstarch - 1 teaspoon vanilla extract - 1/8 teaspoon salt - 3 ripe bananas, sliced - 1 cup crushed Biscoff cookies (for layering and garnish) - Whipped cream (optional, for topping) The Biscoff banana pudding is a treat, but it comes with calories. Each serving has about 350 calories. It has sugar and fat from the cookies and cream. If you want to reduce calories, you can use less sugar or lighter cream. You can also switch to a non-dairy milk for a vegan option. This dessert has a good mix of flavors and textures. You get the creaminess from the pudding and the crunch from the cookies. - Mix Dry Ingredients: In a medium saucepan, combine 1/2 cup granulated sugar, 1/4 cup cornstarch, and 1/8 teaspoon salt. Whisk them until there are no lumps. - Add Milk and Cook Mixture: Slowly pour in 2 cups of whole milk while whisking. This helps to avoid clumps in your pudding. Place the saucepan on medium heat and stir constantly. Cook until the mixture thickens and bubbles, about 5 to 7 minutes. - Incorporate Flavors: Once thickened, remove the saucepan from heat. Stir in 1 teaspoon vanilla extract and 1 cup of Biscoff cookie spread. Mix well until everything is smooth and combined. - Whip the Cream: In a separate bowl, whip 1 cup of heavy cream using an electric mixer. Beat until soft peaks form. Make sure it holds shape but is not too stiff. - Combine with Biscoff Mixture: Gently fold the whipped cream into the Biscoff mixture. Use a spatula and be gentle to keep the airy texture. - Layer the Dessert: In a large dish or individual cups, lay down sliced bananas. Then, spoon a layer of the Biscoff pudding over the bananas. - Add Crushed Cookies: Sprinkle a layer of crushed Biscoff cookies on the pudding. Repeat the layers with the remaining ingredients. Ensure the top layer is the Biscoff pudding. - Finishing Touches: For a nice look, pipe or dollop whipped cream on top. Garnish with extra crushed Biscoff cookies. - Chill the Dessert: Cover the dessert and place it in the fridge for at least 4 hours, or overnight. This helps all the flavors blend together. For the complete recipe, check the [Full Recipe]. Enjoy your cooking! To get the right whipped cream consistency, start with cold heavy cream. Use a clean bowl and beaters for the best results. Whip at medium speed until soft peaks form. This means the cream should hold its shape but still be smooth. Avoid over-whipping, as this can turn it into butter. To prevent lumps in the pudding, whisk the dry ingredients well before adding milk. Pour in the milk slowly while stirring. This helps mix everything evenly. Keep stirring as you cook the mixture over medium heat. This ensures a smooth pudding without any lumps. For the best presentation, use clear glasses or bowls. This shows off the lovely layers of bananas, creamy pudding, and crunchy cookies. You can also add a banana slice or a whole Biscoff cookie on top for a nice touch. This makes each serving look even more inviting. For garnishing ideas, sprinkle extra crushed Biscoff cookies on top. A dollop of whipped cream adds a nice finishing touch. You can also drizzle some melted Biscoff cookie spread over the top for added flavor and flair. The best time to prepare this dessert is a day ahead. This gives the flavors time to blend well. The pudding needs at least 4 hours in the fridge, but overnight is even better. This chilling time lets the pudding set perfectly. For optimal flavor, chill the dessert for at least 4 hours. This helps all the elements come together. The longer you chill, the more delicious it gets! Enjoy your Biscoff banana pudding after the wait; it will be worth it. {{image_4}} You can make this dessert even more fun by adding chocolate layers. Just mix cocoa powder into the Biscoff pudding. This mix creates a rich, sweet flavor. You can also use chocolate pudding as a layer. The blend of chocolate and Biscoff is a match made in dessert heaven. You can easily make a vegan version of Biscoff banana pudding. Use almond milk or coconut milk instead of whole milk. For the cream, try coconut cream. You can replace granulated sugar with maple syrup or agave. These swaps keep the taste yummy while being plant-based. If you need a gluten-free option, use gluten-free cookies. Look for brands that make gluten-free Biscoff-style cookies. Ensure that all other ingredients are gluten-free. This way, everyone can enjoy this delightful dessert without worry. To keep your Biscoff banana pudding fresh, store leftovers in the fridge. Use an airtight container to prevent air and moisture from spoiling it. If you don’t have one, cover the dish tightly with plastic wrap. This keeps the pudding creamy and tasty. In the fridge, this pudding lasts about 3 to 5 days. After that, it may lose its texture and flavor. Always check for any signs of spoilage before enjoying it again. If it smells off or looks strange, it’s best to toss it. Yes, you can freeze this pudding! To freeze, spoon it into a freezer-safe container, leaving room for expansion. Cover tightly with a lid or plastic wrap. When you're ready to eat, thaw in the fridge overnight. Avoid refreezing once thawed, as it may change the texture. Enjoy your creamy treat! For the full recipe, check out the Biscoff banana pudding delight. Can I use other nut butters instead of Biscoff? You can try using almond or peanut butter. However, Biscoff has a unique flavor. It adds a sweet, spiced taste. This makes it hard to replicate. Use other nut butters if you prefer them. The result will be different but still tasty. How do I know when the pudding mixture is thick enough? Stir the mixture while it cooks. It will start to bubble and thicken. When it coats the back of a spoon, it's ready. If it drips off the spoon slowly, you've got the right texture. This usually takes about 5-7 minutes. Can I make this dessert ahead of time? Yes, you can make it a day in advance. It tastes better when the flavors blend. Just cover it well and chill it in the fridge. This way, you save time and enjoy a delicious dessert. Can I use low-fat milk? Low-fat milk works, but it changes the creaminess. The pudding may be less rich. If you choose this option, consider adding a little extra whipped cream for texture. What if I don't have cornstarch? You can use flour as a substitute. It will work to thicken the pudding. Use about twice the amount of flour. Just remember, it might slightly change the taste. What can I pair with Biscoff banana pudding? This dessert pairs well with fresh fruit. Try berries or slices of mango. It also goes great with coffee or tea. The flavors balance nicely. Is it suitable for special occasions? Absolutely! Biscoff banana pudding is perfect for parties. Its layers look stunning in clear cups. Everyone loves a sweet and creamy dessert like this. It's a showstopper that impresses guests! This blog post covered how to make a delicious Biscoff banana pudding. We explored key ingredients and discussed the preparation and assembly steps to perfect the dish. I shared tips for achieving the best texture and serving suggestions to impress guests. You also learned about variations for diet needs and how to store leftovers safely. Enjoying this pudding can bring joy to many occasions. With the right ingredients and care, you can make this treat a family favorite.](https://fastmealmate.com/wp-content/uploads/2025/05/85e9a37f-c50b-46e1-af24-a41950287baa-768x768.webp)

![- Fresh peaches - Red onion - Jalapeño pepper - Red bell pepper - Fresh cilantro - Lime juice - Salt and pepper - Optional honey For this fresh peach salsa, you want to gather simple ingredients that burst with flavor. Start with fresh peaches, as they are the star of this dish. Choose ripe peaches that give slightly when you press them gently. This ensures they are sweet and juicy. Next, chop a red onion finely. This will add a nice crunch and a hint of sharpness. If you prefer a milder taste, soak the onion in cold water for a few minutes before adding it to the salsa. Now, grab a jalapeño pepper. Remove the seeds to control the heat. If you like spicy salsa, leave some seeds in for an extra kick. Finely mince the jalapeño and add it to the mix. For sweetness and crunch, include a red bell pepper. Dice it into small pieces. The bright color will also make the salsa visually appealing. You can't forget the fresh cilantro! Chop about a quarter cup. The cilantro adds a fresh, herbal taste that brightens the whole dish. Next, squeeze the juice of two limes into the bowl. This adds a zesty tang that pairs perfectly with the sweetness of the peaches. Finally, season with salt and pepper to taste. This will help to enhance all the flavors in your salsa. For those who enjoy a hint of sweetness to balance the tang, you can add optional honey. This combination of ingredients creates a colorful, zesty dip that is perfect for any occasion. You can find the complete steps in the Full Recipe. 1. Start by dicing the peaches. Use three ripe peaches. Cut them into small pieces. This gives your salsa a sweet base. 2. Next, chop the red onion. Use one small onion. Finely chop it to enhance the flavor. The onion adds a nice crunch. 3. Now, take a jalapeño pepper. Remove the seeds and mince it. This adds heat to your salsa. If you like it milder, use less. 4. Dice one red bell pepper. This pepper adds sweetness and a nice crunch. It balances the heat from the jalapeño. 5. Finally, slice the cilantro. Use about 1/4 cup. The fresh herb adds lovely notes to your salsa. 1. Combine all your ingredients in a medium mixing bowl. This includes the diced peaches, chopped onion, minced jalapeño, and diced red bell pepper. 2. Add the coarsely chopped cilantro into the bowl. This brightens up the salsa. 3. Squeeze the juice from two limes. Pour the juice directly into the bowl. This adds tang and freshness. 4. If you want a touch of sweetness, drizzle in one teaspoon of honey. Mix well to combine all the flavors. 1. Season your salsa with salt and pepper. Start with a little and taste as you go. Adjust according to your preference. 2. Gently toss all the ingredients together. Be careful not to mash the peaches. This keeps the salsa fresh and vibrant. 3. Let the salsa rest for at least 15 minutes. This helps the flavors meld beautifully. Enjoy this fresh peach salsa with tortilla chips or as a topping on grilled meats. For the full recipe, check [Full Recipe]. When picking peaches, look for a few key signs. They should feel slightly soft when you press them gently. The color should be vibrant, with a golden hue. The sweet aroma is also a good sign of ripeness. For salsa, I recommend these peach varieties: - Freestone peaches: Easy to pit and sweet. - Clingstone peaches: Juicy and flavorful, perfect for fresh dishes. To create a zesty salsa, balance the sweet and spicy flavors. Add just enough jalapeño to give it a kick without overwhelming the sweetness of the peaches. You can also try some optional add-ins: - A dash of cumin for warmth. - Chopped mango for extra sweetness. - A splash of vinegar for brightness. Fresh peach salsa pairs perfectly with crispy tortilla chips. It adds a fun twist to your standard snack. For a creative presentation, serve the salsa in a colorful bowl. You can also place it in hollowed-out peaches for a fun touch. Garnish with a sprig of fresh cilantro to make it pop. Want to try the full recipe? Check out the Peachy Paradise Salsa for all the details! {{image_4}} To make your fresh peach salsa spicy, add more jalapeños or other hot peppers. Start with an extra jalapeño, finely chopped. If you love heat, try serrano or habanero peppers. These peppers give a nice kick. Just remember to adjust the amount based on your spice level. Taste as you mix. You want to enjoy the heat, not overpower it. Try adding mango or pineapple for a tropical twist. These fruits add sweetness and juicy texture. Diced mango blends well with peaches. Pineapple brings a tangy note. Mix about one cup of diced fruit with your peach salsa. This combo makes your salsa even more vibrant and exciting. It's fun to explore different flavors. Herbs can elevate your peach salsa. Experiment with different herbs like basil or mint. Basil adds a sweet, peppery flavor that pairs well with peaches. Mint gives a fresh, cool taste. Use about 1/4 cup of finely chopped herbs. Add them in with the cilantro for a unique twist. This makes your salsa special and refreshing. For the full recipe, check out [Full Recipe]. To keep your fresh peach salsa tasty, store it in the fridge. Use an airtight container. This helps keep the flavors strong and fresh. If you want to keep it longer, freezing is an option. Just place the salsa in a freezer-safe bag. Remove as much air as possible before sealing. It is best to freeze in smaller portions, so you can thaw what you need. In the fridge, fresh peach salsa is good for about 3 to 5 days. After that, it may lose its flavor and freshness. Look for signs of spoilage. If the salsa smells sour or changes color, it's time to toss it. Always trust your senses when checking food. If it looks or smells off, do not eat it. You can use canned peaches, but I prefer fresh ones. Fresh peaches offer better taste and texture. They give your salsa a juicy bite. However, canned peaches are convenient. They save time and are available year-round. Just look for peaches packed in juice, not syrup. This keeps the flavor bright and fresh. If you use canned peaches, drain them well. This helps avoid a watery salsa. To spice up your salsa, add more jalapeño. You can also try serrano or habanero peppers. They bring heat and flavor. Remove the seeds for less heat if needed. You might also mix in some cayenne pepper or hot sauce. Start with a little and taste as you go. This way, you can find the perfect heat level for you. Fresh peach salsa is great with many dishes! Serve it with tortilla chips for a tasty snack. You can also pair it with grilled chicken or fish. It adds a zesty twist to tacos or burritos. Try it on top of a fresh salad. It brings a burst of flavor that brightens any meal. Peach salsa is packed with nutrients! Peaches are rich in vitamins A and C. These vitamins help keep your skin healthy. The red onion adds antioxidants, which protect your cells. Cilantro brings fresh flavor and may aid digestion. Lime juice provides vitamin C and helps with hydration. Overall, this salsa is a delicious way to enjoy healthy ingredients. To make it even healthier, skip the honey or use less. You can find the full recipe [here](#). Fresh peach salsa brings together the perfect blend of flavors. We explored the ingredients, from ripe peaches to zesty lime juice. You learned how to prepare and mix the salsa, and how to enhance its taste. The tips on choosing peaches and serving ideas elevated your dish. Variations and storage advice help you make this salsa a staple. In the end, fresh peach salsa is simple, delicious, and versatile. Enjoy creating your own unique twist and sharing it with others!](https://fastmealmate.com/wp-content/uploads/2025/06/2f0fc8ad-37c3-48ee-80ed-3417aa8b3609-768x768.webp)