
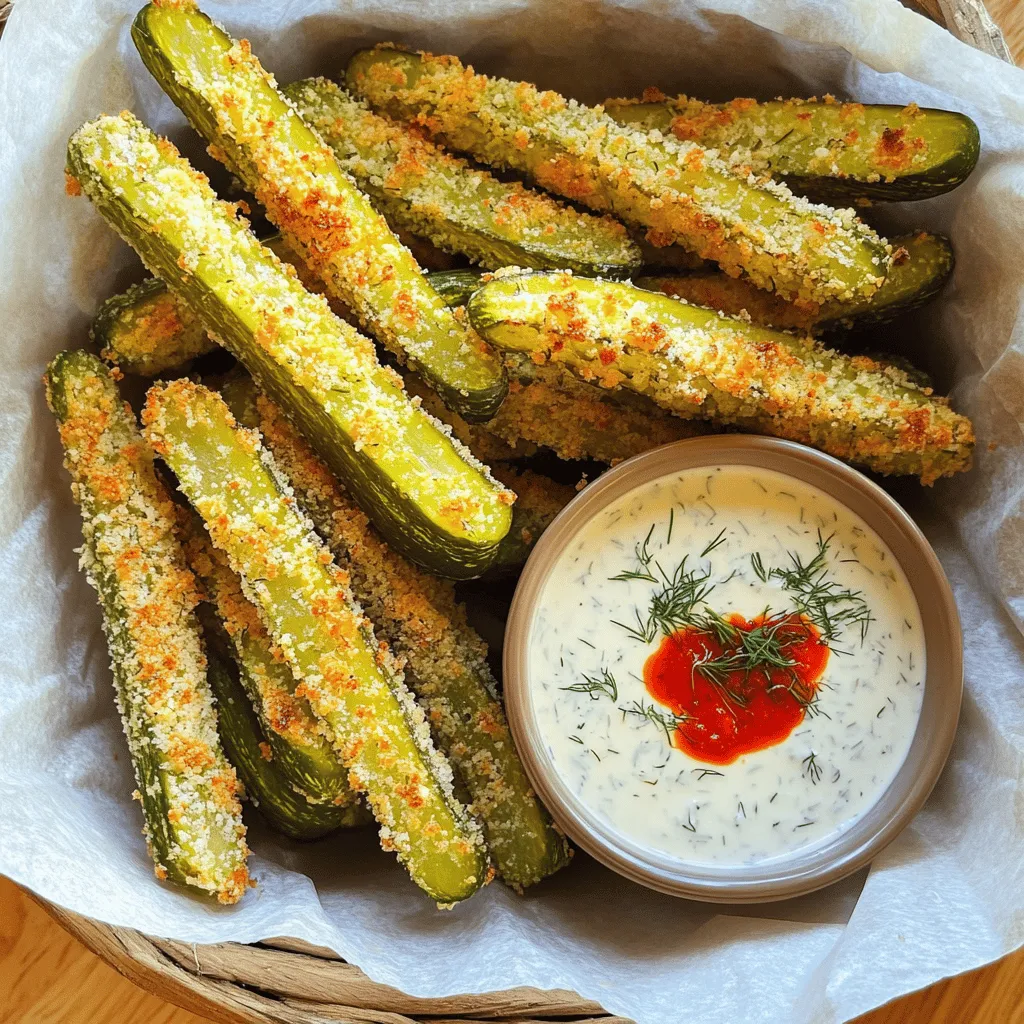
Crispy Dill Pickle Fries with Spicy Ranch Delight
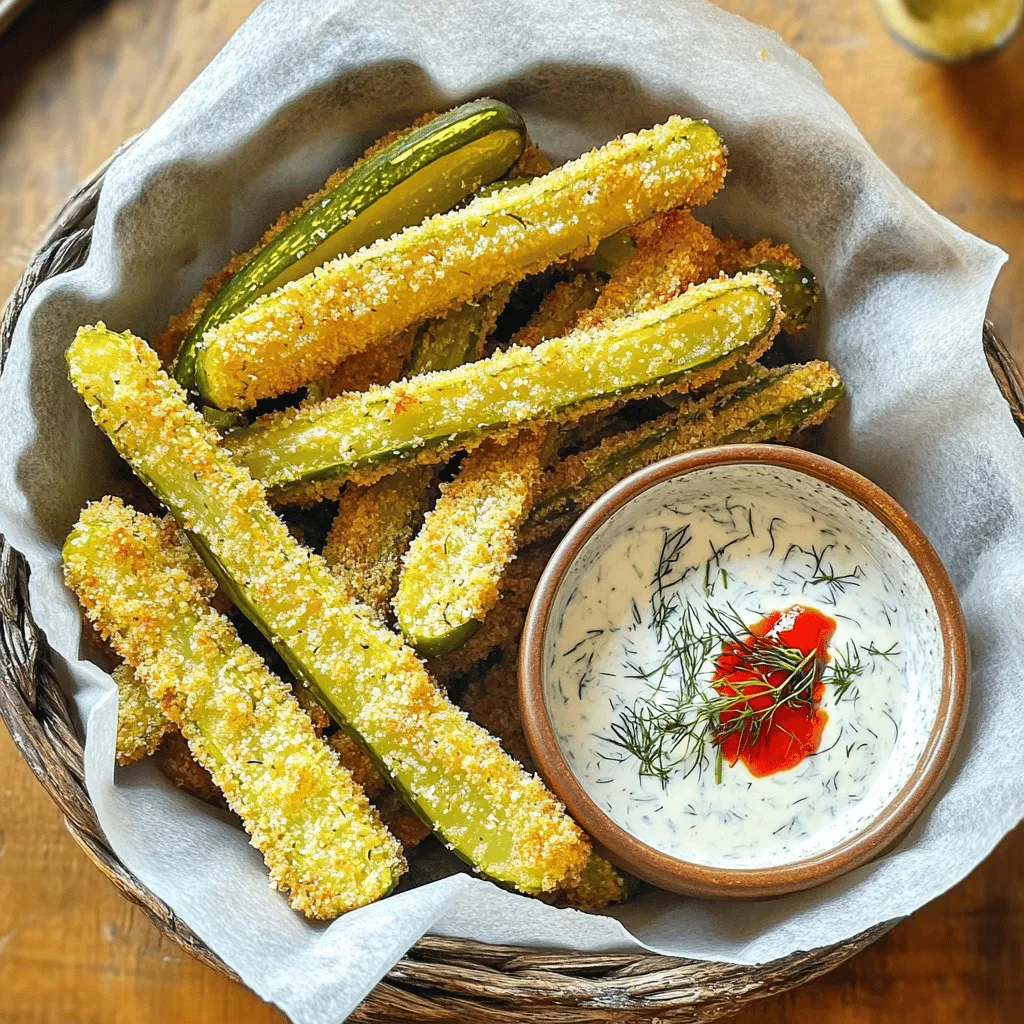
Craving a tasty snack that packs a punch? Look no further! My Crispy Dill Pickle Fries with Spicy Ranch Delight will make your taste buds dance. These crunchy fries offer the perfect mix of tangy pickles, spicy ranch, and a satisfying crunch. Whether you’re hosting friends or enjoying a night in, this recipe is sure to impress. Let’s dive into the crispy, flavorful world of pickle fries, and make your next snack unforgettable!
Ingredients
List of Ingredients
– 4 large dill pickles, sliced into fry shapes
– 1 cup all-purpose flour
– 1 teaspoon garlic powder
– 1 teaspoon onion powder
– 1 teaspoon paprika
– 1/2 teaspoon cayenne pepper
– 2 large eggs
– 1 cup breadcrumbs (preferably panko)
– Vegetable oil, for frying
Spicy Ranch Dipping Sauce:
– 1/2 cup ranch dressing
– 1 tablespoon hot sauce (like Sriracha)
– 1 teaspoon minced fresh dill
Recommended Brands for Ingredients
For the best taste, I often choose Dill Pickles from Claussen. Their crunch and flavor are perfect. For Breadcrumbs, I prefer Panko from Kikkoman. It gives a fantastic crunch. For ranch dressing, Hidden Valley is a classic choice. Their flavor pairs well with spicy hot sauce.
Substitutions and Alternatives
If you need gluten-free options, swap the all-purpose flour with almond flour. For the breadcrumbs, use gluten-free breadcrumbs. You can also use any hot sauce you love for the ranch. If you want a milder dip, skip the cayenne pepper or reduce the amount.
Step-by-Step Instructions
Prep the Pickles
Start by patting the sliced dill pickles dry using paper towels. This removes extra moisture. Dry pickles help create a crispy texture when frying.
Set Up Breading Station
Now, let’s set up your breading station. Place three shallow bowls in a line. In the first bowl, mix 1 cup of flour, 1 teaspoon of garlic powder, 1 teaspoon of onion powder, 1 teaspoon of paprika, and 1/2 teaspoon of cayenne pepper. In the second bowl, crack two large eggs and beat them until smooth. The third bowl should have 1 cup of breadcrumbs.
Bread the Pickles
Take a pickle fry and dip it into the flour mix first. Make sure it’s covered well. Then, dip it into the beaten eggs to coat it, letting excess drip off. Finally, roll it in the breadcrumbs. Ensure each fry is covered for a crunchy finish.
Heat the Oil
In a deep skillet, pour in about 1 inch of vegetable oil. Heat it over medium-high until it hits 350°F (175°C). To check, drop in a piece of breadcrumb. If it sizzles, the oil is ready.
Fry the Pickles
Carefully place the breaded pickle fries in the hot oil, working in small batches. Fry them for about 2-3 minutes on each side. They should turn golden brown and crispy. Use a slotted spoon to take them out and drain them on paper towels.
Make the Spicy Ranch
While frying, mix up the spicy ranch. In a small bowl, combine 1/2 cup of ranch dressing, 1 tablespoon of hot sauce, and 1 teaspoon of minced fresh dill. Stir until everything blends smoothly.
Serve
Transfer your crispy dill pickle fries to a serving platter. Place the spicy ranch in a small bowl beside them for dipping. Enjoy your delicious creation!
Tips & Tricks
Best Practices for Crispy Texture
To achieve the perfect crispy texture, start with dry pickles. Pat the sliced dill pickles with paper towels. This step removes excess moisture that can make your fries soggy. Use panko breadcrumbs for extra crunch. They add a delightful crispiness that regular breadcrumbs cannot match. Fry in small batches to keep the oil hot. Overcrowding lowers the oil temperature, leading to less crispy results. Finally, drain the fried pickles on paper towels to remove extra oil.
How to Adjust Spiciness
If you want a milder flavor, reduce the cayenne pepper in the breading mix. A half teaspoon works well for most people. For more heat, add more cayenne or try a hotter hot sauce in the ranch dip. Sriracha packs a punch, but you can pick any sauce that suits your taste. Experiment with different amounts to find your perfect spice level.
Suggested Cooking Tools
Having the right tools makes cooking easier. Use a deep skillet or frying pan for frying. A thermometer helps track the oil temperature, ensuring it stays at 350°F. Shallow bowls work well for the breading station. A slotted spoon is great for lifting out the fries. Finally, keep some paper towels handy for draining excess oil after frying.
Variations
Adding Different Spices
You can customize your crispy dill pickle fries by adding spices. Try using cayenne pepper for heat or smoked paprika for a nice twist. You might enjoy a pinch of dill weed for a fresh taste. If you prefer a kick, add some chili powder or black pepper. Experimenting lets you find your ideal flavor.
Alternative Dipping Sauces
The spicy ranch sauce is fantastic, but you can switch it up. Try a tangy mustard sauce for a zesty touch. A honey mustard mix adds sweetness that contrasts nicely with the pickles. You can also blend Greek yogurt with garlic and herbs for a creamy dip. Each sauce brings a new flavor adventure.
Bake Instead of Fry
Baking is a great choice if you want a lighter version. Preheat your oven to 425°F (220°C). Place the breaded pickle fries on a baking sheet lined with parchment paper. Spray them lightly with cooking oil for crispness. Bake for about 15-20 minutes, flipping halfway. This method gives you crunch without frying. Enjoy a healthier option that keeps the flavor intact.
Storage Info
How to Store Leftovers
To keep your crispy dill pickle fries fresh, place them in an airtight container. Make sure they cool down first. Store them in the fridge for up to three days. This helps maintain their flavor and prevents sogginess.
Reheating Instructions
When you’re ready to enjoy leftovers, reheat them in the oven. Preheat your oven to 375°F (190°C). Place the pickle fries on a baking sheet. Heat for about 10 minutes or until they are crispy again. Avoid using the microwave, as it makes them soft.
Freezing Options
You can freeze uncooked pickle fries before frying. Arrange them in a single layer on a baking sheet. Freeze until solid, then transfer them to a freezer-safe bag. They will last for up to two months. When ready to eat, fry them straight from the freezer. Just add a couple of extra minutes to the cooking time.
FAQs
Can I use pickled okra instead of dill pickles?
Yes, you can use pickled okra. They will offer a different flavor. Pickled okra has a nice crunch, just like dill pickles. The spice mix works well with this swap. Try it for a new twist on the recipe!
What can I serve with crispy dill pickle fries?
Crispy dill pickle fries pair well with many dishes. You can serve them with burgers, sandwiches, or even as a snack. They work great as an appetizer too. Add some veggies or a fresh salad for a balanced meal. Serve them with the spicy ranch for extra flavor!
How can I make this recipe gluten-free?
To make it gluten-free, swap regular flour for gluten-free flour. You can also use gluten-free breadcrumbs. Check the labels to ensure they are certified gluten-free. This change will help you enjoy the crispy dill pickle fries without gluten.
Can I prepare the pickle fries in advance?
Yes, you can prepare the pickle fries in advance. Bread the pickles and store them in the fridge for a few hours. This helps the coating stick better. When you’re ready, just fry them up for a quick snack.
You now have a clear guide to making crispy dill pickle fries. We covered the right ingredients, brands, and easy substitutions. You learned step-by-step instructions to prep, bread, and fry your pickles. Tips for a crispy texture and storage advice were shared too.
Remember, experimenting with spices and dips can enhance your flavor. Feel free to make this recipe your own. Enjoy your crunchy, spicy snack!


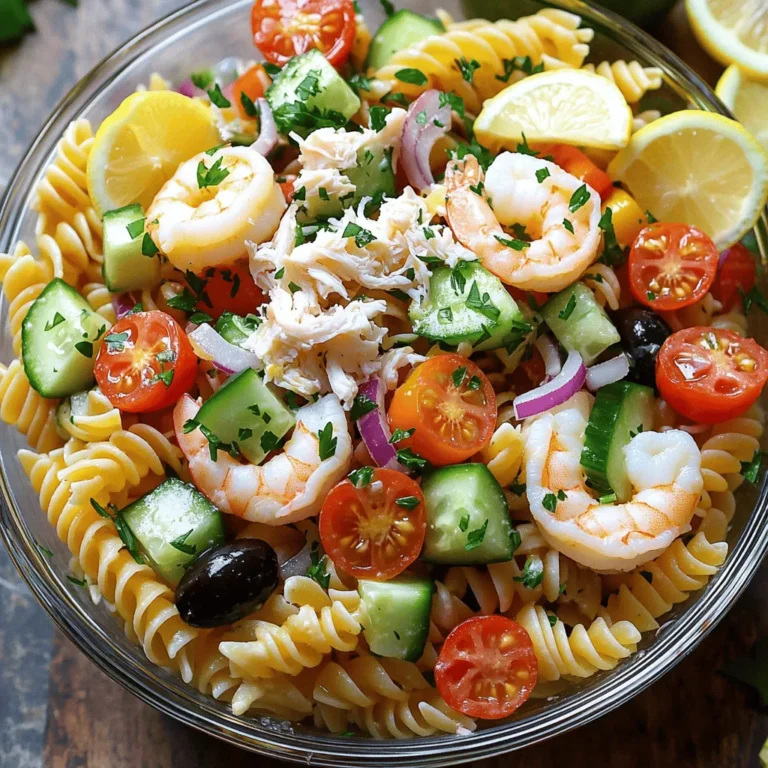
![For the Chicken Caesar Pasta Salad, you will need these main ingredients: - 8 oz fusilli pasta - 1 cup cooked chicken breast, diced (or rotisserie chicken) - 1 cup romaine lettuce, chopped into bite-sized pieces - 1/2 cup cherry tomatoes, halved - 1/4 cup freshly grated Parmesan cheese - 1/4 cup Caesar dressing - 2 tablespoons freshly squeezed lemon juice - 1 teaspoon garlic powder - Salt and black pepper, to taste - 1/4 cup crunchy croutons (for garnish) - Fresh parsley, finely chopped (for garnish) These ingredients come together to create a vibrant and tasty dish. Feel free to customize your salad with these optional ingredients: - Avocado slices for creaminess - Grilled zucchini or bell peppers for extra veggies - Bacon bits for a smoky flavor - Extra herbs like basil or dill for freshness Adding these extras can make your salad unique and tailored to your taste. This salad not only tastes great but also packs some nutritional value. Here is a rough estimate of what you get per serving: - Calories: About 400 - Protein: 30g - Carbohydrates: 35g - Fat: 20g - Fiber: 3g This Chicken Caesar Pasta Salad is a balanced meal, making it perfect for lunch or dinner. You can find the full recipe at [Full Recipe]. First, grab a large pot and fill it with water. Bring the water to a rolling boil. Add a pinch of salt to the water. Now, add 8 oz of fusilli pasta. Cook it for 8-10 minutes until it's al dente. When the pasta is done, drain it well. Rinse it under cold water to stop cooking. This helps keep the pasta firm and cool. Set the pasta aside in a large bowl. Next, let’s focus on the chicken. If you have leftover cooked chicken, chop it into small pieces. If you’re using fresh chicken, season it with salt, black pepper, and 1 teaspoon of garlic powder. Cook it in a skillet over medium heat for 6-8 minutes. Make sure it’s cooked through and no longer pink. Let the chicken rest for a few minutes, then chop it into bite-sized pieces. Now, it’s time to bring it all together. In the large bowl with the pasta, add the diced chicken. Then, toss in 1 cup of chopped romaine lettuce and 1/2 cup of halved cherry tomatoes. Gently mix everything to keep the lettuce fresh. In a small bowl, whisk together 1/4 cup of Caesar dressing and 2 tablespoons of fresh lemon juice. Pour the dressing over the salad and toss it all together. Sprinkle 1/4 cup of grated Parmesan cheese and 1/4 cup of crunchy croutons on top. For a fresh touch, add some chopped parsley. Enjoy your Chicken Caesar Pasta Salad right away for the best taste! To make the best Caesar dressing, use fresh ingredients. Start with a good Caesar dressing base. Add freshly squeezed lemon juice for a bright taste. This gives your salad a fresh kick. If you like garlic, mix in some minced garlic. This adds depth to the flavor. Taste your dressing before pouring it over the salad. Adjust salt and pepper to your liking. For a creamier texture, whisk in some Greek yogurt or sour cream. This can make the salad richer and more satisfying. Serve this salad in a big bowl to show off its colors. Layer it with extra romaine for a nice crunch. Add more cherry tomatoes for a sweet touch. For a fun twist, sprinkle some bacon bits or chopped olives on top. This adds extra flavor and texture. You can also serve it as a side dish for grilled meats. Pair it with garlic bread for a full meal. For a picnic, pack the salad in a jar. Just layer the ingredients and keep the dressing separate until serving. To save time, use rotisserie chicken. It’s already cooked and ready to go. You can also cook the pasta in advance. Just store it in the fridge until you’re ready to mix the salad. Pre-chop your veggies and store them in airtight containers. This makes assembly quick and easy. If you have leftovers, make sure to keep the dressing separate. This keeps the salad fresh and crunchy. You can enjoy it for lunch the next day, too! Check out the full recipe for more details. {{image_4}} You can add many proteins to your Chicken Caesar Pasta Salad. Grilled shrimp gives a sweet and savory taste. You can use steak for a heartier meal. If you like fish, try adding tuna for a fresh twist. Each protein adds a unique flavor and texture. For a vegetarian version, skip the chicken and use chickpeas. They add protein and a nice bite. To make it vegan, swap the Caesar dressing for a plant-based version. You can also use nutritional yeast instead of Parmesan cheese for a cheesy flavor without dairy. If you have dietary needs, you can make simple swaps. Use gluten-free pasta if you need to avoid gluten. For a lower carb option, try zucchini noodles. If you're watching calories, cut down on the dressing or use a lighter version. Always feel free to adjust this recipe to fit your diet. To store your Chicken Caesar Pasta Salad, place it in an airtight container. This keeps the flavors fresh and prevents it from drying out. Make sure it cools down first before sealing. You can store it in the fridge for up to three days. For meal prep, divide the salad into single-serving containers. This makes it easy to grab and go. Keep the croutons and dressing separate until you're ready to eat. This way, the salad stays crisp, and the flavors blend perfectly when you mix it. The salad tastes best cold. If you want to reheat it, warm the chicken separately, then mix it back in. However, I recommend enjoying it cold for the best flavor. The salad keeps well for about three days, but the croutons may lose their crunch after a day. For the freshest taste, eat it sooner rather than later. For more details, check out the Full Recipe. To make Chicken Caesar Pasta Salad less calorie-dense, you can swap some ingredients. Use whole wheat pasta instead of regular. This change adds fiber and nutrients. You can also replace Caesar dressing with a lighter version or make your own with yogurt. This option cuts down on fat. Reducing the amount of cheese and croutons helps too. You get the flavor without the extra calories. Focus on using more veggies, like cucumbers or bell peppers. They add crunch and volume without many calories. Yes, you can use different types of pasta for this salad. Fusilli is great, but penne, rotini, or even whole wheat pasta works well too. Gluten-free pasta is an option if you need it. Each type brings its unique shape and texture. Just make sure to cook it al dente as per package directions. This ensures it holds up well with the dressing and other ingredients. When looking for the best store-bought Caesar dressings, I recommend a few brands. Look for ones with natural ingredients and low sugar. Some great options include Annie's Organic Caesar, Ken's Steakhouse, and Cardini's. These dressings have a good balance of flavor and creaminess. Always check the label. You want a dressing that fits your taste and dietary needs. If possible, try a few to find your favorite! This post detailed how to make Chicken Caesar Pasta Salad. You learned about main ingredients, tips for making the best dressing, and how to customize your meal. We covered storage, time-saving tricks, and tasty variations. In summary, this salad is easy to make. You can enjoy it fresh or save it for later. Use these tips to make your dish unique. Enjoy your cooking journey!](https://fastmealmate.com/wp-content/uploads/2025/06/c8df564d-281f-4520-b900-ec1f4444fefb-768x768.webp)