Best Moist Zucchini Bread Recipe for Irresistible Flavor
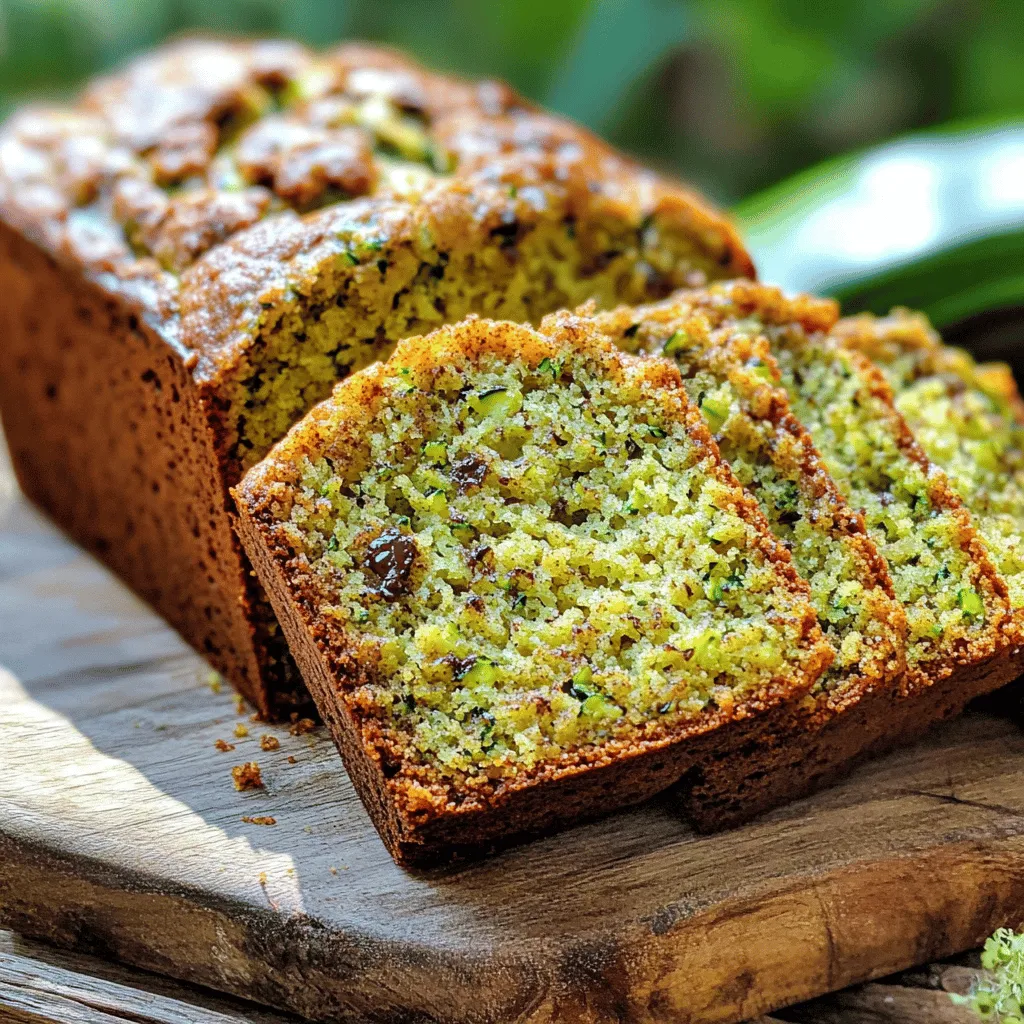
Do you love the taste of fresh-baked bread? If so, this Best Moist Zucchini Bread recipe is for you! I’ll share the secrets to achieving that perfect balance of moistness and irresistible flavor. With simple ingredients and easy steps, making this delicious treat at home is a breeze. Get ready to impress your family and friends with a loaf that’s both comforting and scrumptious! Let’s dive into the details.
Ingredients
Key Ingredients for Best Moist Zucchini Bread
To make the best moist zucchini bread, you need key ingredients. Here’s what you’ll use:
– 2 cups grated zucchini (about 2 medium zucchinis)
– 1 cup granulated sugar
– 1/2 cup brown sugar, tightly packed
– 3 large eggs, preferably at room temperature
– 1/2 cup vegetable oil (or melted coconut oil)
– 1 teaspoon pure vanilla extract
– 2 cups all-purpose flour (you can use half whole wheat flour)
– 1 teaspoon baking soda
– 1/2 teaspoon baking powder
– 1 teaspoon ground cinnamon
– 1/2 teaspoon ground nutmeg
– 1/2 teaspoon fine salt
These ingredients work together to create a soft, moist loaf. The zucchini adds moisture, while the sugars give sweetness.
Optional Mix-ins for Extra Flavor
You can get creative with mix-ins to enhance flavor. Here are some options:
– 1/2 cup chopped walnuts or pecans (for crunch)
– 1/2 cup semi-sweet or dark chocolate chips (for a treat)
Adding these mix-ins makes the bread even more special. The nuts give texture, and chocolate adds richness.
Ingredient Substitutions for Healthier Options
If you want to make your zucchini bread healthier, consider these swaps:
– Use applesauce instead of oil for less fat.
– Replace granulated sugar with honey or maple syrup.
– Add flaxseed meal instead of some flour for more fiber.
These substitutions still keep the bread tasty while providing healthier choices. You can enjoy this delightful bread without guilt!
Step-by-Step Instructions
Preparing the Oven and Loaf Pan
Start by preheating your oven to 350°F (175°C). Grease a 9×5 inch loaf pan with butter or oil. Dust it lightly with flour. You can also line it with parchment paper. This makes it easy to remove the bread later.
Mixing Wet Ingredients for Maximum Moisture
In a big mixing bowl, add the grated zucchini. Use about 2 medium zucchinis. Add 1 cup of granulated sugar and 1/2 cup of brown sugar. Whisk in 3 large eggs, 1/2 cup of vegetable oil, and 1 teaspoon of pure vanilla extract. Mix everything until it is smooth. This mix adds moisture to the bread.
Combining Dry Ingredients without Overmixing
In a separate bowl, sift together 2 cups of all-purpose flour, 1 teaspoon of baking soda, 1/2 teaspoon of baking powder, 1 teaspoon of ground cinnamon, 1/2 teaspoon of ground nutmeg, and 1/2 teaspoon of fine salt. This step helps to remove lumps and ensures even mixing.
Baking the Bread to Perfection
Gradually add the dry mix to the wet ingredients. Stir gently until just combined. It’s okay if the batter has some lumps. Overmixing can make the bread dense. Pour the batter into the prepared loaf pan. Smooth the top with a spatula. Bake the bread for 50-60 minutes. Check with a toothpick; it should come out clean or with a few moist crumbs.
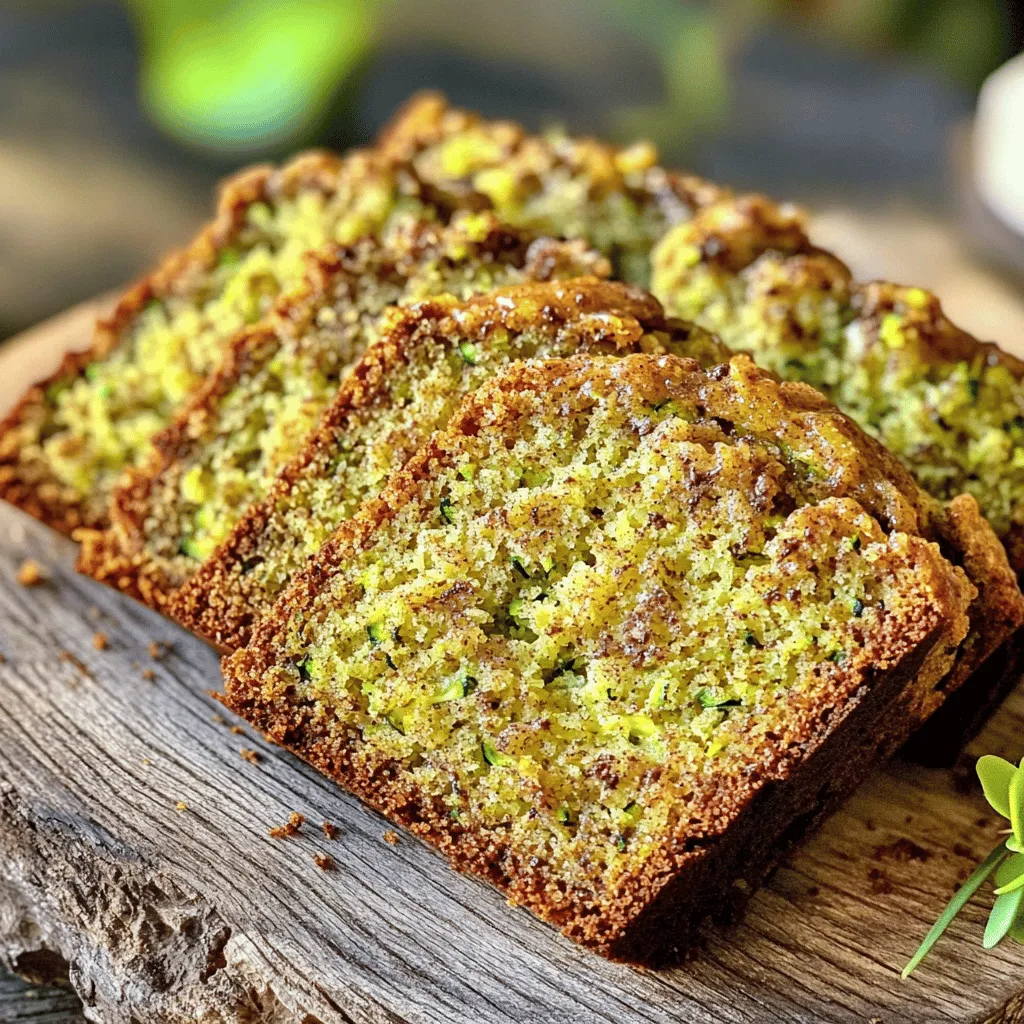
Cooling and Slicing Techniques
Let the bread cool in the pan for about 10 minutes after baking. Carefully transfer the loaf to a wire rack. Allow it to cool completely before slicing. This helps keep the bread moist and fluffy. Enjoy each slice with cream cheese or butter for an extra treat.
Tips & Tricks
Selecting the Best Zucchini
To make great zucchini bread, start with fresh zucchinis. Choose medium-sized ones, as they have the best flavor. Look for smooth skin and a firm feel. Avoid any zucchinis with soft spots or blemishes. You can also use yellow squash for a fun twist. Always wash them well before grating.
Techniques to Retain Moistness in Zucchini Bread
Moistness is key to a delicious zucchini bread. Here are some tips to keep it rich:
– Grate Zucchini Finely: This helps it blend into the batter and release moisture.
– Don’t Squeeze Too Hard: While you should remove some excess water, keep some moisture for the bread.
– Use Room Temperature Eggs: This helps mix better and adds to the moisture.
– Add Oil: Using vegetable oil or melted coconut oil adds richness.
– Don’t Overmix: Stir gently until just combined to avoid a dense loaf.
Common Baking Mistakes to Avoid
Even the best bakers can make mistakes. Here are some common ones to watch out for:
– Not Preheating the Oven: Always preheat your oven before baking to ensure even cooking.
– Overbaking: Check your bread early to avoid a dry loaf. A toothpick should come out with some moist crumbs.
– Skipping the Cooling Step: Letting your bread cool in the pan for a bit helps it set and makes slicing easier.
– Using Too Much Flour: Weigh ingredients or spoon flour into measuring cups to avoid packing it down. Too much flour makes the bread dry.
These tips will help you create a moist, flavorful zucchini bread every time.Enjoy baking your delicious loaf!
Variations
Chocolate Zucchini Bread Recipe
You can make a tasty chocolate version of zucchini bread. This adds a rich flavor. Start with the base recipe. Then, fold in 1 cup of semi-sweet chocolate chips. You can also add 1/4 cup of cocoa powder to the dry mix. This makes the bread extra moist and sweet. The chocolate pairs well with the zucchini. Your kids will love it, and so will you!
Gluten-Free Zucchini Bread Options
If you need a gluten-free option, use gluten-free flour. Look for a blend that works well in baking. You can also use almond flour or coconut flour. Adjust the ratios a bit, as these flours absorb moisture differently. You might need to add an extra egg or some applesauce to keep it moist. This way, everyone can enjoy your delicious zucchini bread.
Adding Spices for Unique Flavor Profiles
Adding spices can make your zucchini bread stand out. Try mixing in 1 teaspoon of pumpkin spice for a warm flavor. You can use cardamom or ginger for a bit of zing. A dash of nutmeg adds depth too. Each spice gives a new twist to the classic recipe. Experiment and find your favorite mix. Your friends and family will be impressed by your creativity!
Storage Info
Best Practices for Storing Zucchini Bread
To keep your zucchini bread fresh, store it in an airtight container. Place the loaf at room temperature for up to three days. If you want to keep it longer, the fridge works too. Just wrap it in plastic wrap before putting it in the fridge. This helps trap moisture and flavor, ensuring each slice stays soft.
How to Freeze Zucchini Bread for Longer Shelf Life
Freezing zucchini bread is a great way to save it for later. Start by letting the bread cool completely. Then, slice it into individual pieces for easy thawing. Wrap each slice tightly in plastic wrap. Place the wrapped slices in a freezer bag or airtight container. It can stay in the freezer for up to three months. When you want to enjoy it, just thaw a slice in the fridge or at room temperature.
Reheating Tips for Freshness
To reheat your zucchini bread, preheat your oven to 350°F (175°C). Place the whole loaf or individual slices on a baking sheet. Heat for about 10-15 minutes for a whole loaf or 5-7 minutes for slices. This warms the bread and adds a nice touch of crispness to the crust. You can also use a microwave if you’re in a rush. Just heat each slice for about 10-15 seconds. Enjoy your warm, moist zucchini bread just like fresh from the oven!
FAQs
How Can I Make Zucchini Bread Moist?
To make zucchini bread moist, use fresh zucchini with high water content. Grate it finely to release moisture. Adding enough oil and sugar helps too. Don’t overmix the batter; gently stir until combined. Bake it until just done for the best texture.
Can I Use Frozen Zucchini for This Recipe?
Yes, you can use frozen zucchini. Thaw it first and drain excess water. Frozen zucchini works well, but fresh is best for taste. It may change the texture slightly, but it still makes delicious bread.
What is the Best Way to Grate Zucchini?
Use a box grater or food processor to grate zucchini. A box grater gives you control for a fine or coarse grate. A food processor saves time for larger batches. Make sure to squeeze out excess water to keep the bread from being too wet.
How Long Does Zucchini Bread Last?
Zucchini bread lasts about 3 to 4 days at room temperature. Store it in an airtight container to keep it fresh. You can also refrigerate it for up to a week. For longer storage, freeze it for up to three months.
Can I Use Whole Wheat Flour Instead of All-Purpose Flour?
Yes, you can use whole wheat flour instead of all-purpose flour. It adds fiber and a nutty flavor. For a lighter texture, try half whole wheat and half all-purpose flour. Adjust the liquid slightly if needed, as whole wheat absorbs more moisture.The grated zucchini keeps it moist and tender. You can enjoy it for breakfast or as a snack. It’s easy to make and uses simple ingredients. Adding nuts or chocolate chips makes it even better. This recipe is a winner in my kitchen and will be in yours too.
Complete Ingredient List
– 2 cups grated zucchini (about 2 medium zucchinis)
– 1 cup granulated sugar
– 1/2 cup brown sugar, tightly packed
– 3 large eggs, at room temperature
– 1/2 cup vegetable oil (or melted coconut oil)
– 1 teaspoon pure vanilla extract
– 2 cups all-purpose flour (or half whole wheat flour)
– 1 teaspoon baking soda
– 1/2 teaspoon baking powder
– 1 teaspoon ground cinnamon
– 1/2 teaspoon ground nutmeg
– 1/2 teaspoon fine salt
– 1/2 cup chopped walnuts or pecans (optional)
– 1/2 cup semi-sweet or dark chocolate chips (optional)
Final Cooking Instructions
1. Preheat the oven to 350°F (175°C). Grease a 9×5 inch loaf pan or line it with parchment paper.
2. In a large bowl, mix the grated zucchini, granulated sugar, and brown sugar. Add the eggs, vegetable oil, and vanilla. Whisk until smooth.
3. In another bowl, sift the all-purpose flour, baking soda, baking powder, cinnamon, nutmeg, and salt. Make sure there are no lumps.
4. Gradually mix the dry ingredients into the wet ingredients. Stir gently until just combined. It’s okay if the batter is a bit lumpy; overmixing makes the bread dense.
5. Fold in the walnuts and chocolate chips, if using.
6. Pour the batter into the prepared loaf pan. Smooth the top with a spatula.
7. Bake for 50-60 minutes. Check doneness with a toothpick; it should come out clean or with a few crumbs. The top should be golden brown.
8. Let the bread cool in the pan for 10 minutes. Then transfer it to a wire rack to cool completely before slicing.
In this post, we covered how to make the best moist zucchini bread. You learned about key ingredients and tasty mix-ins. I shared tips for mixing and baking to keep it soft. We also looked at storage options and variations.
Zucchini bread can be a fun treat with many flavors. With these steps, you can bake a delicious loaf every time. Enjoy your baking journey and share it with friends!

![For a delicious S'mores Brownie Skillet Dip, gather the following ingredients: - 1 cup all-purpose flour - 1 cup granulated sugar - 1/2 cup unsweetened cocoa powder - 1/2 teaspoon baking powder - 1/4 teaspoon salt - 1/2 cup unsalted butter, melted - 2 large eggs - 1 teaspoon vanilla extract - 1 cup semi-sweet or dark chocolate chips - 1 cup mini marshmallows - 1/2 cup graham cracker crumbs - Extra graham crackers for serving These ingredients blend together to create a rich, chocolatey dip. The all-purpose flour and cocoa give it a brownie base. The sugar adds sweetness, while the baking powder helps it rise slightly. The melted butter keeps it rich and moist. The eggs and vanilla extract add flavor and structure. Chocolate chips provide bursts of chocolatey goodness. Mini marshmallows, when baked, become soft and gooey, adding that classic S'mores taste. Finally, the graham cracker crumbs create a crunchy topping, perfect for dipping. Use this list to prepare your dip. Following these steps ensures you get the best flavor and texture. For full details, check out the Full Recipe. - Preheat oven to 350°F (175°C). This helps the dip cook evenly. - In a large bowl, mix the dry ingredients: flour, sugar, cocoa powder, baking powder, and salt. Stir well to combine. - In another bowl, combine the wet ingredients: melted butter, eggs, and vanilla extract. Mix gently until they blend together. - Pour the wet mix into the dry mix. Stir until just combined. Do not overmix; a few lumps are okay. - Now, fold in the chocolate chips. This adds rich flavor and texture to the dip. - Grease a 10-inch cast-iron skillet or oven-safe dish. Pour the brownie batter into the skillet. Spread it evenly. - Top the batter with mini marshmallows and graham cracker crumbs. This gives the dip that classic s'mores taste. - Place the skillet in the preheated oven. Bake for 20-25 minutes. The edges should be set, and the center should be soft. The marshmallows will puff up and turn golden. - Once baked, take the skillet out of the oven. Let it cool for a few minutes. This makes it safe to eat. Enjoy this warm dip with extra graham crackers for a fun treat! To avoid overmixing the batter, mix just until the wet and dry ingredients blend. You want some lumps for that fudgy texture. Too much mixing makes the brownies tough. For the perfect marshmallow topping, add them during the last few minutes of baking. This lets them brown nicely without burning. Keep an eye on them. You want golden, not charred! The best snacks for dipping are graham crackers, of course! You can also use fruit like strawberries or bananas. They add a nice, fresh taste to the rich dip. For a great presentation, drizzle melted chocolate on top before serving. Add some colorful fruit on the side. It makes the dish look fun and inviting. {{image_4}} You can make this dessert fit your needs with some easy swaps. If you want a gluten-free option, use gluten-free flour. It works well and keeps the taste great. You can also switch the chocolate. Dark chocolate gives a rich taste, while milk chocolate is sweeter. Choose what you like best! Add more fun to your dip with flavor extras. Chopped nuts add crunch and taste. Walnuts or pecans work best. If you love sweetness, drizzle some caramel over the top. It makes the dip even more special. You can also try different extracts. Almond extract gives a nice twist. Coconut extract can add a tropical touch. Just use a little bit to taste and enjoy! To keep your S'mores Brownie Skillet Dip fresh, store it in the fridge. First, let it cool completely. Then, cover the skillet tightly with plastic wrap or transfer it to an airtight container. When stored this way, it can last for about 3 days. If you have more than you can eat, freezing is an option. Scoop the dip into a freezer-safe container. Leave a little space at the top, as it may expand. It can last up to 2 months in the freezer. Just remember to label the container with the date for easy tracking. When it's time to enjoy your leftovers, reheating is simple. You can warm it up in the oven. Preheat the oven to 350°F (175°C). Place the skillet in the oven for about 10-15 minutes. This helps keep the dip gooey and warm. You can also reheat in the microwave if you're short on time. Use a microwave-safe bowl and heat in short bursts. Stir between each burst to ensure even warming. This way, the marshmallows remain soft and fluffy, just like when it was first made. Can I make this dish ahead of time? Yes, you can prepare the batter ahead. Just store it in the fridge. Bake it right before serving for best results. What can I use if I don’t have a cast-iron skillet? You can use any oven-safe dish. A glass or ceramic baking dish works well too. Just make sure to grease it well. How can I make it less sweet? To cut back on sweetness, use less sugar or dark chocolate. You can also add a pinch of salt to balance the flavors. What is the best way to serve this dip? Serve it warm with extra graham crackers. You can also add fresh fruit like strawberries or bananas for dipping. - Check out the [Full Recipe] for detailed instructions. This blog post covers a fun and tasty s'mores brownie skillet dip. You learned how to mix the right ingredients and bake this treat perfectly. I shared tips to make it even better and suggestions for serving. With storage info, you can save leftovers too. Enjoy making this sweet dip for your next gathering! It’s easy, fun, and sure to impress. Remember that you can personalize it with your favorite flavors. Happy baking!](https://fastmealmate.com/wp-content/uploads/2025/07/00705dfa-6977-4536-b8b9-b3715ee69892-768x768.webp)

![- 2 ripe peaches, cut into wedges - 1 cup cherry tomatoes, rinsed and dried - 1 cup fresh basil leaves, gently washed and dried - 8 oz fresh mozzarella balls (bocconcini), drained - 3 tablespoons balsamic glaze - 2 tablespoons extra-virgin olive oil - Salt and freshly ground black pepper, to taste - 12-15 (6-inch) wooden skewers Peach Caprese skewers blend sweet and savory flavors. The ripe peaches add natural sweetness. Use firm yet soft peaches for the best taste. Cherry tomatoes bring a burst of juiciness. Fresh basil adds aromatic freshness that complements the fruit. For the creamy element, fresh mozzarella balls are ideal. They provide a soft texture and mild flavor. Drizzle balsamic glaze for sweetness and tang. Extra-virgin olive oil enhances all the flavors. You’ll need salt and black pepper to season. They add depth to your dish. Finally, grab some wooden skewers to assemble your tasty bites. For the complete list of ingredients and measurements, refer to the Full Recipe. 1. Cutting peaches into wedges: Start with two ripe peaches. Cut them into even wedges. Make sure they are sweet and juicy for the best flavor. 2. Rinsing cherry tomatoes and drying: Take one cup of cherry tomatoes. Rinse them well under cool water. After rinsing, use a clean towel to dry them gently. This helps keep the skewers from getting soggy. 3. Draining mozzarella balls: Use eight ounces of fresh mozzarella balls. Drain them to remove excess liquid. This keeps the skewers light and fresh. 1. Step-by-step threading process: Grab a six-inch wooden skewer. Start by threading a fresh basil leaf onto the skewer. Then, add a peach wedge. Next, slide on a cherry tomato, followed by a mozzarella ball. 2. Layering pattern for vibrant colors: Repeat the pattern: basil, peach, tomato, mozzarella. This layering creates a colorful and appealing look. Aim for a mix of colors on each skewer. 3. Tips for an appealing presentation: Leave some space at the end of each skewer. This makes them easy to handle. Arrange the finished skewers on a platter or in a jar for a fun touch. 1. Drizzling olive oil: Once your skewers are ready, drizzle them lightly with extra-virgin olive oil. This adds richness and enhances the flavors of the fresh ingredients. 2. Adding seasoning: Sprinkle a little salt and freshly cracked black pepper over the skewers. This adds a nice kick and brings out the taste of each ingredient. 3. Applying balsamic glaze: Finally, drizzle balsamic glaze over the skewers. This sweet and tangy glaze adds a wonderful finish to the dish. For the full recipe, check out the instructions I shared earlier. When making Peach Caprese Skewers, the first step is choosing ripe peaches. Look for peaches that feel slightly soft when you press them. Their color should be vibrant and rich. Ripe peaches add natural sweetness, making your skewers delicious. Next, consider the mozzarella and basil. You want fresh mozzarella balls, called bocconcini. They should be firm and moist. Fresh basil leaves should be bright green and fragrant. If they look wilted, they won't taste good. Using fresh ingredients elevates your dish. For easy skewering, start with a wooden skewer. Grab a fresh basil leaf and thread it onto the skewer first. This helps anchor the other ingredients. Next, add a peach wedge, then a cherry tomato, and finish with a mozzarella ball. Repeat this pattern to create a colorful skewer. To make your skewers visually appealing, mix up the colors. Alternate between peach, tomato, and mozzarella. This creates a beautiful display. You can also arrange the skewers in a jar for a fun presentation. When serving, think about your platter. A large, decorative platter can be eye-catching. You can also arrange the skewers in a tall vase. This adds a unique touch to your table. Pair your Peach Caprese Skewers with drinks like lemonade or sparkling water. They also go well with other appetizers, like bruschetta. This way, you create a delightful spread for your guests. For the full recipe, check out the detailed instructions to help you on your cooking adventure! {{image_4}} You can switch out the peaches for other fruits. Strawberries add sweetness, while figs bring a rich taste. Both work well with the cheese. For cheese, try feta or goat cheese instead of mozzarella. Feta adds a salty kick, while goat cheese offers creaminess. To boost flavors, add spices or herbs. A sprinkle of black pepper can elevate taste. Fresh mint or thyme can also add a nice twist. Experiment with different glazes too. A honey glaze can add sweetness, while a spicy chili glaze can bring heat. You can easily make these skewers vegan. Use tofu or avocado in place of cheese. For low-carb or keto options, skip the fruit and focus on cheese and herbs. Cherry tomatoes still fit well in this version. This allows everyone to enjoy the dish, no matter their diet. To keep your Peach Caprese Skewers fresh, store them in the fridge. Use an airtight container to avoid drying out. Place a damp paper towel inside the container. This helps keep the ingredients moist. Try to eat leftovers within two days for the best taste. Reheat your skewers in a pan on low heat. This warms them gently without losing flavor. Avoid using a microwave, as it can make the cheese rubbery. Heat just until the cheese is warm, about 2-3 minutes. Freezing these skewers is tricky. I do not recommend it because the peaches and mozzarella lose texture. If you must freeze, assemble them without the balsamic glaze. Wrap the skewers tightly in plastic wrap. Store them in a freezer-safe bag. Use within a month for best results. Yes, you can prepare these skewers a few hours in advance. Keep them in the fridge until serving. This helps the flavors blend. - Storage timelines: Store them for up to 4 hours. After that, the peaches may get mushy. - Ingredients that keep well: Mozzarella and cherry tomatoes hold up nicely. Fresh basil gets a bit wilty but will still taste great. For this dish, use yellow or white peaches. Both are sweet and juicy. Yellow peaches have a nice tang, while white peaches are sweeter. - Recommended varieties for sweetness and texture: Look for Freestone peaches. They come off the pit easily and have great flavor. Absolutely! You can mix and match ingredients to fit your taste. Try using different fruits or cheeses. - Suggestions for personalizing flavors and textures: Substitute peaches with strawberries or figs. You can also use feta or goat cheese instead of mozzarella. These skewers are perfect for gatherings. You can set them up on a big platter for guests to grab. - Ideas for large gatherings and events: Arrange them in a tall vase for fun. Add a small bowl of balsamic glaze for dipping. This will impress your guests! For the complete recipe, check out the [Full Recipe]. Peach Caprese skewers bring together fresh produce, creamy mozzarella, and bold flavors. Using ripe peaches, cherry tomatoes, and basil makes them a vibrant choice. Adding olive oil, balsamic glaze, and a touch of seasoning elevates every bite. You can easily swap ingredients for different tastes or dietary needs. Remember, these skewers are fun and simple to make. They are perfect for summer gatherings or a light snack. Enjoy crafting your own skewers, and let your creativity shine!](https://fastmealmate.com/wp-content/uploads/2025/07/b9012ea0-d5e7-459d-b2ed-b5a660c32588-768x768.webp)