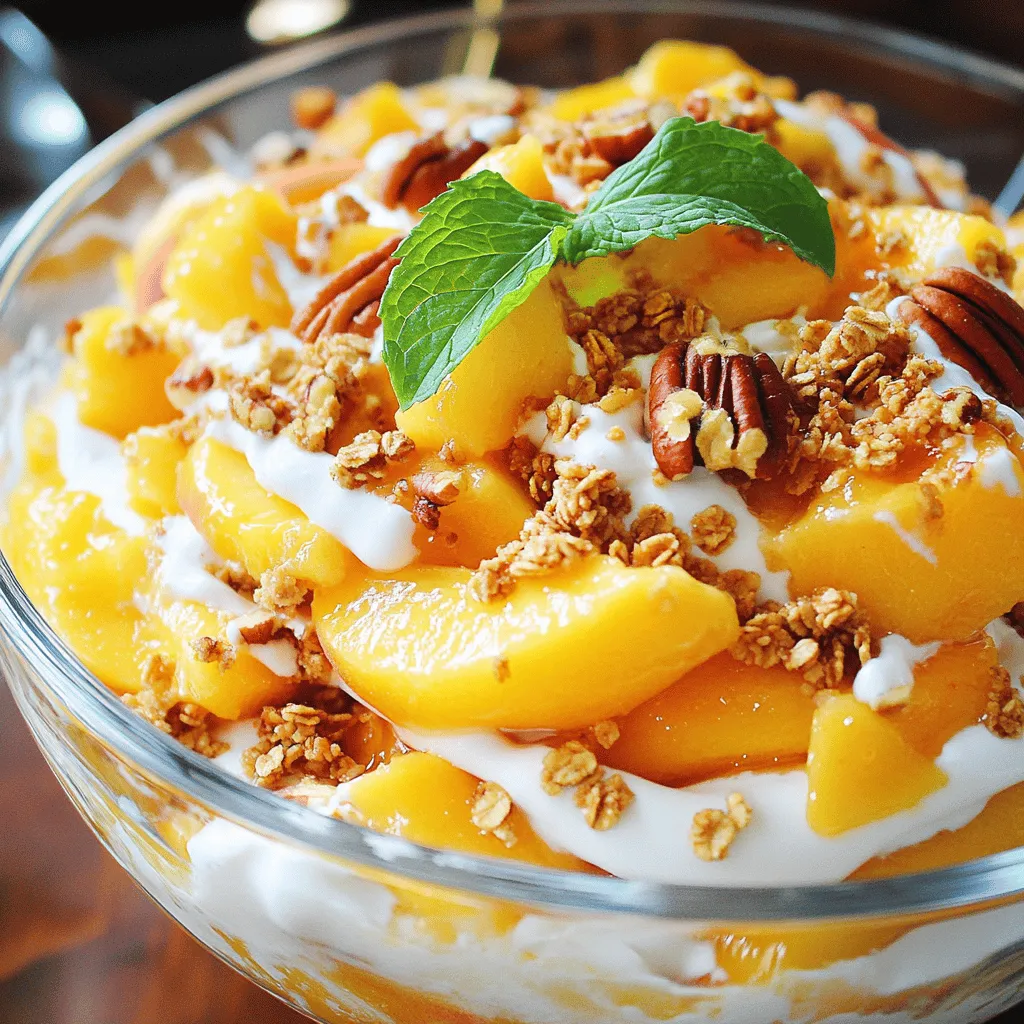
Peach Cobbler Cheesecake Salad Delightful Treat Idea

Craving a sweet twist on a classic dessert? Dive into my Peach Cobbler Cheesecake Salad! This recipe blends fresh peaches, creamy cheese, and crunchy granola for a delightful treat. Perfect for summer gatherings or a cozy night in, it’s easy to make and fun to enjoy. Ready to impress your friends and family? Let’s dive into the ingredients and steps to create this mouthwatering dish!
Ingredients
Fresh Peaches
You need 2 cups of fresh peaches. Dice them into bite-sized pieces. Use ripe peaches for the best flavor. Fresh peaches bring a sweet and juicy taste that pairs well with the creaminess of the dish.
Cream Cheese & Yogurt
For this recipe, grab 1 cup of softened cream cheese. It should be at room temperature to mix easily. Also, use ½ cup of Greek yogurt. You can pick plain or vanilla yogurt based on your taste. These ingredients give the salad its creamy texture.
Sweeteners and Spices
You will need ½ cup of sifted powdered sugar. This sweetens the mixture and helps it stay smooth. Use 1 teaspoon of vanilla extract to enhance the flavor. Also, add 1 teaspoon of ground cinnamon for warmth and a hint of spice.
Granola and Pecans
Grab 1 cup of granola for crunch. Butter pecan or cinnamon varieties work best. They add flavor and texture to the dish. You can also use ½ cup of chopped pecans if you want extra crunch. Finally, fresh mint leaves make a nice garnish on top.
Step-by-Step Instructions
Preparing the Cream Cheese Mixture
Start by taking a medium bowl. Add 1 cup of softened cream cheese. Then, mix it with ½ cup of Greek yogurt. Use a hand mixer or a whisk. Beat them together until smooth. Next, add ½ cup of sifted powdered sugar. Mix again until everything blends well. Pour in 1 teaspoon of vanilla extract and 1 teaspoon of ground cinnamon. Stir until the mixture is creamy and fully combined.
Folding in the Peaches
Now, take 2 cups of diced fresh peaches. Carefully fold them into the cream cheese mixture. Use a spatula for this. Be gentle to keep the peach pieces intact. You want nice, chunky bits for texture. This step adds a fruity burst to every bite.
Layering the Salad
Next, grab your serving bowls or a large trifle dish. Start layering the salad. Begin with a generous layer of the peach cheesecake mixture at the bottom. After that, add a layer of granola, about 1 cup. Ensure it spreads evenly. Repeat these layers, alternating between peach cheesecake and granola. Finish with a top layer of granola for a lovely crunch.
Chilling and Serving
Once your layers are complete, cover the dish with plastic wrap. Place it in the refrigerator. Chill for at least 30 minutes. This helps all the flavors blend nicely. Just before serving, garnish with fresh mint leaves. This adds a pop of color and a refreshing touch. Enjoy your Peach Cobbler Cheesecake Salad!
Tips & Tricks
How to Choose the Best Peaches
When picking peaches, look for ones that are ripe. They should feel slightly soft when you press them. The skin should be smooth and have a vibrant color. Avoid any peaches with bruises or dark spots. These can spoil the salad’s flavor. Fresh peaches give your salad a sweet and juicy taste.
Ensuring Cream Cheese Smoothness
To get a smooth cream cheese mixture, start with softened cream cheese. You can leave it out for about an hour before you mix it. Use a hand mixer or a whisk to blend it with yogurt. Mix until it is creamy and free of lumps. Adding sifted powdered sugar helps create that dreamy texture.
Presentation Ideas
For a stunning look, use clear glass bowls. This lets everyone see the beautiful layers. You can also serve in individual cups for a neat touch. Finish with a sprinkle of granola on top. Add fresh mint leaves for color and a fresh taste. This will make your salad stand out at any gathering.
Variations
Using Different Fruit Combinations
You can change up the fruit in this salad. Try using ripe strawberries, sweet blueberries, or tangy pineapple. Each fruit will add a unique taste. For a tropical twist, mix in mango or banana slices. These fruits will bring fresh flavors and fun colors to your dish. You can even make a mixed fruit version for more variety.
Alternative Crunch Toppings
If you want a different crunch, swap the granola. Use crushed cookies, like gingersnaps or vanilla wafers. You can also try toasted oats or even coconut flakes. Each of these options will change the texture and taste. For a nutty crunch, you can add walnuts or almonds. Experiment with these toppings to find your perfect mix.
Flavor Enhancements with Extracts
Add extra flavor with different extracts. Besides vanilla, you can use almond or coconut extract. Each will give your salad a new twist. A bit of lemon or orange zest can brighten the flavors too. These enhancements will make your salad even more delicious. Don’t be afraid to play with these flavors to match your taste.
Storage Info
How to Store Leftovers
To store your Peach Cobbler Cheesecake Salad, place it in an airtight container. Be sure to cover it well to keep it fresh. You can also use plastic wrap to seal the dish. This method helps keep the flavors intact and prevents drying out.
Duration for Freshness
If stored properly in the fridge, your salad will stay fresh for about 3 days. I recommend enjoying it within this time for the best flavor and texture. After this period, the peaches may start to get mushy, and the granola can lose its crunch.
Freezing Options
While I don’t recommend freezing this salad, you can freeze the peach cheesecake mixture separately. To do this, place it in a freezer-safe container. It can last up to 2 months in the freezer. When you’re ready to eat, thaw it in the fridge overnight. Then, mix in fresh granola before serving to regain that delightful crunch.
FAQs
Can I use canned peaches instead of fresh?
Yes, you can use canned peaches. Just make sure to drain them well. Canned peaches can save time and still taste great. However, fresh peaches offer a better texture and flavor.
How long does the Peach Cobbler Cheesecake Salad last?
The salad lasts about 2 to 3 days in the fridge. Store it in an airtight container for best results. The flavors will blend, but the granola may soften over time.
Can I make this recipe ahead of time?
Yes, you can prepare it a day in advance. Just layer the salad as usual and chill it in the fridge. This allows the flavors to mix and enhances the taste.
What can I substitute for Greek yogurt?
You can use sour cream or regular yogurt as a substitute. Both will add creaminess. If you want a dairy-free option, try coconut yogurt for a unique twist.
Is this dessert salad gluten-free?
Yes, this recipe is gluten-free. Just ensure your granola is labeled gluten-free. Most ingredients are naturally gluten-free, making it a safe choice for those with gluten sensitivities.
In this blog post, I shared how to make a tasty Peach Cobbler Cheesecake Salad. We covered key ingredients like fresh peaches, cream cheese, and granola. I gave step-by-step instructions for making this dessert salad. Tips on choosing the best peaches and ideas for presentation were included. Don’t forget the variations to switch up flavors. Storing leftovers properly is also essential. This recipe is simple and fun. Enjoy making it fresh or ahead of time for your next gathering!

![- 2 slices of rustic sourdough bread - 1 cup cooked chicken, shredded - 1 cup marinara sauce - 1 cup shredded mozzarella cheese - ¼ cup freshly grated Parmesan cheese - 1 tablespoon extra virgin olive oil - 1 teaspoon garlic powder - 1 teaspoon dried Italian seasoning - Salt and pepper, to taste Gathering the right ingredients is key to making a great Lazy Chicken Parmesan Grilled Cheese. Start with rustic sourdough bread. This bread gives your sandwich a hearty base. Next, grab cooked chicken. Shredded rotisserie chicken is a fantastic choice. It adds flavor and saves time. For the sauce, you can use homemade or store-bought marinara. Either way, it brings rich taste. Now, mozzarella cheese is a must for that gooey, stretchy texture. The Parmesan cheese adds a nice sharp bite too. You will also need some simple seasonings. Extra virgin olive oil helps achieve that golden crust. Garlic powder brings out depth in flavor. Italian seasoning adds a nice herbal note. Finally, don’t forget salt and pepper to taste. With these ingredients, you'll create a delightful twist on a classic dish. For the full recipe, check out the [Full Recipe]. First, preheat your skillet over medium heat. This gets the skillet hot and ready. Next, add a tablespoon of olive oil. This will coat the bottom of the skillet. The oil helps keep the bread from sticking and adds flavor. In a mixing bowl, combine your shredded chicken and marinara sauce. You can use any chicken you like, but rotisserie chicken is fast and tasty. Then, add garlic powder, Italian seasoning, and a pinch of salt and pepper. Mix everything well. You want all the chicken to be coated in sauce and spices. Take one slice of the sourdough bread and place it in the hot skillet. Layer half of the shredded mozzarella cheese on top. Spoon the chicken mixture onto the cheese, spreading it evenly. Add the rest of the mozzarella cheese on top of the chicken. Finish with a sprinkle of grated Parmesan cheese. Place the second slice of sourdough on top to make a sandwich. Grill it for about 3-4 minutes. You want the bottom to be golden brown and the cheese to begin melting. Carefully flip the sandwich using a spatula. Grill the other side for another 3-4 minutes. You want both sides crispy and the cheese fully melted. Once done, take it out and slice it in half. Let it cool for a minute before serving. This helps the cheese set a bit. Enjoy your Lazy Chicken Parmesan Grilled Cheese! For more details, check out the Full Recipe. Using rotisserie chicken makes this recipe quick and easy. You can find it at most grocery stores. It saves time, as it is already cooked and seasoned. To shred chicken quickly, use two forks to pull it apart. This method works well and takes just minutes. You can also use your hands if the chicken is cool enough. For the best grilled cheese, choose rustic sourdough bread. It has a great texture and flavor. You can also try a hearty Italian bread or whole grain. To achieve a crispy crust, heat your skillet over medium heat. Make sure to coat the pan with olive oil evenly. This will help the bread brown nicely and not stick. To ensure the cheese melts perfectly, use a mix of mozzarella and Parmesan. The mozzarella adds stretch, while Parmesan adds a sharp flavor. Place a lid on the skillet to trap heat and help the cheese melt faster. This prevents the sandwich from getting soggy. Grill the sandwich until the bread is golden brown and the cheese is gooey. {{image_4}} You can easily boost the health of your Lazy Chicken Parmesan Grilled Cheese by adding veggies. Spinach is a great choice. It adds color and nutrients. Just toss in a handful of fresh spinach when you layer the chicken. Bell peppers work well too. Slice them thin, and add them with the chicken. They give a nice crunch and a pop of flavor. Other ingredients can add texture and taste. Try sun-dried tomatoes for a tangy bite. You can also add mushrooms for an earthy note. Each veggie brings its own special twist. Experiment with what you like best! If you love heat, spice up your sandwich! One easy way is to use spicy marinara sauce. It adds warmth and flavor. You can also add jalapeños for an extra kick. Slice them thin and layer them on top of the chicken. Using pepper jack cheese is another fun option. This cheese melts beautifully and has a nice heat. Mix it with mozzarella to keep things gooey and flavorful. Your taste buds will thank you! For those who need a gluten-free choice, there are great alternatives. Instead of sourdough, try gluten-free bread. Look for brands that are soft and hearty. They will hold up well when grilling. You can adjust the recipe easily. Ensure your marinara sauce is gluten-free too. Many brands offer this option. Always check the labels when shopping. This way, everyone can enjoy this delicious meal! For the full recipe, be sure to check the complete guide. To keep your Lazy Chicken Parmesan Grilled Cheese fresh, wrap it tightly in foil or plastic wrap. Place it in an airtight container. This method helps keep the flavors and moisture inside. You can store it in the fridge for up to three days. If you want to keep it longer, consider freezing it. It can last in the freezer for about one month. Just remember to let it cool completely before storing. Reheating your grilled cheese needs care. I recommend using a skillet or toaster oven for the best results. Heat the skillet over low to medium heat. Add a small amount of butter or oil to keep it crispy. Place the sandwich in the skillet and cover it with a lid. This helps the cheese melt without burning the bread. Heat for about 3-4 minutes on each side. If using a toaster oven, set it to 350°F (175°C). Bake for around 10-15 minutes until warm and crispy. Enjoy that delicious, gooey goodness just like the first time! Yes, you can prepare this dish in advance. Here are some tips for prepping. - Cook the chicken: Shred and mix it with marinara sauce. Store it in the fridge. - Slice the bread: Cut the sourdough and keep it in a sealed bag. - Grate cheese: Pre-grate the mozzarella and Parmesan. Store these in airtight containers. - Assemble before cooking: You can layer the sandwich without grilling. Wrap it tightly in plastic wrap. Making these steps ahead helps save time. Just grill when you are ready to eat! Yes, you can freeze Lazy Chicken Parmesan Grilled Cheese. Here are the best practices. - Assemble without grilling: Build the sandwich fully, but do not cook it. - Wrap tightly: Use plastic wrap or aluminum foil to cover each sandwich. - Store in a freezer bag: Label with the date, then place in the freezer. When you want to eat it, thaw in the fridge overnight. Reheat in a skillet to keep it crispy. Pairing sides can enhance your meal. Here are some tasty suggestions. - Salad: A fresh mixed greens salad adds crunch. - Soup: Tomato or basil soup complements the sandwich well. - Fries: Crispy fries or sweet potato fries are a fun choice. - Veggies: Roasted or steamed veggies give a healthy balance. These sides will make your meal even more delightful. Enjoy your Lazy Chicken Parmesan Grilled Cheese! You learned how to make Lazy Chicken Parmesan Grilled Cheese. This dish is tasty and easy. We covered main ingredients, cooking steps, and useful tips. I shared fun variations to fit your taste. Now, you can store leftovers and reheat them without losing flavor. Enjoy your cooking and make this sandwich again. It’s a great meal for busy days or fun gatherings. Happy grilling!](https://fastmealmate.com/wp-content/uploads/2025/06/c9cbfd60-7ee3-4aef-9602-f6c93f96b3d1-768x768.webp)


![- Salmon fillets - Sweet chili sauce - Jasmine rice - Mixed vegetables - Soy sauce - Sesame oil - Avocado - Green onions - Sesame seeds - Fresh cilantro (optional) - Baking sheet - Mixing bowl - Medium pot - Non-stick skillet In this Sweet Chili Salmon Bowl, you need fresh salmon fillets as the star. The sweet chili sauce adds a rich flavor that pairs well with the fish. Jasmine rice provides a soft base. Mixed vegetables add color and crunch to the bowl. For added flavor, include soy sauce and sesame oil. Sliced avocado gives a creamy touch. Green onions and sesame seeds serve as tasty garnishes. If you want, sprinkle fresh cilantro for a pop of freshness. To prepare this dish, you will need a few kitchen tools. Use a baking sheet to cook the salmon. A mixing bowl helps combine the marinade. Cook the rice in a medium pot. Lastly, a non-stick skillet is perfect for sautéing the vegetables. You can find the [Full Recipe] to follow these steps easily! With these ingredients and tools, you are set for a delicious meal. - Combine sweet chili sauce, soy sauce, and sesame oil in a bowl. - Place salmon fillets in the bowl and marinate for 15 minutes. Marinating the salmon gives it a rich flavor. The sweet chili sauce adds a nice sweetness. The soy sauce brings some saltiness, while sesame oil adds a nutty taste. This step is key for a tasty salmon bowl. - Bring vegetable broth or water to a boil in a pot. - Add jasmine rice and let it simmer until fluffy. Using vegetable broth adds extra flavor to the rice. Jasmine rice is fragrant and pairs well with the salmon. Once cooked, it should be light and fluffy. - Sauté mixed vegetables in a non-stick skillet. - Cook until they are tender yet crisp. I like to use bell peppers, snap peas, and carrots. These veggies add color and crunch. Sautéing keeps them bright and fresh, which balances the dish. - Preheat the oven to 400°F (200°C). - Bake marinated salmon for 12-15 minutes. Baking the salmon helps it stay moist. It should flake easily with a fork when done. This cooking method keeps the flavors intact. - Fluff the cooked rice and distribute it into bowls. - Top with vegetables, salmon, and avocado slices. Assembling the bowl is fun and creative. You can layer the ingredients however you prefer. The avocado adds creaminess, making every bite delicious. - Sprinkle green onions and sesame seeds on top. - Drizzle remaining marinade if desired. Adding garnishes makes the dish look pretty. Green onions bring a mild onion flavor, while sesame seeds add crunch. The extra marinade enhances the taste, so don’t skip this step! For the complete recipe, check out the Full Recipe. To get the best salmon, focus on the cooking temperature. Aim for 400°F (200°C) when baking. This heat cooks the fish evenly. It keeps the salmon moist and tender. Use a thermometer to check the internal temperature. It should reach 145°F (63°C) for safe eating. Next, look for flakiness to know when it is done. Gently press the salmon with a fork. If it flakes easily, it is ready. Don't overcook it, as this can make the salmon dry. To boost the taste, try different sauces. You can use teriyaki or garlic sauce instead of sweet chili. Each sauce adds a new twist to the dish. Also, add spices to the vegetables before sautéing. A pinch of garlic powder or ginger can elevate the flavor. This simple step makes your veggies pop. Pair your bowl with side salads or crispy wontons for crunch. This adds a nice texture balance. You can also serve it with extra avocado for creaminess. The creamy avocado complements the salmon well. It makes each bite even better. Feel free to explore the [Full Recipe] for more tips and ideas! {{image_4}} You can swap the salmon for chicken or tofu. Chicken works well with the sweet chili sauce. Marinate it just like you do the salmon. Tofu absorbs flavors nicely, making it a great option, too. You can also try different fish like trout or tilapia. Each fish will give your bowl a unique taste. Seasonal vegetables can really change your bowl. Think fresh corn in summer or pumpkin in fall. You can also add leafy greens like spinach or kale. Broccoli offers a nice crunch and pairs well with the sauce. Mix and match to keep it exciting! Want more kick? Try a spicy chili sauce instead of sweet chili sauce. This will give your bowl a bold flavor. You can also add citrus zest, like lime or lemon, for a fresh twist. These small changes can make a big difference in taste. For the full recipe, check out the details above! After you enjoy your Sweet Chili Salmon Bowl, store any leftovers in airtight containers. This keeps the food fresh and tasty. Place the containers in the fridge. Your meal will stay good for 2-3 days. Make sure to cool the food first before sealing it up. If you want to save your meal for longer, freezing is a great option. Freeze the cooked salmon separately to keep its quality. Salmon can lose its texture if frozen with rice and veggies. Store your rice and mixed vegetables in separate containers. This way, they stay fresh and tasty when you thaw them. When you're ready to eat, reheating is easy. You can use the microwave or stovetop for quick reheating. Just be careful not to overcook the salmon. Overcooking can make it dry and tough. Heat it gently to keep the flavor and texture intact. Enjoy your delicious meal again! Yes, you can prepare the ingredients in advance. Store each item separately in the fridge. This way, you save time when you are ready to cook. Just mix and heat everything when you want to eat. If you want a change, you can substitute jasmine rice with brown rice or quinoa. Both options are healthy and add a nice flavor. Quinoa is a great choice if you want extra protein. Absolutely! You can make this bowl spicy by adding fresh chili peppers or a dash of hot sauce. Adjust the heat to your liking. This adds a fun kick to the dish. To make the Sweet Chili Salmon Bowl healthier, reduce the amount of sauce you use. You can also add more veggies, like leafy greens or broccoli. This boosts nutrition and flavor. Yes, this bowl can be enjoyed cold too! It makes a refreshing salad dish. Just let it cool before serving. Enjoy it as a light meal on a warm day. For the full recipe, check out the detailed steps above. This guide showed how to make a tasty salmon bowl using sweet chili sauce and veggies. You learned about the key ingredients, tools, and steps. Remember, marinating the salmon and choosing the right veggies can boost flavor. Feel free to experiment with proteins and spices. Finally, you can store leftovers for quick meals later. Enjoy making this dish your own!](https://fastmealmate.com/wp-content/uploads/2025/07/c95c4cfe-a415-4c4e-8f12-f828502a92fe-768x768.webp)