
Crispy Fried Okra Flavorful and Easy to Make
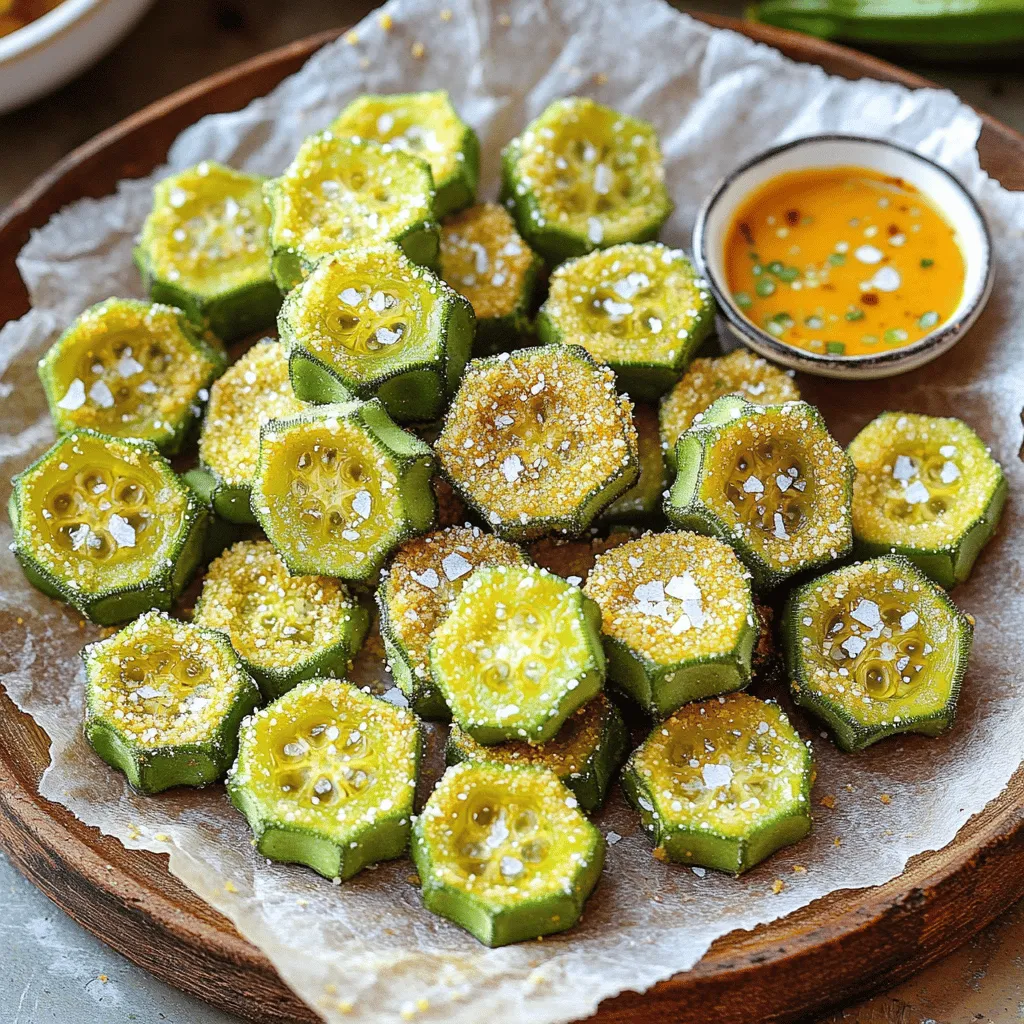
Are you craving a crunchy, flavorful snack? Look no further! Crispy fried okra is an easy dish that dazzles your taste buds. With just a few simple ingredients and steps, you can whip up a mouthwatering treat perfect for any occasion. Join me as we explore how to make this Southern classic that’s sure to impress your friends and family. Let’s get started on this delicious journey!
Ingredients
To make crispy fried okra, you need simple ingredients. Here’s what you will need:
– 1 pound fresh okra, sliced into ½ inch rounds
– 1 cup buttermilk
– 1 cup cornmeal
– ½ cup all-purpose flour
– 1 teaspoon garlic powder
– 1 teaspoon onion powder
– ½ teaspoon cayenne pepper (adjust to taste)
– Salt and black pepper to taste
– Vegetable oil for frying
These ingredients work together to create a crunchy outer layer and tender inside. Fresh okra shines in this dish. The buttermilk adds a nice tang and helps the coating stick. Cornmeal gives a great crunch, while flour helps everything bind. Garlic and onion powders bring flavor, and cayenne adds a kick. Adjust the cayenne if you don’t want too much heat.
Using the right oil is also key. Vegetable oil has a high smoke point, which is perfect for frying. Remember, using fresh ingredients makes a big difference in taste.
Step-by-Step Instructions
Preparation Steps
– Rinse and dry the fresh okra
– Marinate okra in buttermilk
Start by rinsing the fresh okra. Place it under cold running water. This step removes dirt and debris. Once rinsed, dry the okra with a clean paper towel. A dry surface helps create a crispy coating later.
Next, marinate the okra in buttermilk. Pour one cup of buttermilk into a large bowl. Add the sliced okra and stir gently. Make sure every piece is coated. Let it sit for about 15 minutes. This allows the okra to soak in the flavor.
Coating and Frying
– Mix the dry ingredients
– Heat oil and test readiness
– Dredge okra and fry until golden
In a separate bowl, mix the dry ingredients. Combine one cup of cornmeal, half a cup of flour, garlic powder, onion powder, cayenne pepper, salt, and black pepper. Use a whisk to blend these well, so the spices spread evenly.
Now, heat about one inch of vegetable oil in a skillet. Set the heat to medium-high. To check if the oil is ready, drop a pinch of the cornmeal mixture in. If it bubbles and sizzles, the oil is hot enough.
Carefully take each okra piece from the buttermilk. Let excess liquid drip off. Dredge the okra in the cornmeal mixture, making sure to coat it well. Shake off any extra coating to avoid clumps.
Fry the okra in small batches. This keeps the temperature steady. Cook for 3 to 4 minutes, or until the okra is golden brown.
Final Touches
– Transfer to absorb excess oil
– Serve right away for optimal crispiness
Once done, use a slotted spoon to transfer the okra. Place it on a plate with paper towels. This step absorbs extra oil and keeps the okra crispy.
Serve your crispy fried okra right away. Enjoy it as a snack or side dish. For the best taste, serve while hot.
Tips & Tricks
Achieving Maximum Crispy Texture
To get crispy fried okra, you must dry the okra well. Moisture can make your okra soggy. After rinsing, pat it with a paper towel. This helps the coating stick better. The ideal frying temperature is around 350°F. If the oil is too cool, the okra will absorb more oil. If it’s too hot, the coating will burn. Use a deep skillet or fryer to control the heat.
Seasoning Tips
You can add more flavor with seasonings. I recommend garlic powder and onion powder for a tasty base. If you like spice, cayenne pepper is great. Start with half a teaspoon. You can always add more if you want it hotter. Mix all seasonings well with the cornmeal and flour for even flavor.
Serving Suggestions
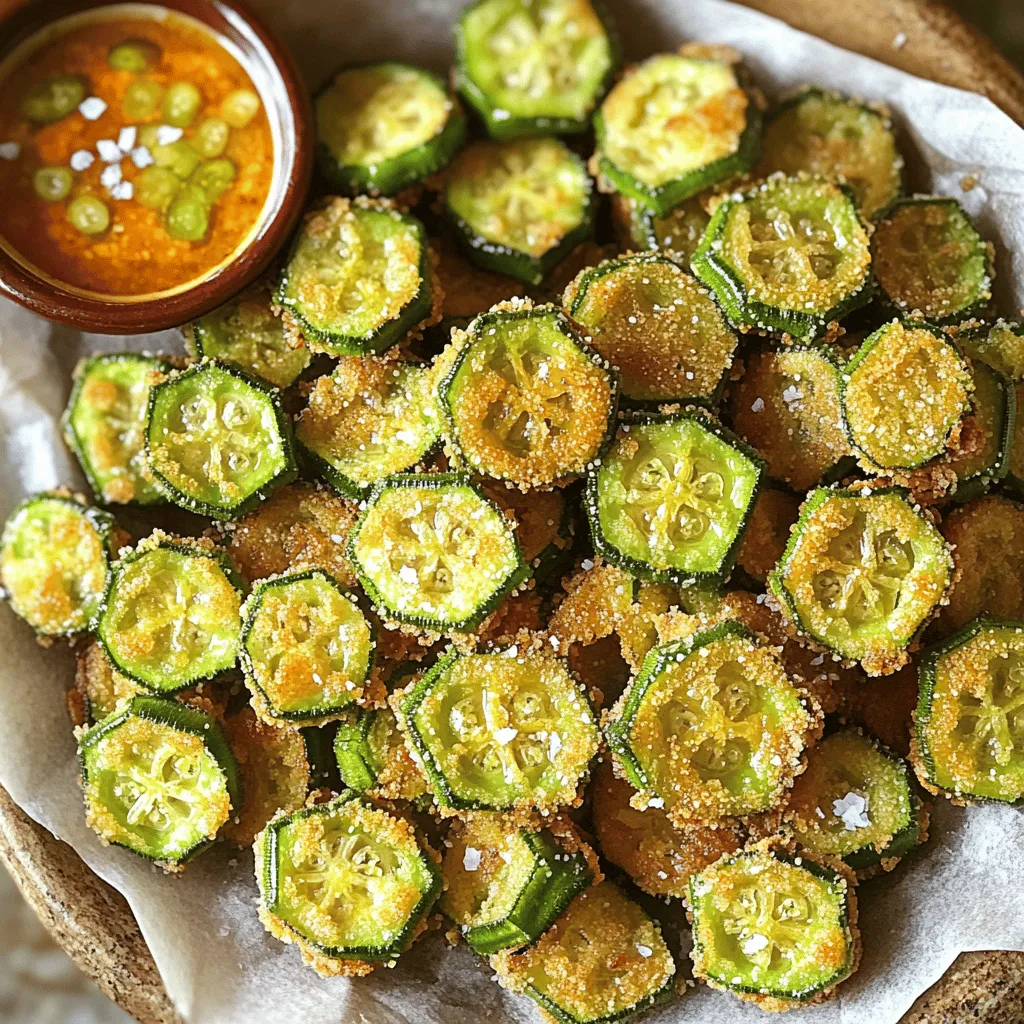
Fried okra is best served hot. It gets softer as it cools. Pair it with a tasty dipping sauce. Ranch dressing or a spicy remoulade works well. You can also sprinkle a bit of sea salt on top for extra flavor. For a great look, arrange the okra on a platter with parchment paper. This makes it easy to grab and enjoy!
Variations
Alternative Coatings
You can switch up the coating for crispy fried okra. Instead of all-purpose flour, try gluten-free flour. This keeps the crunch while making it suitable for gluten-free diets. You could also mix in cornmeal with almond flour for extra texture.
Adding spices can give your okra a fun twist. Try smoked paprika for a rich flavor, or add cumin for an earthy taste. You can even use ranch seasoning for a zesty kick. Experiment and find your favorite mix!
Cooking Methods
If you want a healthier option, consider air frying the okra. It still gets crispy, but with less oil. Set your air fryer to 400°F and cook for about 10 to 15 minutes. Shake the basket halfway through for even cooking.
Baking is another great method. Preheat your oven to 425°F. Spread the coated okra on a baking sheet in a single layer. Bake for about 20 minutes, flipping halfway through. This method is simple and requires less hands-on time.
Regional Variations
Crispy fried okra shines in Southern cooking. The classic recipe uses cornmeal for a crunchy finish and is often served with a side of ranch or remoulade.
For a twist, try Cajun-style fried okra. Add Cajun seasoning to your coating mix for a spicy kick. This version brings a bold, flavorful punch that makes it special. Each bite bursts with flavor and warmth, perfect for gatherings or a cozy meal.
Storage Info
Storing Leftovers
To keep your fried okra crispy, follow these steps. First, let the okra cool to room temperature. Avoid stacking them to prevent moisture buildup. Use a paper towel to line an airtight container. Place the okra in a single layer, if possible. This helps maintain the crunch. Seal the container tightly, and store it in the fridge.
For best results, eat your fried okra within two days. The longer it sits, the less crispy it becomes. If you want to enjoy it later, consider freezing. Place the fried okra in a freezer-safe bag. Remove as much air as you can before sealing.
Reheating Tips
Reheating fried okra can be tricky. The aim is to keep it crispy. The best way is to use an oven or an air fryer. Preheat your oven to 375°F (190°C). Spread the okra on a baking sheet in a single layer. Heat for about 10 minutes or until hot.
If using an air fryer, set it to 350°F (175°C). Heat the okra for around 5 minutes, checking often. Avoid microwaving, as it makes the okra soggy. For even better results, reheat in small batches. This way, they stay crispy and delicious.
FAQs
What is the best oil for frying okra?
The best oil for frying okra is vegetable oil. It has a high smoke point. This means it can handle high heat without burning. Other good options include canola oil and peanut oil. These oils also give a nice flavor to the fried okra. Choose an oil that you enjoy for frying, as taste matters.
Can I make crispy fried okra ahead of time?
You can make crispy fried okra ahead of time, but it may lose some crunch. To keep it crispy, store it in a single layer on a plate. Cover it lightly with foil. Reheat the okra in the oven to bring back the crunch. Avoid microwaving, as it will make the okra soggy.
How do I know when the okra is done frying?
You know the okra is done frying when it turns golden brown. It should take about 3-4 minutes in hot oil. Use a slotted spoon to check a piece. If it feels crispy and looks golden, it’s ready. Keep an eye on the okra to avoid burning.
What are the nutritional facts for crispy fried okra?
Crispy fried okra is tasty but should be eaten in moderation. A serving (about 1 cup) has around 150 calories. It contains about 6 grams of protein, 12 grams of carbs, and 9 grams of fat. Okra is also high in fiber and offers vitamins A and C. Enjoy it as a snack, but balance it with healthy meals.
Can frozen okra be used for this recipe?
Yes, you can use frozen okra for this recipe. Just thaw it and pat it dry before frying. This helps keep the coating crisp. Frozen okra may not be as fresh but still tastes great. Follow the same steps as with fresh okra for the best results.
This blog post covered how to make crispy fried okra from scratch. We discussed the ingredients, preparation, frying, and tips for the best results. With proper drying and the right oil temperature, you can achieve a perfect crunch. Remember, seasoning and serving suggestions can elevate flavors. Explore variations to keep things fresh. Store leftovers well and follow the best reheating tips to maintain that crunch. Enjoy making this tasty dish!
![To make a tasty Blueberry Peach Crostata, you’ll need a few simple ingredients. Here’s what to gather: - 1 cup fresh blueberries - 2 ripe peaches, diced (about 2 cups) - 1/4 cup granulated sugar - 1 tablespoon freshly squeezed lemon juice - 1 tablespoon cornstarch - 1 teaspoon pure vanilla extract - 1 pre-made pie crust (or homemade for an artisanal touch) - 1 egg, beaten (for gloss and color) - 1 tablespoon unsalted butter, cut into small pieces - A pinch of fine sea salt - Optional: powdered sugar for a final dusting Each ingredient plays a key role in the taste and texture of the crostata. The fresh blueberries and peaches bring sweetness and juiciness. The sugar enhances their natural flavors, while lemon juice adds a bright zing. Cornstarch helps thicken the filling, keeping it from getting too runny. Using vanilla extract adds depth to the fruit, and a pinch of sea salt balances the sweetness. For the crust, you can choose a pre-made option for ease or whip up your own for that homemade touch. The beaten egg gives the edges a lovely golden color, while unsalted butter adds richness. Don’t forget the powdered sugar for a sweet finish on top! Ready to gather these ingredients? You can find the full details in the [Full Recipe]. 1. Preheat the Oven: Start by heating your oven to 375°F (190°C). This step ensures the crostata cooks evenly. 2. Prepare the Baking Sheet: Line a baking sheet with parchment paper. This helps with easy cleanup later. 3. Prepare the Fruit Filling: In a bowl, mix fresh blueberries and diced peaches. Add granulated sugar, lemon juice, cornstarch, vanilla extract, and a pinch of sea salt. Toss gently. Let this mixture rest for about 10 minutes. This helps the flavors blend. 4. Roll Out the Pie Crust: Roll out your pie crust on a floured surface. Aim for a circle about 12 inches wide. If you use a store-bought crust, make sure it is cold for easy handling. 1. Shape the Crostata: Place the rolled crust on your baking sheet. Spoon the fruit mixture into the center, leaving a 2-inch border. 2. Fold the Edges: Carefully fold the crust edges over the filling. Create pleats to give it a rustic look. Make sure some fruit shows at the center. 3. Apply the Egg Wash: Use a pastry brush to coat the crust edges with the beaten egg. This gives it a nice golden color when baked. 4. Dot with Butter: Scatter small pieces of butter over the fruit filling. This adds extra richness during baking. 1. Bake: Place your crostata in the preheated oven. Bake for 30-35 minutes. Look for a golden-brown crust and bubbling filling. 2. Cool Before Serving: Once baked, let the crostata cool on the sheet for 10 minutes. This makes it easier to slice. Dust with powdered sugar if you like, then serve warm or at room temperature. You can find the Full Recipe for more detailed steps and tips. Enjoy your delicious Blueberry Peach Crostata! To create the best crust, start with cold ingredients. This helps the crust stay flaky. Use your fingers to mix the butter into the flour until it looks like coarse crumbs. Do not overwork the dough; handle it gently. Balancing sweetness and acidity is key. Blueberries are sweet, while peaches add a nice tang. Use lemon juice to brighten the flavors. Taste your filling before baking. If it seems too sweet, add a tiny bit of salt. This will balance the flavors better. For a beautiful display, serve slices on a rustic wooden board. Garnish with fresh mint leaves for color. You can also dust the top with powdered sugar for a nice finish. Pair your crostata with a scoop of vanilla ice cream or a dollop of whipped cream. The cold creaminess goes perfectly with the warm fruit filling. You can also try it with a drizzle of honey for an extra touch. If your crust is too soggy, it may need more time in the oven. Check the bottom of the crust to see if it is golden brown. You can also try baking it a few minutes longer. To avoid over-baking, keep an eye on the crostata as it cooks. The crust should be golden and the filling should bubble. If you notice it browning too quickly, cover it lightly with foil. This will help protect it while it finishes baking. For the full recipe, visit the link. {{image_4}} You can switch up the fruits in your crostata. For a fun twist, try using apricots or cherries. Both fruits bring a unique taste. They also pair well with blueberries and peaches. If you need a gluten-free option, use almond flour or a gluten-free pie crust. This keeps your dessert delicious and safe for gluten-sensitive friends. Want to add some extra flavor? Sprinkle in some cinnamon or nutmeg. These spices add warmth and depth to the filling. You can also try fresh herbs like basil or mint. They give a fresh twist that brightens the fruit flavors. When it comes to serving, think outside the box. A drizzle of homemade caramel sauce or a scoop of creamy vanilla ice cream works wonders. For special occasions, serve slices on a beautiful platter. Add fresh mint leaves for color and aroma. Your guests will love the visual and tasty touch! For the complete recipe, check out the Full Recipe section. To keep your blueberry peach crostata fresh, store it in the fridge. First, let it cool completely. Then, cover it with plastic wrap or place it in an airtight container. This helps keep the crust crispy and the filling juicy. You can enjoy it for up to three days. If you want to save it for longer, freezing is a great option. Wrap the crostata tightly in plastic wrap, then in aluminum foil. This method helps prevent freezer burn. You can freeze it for up to three months. When you're ready to eat it, just thaw it in the fridge overnight. To reheat the crostata, the oven is your best friend. Preheat it to 350°F (175°C). Place the crostata on a baking sheet and warm it for about 10-15 minutes. This method keeps the crust nice and flaky. If you want to refresh the flavors, brush a little melted butter on top before reheating. This adds richness and helps the fruit flavors shine. Enjoy your crostata warm for the best taste! Can I make the crostata ahead of time? Yes, you can make the crostata ahead. Prepare the filling and crust separately. Store them in the fridge for a day. When ready, assemble and bake. This keeps the crust fresh. How do I know when the crostata is done baking? Look for a golden brown crust and bubbling filling. A toothpick should slide easily through the crust. If it’s too soft, bake a few more minutes. What’s the difference between a crostata and a galette? A crostata is a rustic pie, often filled with fruit. A galette is similar but usually has a more free-form shape. Both have a flaky crust. They are delicious and easy to make. Can I use frozen fruit in the recipe? Yes, frozen fruit works well. Just thaw and drain excess liquid. This keeps the filling from being too watery. How do I keep the crust from getting soggy? To prevent a soggy crust, sprinkle cornstarch on the bottom before adding fruit. This absorbs extra juices. Bake until the crust is golden for best results. Making the crostata vegan To make a vegan crostata, replace the egg wash with a plant-based milk. Use a vegan pie crust. The filling stays the same, ensuring a tasty dessert. Tips for reducing sugar in the recipe You can cut the sugar by half. Use ripe fruits for natural sweetness. Add a touch of honey or maple syrup if needed. This keeps the flavor balanced and fresh. For the Full Recipe, check the main section. In this post, we covered how to make a delicious fruit crostata with fresh ingredients. You learned about the necessary ingredients, step-by-step instructions, and useful tips for perfecting your dessert. We also explored variations and storage options to extend its life. Now, you’re equipped to create your own stunning crostata. Experiment with flavors and enjoy the praise from family and friends! Your new dessert will impress at any gathering.](https://fastmealmate.com/wp-content/uploads/2025/06/584381ba-fe5e-4dcd-ab97-e37815fc2576-768x768.webp)
![For this no-bake strawberry cheesecake cups, you will need: - 1 cup graham cracker crumbs - 2 tablespoons granulated sugar - 1/2 cup unsalted butter, melted - 1 cup cream cheese, softened - 1/2 cup powdered sugar - 1 teaspoon pure vanilla extract - 1 cup heavy whipping cream - 1 cup fresh strawberries, diced - Additional fresh strawberries, sliced for topping You can swap some ingredients if needed: - Use chocolate cookies instead of graham crackers for a twist. - Swap granulated sugar with brown sugar for a deeper flavor. - Low-fat cream cheese works well if you're watching calories. - Coconut cream can replace heavy cream for a dairy-free option. - If fresh strawberries are not available, try using raspberries or blueberries. When using fresh strawberries, choose ripe ones for the best taste. Look for bright red berries without any green spots. Wash them gently and pat them dry before dicing. If you want to enhance their flavor, sprinkle a little sugar on the diced strawberries and let them sit for about 10 minutes. This draws out the juices and creates a sweet syrup, making your cheesecake cups even more delicious. For the full recipe and step-by-step instructions, check out the [Full Recipe]. To make the crust, start with a mixing bowl. Add 1 cup of graham cracker crumbs and 2 tablespoons of granulated sugar. Pour in 1/2 cup of melted unsalted butter. Mix it well until the crumbs look like wet sand. This will give your crust a great flavor and texture. Next, take about two tablespoons of this crumb mixture and spoon it into each cup. Use your fingers or the back of a spoon to press it down gently. This step helps form a solid base for your cheesecake. For the cream cheese filling, grab another bowl. Beat 1 cup of softened cream cheese with an electric mixer. Keep mixing until it is smooth and creamy. Once it looks good, add 1/2 cup of powdered sugar and 1 teaspoon of pure vanilla extract. Mix until everything is silky and combined. In a separate bowl, whip 1 cup of heavy cream. Use the mixer until stiff peaks form. Be careful not to over-whip it. You want the cream to be light and fluffy. Now, gently fold the whipped cream into the cream cheese mixture. Use a spatula and mix until just combined. This folding keeps the mixture airy. Spoon the cream cheese filling over the crust in each cup. Fill them about three-quarters full. Use the spatula to smooth the tops. Next, top each cup with diced strawberries. Press them gently into the cream cheese layer. This step spreads their flavor throughout the dessert. For the final touch, add a dollop of remaining cream cheese mixture on top. Garnish each cup with a fresh strawberry slice. Now, place the cups in the refrigerator. Chill them for at least 2 hours. This step lets the layers set and enhances the flavors. Enjoy your no-bake strawberry cheesecake cups! For the full recipe, refer to the section above. To get a smooth and creamy filling, make sure your cream cheese is at room temperature. If it’s too cold, it will clump. Use an electric mixer to beat the cream cheese until it is silky. Slowly add in the powdered sugar and vanilla while mixing. This step helps blend everything perfectly. When whipping the heavy cream, stop when you see stiff peaks. Over-whipping makes it grainy. Finally, gently fold the whipped cream into the cream cheese mixture. This keeps it light and fluffy. Serve these cheesecake cups in clear glass dishes. This way, everyone can see the beautiful layers. For a fun twist, try adding a layer of chocolate sauce or a fruit puree. You can also sprinkle crushed graham crackers on top for added crunch. If you want to impress your guests, use fresh mint leaves as a garnish. It adds a nice pop of color and flavor. You’ll need a few basic tools. A mixing bowl is key for combining ingredients. An electric mixer is best for whipping the cream and mixing the filling. Use a spatula to gently fold mixtures together. For serving, small glass cups or jars work wonderfully. They show off the layers and make for a pretty presentation. Lastly, have a measuring cup and spoons on hand for accuracy. Don't forget to check out the Full Recipe to perfect your technique! {{image_4}} You can switch up the flavor of your no-bake cheesecake cups. Try chocolate by adding cocoa powder to the cream cheese mix. For mango, blend fresh mango into the cream cheese before mixing. You can even use lemon zest for a bright, citrusy kick. These simple changes keep your dessert fun and fresh. Want a lighter cheesecake? Use low-fat cream cheese instead of regular cream cheese. You can also swap out heavy cream for Greek yogurt. This keeps the taste rich but lowers the fat. Using honey or agave syrup instead of sugar can add sweetness without the extra calories. Layering is key to a stunning dessert. Start with a crust layer, then add your creamy filling. You can add a layer of fruit between the cream cheese and whipped cream. This adds texture and flavor. For a fun twist, try layering different fillings. You could alternate between plain and flavored mixes. This creates a beautiful, colorful effect in your cups. For the full recipe, check out the [Full Recipe]. To store your no-bake strawberry cheesecake cups, use airtight containers. Place the cups in the fridge right after they set. This keeps them fresh and tasty. If you make them ahead of time, cover each cup with plastic wrap or a lid. This helps avoid any weird smells from other foods in the fridge. These cheesecake cups last in the fridge for about 3 to 5 days. After that, the texture may change. You want to enjoy them when they are at their best. Always check for any signs of spoilage before serving. If you see any mold or the smell seems off, it’s best to throw them away. You can freeze these cheesecake cups if you want to save them for later. First, let them chill in the fridge for at least 2 hours. After that, cover each cup tightly with plastic wrap and foil. This extra layer helps prevent freezer burn. You can freeze them for up to 2 months. When you’re ready to enjoy, take them out and let them thaw in the fridge overnight. Remember, the texture may change a bit after thawing. For the full recipe, check back for more details! No-Bake Strawberry Cheesecake Cups last about three days in the fridge. Store them in an airtight container to keep them fresh. You want to enjoy the creamy texture and berry flavor at their best. After three days, the strawberries may lose their crispness and the filling might not be as fresh. Yes, you can use frozen strawberries. Just make sure to thaw and drain them first. This helps avoid extra moisture in your cups. Frozen strawberries can still taste great and add sweetness. However, fresh strawberries give a better texture and brightness to the dish. If you need a substitute for heavy cream, you can use coconut cream or Greek yogurt. Coconut cream adds a rich flavor, while Greek yogurt keeps it light. You may also mix milk with butter for a quick fix. Use a 3:1 ratio of milk to butter for a creamy texture. Just remember, these swaps may change the overall taste slightly. You learned how to make no-bake strawberry cheesecake cups. We covered ingredients, tips, and storage methods. Remember to choose fresh berries for the best taste. Use my tips for a creamy texture and fun flavor twists. Store them right to enjoy later. With these steps, you can craft a delicious treat easily. Embrace your creativity, and have fun making these cheesecake cups!](https://fastmealmate.com/wp-content/uploads/2025/06/462f42fe-2b9d-4e42-aace-05b4fd02c510-768x768.webp)
![- 1 cup grated zucchini - ½ cup unsweetened applesauce - ½ cup brown sugar - ¼ cup white sugar The main ingredients in these brownies are simple and nutritious. Zucchini adds moisture and keeps the brownies soft. The applesauce replaces some fat while adding sweetness. Using both brown and white sugar gives the brownies a rich flavor and a nice texture. - ⅓ cup vegetable oil or melted coconut oil - 2 large eggs - 1 teaspoon vanilla extract - 1 cup all-purpose flour - ⅓ cup unsweetened cocoa powder - ½ teaspoon baking soda - ¼ teaspoon baking powder - ¼ teaspoon salt - ½ cup chocolate chips - Optional: ¼ cup chopped nuts (e.g., walnuts or pecans) The additional ingredients help create a great structure in the brownies. The oil keeps them moist, while the eggs bind everything together. Flour and cocoa powder provide the base, giving that rich, chocolate flavor. Baking soda and baking powder help the brownies rise. The chocolate chips melt into sweet pockets of goodness. If you like nuts, they add a nice crunch and flavor. You can find the complete list of ingredients in the Full Recipe section for more details on how to get started. - Preheat your oven to 350°F (175°C). - Prepare an 8x8 inch baking pan. You can grease it or line it with parchment paper. - In a large bowl, combine the wet ingredients. Mix grated zucchini, applesauce, brown sugar, white sugar, oil, eggs, and vanilla extract until well blended. - In another bowl, mix the dry ingredients. Whisk flour, cocoa powder, baking soda, baking powder, and salt together. - Now, add the dry mixture to the wet ingredients. Stir gently until just combined. Be careful not to overmix. - Pour the brownie batter into the prepared pan. Use a spatula to smooth the top. - Bake in the preheated oven for 25-30 minutes. Check for doneness by inserting a toothpick. It should come out with a few moist crumbs. - Let the brownies cool in the pan for about 10 minutes. Then transfer them to a wire rack to cool completely. You can find the full recipe in the earlier sections. Enjoy your delicious zucchini brownies! To make perfect zucchini brownies, focus on two key tips: - Avoid overmixing: Mix just enough until the dry and wet ingredients blend. Overmixing can make brownies tough. - Drain excess moisture from zucchini: Zucchini holds a lot of water. Grate it, then put it in a clean cloth. Squeeze out the extra moisture. This step helps achieve a fudgy texture. Baking these brownies is simple. Here are two tips to ensure the best results: - Check for doneness with a toothpick: Insert a toothpick into the center. If it comes out with moist crumbs, your brownies are done. If it comes out clean, they might be overbaked. - Cooling suggestions for optimal texture: After baking, let the brownies cool in the pan for about 10 minutes. Then, transfer them to a wire rack to cool completely. This cooling method helps keep the brownies soft and chewy. For more details, check the Full Recipe. {{image_4}} You can make these brownies gluten-free! Just swap regular flour for a gluten-free flour blend. This simple change works well without affecting taste. Look for blends that contain rice flour, almond flour, or coconut flour. These options hold moisture and keep the brownies soft. Want to mix it up? Try different types of chocolate in your brownies. You can use milk chocolate, dark chocolate, or even white chocolate. Each type adds its own unique taste. Adding spices like cinnamon or nutmeg can enhance the flavor too. A pinch of cinnamon gives warmth, while nutmeg adds a hint of sweetness. You can also add dried fruits or seeds for more texture. Try mixing in chopped nuts, like walnuts or pecans, for a nice crunch. Dried cherries or raisins can add a burst of sweetness. These additions make your brownies even more delightful and fun to eat. For the full recipe, check out the Chocolate Zucchini Brownies Full Recipe! To keep your zucchini brownies fresh, use an airtight container. This helps seal in moisture and flavor. Place them in the container after they cool down. You can store them at room temperature for up to four days. If you want them to last longer, keep them in the fridge. They can stay fresh for about a week in the fridge. Just make sure they are well-covered to avoid drying out. Freezing zucchini brownies is a great way to save some for later. First, let the brownies cool completely. Then, cut them into squares. Wrap each square in plastic wrap, and place them in a freezer bag. Make sure to remove as much air as possible from the bag. You can freeze them for up to three months. When you're ready to eat them, simply thaw them in the fridge overnight. This way, they will keep their great taste and soft texture. For the full recipe, check out the Chocolate Zucchini Brownies full recipe. Yes, you can use sugar substitutes. Common options are stevia, erythritol, or monk fruit. These substitutes can make your brownies lower in calories. However, they may change the taste and texture. Some might be sweeter, so adjust the amount. Always check the package for the right measurement. This way, your brownies will still taste great. To check if your brownies are done, look for a few signs. The edges will pull away from the pan. The top should look set and have a slight sheen. You can also use a toothpick. Insert it into the center of the brownies. If it comes out with a few moist crumbs, they are ready. If it has wet batter, bake a few more minutes. Yes, you can make these brownies vegan. Replace eggs with flax eggs or applesauce. Use 1 tablespoon of flaxseed meal mixed with 2.5 tablespoons of water for each egg. For dairy, substitute with plant-based milk or yogurt. You can also use coconut oil instead of butter. These swaps will keep the brownies moist and tasty. Each brownie has about 150 calories. They contain around 6 grams of fat and 20 grams of sugar. The exact numbers can change based on the ingredients used. For example, using less sugar or different oils can lower calories. Adding nuts can increase healthy fats and protein. Always check the recipe for detailed info. Zucchini brownies can last up to a week when stored properly. Keep them in an airtight container at room temperature. If you want them to last longer, freeze them. They can stay fresh in the freezer for up to three months. Just remember to wrap them well in plastic wrap or foil. For the complete recipe, check out the Chocolate Zucchini Brownies [Full Recipe]. Zucchini brownies blend health and taste. We covered key ingredients, easy steps, and tips. Think alternatives like gluten-free flour or added spices for fun flavors. Proper storage keeps them fresh, while freezing maintains taste and texture. With answers to common questions, you now have all you need for success. Try making these tasty brownies soon! You'll enjoy a delicious treat that also sneaks in some veggies.](https://fastmealmate.com/wp-content/uploads/2025/06/6955e8e8-deef-478f-bc92-a4114a14f9ca-768x768.webp)