
Strawberry Cheesecake Frappuccino Delightful Recipe

Are you ready to treat your taste buds? The Strawberry Cheesecake Frappuccino is a fun and tasty drink you can make at home. With just a few simple ingredients, you can whip up this delight in no time. Get ready to blend creamy cheesecake, fresh strawberries, and strong coffee into a refreshing delight. Read on to discover the easy steps and tips to create this delicious drink today!
Ingredients
List of Ingredients
– 1 cup strong brewed coffee, cooled to room temperature
– 1 cup milk (dairy or non-dairy alternative)
– 1 cup frozen strawberries
– 1/2 cup cheesecake filling
– 2 tablespoons sugar (adjust to taste)
– 1/2 teaspoon vanilla extract
– Whipped cream for topping
– Crushed graham crackers for garnish
– Fresh strawberries for decoration
To make the Strawberry Cheesecake Frappuccino, start with strong brewed coffee. It gives the drink a rich base. Let it cool to room temperature before blending. Next, choose your milk. You can use dairy or any non-dairy milk you like. Almond, soy, or oat milk all work well.
Frozen strawberries add a refreshing chill and burst of flavor. You can use fresh strawberries too, but frozen gives a creamier texture. The cheesecake filling is key for that signature taste. You can buy it or make your own if you have time.
For sweetness, add sugar to taste. I find that two tablespoons gives a nice balance, but adjust according to your preference. A dash of vanilla extract enhances the flavor profile, making it even more delightful.
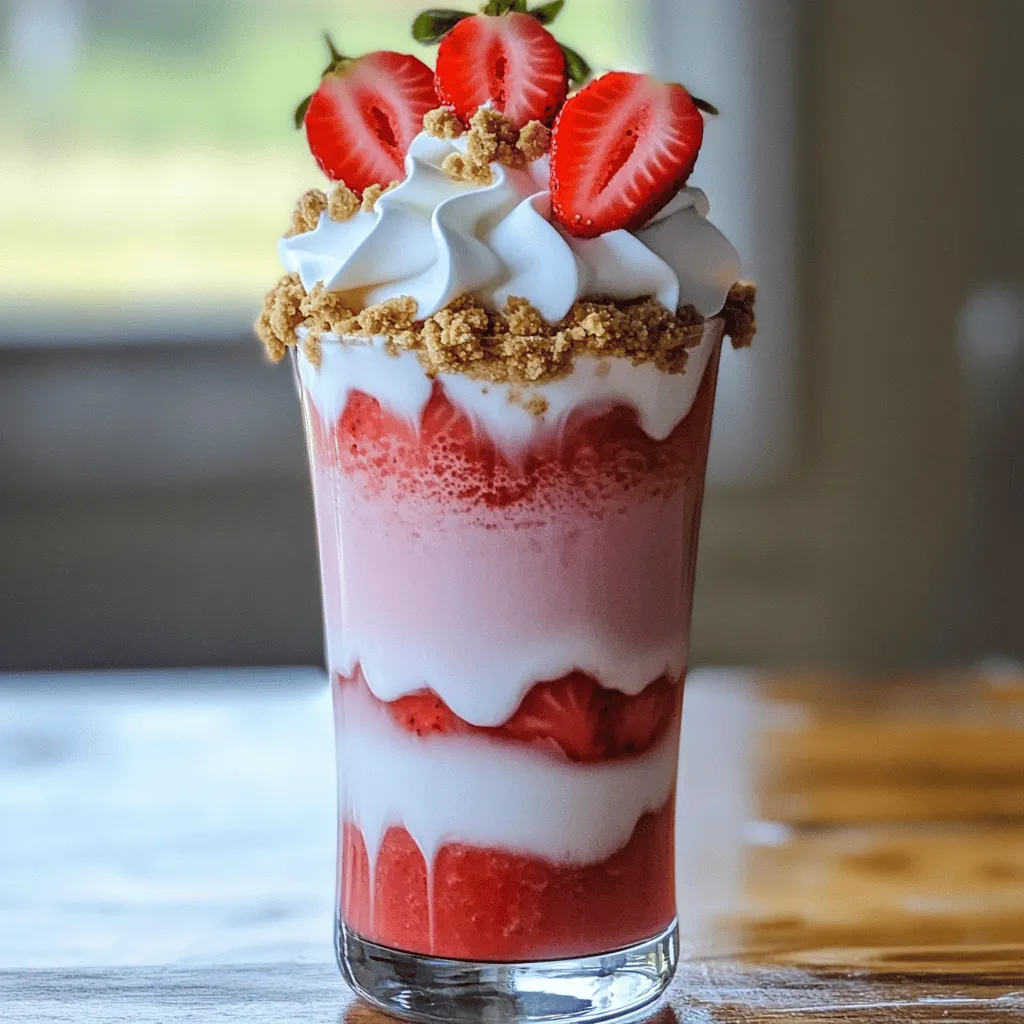
Don’t forget the whipped cream! It adds a lovely touch on top. The crushed graham crackers act as a garnish, giving that cheesecake crust feel. Finally, fresh strawberries make the drink look beautiful and fresh.
Now that you have the ingredients, you’re ready to dive into making this delicious treat!
Step-by-Step Instructions
Preparing the Base
– Pour cooled coffee into the blender.
– Add milk, frozen strawberries, cheesecake filling, sugar, and vanilla extract.
Start by pouring your cooled coffee into the blender. This is the base of your frappuccino. Next, add one cup of milk. You can choose dairy or your favorite non-dairy option. Then, toss in one cup of frozen strawberries. These will make your drink cold and fruity. Now, add half a cup of cheesecake filling. You can buy this or make it at home. Next, sprinkle in two tablespoons of sugar. You can adjust this to fit your taste. Finally, add half a teaspoon of vanilla extract for a sweet touch.
Blending to Perfection
– Blend on high speed until smooth.
– Adjust sweetness and texture if needed.
Secure the lid tightly on the blender and blend at high speed. Keep blending until the mix is smooth and creamy. You don’t want any chunks left in your drink. Once blended, taste your frappuccino. If it needs more sweetness, add a little sugar and blend again. If it’s too thick, pour in a splash more milk. Blend again until you reach your desired texture.
Assembling the Drink
– Pour into tall glasses.
– Top with whipped cream, crushed graham crackers, and fresh strawberries.
Once blended, pour the mixture into tall glasses. This drink looks great in a clear glass. Now it’s time for the fun part! Top each glass with a swirl of whipped cream. This makes it look fancy and inviting. Sprinkle crushed graham crackers on top of the whipped cream. This gives a nice crunch like a cheesecake crust. Finally, add fresh strawberry halves on top. This adds color and a fruity touch. Enjoy this delightful treat cold!
Tips & Tricks
Achieving the Best Flavor
To get the best flavor from your Strawberry Cheesecake Frappuccino, try different types of milk. Whole milk gives a rich taste, while almond milk adds a nutty twist. You can also add flavors like almond extract for more depth. Just a few drops can change the whole drink!
Texture Adjustments
If your frappuccino is too thick, add a splash of milk to loosen it. Blend again until smooth. For sweetness, taste after blending. If it’s not sweet enough, mix in more sugar a little at a time. For a dairy-free version, use almond or coconut milk and a dairy-free cheesecake filling. This way, everyone can enjoy it!
Presentation Tips
Serve your frappuccino in tall, clear glasses to show off its beautiful layers. Top with a generous amount of whipped cream. Sprinkle crushed graham crackers on top to mimic a cheesecake crust. Add fresh strawberry halves for a pop of color. Serve with a colorful straw and enjoy while it’s cold!
Variations
Alternative Flavors
You can switch up the flavors for your frappuccino. Here are two fun ideas:
– Chocolate Cheesecake Frappuccino: This version combines rich chocolate flavor with creamy cheesecake. Just mix chocolate syrup with your base ingredients. It’s a sweet treat for chocolate lovers.
– Berry Medley Cheesecake Frappuccino: Try mixing different berries, like blueberries and raspberries. They add a vibrant color and a burst of flavor. Blend them with your strawberries for a mixed berry delight.
Seasonal Variations
Seasonal changes can inspire new flavors. Here are two you might love:
– Summer Berry Frappuccino: In summer, use fresh berries for a light and fruity drink. Swap out frozen strawberries for fresh ones to highlight their taste. Add a splash of lemonade for a refreshing twist.
– Pumpkin Cheesecake Frappuccino (Fall Special): When fall arrives, bring in pumpkin spice. Just add pumpkin puree and a sprinkle of cinnamon to your base. This will give you a cozy, autumn-inspired drink.
Healthier Swaps
You can make your frappuccino a bit healthier with these swaps:
– Lower Sugar Alternatives: Use honey or agave syrup instead of sugar. These sweeteners can add flavor without as much sweetness. You can also reduce the amount of sugar to suit your taste.
– Using Greek Yogurt Instead of Cheesecake Filling: Greek yogurt can replace cheesecake filling. It adds creaminess while cutting down on fat. Plus, it packs a protein punch, making your drink more filling.
Explore these variations to find your perfect strawberry cheesecake frappuccino!
Storage Info
Best Ways to Store
To store leftover frappuccino, pour it into a sealed container. Keep it in the fridge. It stays fresh for about two days. If you want to freeze ingredients, use ice cube trays. Pour leftover coffee, milk, or blended strawberries into the trays. Once frozen, pop them out and store in a freezer bag. This makes blending easy later.
Reheating Tips
You can enjoy leftover frappuccino by re-blending it. Just pour it back into the blender. Add a splash of milk if it looks too thick. Blend until it’s smooth again. This way, your frappuccino tastes fresh!
Shelf Life of Ingredients
Homemade frappuccino lasts about two days in the fridge. For milk, check the expiration date on the carton. Usually, it lasts a week after opening. Cheesecake filling can last up to five days if stored properly. Always check for any signs of spoilage before use. Keeping these tips in mind helps you enjoy your delicious drink longer!
FAQs
What is a Strawberry Cheesecake Frappuccino?
A Strawberry Cheesecake Frappuccino is a sweet, creamy drink. It combines coffee, milk, and frozen strawberries. The cheesecake filling gives it a rich taste. This drink is topped with whipped cream and graham cracker crumbs. It looks as good as it tastes.
Where can I buy a Strawberry Cheesecake Frappuccino?
You can find this drink at many popular coffee shops. Chains like Starbucks often offer a version of it. Some local cafes may also create their own take on this treat. Check your favorite coffee spot to see if they have it.
Can I make this recipe vegan?
Yes, you can make a vegan version! Use almond, soy, or oat milk instead of dairy milk. Choose a dairy-free cheesecake filling or make your own with cashews. This way, you enjoy the same great flavor without dairy.
How many calories are in a Strawberry Cheesecake Frappuccino?
A typical serving has about 300 to 400 calories. The calories will vary based on your ingredients. To make it healthier, use less sugar or a lighter milk. You can also skip the whipped cream if you want.
Can I make the frappuccino without coffee?
Absolutely! You can skip the coffee and still enjoy a tasty drink. Use cold milk and add extra strawberries. Try adding a splash of vanilla or almond extract for more flavor. This way, you have a refreshing, caffeine-free option.
This blog post walks you through making a tasty Strawberry Cheesecake Frappuccino. You learned about the key ingredients, easy steps for prep, and tips for the best flavor. We explored different variations, storage options, and answered common questions.
Now, you can enjoy a delicious drink that fits your taste and needs. Try making this frappuccino your own. Remember, it’s all about fun and creativity in your kitchen! Enjoy your sweet treat!


![To make this delicious bread, gather these items: - 1 cup fresh strawberries, hulled and diced - 1 cup rhubarb, diced - 1/2 cup unsalted butter, softened to room temperature - 1 cup granulated sugar, divided - 2 large eggs, at room temperature - 1 teaspoon pure vanilla extract - 1/2 cup Greek yogurt, plain - 2 cups all-purpose flour - 1 teaspoon baking powder - 1/2 teaspoon baking soda - 1/4 teaspoon sea salt - 1/2 teaspoon ground cinnamon (optional) - 1/4 cup chopped walnuts or pecans (optional) Using fresh ingredients is key to good flavor. Fresh strawberries and rhubarb give the bread a tart and sweet taste. They also add moisture, making the bread soft. When you choose fresh fruits, look for vibrant colors and firm textures. This will enhance your final dish. If you can, visit a local farmer’s market for the best produce. It really makes a difference in taste. You can make the bread even better with some optional ingredients. Adding ground cinnamon brings warmth and depth to the flavor. If you like crunch, chopped walnuts or pecans add a nice texture. These nuts also pair well with the fruit. You can mix and match these extras based on your taste. Feel free to experiment and find what you love! For the full recipe, check out the earlier sections. Start by preheating your oven to 350°F (175°C). This warms the oven for even baking. Grease and flour a 9x5-inch loaf pan. This step helps the bread slide out easily after baking. Next, prepare the fruit. In a medium bowl, mix the diced strawberries and rhubarb. Sprinkle 1 tablespoon of sugar over the fruit and toss gently. Let it sit for a few minutes. This draws out moisture and brings out the fruit's flavor. In a large mixing bowl, cream the softened butter with the remaining sugar. Use an electric mixer for about 3-4 minutes. The mixture should look light and fluffy. Add the eggs one at a time, mixing well after each addition. Then, mix in the vanilla extract and Greek yogurt until smooth. In another bowl, whisk together the flour, baking powder, baking soda, sea salt, and ground cinnamon. Gradually add this dry mix to the wet ingredients. Stir gently until just combined to avoid a dense bread. Finally, fold in the prepared strawberries and rhubarb. If you like, add chopped nuts for crunch. Pour the batter into your greased loaf pan. Smooth the top with a spatula for an even surface. Bake in the preheated oven for 55-65 minutes. Check if it’s done by inserting a toothpick in the center. It should come out clean or with a few moist crumbs. Once baked, let the bread cool in the pan for about 10 minutes. Then, transfer it to a wire rack to cool completely. This step is important for the best texture. Now, you can slice and enjoy your strawberry rhubarb delight bread! For the full recipe, refer to the earlier section. To get that soft and fluffy bread, you must mix the batter just right. When you mix the wet and dry ingredients, do it slowly. Stir until just combined. This helps keep air in the batter. Over-mixing makes your bread dense. Remember, a few lumps are okay! One common mistake is using cold ingredients. Always start with eggs and yogurt at room temperature. This helps the batter mix better and rise nicely. Another mistake is not measuring the flour properly. Too much flour can lead to a dry texture. Use a spoon to scoop flour into your measuring cup, then level it off for accuracy. Want to add more flavor? Try adding a bit of lemon zest. It brightens the bread and pairs well with strawberries and rhubarb. You can also mix in spices like nutmeg or ginger for warmth. If you like nuts, fold in walnuts or pecans for crunch. You can find the full recipe for this delicious bread above. {{image_4}} You can easily adapt this recipe for different diets. If you want a dairy-free option, swap the butter for coconut oil or a plant-based butter. Use almond or oat yogurt in place of Greek yogurt. For a gluten-free bread, replace all-purpose flour with a gluten-free blend. Always check the labels to ensure your substitutes fit your needs. This recipe is versatile, allowing you to play with flavors. Instead of strawberries, try blueberries or diced apples. You can mix in lemon zest for a fresh twist. If you love spices, add nutmeg or cardamom for warmth. These changes keep the bread exciting and fun! Get creative with add-ins to enhance your bread. Try adding chocolate chips for a sweet treat. For crunch, include a handful of sunflower seeds or pumpkin seeds. You can also mix in a scoop of shredded coconut for a tropical touch. These add-ins make each slice unique and flavorful. For the complete recipe, check out the [Full Recipe]. To keep your strawberry rhubarb bread fresh, store it at room temperature. Wrap it tightly in plastic wrap or foil. This helps to prevent it from drying out. If you have leftover bread, try to keep it in an airtight container. This way, it stays soft and delicious for a few days. Avoid storing it in the fridge, as that can make it stale faster. If you want to save your bread for later, freezing is a great option. First, let the bread cool completely after baking. Then, slice it into pieces. Wrap each slice in plastic wrap, and then place them in a freezer bag. Make sure to squeeze out any air before sealing. You can freeze it for up to three months. When you're ready to enjoy it, you can thaw it overnight in the fridge or leave it at room temperature for a few hours. To enjoy your strawberry rhubarb bread warm, preheat your oven to 350°F (175°C). Place the slices on a baking sheet and cover with foil. Heat for about 10-15 minutes. This keeps the bread moist and enhances its flavors. You can also use a microwave. Just heat each slice for about 15-20 seconds. However, the oven method gives the best taste and texture. Enjoy your warm slices with a little butter or jam for extra flavor! To keep your bread moist, use fresh fruit. Fresh strawberries and rhubarb add natural moisture. You can also add Greek yogurt. It adds creaminess and keeps the bread soft. Be careful not to over-mix your batter. Over-mixing can cause dense bread. Bake until just done to keep it fluffy. Yes, you can use frozen strawberries and rhubarb. Thaw them and drain excess liquid first. This prevents your bread from getting soggy. The flavor will still be good, but fresh fruit tastes better. Try to use fresh when possible, especially in peak season. This bread is great on its own. For a special treat, serve it with whipped cream. You can also pair it with butter or cream cheese. A sprinkle of powdered sugar adds a nice touch. Serve it warm for the best taste. Enjoy it with your favorite tea or coffee! Strawberry rhubarb bread is simple and fun to make. We covered key ingredients, step-by-step instructions, and helpful tips. Fresh ingredients are vital for great flavor. Remember to avoid common mistakes for the best texture. You can add your own flavors too, which makes it even better. Don’t forget how to store it well, so you can enjoy every bite later. I hope these tips inspire you to bake and savor this delicious bread. Enjoy your time in the kitchen!](https://fastmealmate.com/wp-content/uploads/2025/06/5214b0a0-4654-456a-8121-021057b3e65e-768x768.webp)
![When making Baked Zucchini Parmesan, you need fresh, simple ingredients. Here’s what you should gather: - 4 medium zucchinis, sliced into ½-inch thick rounds - 1 cup shredded mozzarella cheese - ½ cup freshly grated Parmesan cheese - 1 cup panko breadcrumbs - 2 garlic cloves, finely minced - 1 teaspoon dried oregano - 1 teaspoon dried basil - 1 teaspoon sea salt - ½ teaspoon freshly cracked black pepper - 2 tablespoons extra virgin olive oil - Fresh basil leaves for garnish (optional) These ingredients create a great mix of flavors and textures. The zucchini becomes soft, while the cheese melts beautifully. The panko breadcrumbs add the perfect crunch. Each bite gives you a taste of cheesy goodness! For the full recipe, check out the detailed instructions. Enjoy creating this dish! - Preheat the oven to 400°F (200°C). - Line a baking sheet with parchment paper. - In a bowl, combine: - 1 cup panko breadcrumbs - 2 minced garlic cloves - 1 teaspoon dried oregano - 1 teaspoon dried basil - 1 teaspoon sea salt - ½ teaspoon black pepper - Toss the ingredients well. - Drizzle 2 tablespoons olive oil over the mixture. - Mix again until all the breadcrumbs are coated. - Lay sliced zucchini on the baking sheet in a single layer. - Sprinkle the breadcrumb mixture evenly over the zucchini. - Add 1 cup shredded mozzarella cheese on top. - Finish with ½ cup grated Parmesan cheese for extra flavor. - Place the baking sheet in the oven. - Bake for 25-30 minutes until golden and bubbly. - Let cool for a few minutes. - Garnish with fresh basil leaves if desired. For the full recipe, check out the detailed steps included above. Enjoy your crispy, cheesy zucchini! To make your baked zucchini truly crunchy, adjust the breadcrumb coating. Use panko breadcrumbs for a lighter, crispier texture compared to regular breadcrumbs. If you want even more crunch, mix in some crushed cornflakes or a sprinkle of grated Parmesan into the panko. This combination gives a great bite. Baking technique plays a key role too. Make sure you lay the zucchini slices in a single layer. If they overlap, they will steam instead of bake, and you’ll lose that crunch. Turning the baking sheet halfway through baking can also help ensure even cooking. For more flavor, add spices like smoked paprika or chili powder. These spices bring a warm touch that pairs well with zucchini. Fresh herbs can brighten the dish. Use fresh basil or parsley for a burst of color and taste. If fresh herbs are hard to find, dried herbs like oregano or thyme work well too. You can serve baked zucchini parmesan in many ways. For a delightful appetizer, cut it into small squares and serve with a dipping sauce. As a side dish, pair it with grilled chicken or fish for a healthy meal. You can also serve it over pasta for a heartier option. Feel free to explore these ideas and make the dish your own. Enjoy the process! For the full recipe, check out the [Full Recipe]. {{image_4}} You can make baked zucchini parmesan even more exciting by adding other veggies. Try including bell peppers, tomatoes, or mushrooms. These vegetables add color and taste. You can also mix in some spinach for a healthy twist. Adding protein can turn this dish into a hearty meal. Consider cooked chicken, turkey, or even crumbled sausage. For a vegetarian option, use chickpeas or lentils. They add both flavor and protein. If you need a gluten-free dish, swap panko for gluten-free breadcrumbs. This keeps the crunch while catering to dietary needs. Always check the labels to ensure they are truly gluten-free. For a vegan version, replace cheese with plant-based alternatives. Nutritional yeast gives a cheesy flavor without dairy. You can also use cashew cheese for a creamy texture. Use olive oil to replace any butter in the recipe. Using seasonal herbs can elevate your baked zucchini parmesan. Fresh basil, parsley, or thyme can add unique flavors. You can mix and match herbs based on the season for fresh taste. During holidays, adapt this dish to fit the occasion. Add a layer of roasted garlic or sun-dried tomatoes for a festive flair. These simple changes can make it special for gatherings. For the full recipe, check out the [Full Recipe]. To keep your Baked Zucchini Parmesan fresh, store leftovers in an airtight container. This helps lock in flavor and moisture. You can keep it in the fridge for up to three days. If you want to enjoy it later, make sure it cools completely before sealing. Freezing is a great way to save this tasty dish. Here’s how to do it: 1. Cool Completely: Ensure the dish is fully cooled. 2. Wrap it Up: Use plastic wrap to cover it tightly. Then, place it in a freezer-safe container or bag. 3. Label and Date: Write the date on the bag or container. This helps you remember when you made it. You can freeze it for up to three months. When you’re ready to eat, you can reheat it in the oven or microwave. - Oven Method: Preheat the oven to 350°F (175°C). Place the zucchini on a baking sheet and cover it with foil. Bake for about 15-20 minutes until hot. This keeps it crispy. - Microwave Method: Heat it in a microwave-safe dish. Cover it with a damp paper towel. Heat in short bursts of 30 seconds until warm. Note, this method may make it a bit soggy. Choose the method that works best for you! Enjoy your delicious dish anytime! You can tell when the zucchini is done by checking its color and texture. The cheese should be golden and bubbly. The zucchini should be soft but not mushy. This usually takes about 25-30 minutes in the oven. Keep an eye on it to avoid overcooking. Yes, you can use different cheeses! Cheddar, gouda, or even a spicy pepper jack can work well. Mix and match to find your favorite flavor. Just make sure the cheese melts nicely to create a gooey texture. Baked zucchini parmesan is a healthy choice. Each serving has about 180 calories, with 10 grams of fat and 8 grams of protein. It also provides vitamins A and C, plus calcium from the cheese. This dish is a great way to enjoy veggies! You can prepare the zucchini ahead of time! Slice and layer them with breadcrumbs and cheese. Cover the dish and store it in the fridge for up to 24 hours. Just bake it right before serving for a fresh taste. Yes, the recipe is vegetarian as it uses no meat. It features cheese, zucchini, and herbs, all of which are plant-based. Enjoy this dish as a great meat-free option for any meal. To spice things up, add crushed red pepper flakes to the breadcrumb mix. You can also use spicy cheese or add jalapeños for extra kick. Adjust the heat to your taste for a fun twist! For the full recipe, check out the Cheesy Baked Zucchini Delights. Enjoy your cooking adventure! This blog post shares a simple and tasty baked zucchini parmesan recipe. We covered essential ingredients, step-by-step instructions, and helpful tips to enhance flavor and crunch. You learned how to store leftovers and even make variations for different diets. Now you can confidently whip up this dish as a side or appetizer. Enjoy experimenting with flavors and sharing your creations. Baked zucchini parmesan is a great way to eat healthy and delicious food. Happy cooking!](https://fastmealmate.com/wp-content/uploads/2025/06/6985a322-15fd-4ae0-839d-4317f4e09967-768x768.webp)
![- 1 cup Biscoff cookie spread - 2 cups whole milk - 1 cup heavy cream - 1/2 cup granulated sugar - 1/4 cup cornstarch - 1 teaspoon vanilla extract - 1/8 teaspoon salt - 3 ripe bananas, sliced - 1 cup crushed Biscoff cookies (for layering and garnish) - Whipped cream (optional, for topping) The Biscoff banana pudding is a treat, but it comes with calories. Each serving has about 350 calories. It has sugar and fat from the cookies and cream. If you want to reduce calories, you can use less sugar or lighter cream. You can also switch to a non-dairy milk for a vegan option. This dessert has a good mix of flavors and textures. You get the creaminess from the pudding and the crunch from the cookies. - Mix Dry Ingredients: In a medium saucepan, combine 1/2 cup granulated sugar, 1/4 cup cornstarch, and 1/8 teaspoon salt. Whisk them until there are no lumps. - Add Milk and Cook Mixture: Slowly pour in 2 cups of whole milk while whisking. This helps to avoid clumps in your pudding. Place the saucepan on medium heat and stir constantly. Cook until the mixture thickens and bubbles, about 5 to 7 minutes. - Incorporate Flavors: Once thickened, remove the saucepan from heat. Stir in 1 teaspoon vanilla extract and 1 cup of Biscoff cookie spread. Mix well until everything is smooth and combined. - Whip the Cream: In a separate bowl, whip 1 cup of heavy cream using an electric mixer. Beat until soft peaks form. Make sure it holds shape but is not too stiff. - Combine with Biscoff Mixture: Gently fold the whipped cream into the Biscoff mixture. Use a spatula and be gentle to keep the airy texture. - Layer the Dessert: In a large dish or individual cups, lay down sliced bananas. Then, spoon a layer of the Biscoff pudding over the bananas. - Add Crushed Cookies: Sprinkle a layer of crushed Biscoff cookies on the pudding. Repeat the layers with the remaining ingredients. Ensure the top layer is the Biscoff pudding. - Finishing Touches: For a nice look, pipe or dollop whipped cream on top. Garnish with extra crushed Biscoff cookies. - Chill the Dessert: Cover the dessert and place it in the fridge for at least 4 hours, or overnight. This helps all the flavors blend together. For the complete recipe, check the [Full Recipe]. Enjoy your cooking! To get the right whipped cream consistency, start with cold heavy cream. Use a clean bowl and beaters for the best results. Whip at medium speed until soft peaks form. This means the cream should hold its shape but still be smooth. Avoid over-whipping, as this can turn it into butter. To prevent lumps in the pudding, whisk the dry ingredients well before adding milk. Pour in the milk slowly while stirring. This helps mix everything evenly. Keep stirring as you cook the mixture over medium heat. This ensures a smooth pudding without any lumps. For the best presentation, use clear glasses or bowls. This shows off the lovely layers of bananas, creamy pudding, and crunchy cookies. You can also add a banana slice or a whole Biscoff cookie on top for a nice touch. This makes each serving look even more inviting. For garnishing ideas, sprinkle extra crushed Biscoff cookies on top. A dollop of whipped cream adds a nice finishing touch. You can also drizzle some melted Biscoff cookie spread over the top for added flavor and flair. The best time to prepare this dessert is a day ahead. This gives the flavors time to blend well. The pudding needs at least 4 hours in the fridge, but overnight is even better. This chilling time lets the pudding set perfectly. For optimal flavor, chill the dessert for at least 4 hours. This helps all the elements come together. The longer you chill, the more delicious it gets! Enjoy your Biscoff banana pudding after the wait; it will be worth it. {{image_4}} You can make this dessert even more fun by adding chocolate layers. Just mix cocoa powder into the Biscoff pudding. This mix creates a rich, sweet flavor. You can also use chocolate pudding as a layer. The blend of chocolate and Biscoff is a match made in dessert heaven. You can easily make a vegan version of Biscoff banana pudding. Use almond milk or coconut milk instead of whole milk. For the cream, try coconut cream. You can replace granulated sugar with maple syrup or agave. These swaps keep the taste yummy while being plant-based. If you need a gluten-free option, use gluten-free cookies. Look for brands that make gluten-free Biscoff-style cookies. Ensure that all other ingredients are gluten-free. This way, everyone can enjoy this delightful dessert without worry. To keep your Biscoff banana pudding fresh, store leftovers in the fridge. Use an airtight container to prevent air and moisture from spoiling it. If you don’t have one, cover the dish tightly with plastic wrap. This keeps the pudding creamy and tasty. In the fridge, this pudding lasts about 3 to 5 days. After that, it may lose its texture and flavor. Always check for any signs of spoilage before enjoying it again. If it smells off or looks strange, it’s best to toss it. Yes, you can freeze this pudding! To freeze, spoon it into a freezer-safe container, leaving room for expansion. Cover tightly with a lid or plastic wrap. When you're ready to eat, thaw in the fridge overnight. Avoid refreezing once thawed, as it may change the texture. Enjoy your creamy treat! For the full recipe, check out the Biscoff banana pudding delight. Can I use other nut butters instead of Biscoff? You can try using almond or peanut butter. However, Biscoff has a unique flavor. It adds a sweet, spiced taste. This makes it hard to replicate. Use other nut butters if you prefer them. The result will be different but still tasty. How do I know when the pudding mixture is thick enough? Stir the mixture while it cooks. It will start to bubble and thicken. When it coats the back of a spoon, it's ready. If it drips off the spoon slowly, you've got the right texture. This usually takes about 5-7 minutes. Can I make this dessert ahead of time? Yes, you can make it a day in advance. It tastes better when the flavors blend. Just cover it well and chill it in the fridge. This way, you save time and enjoy a delicious dessert. Can I use low-fat milk? Low-fat milk works, but it changes the creaminess. The pudding may be less rich. If you choose this option, consider adding a little extra whipped cream for texture. What if I don't have cornstarch? You can use flour as a substitute. It will work to thicken the pudding. Use about twice the amount of flour. Just remember, it might slightly change the taste. What can I pair with Biscoff banana pudding? This dessert pairs well with fresh fruit. Try berries or slices of mango. It also goes great with coffee or tea. The flavors balance nicely. Is it suitable for special occasions? Absolutely! Biscoff banana pudding is perfect for parties. Its layers look stunning in clear cups. Everyone loves a sweet and creamy dessert like this. It's a showstopper that impresses guests! This blog post covered how to make a delicious Biscoff banana pudding. We explored key ingredients and discussed the preparation and assembly steps to perfect the dish. I shared tips for achieving the best texture and serving suggestions to impress guests. You also learned about variations for diet needs and how to store leftovers safely. Enjoying this pudding can bring joy to many occasions. With the right ingredients and care, you can make this treat a family favorite.](https://fastmealmate.com/wp-content/uploads/2025/05/85e9a37f-c50b-46e1-af24-a41950287baa-768x768.webp)