Spring Fresh Salad Bowl Vibrant and Nutritious Meal
Spring is here, and it’s the perfect time to enjoy a fresh salad bowl! In this guide, I’ll share my vibrant and nutritious Spring Fresh Salad Bowl recipe that bursts with flavor and color. From choosing quality ingredients to step-by-step preparation, you’ll discover how to make a meal that’s not just good for you, but also a feast for your eyes. Let’s dive into the delicious world of spring salads!
Ingredients for Spring Fresh Salad Bowl
Fresh Produce Selection
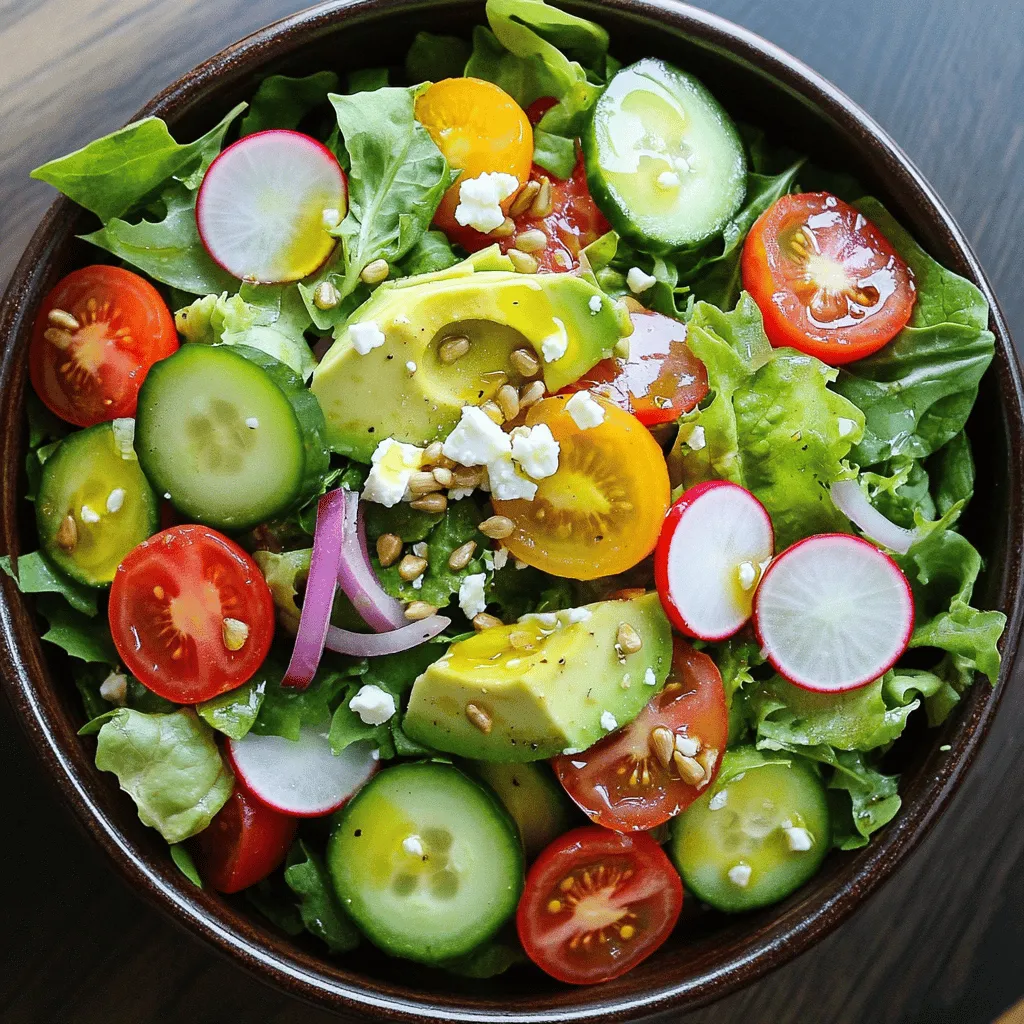
For the Spring Fresh Salad Bowl, choose the freshest produce. I love using:
– 4 cups mixed baby greens (spinach, arugula, and spring mix)
– 1 cup cucumbers, diced
– 1 cup cherry tomatoes, halved
– 1/2 cup radishes, finely sliced
– 1 ripe avocado, diced
– 1/4 cup red onion, thinly sliced
These ingredients create a colorful mix. Fresh greens add a crisp feel. The cucumbers and radishes bring crunch. Avocado adds creaminess. Tomatoes give sweetness, and red onion gives a slight bite.
Importance of Quality Ingredients
Quality matters when choosing ingredients. Fresh produce tastes better and is more nutritious. When you pick fresh greens, they should be vibrant and crisp. Avoid wilting or brown spots. Look for firm cucumbers and bright tomatoes. Each bite should burst with flavor.
Using high-quality ingredients makes a big difference. It enhances both taste and texture. The better the ingredients, the more enjoyable your salad will be.
Nutritional Benefits of Each Ingredient
Each ingredient in the salad offers unique health benefits:
– Mixed baby greens: Packed with vitamins A, C, and K. Great for your skin and bones.
– Cucumbers: Hydrating and low in calories. They help you stay refreshed.
– Cherry tomatoes: Rich in antioxidants, good for heart health.
– Radishes: Boost digestion and add fiber to your diet.
– Avocado: Full of healthy fats, great for your heart.
– Red onion: Contains quercetin, which can help reduce inflammation.
– Feta cheese: Provides calcium and protein while adding flavor.
– Sunflower seeds: High in vitamin E and magnesium, good for your skin.
Together, these ingredients create a bowl that is not just tasty but also nutritious. Eating this salad can help you feel great and stay healthy.
Step-by-Step Instructions
Preparing the Vegetables
Start by washing all your fresh produce. Clean your baby greens thoroughly, removing any dirt. Next, chop your cucumbers into bite-sized pieces. Halve the cherry tomatoes for easy bites. Thinly slice the radishes for a nice crunch. Dice the avocado carefully to keep it intact. Finally, cut the red onion into thin slices. In a large mixing bowl, combine all these veggies gently. Toss them lightly to mix without bruising the greens.
Making the Dressing
In a small bowl, whisk together the dressing ingredients. Pour in the extra virgin olive oil first. Then add the apple cider vinegar and honey. Sprinkle in some salt and freshly ground black pepper. Mix this until it’s smooth and creamy. This dressing will add a bright flavor to your salad. It brings all the elements together in a tasty way.
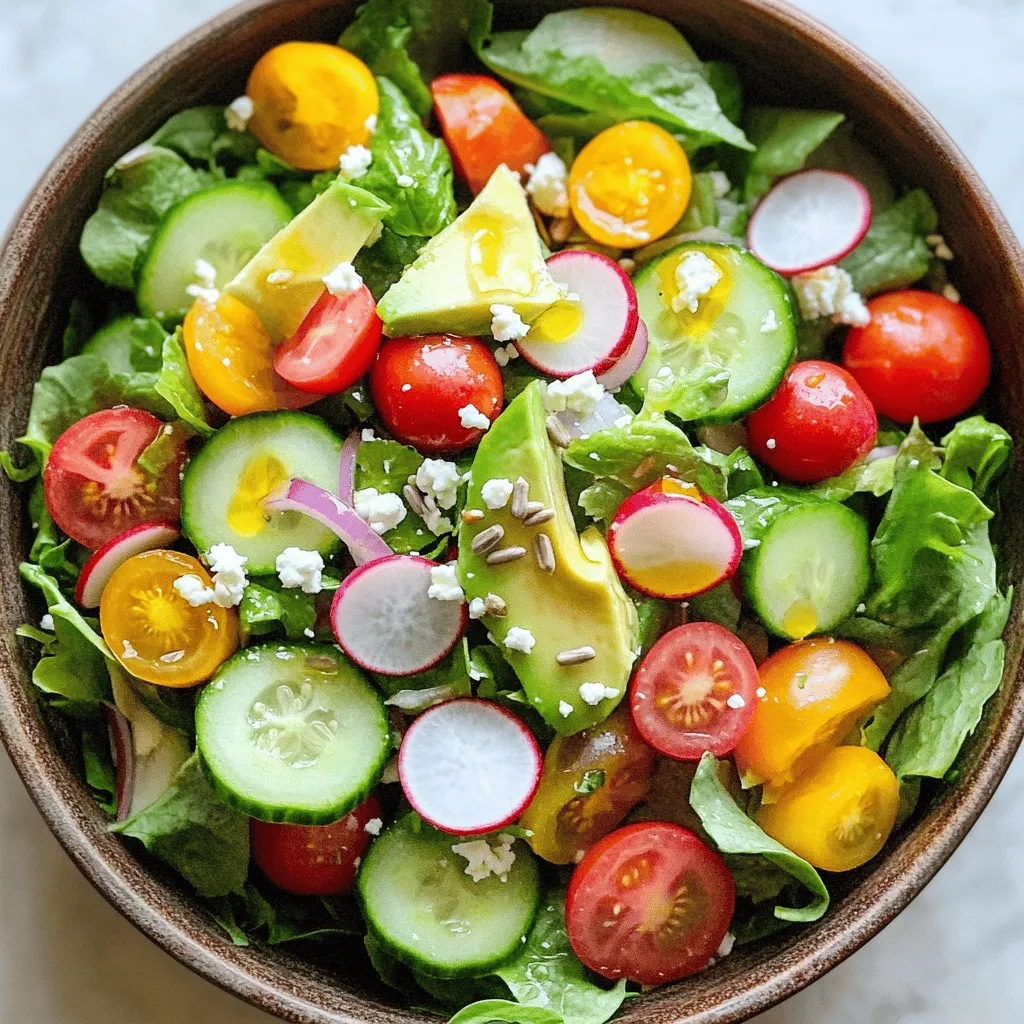
Final Assembly and Serving Suggestions
Take your bowl of mixed veggies and drizzle the dressing over them. Use tongs or a large spoon to mix everything together. Make sure each piece gets coated with the dressing. For a finishing touch, sprinkle the crumbled feta cheese and sunflower seeds on top. Serve your salad right away for the best flavor. You can present it in individual bowls or on a large platter. Add extra sunflower seeds and some whole baby greens for a pretty look. Enjoy your fresh spring salad bowl!
Tips & Tricks for Perfecting Your Salad
How to Choose the Best Greens
Selecting the right greens is key. Look for bright, crisp ones. Fresh greens should feel firm and not wilted. Baby spinach, arugula, and spring mix work well. Each adds unique flavors. Mix them for a colorful base. Avoid greens with brown spots or slimy texture. This ensures your salad stays fresh and tasty.
Enhancing Flavor with Seasoning
Seasoning brings your salad to life. Use salt and pepper as your base. They help highlight the greens and veggies. Add a splash of lemon juice for brightness. You can also try dried herbs like oregano or basil. These add depth without overwhelming the fresh taste. Remember, a little goes a long way. Taste as you go to find the right balance.
Presentation Ideas for Serving
A beautiful presentation makes your meal special. Serve your salad in clear bowls to show off the colors. Layer the ingredients instead of mixing them. This adds visual appeal. Garnish with extra sunflower seeds or whole baby greens on top. You can also use edible flowers for a fun touch. A well-presented salad invites everyone to dig in.
Variations of Spring Fresh Salad Bowl
Vegan Options
You can easily make this salad vegan. Simply leave out the feta cheese. Instead, use avocado for creaminess. You can also add nutritional yeast for a cheesy flavor. This keeps your salad rich and tasty without dairy.
Gluten-Free Modifications
Most of the ingredients in this salad are gluten-free. Just make sure your olive oil and vinegar do not contain gluten. If you want more crunch, try adding gluten-free croutons or chickpeas. Both add great texture and flavor.
Protein Additions for a Hearty Meal
To turn this salad into a hearty meal, add protein. Grilled chicken, shrimp, or tofu all work well. You could also use beans like black beans or chickpeas for a plant-based option. These additions will make your salad filling and satisfying.
Storage Information
How to Store Leftovers
If you have leftover salad, store it in an airtight container. This keeps the salad fresh. Avoid adding the dressing to the whole salad. It makes the greens soggy. Instead, store the dressing separately. This way, you can enjoy fresh salad the next day.
Best Practices for Keeping Salads Fresh
To keep your salad fresh, use whole vegetables instead of pre-cut ones. Whole veggies last longer. Wash and dry greens well before storing. Excess moisture can cause them to wilt. Use a paper towel to absorb any extra water. Place the towel in the container with the greens. It helps keep them crisp.
Duration for Ingredients’ Freshness
Most ingredients in your salad stay fresh for a few days. Baby greens can last about 3 to 5 days. Cucumbers and radishes usually stay good for up to a week. Cherry tomatoes last about 5 days when stored in a cool place. Avocados can brown quickly; use them within a day. Feta cheese lasts about a week when kept cold. Always check for any signs of spoilage before enjoying your salad.
FAQs About Spring Fresh Salad Bowl
Can I make this salad in advance?
Yes, you can make this salad ahead of time. To keep it fresh, store each part separately. Keep the greens in one container and the chopped veggies in another. This way, the greens stay crisp. The dressing should also go in a separate jar. When you are ready to eat, mix everything together and add the dressing. This keeps the salad from getting soggy.
What can I substitute for feta cheese?
If you want a different cheese, try goat cheese or ricotta. Both have a creamy texture. You can also use a dairy-free option like cashew cheese for a vegan choice. If you want a saltier flavor, try olives instead. They give a nice touch to the salad without cheese.
How can I add more protein to this salad?
Adding protein is easy! You can include grilled chicken or shrimp for a boost. Canned chickpeas or black beans are great plant-based options. For a quick fix, sprinkle in some nuts or seeds like almonds or hemp seeds. They add crunch and protein without much effort.
You now have all the tools to create a delicious Spring Fresh Salad Bowl. We explored how to choose the best ingredients, prepare the salad, and serve it beautifully. Each step adds to the freshness and taste. You learned about vegan and gluten-free options too. Remember to store leftovers properly to enjoy them later. Keep these tips in mind as you create your own salad. Fresh ingredients make every bite healthy and tasty. Enjoy your salad-making journey!

![- 1 cup unsalted butter, melted - 1 ½ cups brown sugar - 2 large eggs - 1 teaspoon vanilla extract - Zest and juice of 1 lemon To make these strawberry lemon blondies, we start with some key players. The butter gives a rich base, while brown sugar adds sweetness and depth. Eggs bind everything together, and vanilla extract enhances flavor. The zest and juice of one lemon bring a bright, zesty punch to the mix. - 2 cups all-purpose flour - 1 teaspoon baking powder - ½ teaspoon salt Next, we mix in our dry ingredients. All-purpose flour provides structure. Baking powder helps the blondies rise, making them light and fluffy. A little salt balances the sweetness. - 1 cup fresh strawberries, diced - Optional: Powdered sugar for dusting Finally, we fold in the star of the show: fresh strawberries! Their juicy sweetness pairs perfectly with the lemon. If you want a touch of elegance, consider dusting the blondies with powdered sugar before serving. This simple step adds a nice visual touch and a hint of extra sweetness. For the complete recipe, refer to the [Full Recipe]. First, set your oven to preheat at 350°F (175°C). This step is key to getting that perfect bake. Next, grab a 9x9 inch baking pan. Grease it well and line it with parchment paper. Leave some paper hanging over the edges. This will help you lift the blondies out later. You will need a few mixing bowls. One should be large enough for the wet ingredients. Another bowl should be used for the dry ingredients. Also, keep a whisk and spatula nearby. They make mixing easier. In your large bowl, pour in 1 cup of melted butter. Add 1 ½ cups of brown sugar to it. Stir well until it looks smooth. Next, crack in 2 large eggs. Add 1 teaspoon of vanilla extract, the zest of 1 lemon, and 1 tablespoon of fresh lemon juice. Whisk until everything is mixed well and smooth. Now, take your second bowl. In it, whisk together 2 cups of all-purpose flour, 1 teaspoon of baking powder, and ½ teaspoon of salt. Mix these dry ingredients well. Gradually add them to your wet mixture. Stir gently until you see no dry flour. Be careful not to overmix here. Next, fold in 1 cup of diced strawberries using a spatula. Do this gently to keep the fruit pieces whole. Pour the batter into your prepared pan. Use your spatula to spread it evenly. Then, place the pan in your preheated oven. Bake for 25 to 30 minutes. Keep an eye on the edges; they should turn lightly golden brown. To check for doneness, insert a toothpick in the center. It should come out with a few moist crumbs. After baking, let the blondies cool completely in the pan. A wire rack works great for this. Once they are cool, use the parchment overhang to lift them out. Transfer them to a cutting board and cut them into squares. If you like, lightly dust the tops with powdered sugar before serving. This adds a nice touch and makes them look pretty. Enjoy your strawberry lemon blondies! For the full recipe, check out the details above. To get perfect strawberry lemon blondies, avoid overmixing the batter. Overmixing can make your blondies tough. Mix just until you don’t see dry flour anymore. This keeps them soft and chewy. Also, ensure you measure your ingredients correctly. Use dry measuring cups for flour and sugar. Level them off with a knife for accuracy. This small step helps your blondies turn out just right. To enhance the lemon flavor, use fresh lemon juice and zest. Fresh ingredients make a big difference. The zest gives a bright, bold taste. For an extra kick, add a bit more lemon juice if you like it zesty. When using fresh strawberries, choose ripe ones. Look for bright red berries with no soft spots. Cut them into small, even pieces. This way, they mix evenly into the batter, spreading flavor throughout. To ensure even baking, rotate your pan halfway through. Ovens can have hot spots, so this helps. Keep an eye on the edges. They should look golden brown but not burnt. For storage, use an airtight container. A metal or glass container works best. This keeps your blondies fresh for days. If you have extra, you can freeze them. Wrap them well in plastic wrap before placing them in the freezer. This way, you’ll enjoy them later. For the full recipe, check out the full recipe section. {{image_4}} You can easily adapt the strawberry lemon blondies to fit different diets. For a vegan or dairy-free option, replace the butter with coconut oil or a vegan butter substitute. Instead of eggs, use flax eggs or applesauce. This keeps the texture while making it plant-based. For gluten-free alternatives, swap out the all-purpose flour with a gluten-free blend. Many brands offer mixes that work well in baking. Just make sure your baking powder is gluten-free, too, to keep everything safe for those with allergies. To add more fruit flavors, consider mixing in blueberries or raspberries for a twist. These berries pair nicely with lemon and add vibrant colors. You can also try adding different extracts, like almond or coconut, to change the taste. Cinnamon or nutmeg can give a warm touch to your blondies. Pairing your blondies with a scoop of vanilla ice cream makes for a delightful treat. The cold ice cream complements the warm blondies beautifully. For a fun twist, create a blondie sundae by stacking a blondie with ice cream and drizzling it with chocolate or caramel sauce. You can also serve them with whipped cream and fresh strawberries on top. This not only looks appealing but also enhances the flavors. For the full recipe, check out the Sweet & Zesty Strawberry Lemon Blondies. To store strawberry lemon blondies at room temperature, place them in a cool, dry area. Use a plate or a baking dish. Cover them lightly with foil or wax paper. This keeps them fresh for about three days. Avoid direct sunlight to prevent them from drying out. For long-term storage, you can freeze the blondies. First, let them cool completely. Then, cut them into squares. Wrap each square tightly in plastic wrap. Place the wrapped blondies in a freezer bag or airtight container. They can last up to three months in the freezer. When you want to enjoy them, you can thaw them. For the best texture, place the blondies in the fridge overnight. If you're in a hurry, let them sit at room temperature for a few hours. This way, they stay soft and tasty. To keep your blondies fresh, always use airtight containers. This prevents air from drying them out. If you don't have one, use plastic wrap tightly. Keep blondies away from strong odors, as they can absorb them. Enjoy your strawberry lemon blondies at their best! For the full recipe, check out the detailed instructions above. To cut blondies neatly, first let them cool. Use a sharp knife for clean cuts. Warm the knife in hot water, then wipe it dry. This helps slice through the soft blondies. Cut in straight lines for even squares. For a nice finish, dust the top with powdered sugar after cutting. Yes, you can make these blondies ahead of time. Bake and cool them completely. Wrap them tightly in plastic wrap. Store them in an airtight container at room temperature. They stay fresh for a few days. For longer storage, freeze them in an airtight container. Thaw at room temperature before serving. Strawberry lemon blondies last about 3 to 5 days at room temperature. Keep them in an airtight container to maintain freshness. If you store them in the fridge, they may last up to a week. For best taste, enjoy them within a few days of baking. Yes, you can use frozen strawberries in this recipe. Thaw and drain them before adding to the batter. This prevents excess moisture in the blondies. While fresh strawberries taste great, frozen ones work well too. They still provide that sweet and tart flavor we love. You now have a complete guide to making delicious strawberry lemon blondies. We covered key ingredients, step-by-step instructions, and helpful tips. Remember to avoid overmixing for the best texture and to store them properly. Feel free to customize with different fruits or flavors to make this treat your own. Enjoy your baking and share these delights with friends and family. The joy of homemade desserts is unbeatable!](https://fastmealmate.com/wp-content/uploads/2025/06/d01b8b31-fd8b-4a7a-a702-50bce4a43ad8-768x768.webp)